
Stained Glass Christmas Cookies
These delicious stained glass Christmas cookies are so fun and easy to make and are sure to wow Santa this holiday season!
The cookies bake up nice and soft and are decorated with decadent buttercream.
This post is sponsored by my friends at Domino® Sugar, and this recipe uses my favorite types of Domino® Sugar.
Making These Stained Glass Christmas Cookies Together
Let’s walk through each step of this recipe to make sure it turns out as amazing as possible!
I’ve also shared a video tutorial on how to make them below.
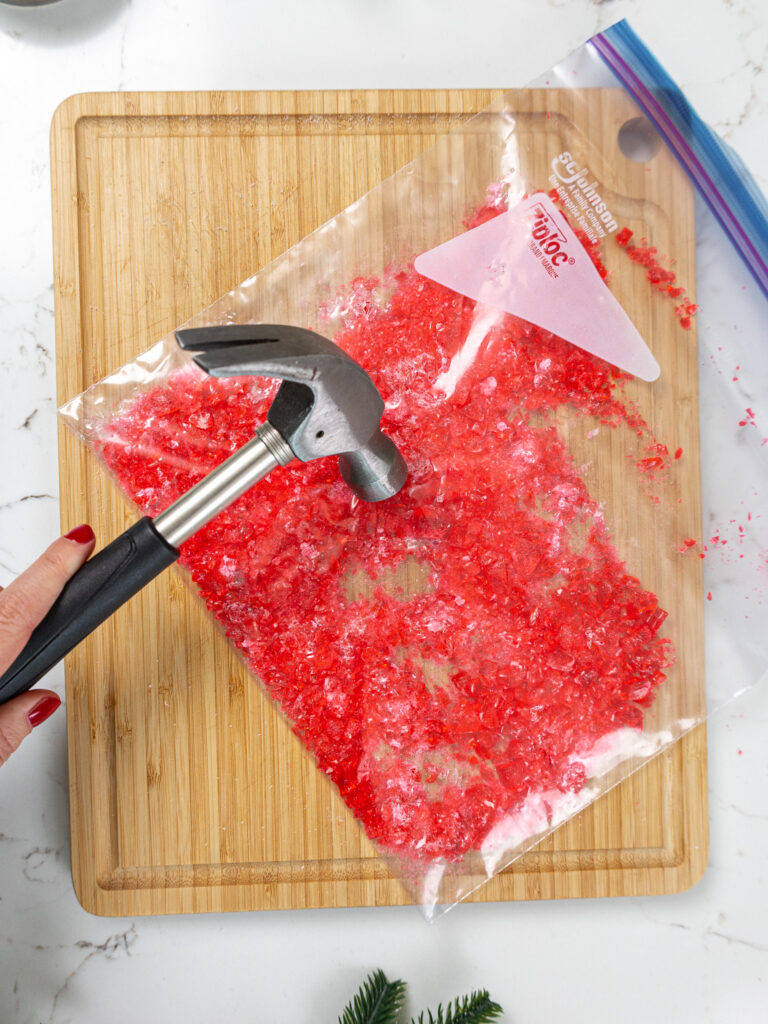
Step 1: Crush the Hard Candies
Unwrap and sort the hard candies by color then place each color in its own small resealable bag.
Place the bags on a thick cutting board to protect your counter, then crush them into small bits using a hammer or meat mallet and set aside.
Step 2: Make the Cookie Dough
Next, it’s time to make the cookie dough! Follow the recipe card at the bottom of this post to make the dough.
Then divide the dough in half and wrap each piece of dough in a piece of plastic wrap.
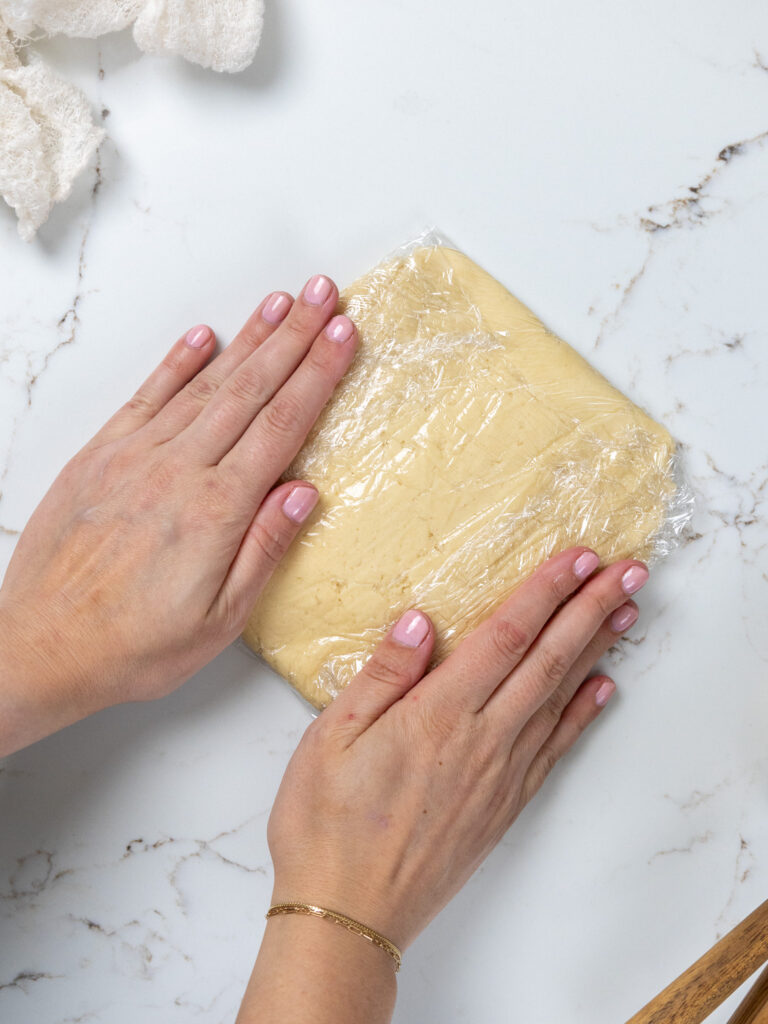
Chill in the fridge for about 2 hours or in the freezer for 30 minutes. You can also chill the dough overnight.
Step 3: Cut Out and Fill the Cookies
Preheat the oven to 350 F / 175 C for about 30 minutes before you plan to roll out the dough.
Generously dust the surface you plan to roll the cookies out on with additional flour. Take one of the dough rectangles out of the fridge or freezer, leaving the other to continue to chill.
Sprinkle some more flour on top of your dough and on your rolling pin.
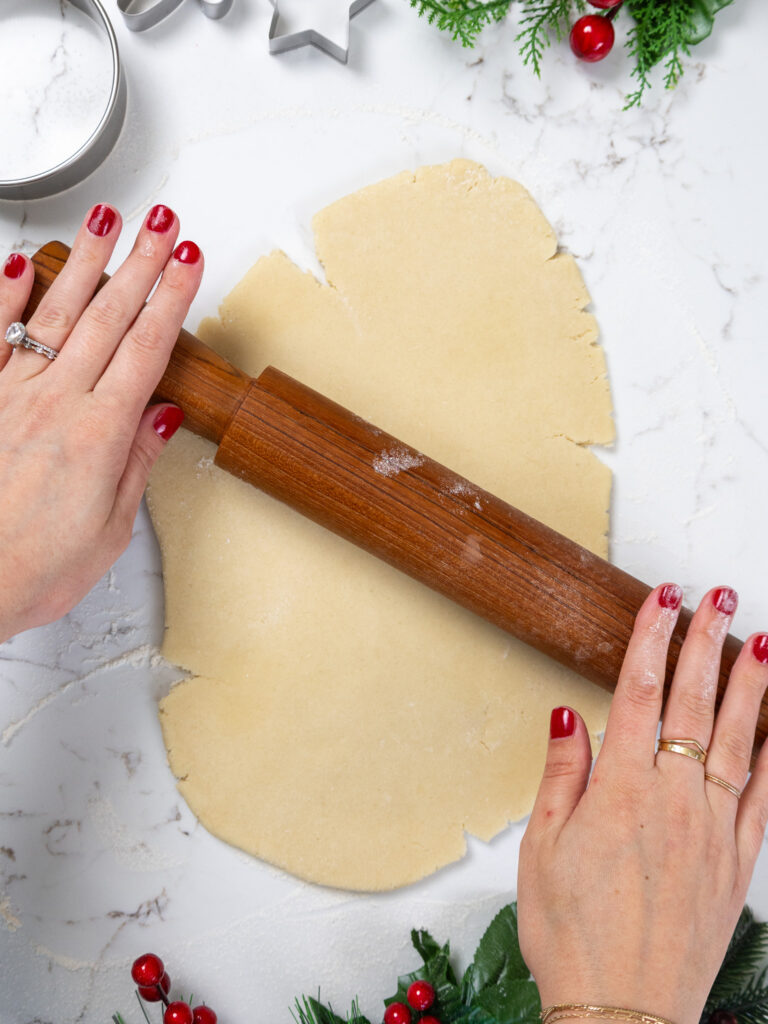
Roll the chilled dough to be 1/4 inch thick and cut out as many circles as possible with a flour-dusted round cookie cutter. I used a 3-inch wide cookie cutter.
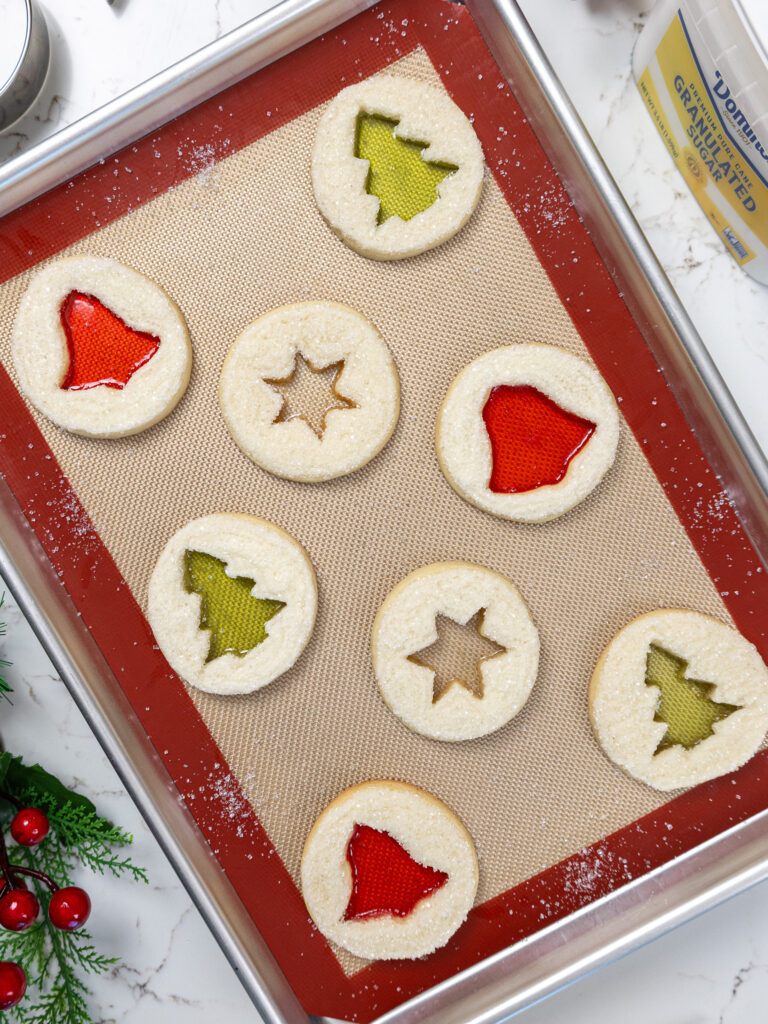
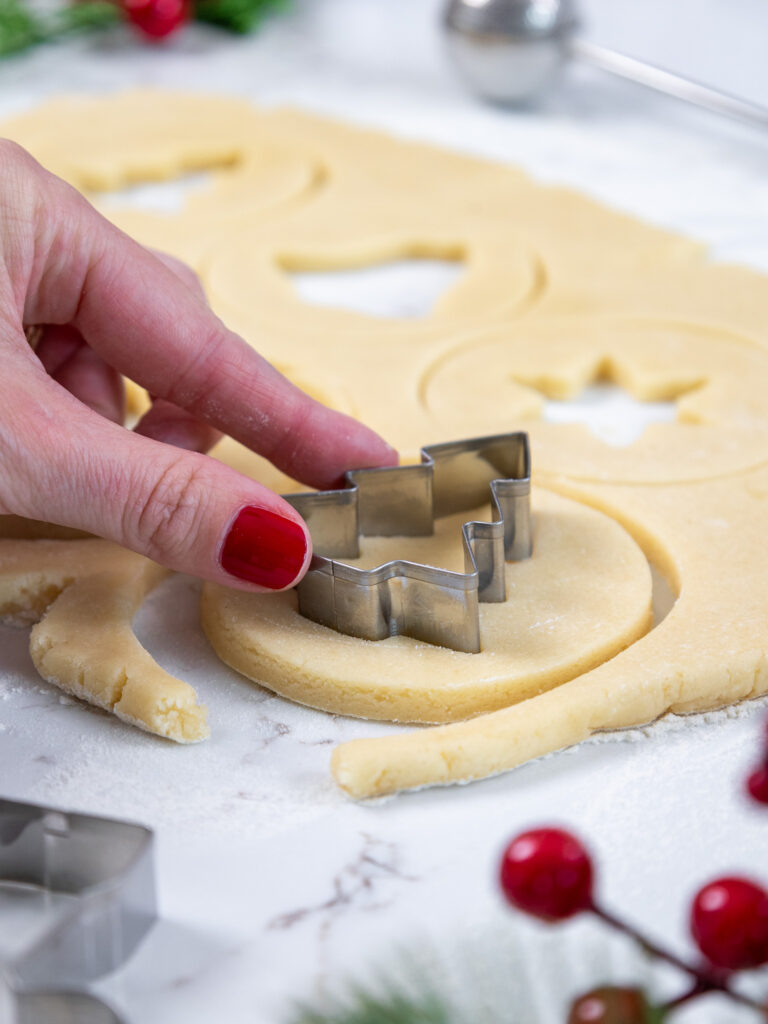
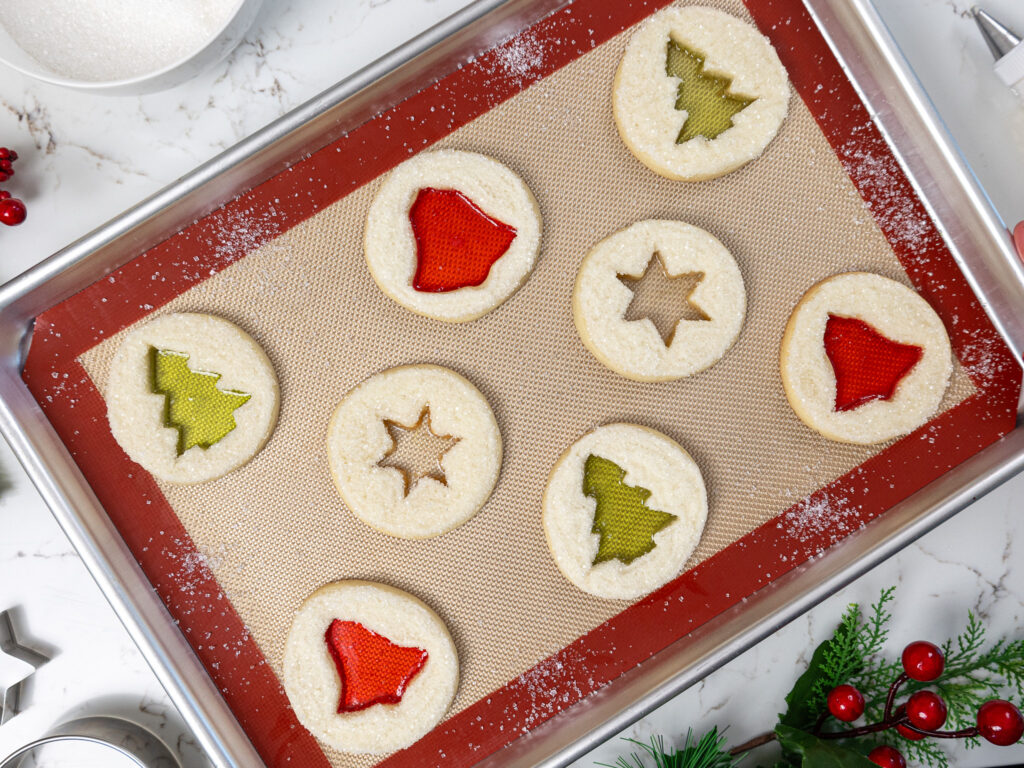
Then use a smaller Christmas-shaped cookie cutter (Christmas tree, snowflake, etc.) to cut out the center of each cookie.
Use a kitchen brush to gently brush off any excess flour and place them 1 inch apart on the prepared baking sheets.
Chill the cutout cookies one more time in the fridge for 15 minutes or the freezer for 10 minutes to help them keep their shape better.
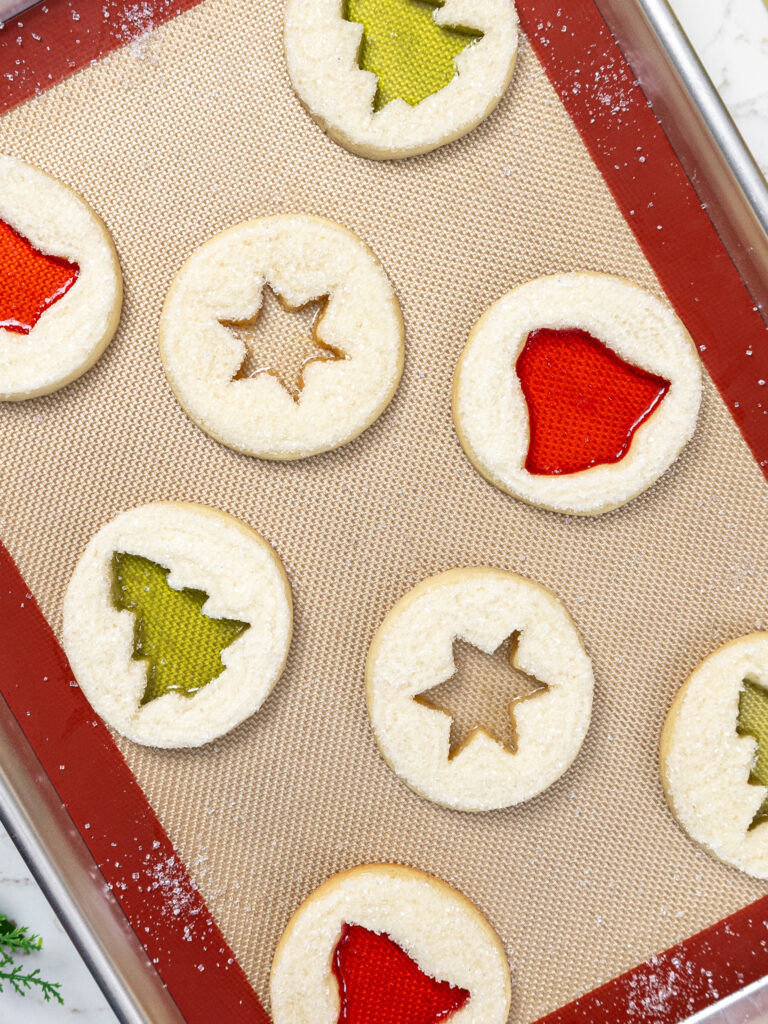
Step 4: Fill and Bake the Cookies
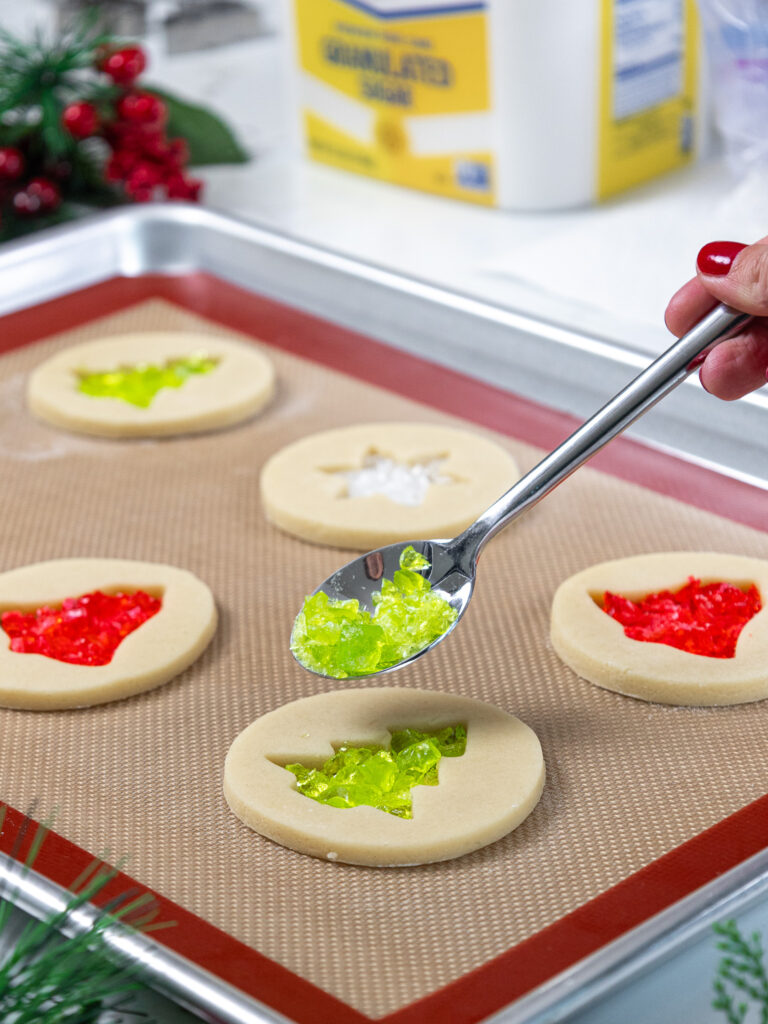
Fill the centers to the top of the cut-out with crushed hard candies.
Bake for 13-15 minutes on the top rack of your oven (time varies based on the size and thickness of the cookies).
Keep a close eye on these and be sure to pull them out once the candy has melted and the edges are set. Let the baked cookies cool fully on the pan.
While the first batch bakes and cools, knead together the cookie dough scraps, and rewrap them in plastic wrap.
Pop them back in the fridge to chill. Pull out your 2nd chilled piece of dough and repeat the steps above. Then repeat with the chilled dough scraps.
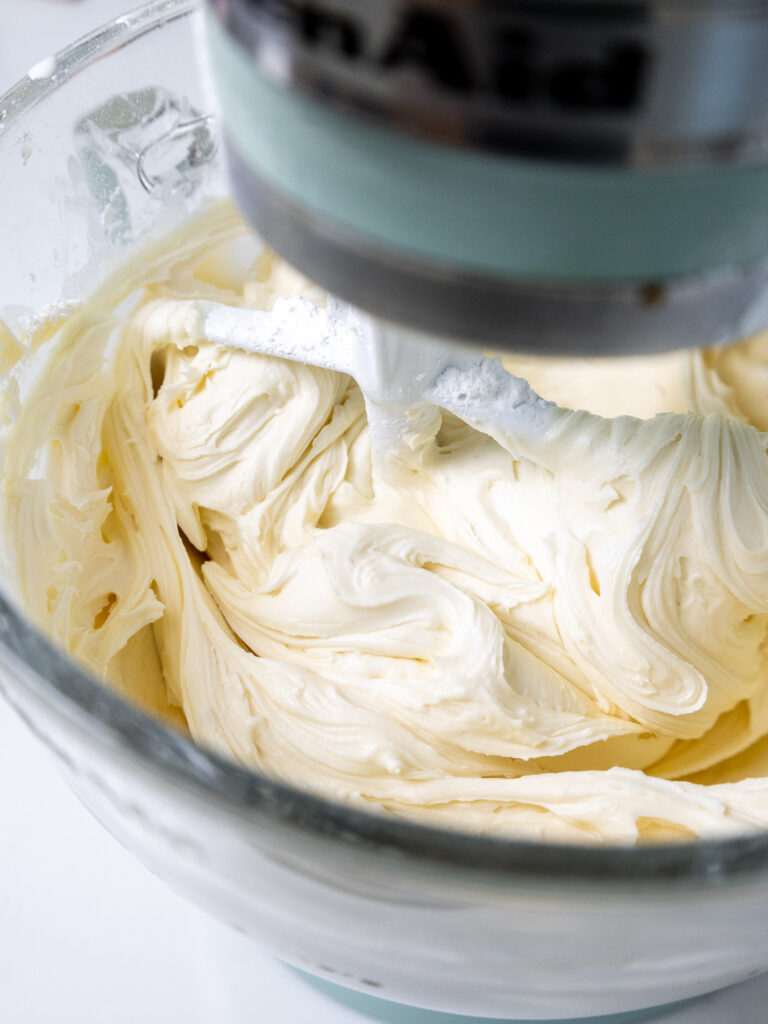
Step 5: Make the Vanilla Buttercream
While the cookies bake and cool, make the vanilla frosting.
If the frosting seems too thick, add an extra Tbsp of heavy cream. If it seems too thin, add another 1/4 cup of powdered sugar.
I’m using Domino® Powdered Sugar to make the frosting, which gives it a wonderfully smooth texture.
Or if you’re unsure what consistency the frosting should be, check out my frosting consistency guide.
Once the frosting is made, stir it by hand with a rubber spatula to get it SUPER smooth.
Place the white buttercream in a large piping bag fitted with a small round tip (like a Wilton 5).
Step 6: Frost and Dunk the Cookies
Once the cookies have fully cooled, pipe the buttercream onto the cookie around the stained glass candy center.
Dunk the cookie in a bowl of white sanding sugar or Domino® Granulated Sugar, gently pressing it into the sugar to help flatten out the frosting and fully cover it with sugar.
Repeat with the remaining cookies, then enjoy! Frosted cookies can be stored in an airtight container for up to a day at room temperature or up to 5 days in the fridge.
Substitutions and Swaps – Sugar Cookies
Now that we’ve covered how to make these cookies, let’s talk about the ingredients!
This recipe uses quite a few ingredients, and I know you might not have them all on hand.
Or if you have food allergies or restrictions, I’ve got you covered. Below are some swaps and substitutions that you can make.
- Unsalted Butter – If you only have salted butter on hand, you can use it in place of the unsalted butter. Just be sure to omit the salt that this frosting recipe calls for. You can also use vegan butter in its place (and omit the salt)!
- Cream Cheese – Full-fat cream cheese that comes in a block works best.
- Large Egg – If you have an egg allergy, try using a flaxseed egg or a vegan egg replacer like this one made by Bob’s Red Mill.
- All-Purpose Flour – This recipe turns out best with AP flour, but you can use a gluten-free flour blend if needed.
- Cornstarch – Cornstarch helps give these cookies a soft texture! If you don’t have any one hand, it can be omitted, but your cookies won’t bake up as soft.

Substitutions and Swaps – Buttercream Frosting
- Unsalted Butter – If you only have salted butter on hand, you can use it in place of the unsalted butter. Just be sure to omit the salt that this frosting recipe calls for. You can also use vegan butter in its place.
- Heavy Cream – Whipping cream, coconut cream or alternative milk (soy, almond, oat, coconut) will work fine in this frosting recipe if that’s what you have on hand.
- Vanilla Extract – Other extracts can also be used in place of the vanilla extract if needed.
Yield
This recipe can be used to make 24 3-inch cookies. The yield and bake time will vary based on the size and shape of the cookie cutter you use.
This recipe can be halved or doubled to make more or fewer cookies.
Tips for Making the Best Stained Glass Christmas Cookies
- Liberally flour the counter before you roll out your cookie dough and move it around while you roll and cut your cookies.
- Flour the cookie cutters before each cut. It helps the dough easily pop out of the cutter and helps the cookies keep their shape.
- Really cream together the butter, cream cheese, and granulated sugar for a couple of minutes in the first step of this recipe. It helps incorporate air into the dough, which makes fluffy and soft cookies.
- Don’t over-mix the cookie dough once you add in the flour! It can overwork the gluten and result in tough and dense cookies.
- Roll the cookie dough out to a consistent thickness of 1/4 inch. If some are thicker or thinner than others, they may over- or under-bake in the oven.
- Chill your cookie dough. It helps prevent your cookies from spreading while they bake and helps them bake up soft and chewy.
- Don’t overbake your cookies. Err on the side of under-baking your cookies and remember that the cookies continue to bake for a few minutes once they’re out of the oven and firm up as they cool.
Making these Cookies in Advance and Storage Tips
You can store frosted cookies in an airtight container for up to 2 days at room temperature, or for up to 5 days in the fridge, or in the freezer for up to a month.
If you want to stack the cookies on top of one another, I recommend adding a layer of parchment paper between them.
This cookie dough can also be frozen for up to 1 month if wrapped tightly in plastic wrap and stored in an airtight container. I like to move the cookie dough to the fridge the night before I plan to roll it out and bake the cookies.

Let Us Know What You Think!
If you make these stained-glass Christmas cookies, I’d love to hear what you think of them! Please leave a comment and rating below.
Don’t forget to tag me @chelsweets and @dominosugar so that we can see your delicious creations on social media.

Stained Glass Christmas Cookies
Ingredients
Soft Sugar Cookies
- 24 red, green, and white hard candies
- 3/4 cup (1 1/2 sticks) unsalted butter, room temperature 170g
- 1/2 cup or 4 oz. full fat cream cheese, room temperature 113g
- 1 1/2 cups Domino® Granulated Sugar 300g
- 1 large egg, room temperature 56g
- 2 tsp vanilla extract or vanilla bean paste 8g
- 3 cups all-purpose flour 375g
- 1 Tbsp cornstarch 8g
- 1/2 tsp baking powder 2g
- 1/2 tsp fine salt 3g
Buttercream Frosting
- 1 cup unsalted butter, room temperature 226g
- 1 Tbsp vanilla extract or vanilla bean paste 12g
- 1/2 tsp fine salt 3g
- 3 1/2 cups powdered sugar 454g or a 1 lb. box
- 1/4 heavy whipping cream, room temperature 60g
Additional Supplies
- 3- inch round cookie cutter
- Christmas cookie cutters
- parchment paper or silicone baking mat
- baking sheet
- 1 large piping bag
- 1 small piping tip like a Wilton 5
- 1 cup white sanding sugar or additional Domino® Granulated Sugar
Instructions
Soft Sugar Cookies
- Unwrap and sort the hard candies by color then place each color in its own small resealable bag. Place the bags on a thick cutting board to protect your counter, then crush them into small bits using a hammer or meat mallet and set aside.
- Mix together 3/4 cup butter and 1/2 cup cream cheese at medium speed with a whisk attachment or hand mixer until smooth.
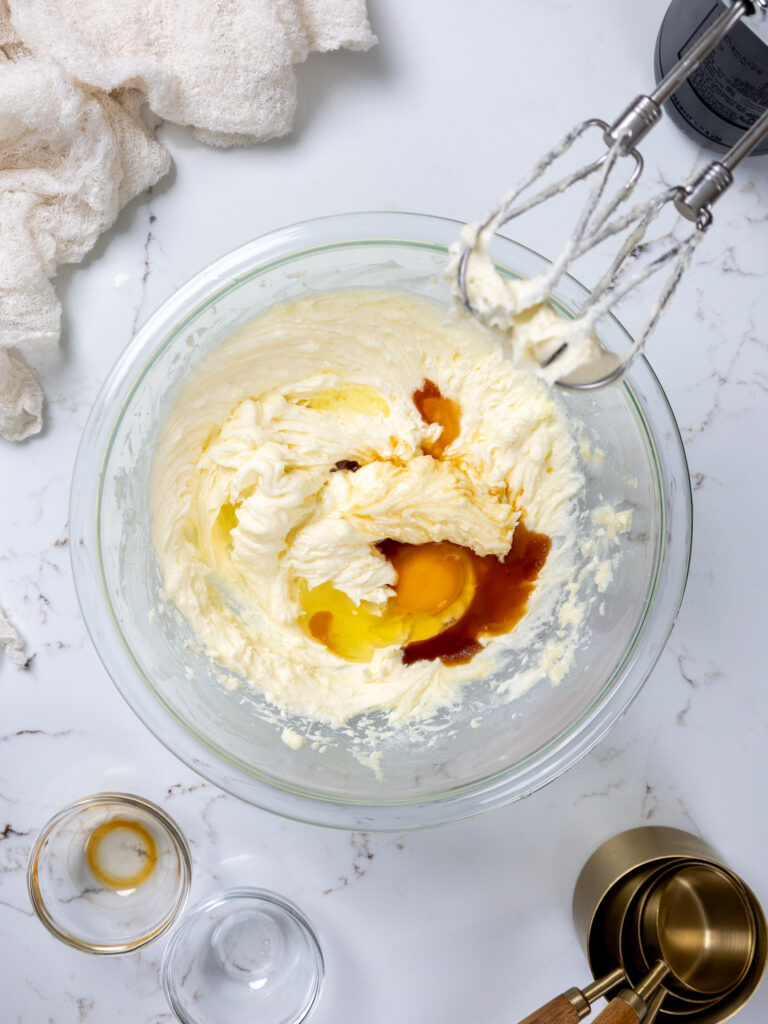
- Next, mix in 1 1/2 cups Domino® Granulated Sugar at a medium-high speed for a couple minutes, until the mixture becomes lighter in color. Add in 1 egg and 2 tsp vanilla extract. Mix on a low speed until incorporated.
- In a separate bowl, whisk together 3 cups flour, 1 Tbsp cornstarch, 1/2 tsp baking powder, and 1/2 tsp salt.
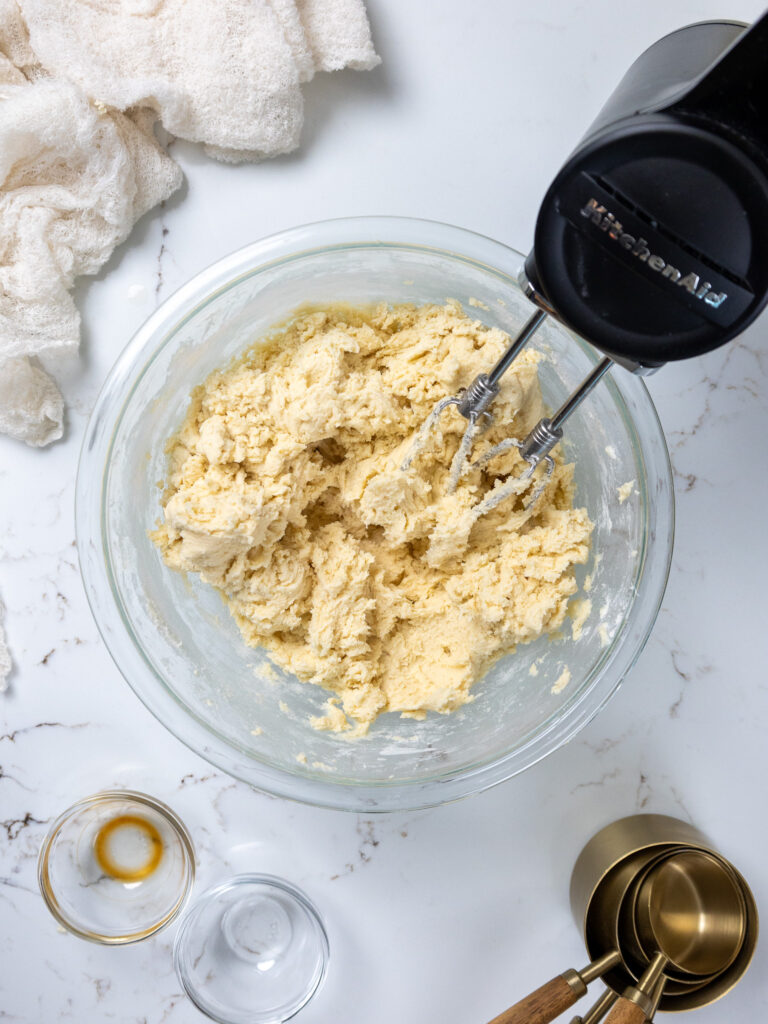
- Gradually mix the flour mixture into the butter mixture on a low speed, until it is JUST incorporated. Scrape the side and bottom of the bowl with a rubber spatula as needed.
- At this point, the dough will still be pretty sticky. Divide the dough in half, flattening it out into the shape of a rectangle, then wrap each piece of dough in a piece of plastic wrap. Chill in the fridge for about 2 hours or the freezer for 30 minutes. You can also chill the dough overnight.
- Preheat the oven to 350 F / 175 C for about 30 minutes before you plan to roll out the dough. Line two large baking sheets with parchment paper or silicone mats and set aside.
- Generously dust the surface you plan to roll the cookies out on with additional flour. Take one of the dough rectangles out of the fridge or freezer, leaving the other to continue to chill.
- Sprinkle some more flour on top of your dough and on your rolling pin. Roll the chilled dough to be 1/4 inch thick and cut out as many circles as possible with a flour-dusted round cookie cutter. I used a 3-inch wide cookie cutter. Then use a smaller Christmas-shaped cookie cutter (Christmas tree, snowflake, etc.) to cut out the center of each cookie.
- Use a kitchen brush to gently brush off any excess flour and place them 1 inch apart on the prepared baking sheets. Chill the cutout cookies one more time in the fridge for 15 minutes or the freezer for 10 minutes to help them keep their shape better.
- Fill the centers to the top of the cut-out with crushed hard candies.
- Bake for 13-15 minutes on the middle rack of your oven (time varies based on the size and thickness of the cookies). Keep a close eye on these and be sure to pull them out once the candy has melted and the edges of the cookies are set. Let the baked cookies cool fully on the pan.
- While the first batch bakes and cools, knead together the cookie dough scraps, and rewrap them in plastic wrap. Pop them back in the fridge to chill.
- Pull out your 2nd chilled piece of dough, and repeat steps 8-12. Then repeat with the chilled dough scraps.
Buttercream Frosting
- Beat 1 cup of butter on a medium speed for 30 seconds with a paddle attachment, until smooth.
- Mix in 1 Tbsp vanilla extract and 1/2 tsp salt on a low speed
- Slowly mix in 3 1/2 Domino® Powdered Sugar and 1/4 cup of heavy cream or milk. Beat on low until the ingredients are fully incorporated and the desired consistency is reached.
- If the frosting seems too thick, add in additional cream (1 Tbsp at a time). If the frosting is too thin, add more powdered sugar (a quarter of a cup at a time).
- Place the white buttercream in a large piping bag fitted with a small round tip (like a Wilton 5).
Decorating these Christmas Cookies
- Once the cookies have fully cooled, pipe white buttercream onto the cookie around the stained glass candy center. Dunk the cookie in white sanding sugar or Domino® Granulated Sugar, gently pressing it into the sugar to help flatten out the frosting and fully cover it with sugar.
- Repeat with the remaining cookies, then enjoy! Frosted cookies can be stored in an airtight container for up to a day at room temperature or up to 5 days in the fridge.
Video
Notes
Making These Stained Glass Cookies in Advance and Storage Tips
You can store frosted cookies in an airtight container for up to a day at room temperature, for up to 5 days in the fridge, or in the freezer for up to a month. If you want to stack the cookies on top of one another, I recommend adding a layer of parchment paper between them. This cookie dough can be frozen for up to a month if wrapped tightly in plastic wrap and stored in an airtight container. I like to move the cookie dough to the fridge the night before I plan to roll it out and bake the cookies.Tips for Making the Best Stained Glass Cookies:
- Liberally flour the counter before you roll out your cookie dough and move it around while you roll and cut your cookies.
- Really cream together the butter, cream cheese, and granulated sugar in the first step of this recipe. It helps incorporate air into the dough which makes fluffy and soft cookies.
- Don’t over-mix your cookie dough once you add in the flour! It can overwork the gluten and result in tough and dense cookies.
- Roll the cookie dough out to a consistent thickness of 1/4 inch. If some are thicker or thinner than others, they may over or under-bake in the oven.
- Chill the cookie dough. It helps prevent your cookies from spreading while they bake and helps them bake up soft and chewy.
- Don’t overbake these cookies. Err of the side of under-baking your cookies and remember that the cookies continue to bake for a few minutes once they’re out of the oven.
Nutrition
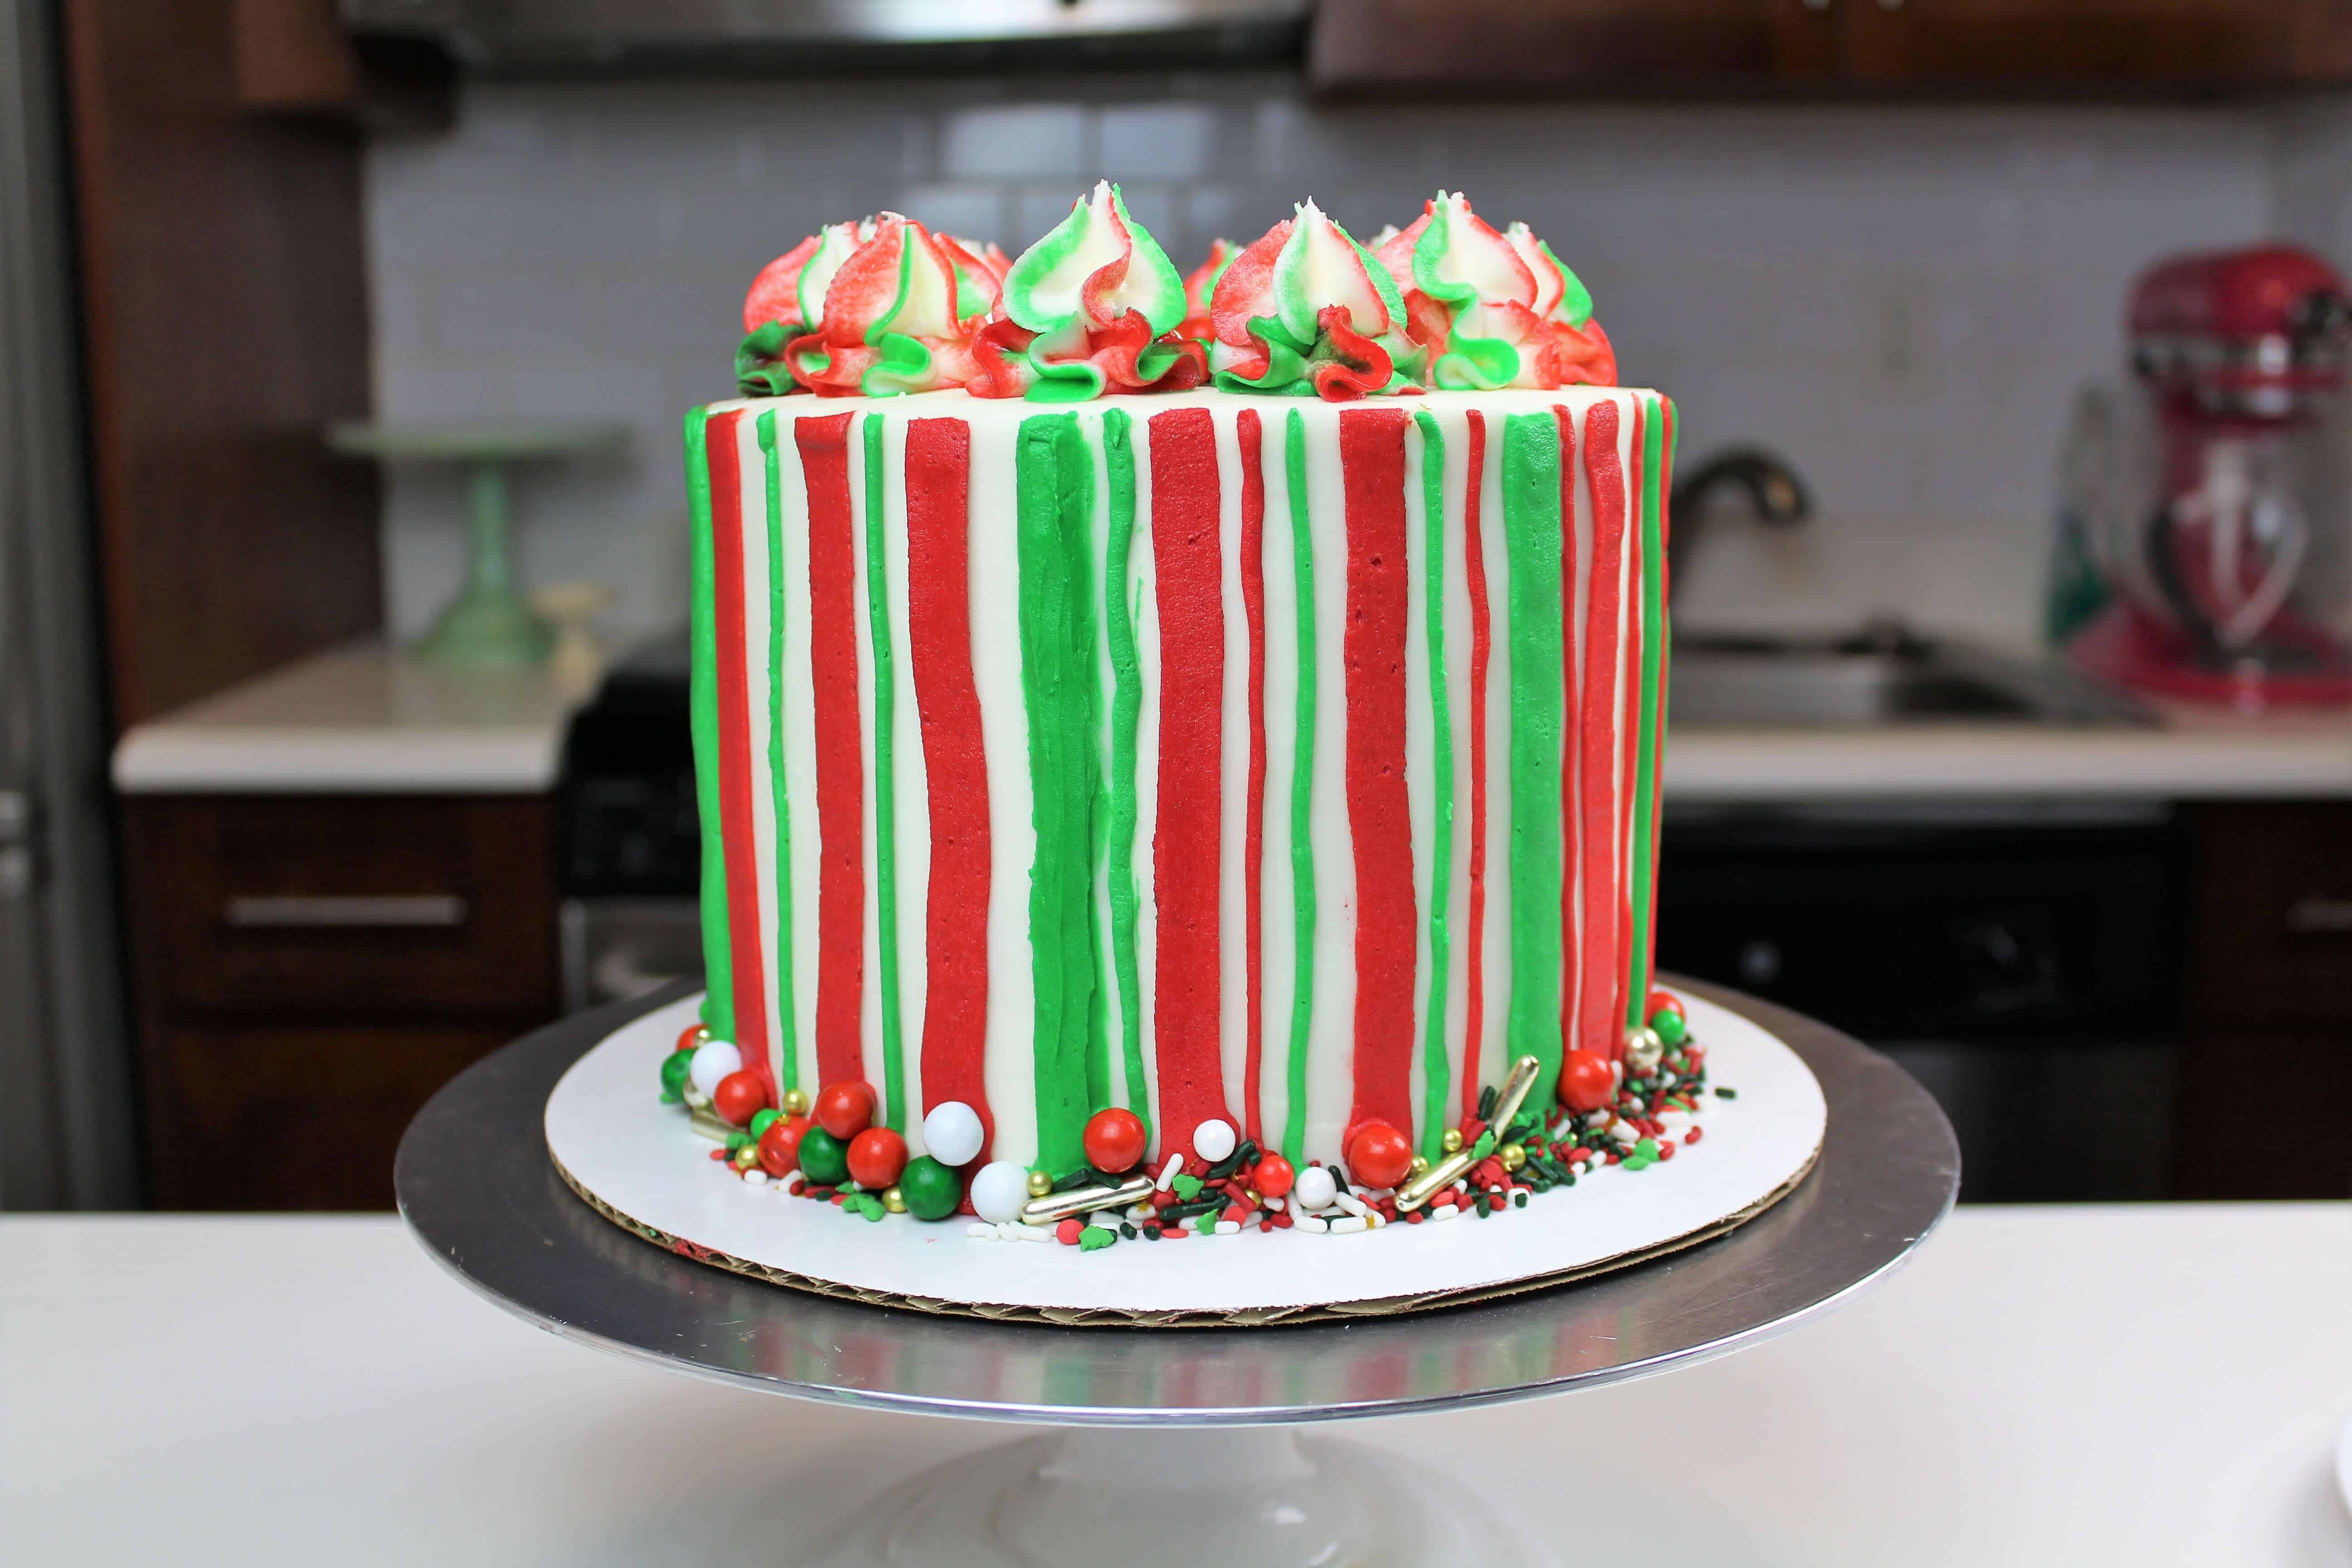
Other Recipes You Might Like:

Does it matter what kind of hard candy?
Hi Leslie,
I used jolly ranchers, but any type should work!
What candy did you use for the white hard candies? I could not find any in my jolly rancher bag 🙁
Thank you SO much for this recipe and all the tips! I finally tried it this past week – they really are beautiful and delicious!! 🙂 Only question is how to keep the candy center from getting sticky while storing them? I used parchment paper between layers but stacked a few cookies without parchment paper inside a cookie box and the candy left marks on the cookie below within just a few hours. Maybe I should refrigerate them until closer to time to box them? Wondering if I should cut small pieces of parchment for the cookie boxes? We did have rainy weather that day so maybe it was just a little humid inside? Thank you SO much for any tips on that.
So happy to hear the cookies turned out great Christi!! Stacking them can be hard, especially with temperature changes or in humid weather. I do think the best way to prevent and marks would be to cut little parchment squares and stack them between the cookies in the box. It isn’t the most aesthetic solution, but it will help prevent that! Hope that helps for the future, happy baking!