
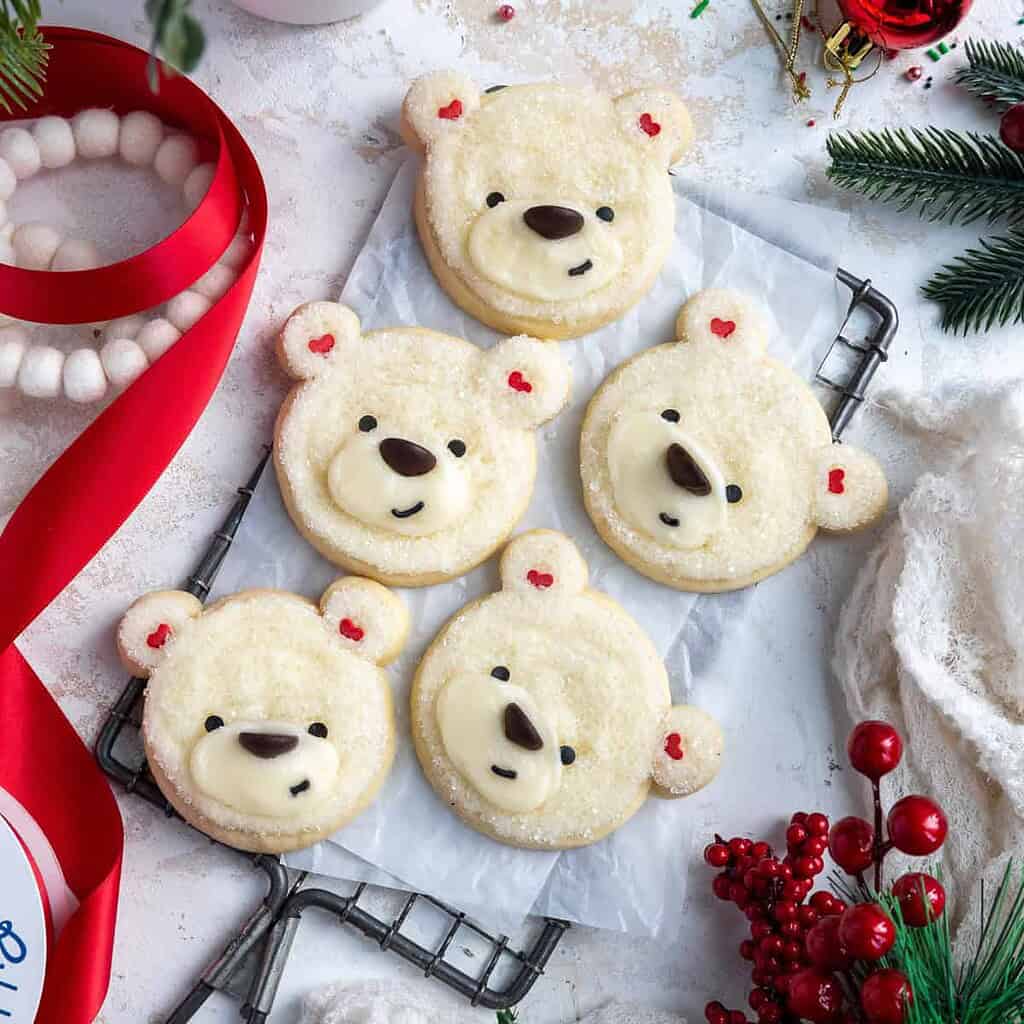
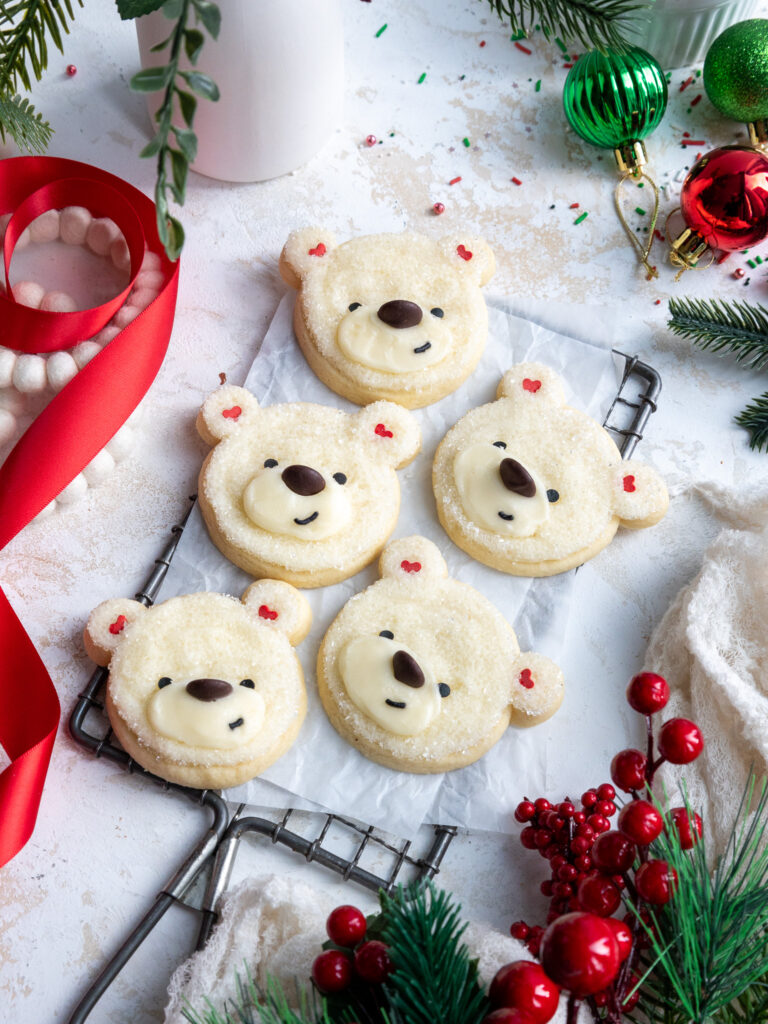
Polar Bear Cookies
These adorable polar bear cookies are incredibly soft and chewy and are topped with the most delicious homemade buttercream frosting.
How to Make These Polar Bear Cookies
Let’s walk through each step of this recipe to make sure it turns out as amazing as possible!
I’ve also shared a video tutorial on how to make them below.
Step 1: Make the Cookie Dough
The first step is to make the cookie dough! Follow the recipe card at the bottom of this post to make the dough.
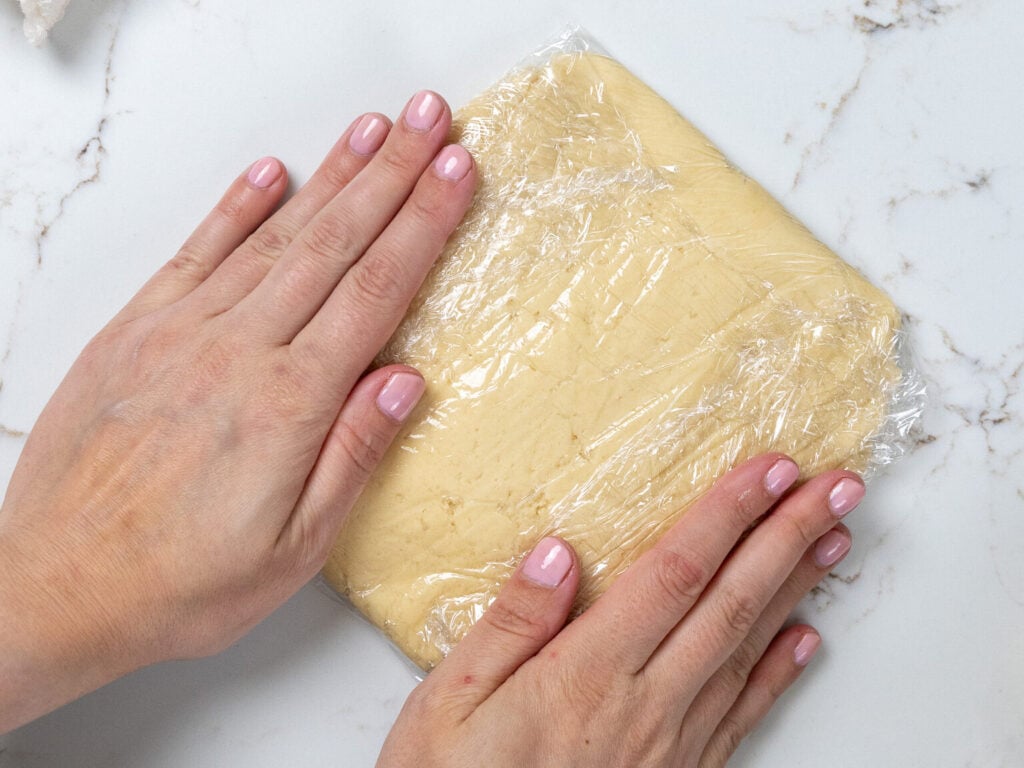
Then divide the dough in half and wrap each piece of dough in a piece of plastic wrap.
Chill in the fridge for about 2 hours or in the freezer for 30 minutes. You can also chill the dough overnight.
Step 2: Roll and Cut Out the Cookies
Preheat the oven to 350°F/175°C for about 30 minutes before you plan to roll out the dough and line two large baking sheets with silicone baking mats or parchment paper. Set aside.
Generously dust the surface you plan to roll the cookies out on with additional flour. Take one of the dough rectangles out of the fridge or freezer, leaving the other to continue to chill.
Sprinkle some more flour on top of your dough and your rolling pin.
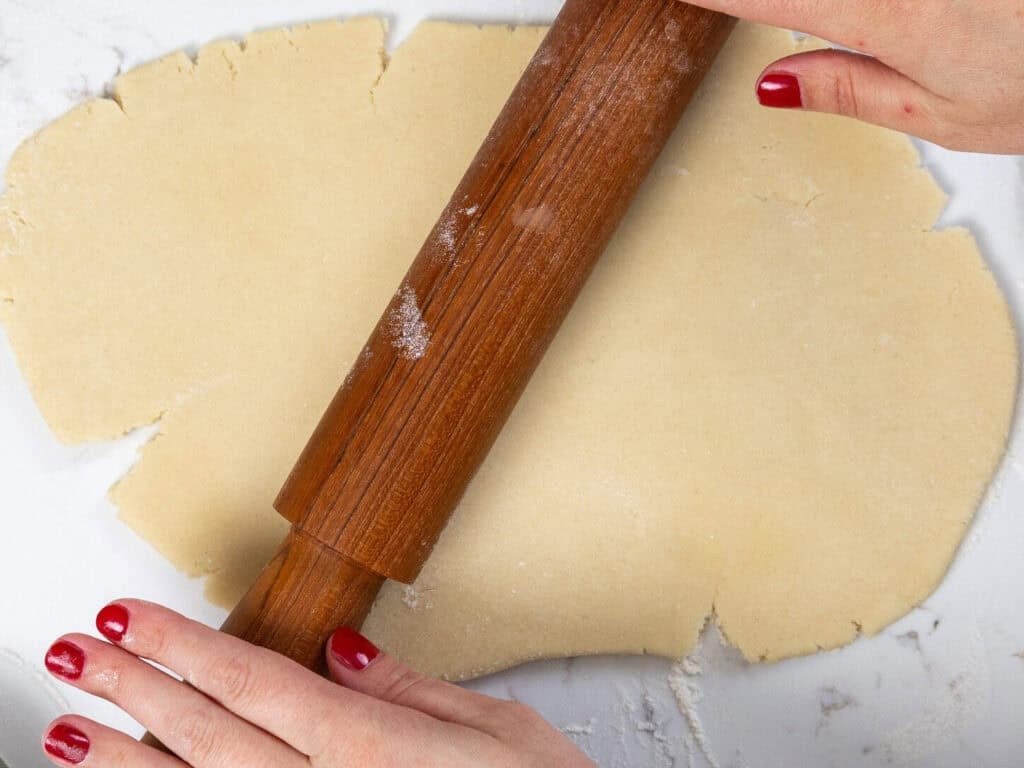
Roll the chilled dough to be 1/3 inch thick and cut out as many circles as possible with a flour-dusted round cookie cutter. I used a 2 1/2-inch wide cookie cutter.
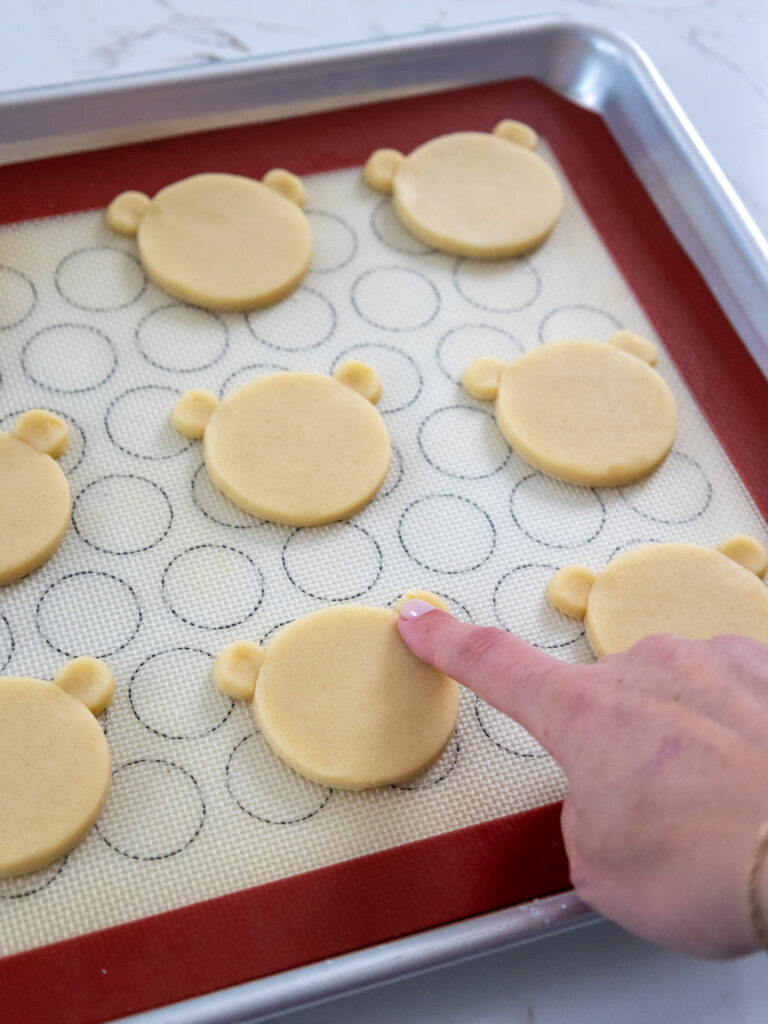
Use a kitchen brush to gently brush off any excess flour and place them 1 inch apart on the prepared baking sheets.
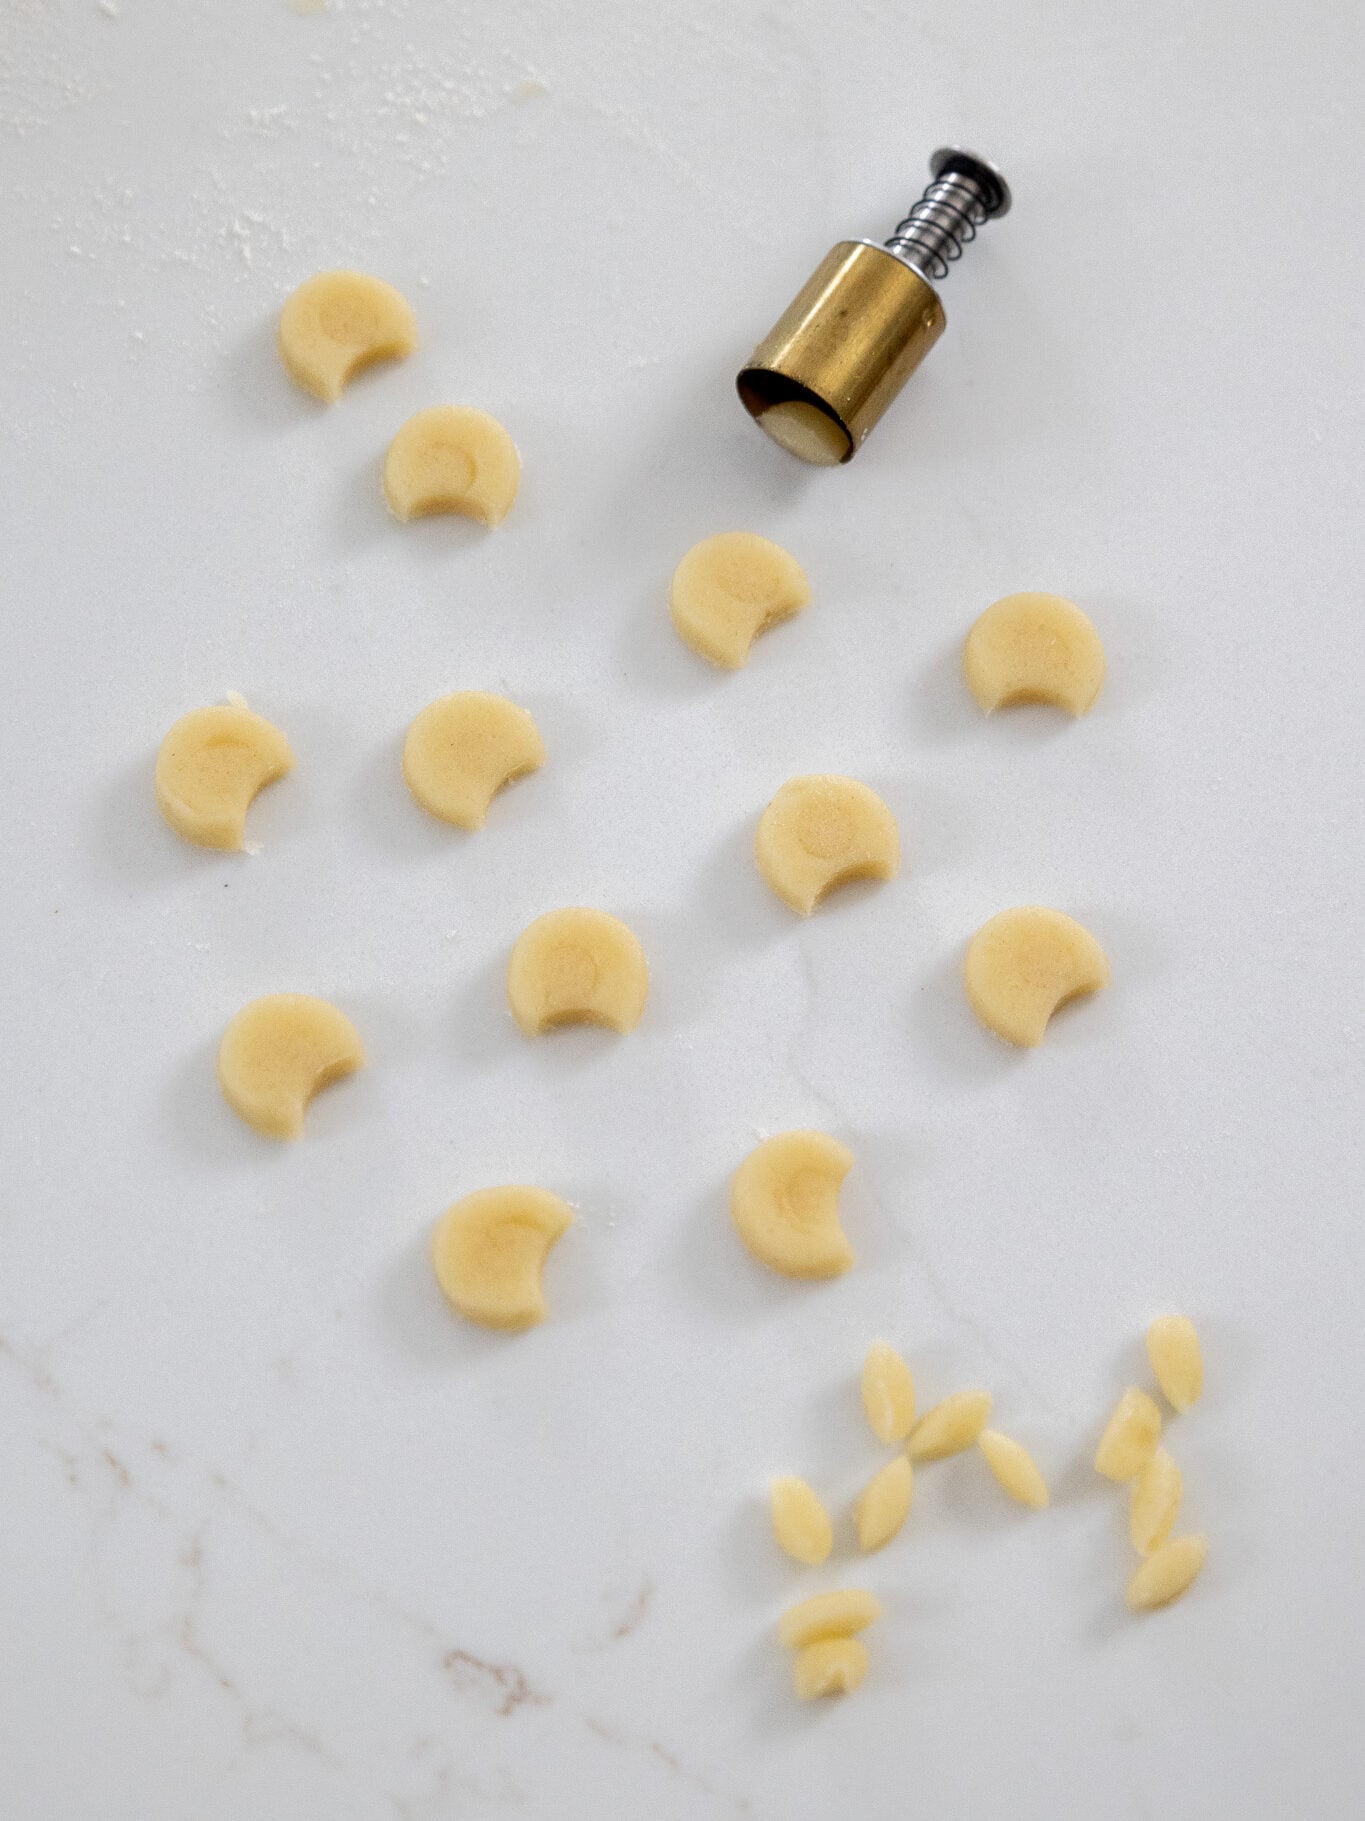
Use a 3/4-inch circle cutter to cut out smaller circles from the remaining dough to make the ears of the bears.
If you don’t have a cutter this size, use a small bottle cap that’s similar in size. You will need twice as many small circles as you cut out of the bigger circles so that each bear can have two ears.
Use the same small cookie cutter to cut out a small bit of each little circle to help the ears sit flush against the larger circles.
Place two of these on the side of each big circle cookie and gently press down where the dough meets to help them stick together.
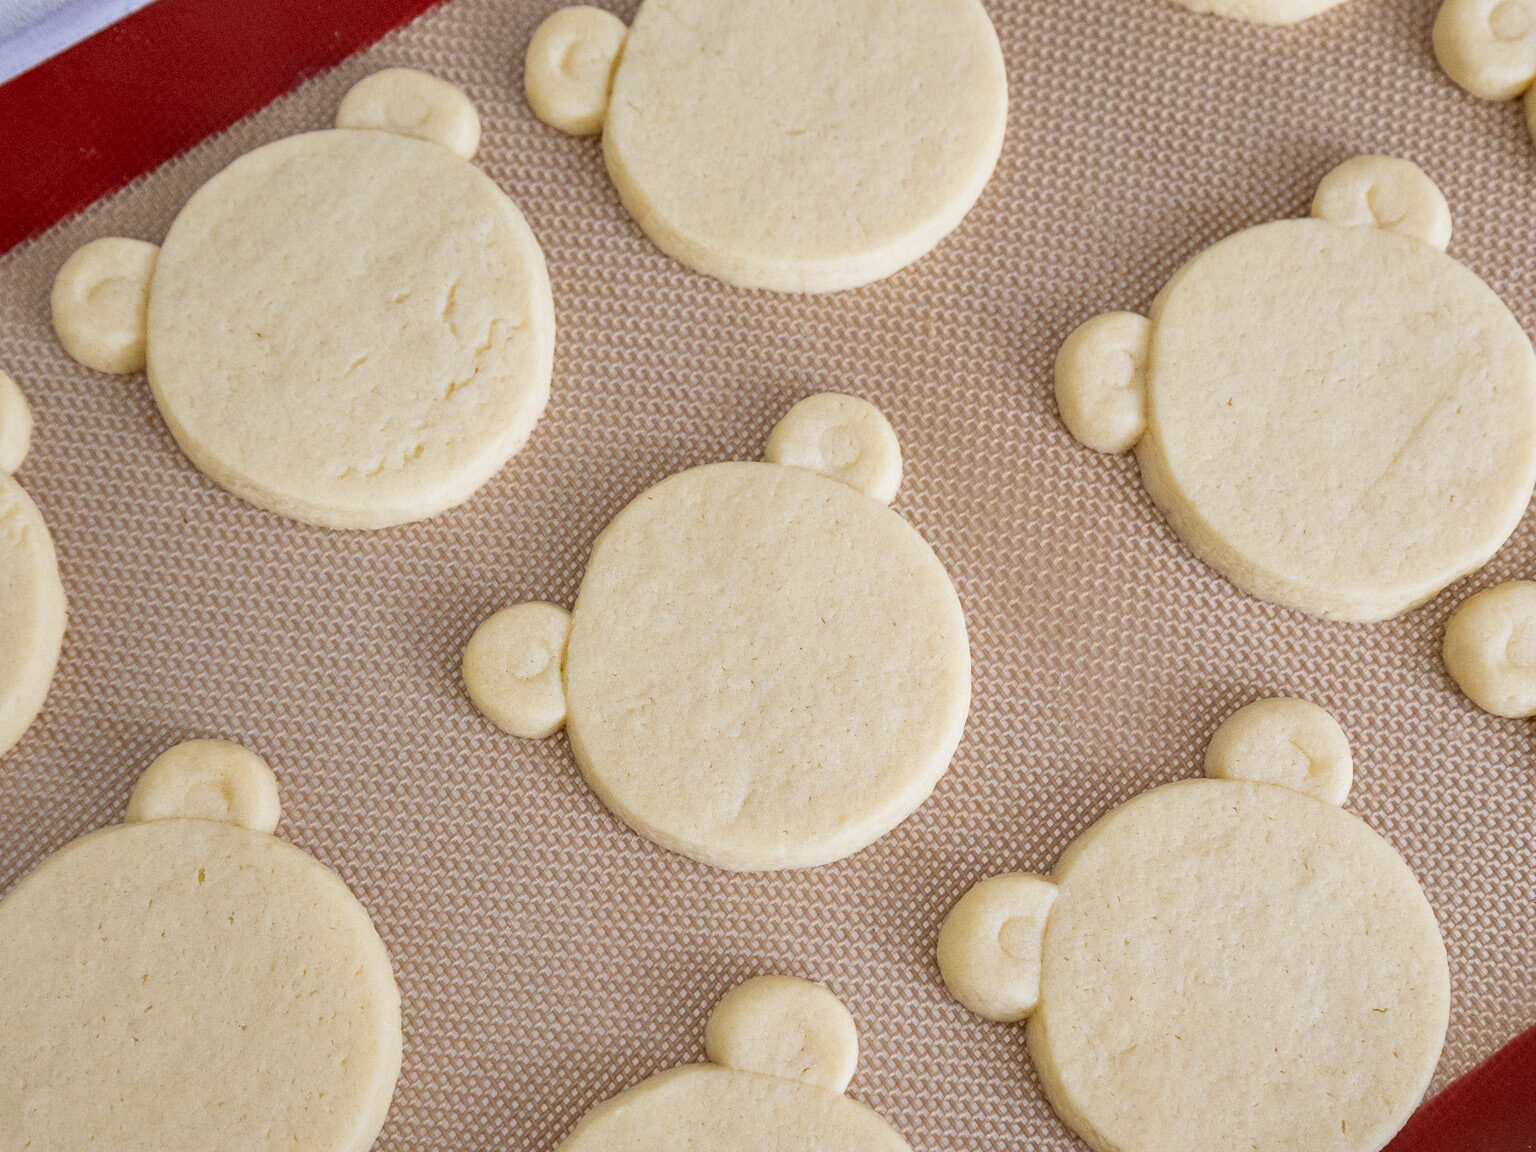
Chill the cut-out cookies one more time in the fridge for 15 minutes or the freezer for 5 minutes to help them keep their shape as they bake.
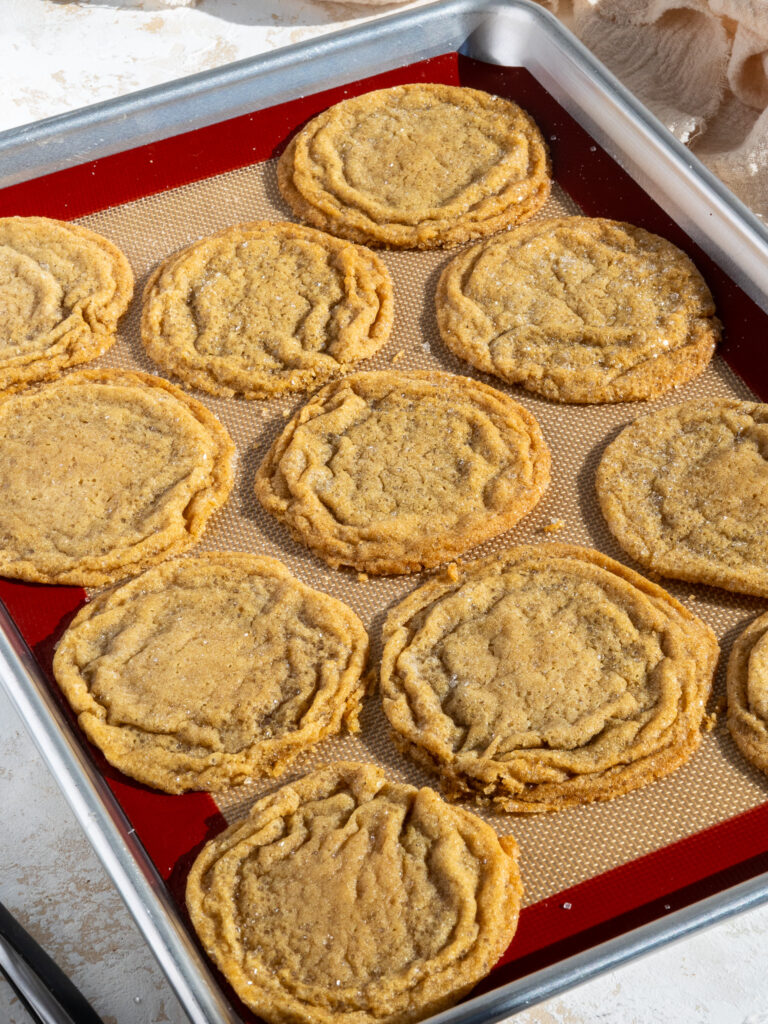
Step 3: Bake the Cookies
Bake for 12-14 minutes on the top rack of your oven (time varies based on the size and thickness of the cookies).
Keep a close eye on the cookies and be sure to pull them out before the edges start to brown. Let the baked cookies cool on the pan for about 15 minutes, then transfer to a wire rack to finish cooling.
While the first batch bakes and cools, knead together the cookie dough scraps and rewrap them in plastic wrap.
Pop them back in the fridge to chill. Pull out your 2nd chilled piece of dough and repeat the steps above. Then repeat with the chilled dough scraps.
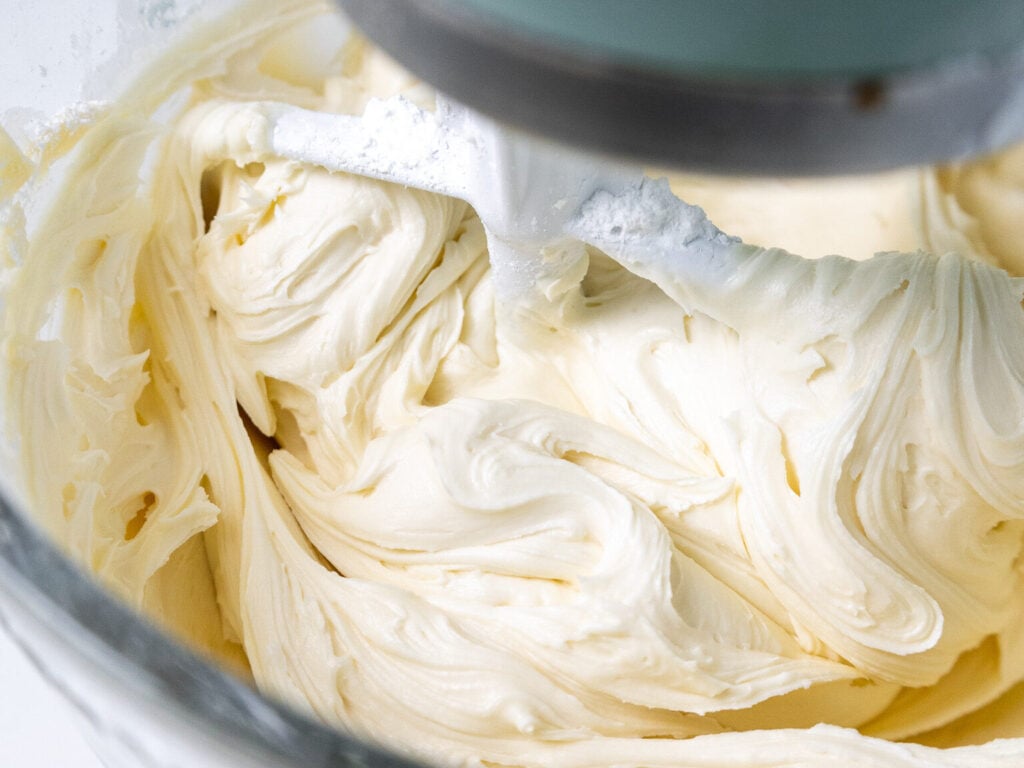
Step 4: Make the Vanilla Buttercream
While the cookies bake and cool, make the vanilla buttercream frosting.
If the frosting seems too thick, add an extra Tbsp of heavy cream. If it seems too thin, add another 1/4 cup of powdered sugar.
If you’re unsure what consistency the frosting should be, check out my frosting consistency guide.
Once the frosting is made, stir it by hand with a rubber spatula to get it SUPER smooth.
Place frosting into a large piping bag fitted with a medium round piping tip (like a Wilton 12) and seal the top with a large rubber band.
If you don’t have that type of piping tip, you can just cut a 1 cm opening at the base of the piping bag. Set aside.
Step 5: Frost and Decorate the Cookies
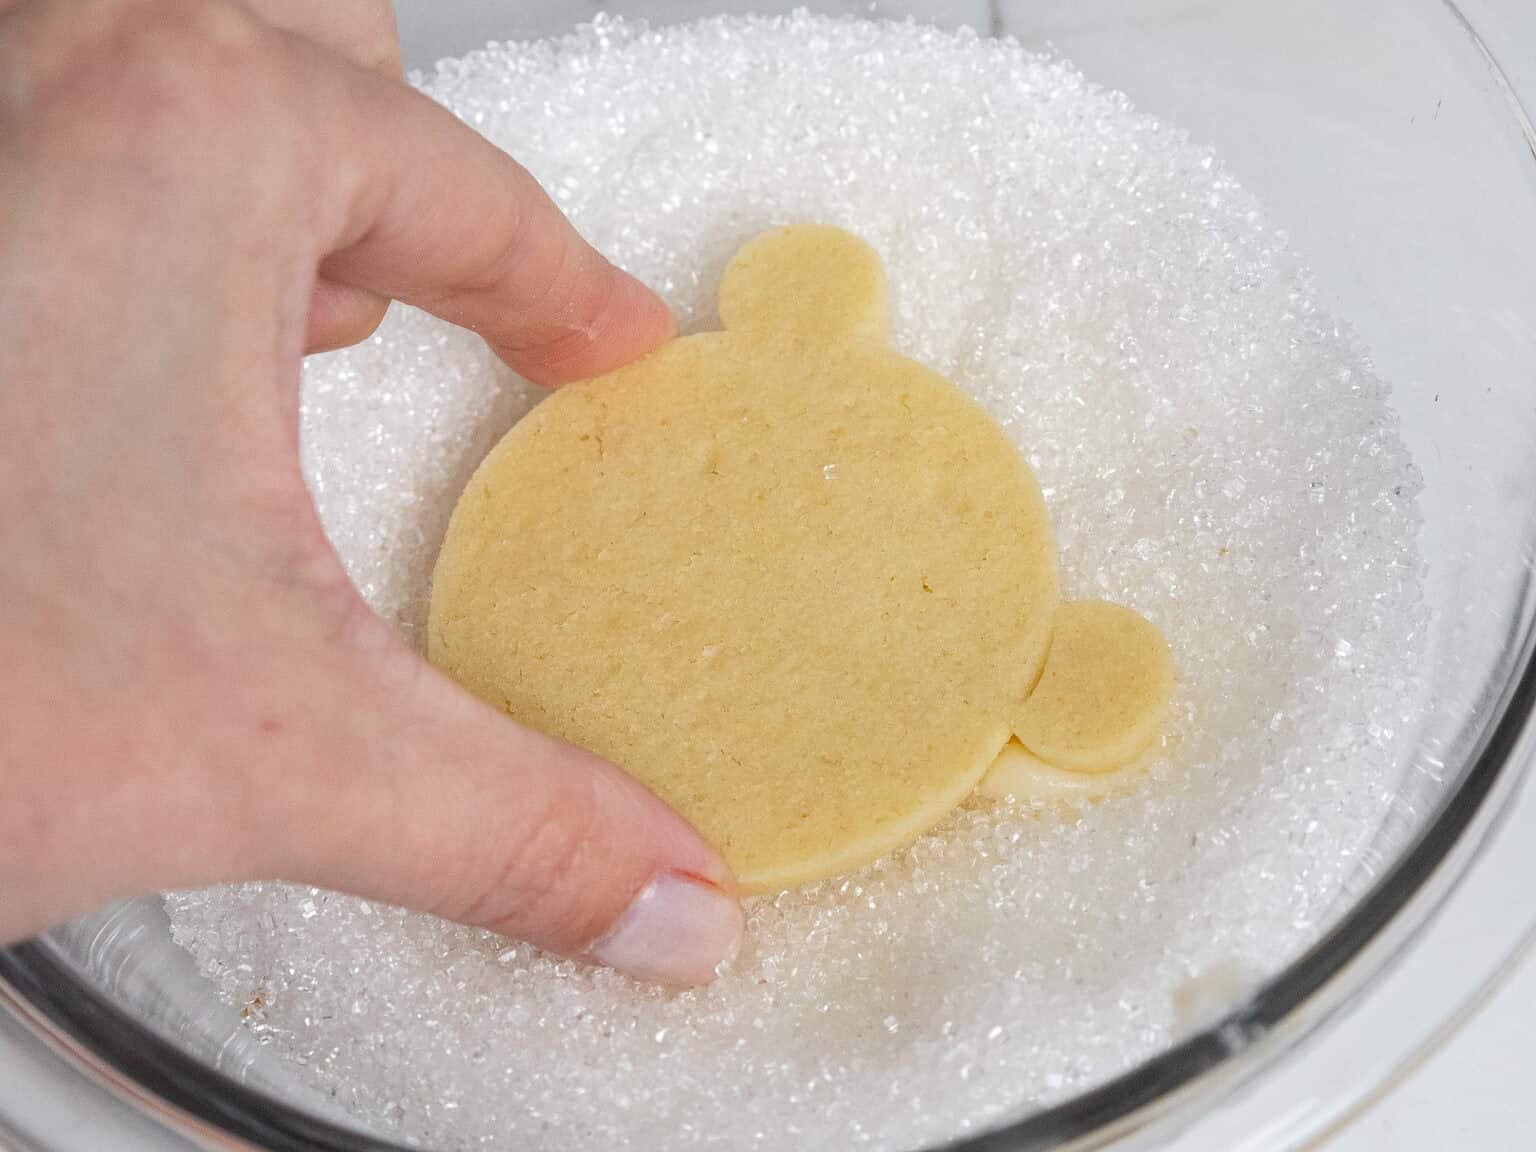
Pour about 1 cup of white sanding sugar or granulated sugar into a small bowl. Set aside. Once the cookies have fully cooled, pipe a thin layer of frosting on top of one of the cookies.
Gently press the cookie into the sanding sugar until the entire top is covered. This should even out the frosting.
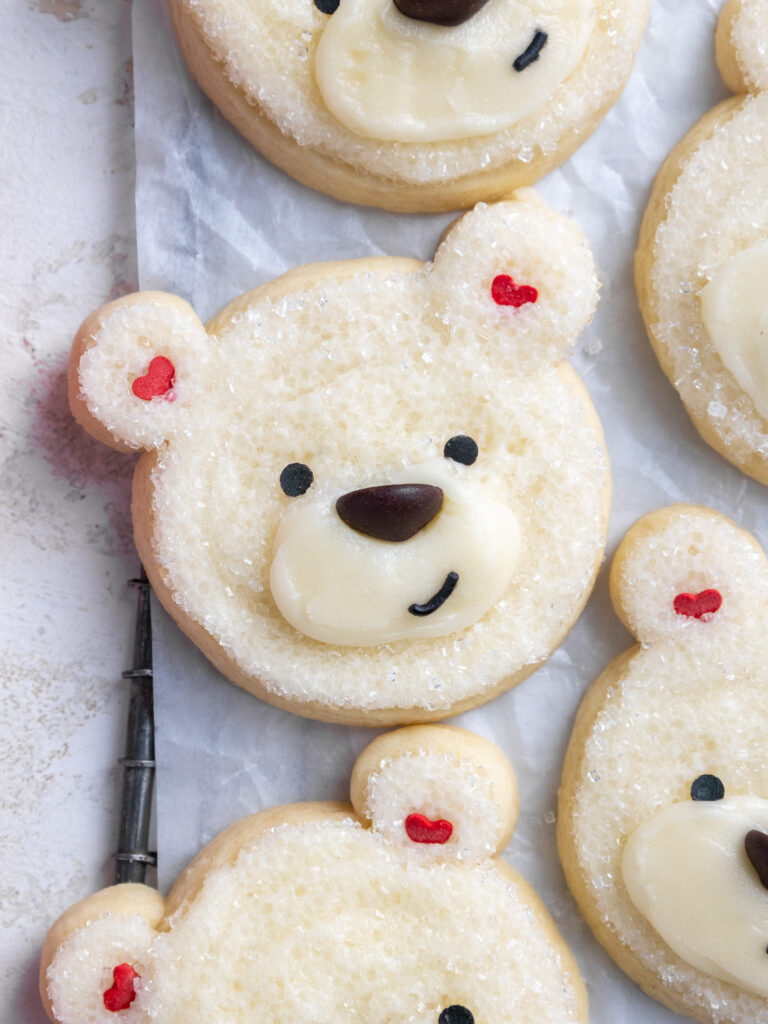
Pipe a small oval towards the bottom of the cookie to be the bear’s muzzle.
Gently press a large chocolate chip into the top of the muzzle to be the nose, and use black sprinkles to make the polar bear’s eyes and red or pink sprinkles to make the polar bear’s ears.
If you don’t have quite the right sprinkles, feel free to improvise with whatever you have on hand!
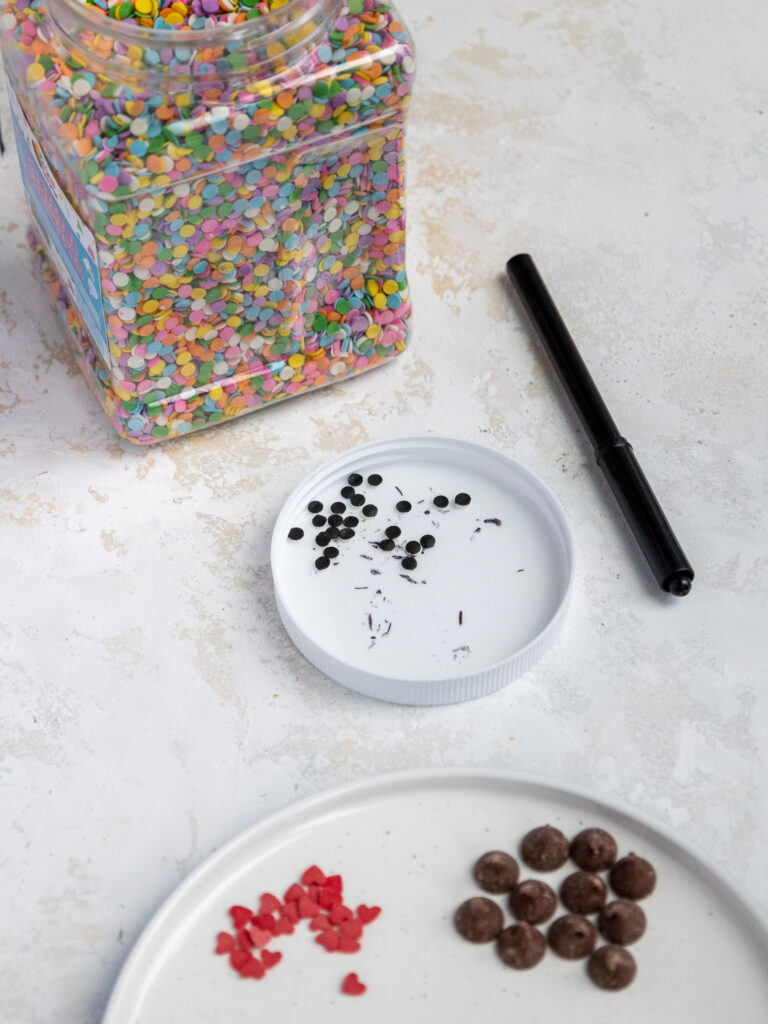
I ended up coloring some white, round, flat sprinkles with an edible marker because I didn’t have any round black sprinkles for the eyes. I also used red heart sprinkles for the ears because I didn’t have any round ones.
In a pinch, you can also use fondant to make the facial features.
Repeat with the remaining cookies, then enjoy!
Substitutions and Swaps – Cream Cheese Cookie Base
Now that we’ve covered how to make these cookies, let’s talk about the ingredients!
This recipe uses quite a few ingredients, and I know you might not have them all on hand.
Or if you have food allergies or restrictions, I’ve got you covered. Below are some swaps and substitutions that you can make.
- Granulated Sugar – I do not recommend reducing the amount of sugar or changing the type of sugar, as it will change the spread of these cookies.
- Unsalted Butter – If you only have salted butter on hand, you can use it in place of the unsalted butter. Just be sure to omit the salt that this recipe calls for. You can also use vegan butter in its place (and omit the salt)!
- Cream Cheese – Full-fat cream cheese that comes in a block works best.
- Large Egg – If you have an egg allergy, try using a flaxseed egg or a vegan egg replacer like this one made by Bob’s Red Mill.
- All-Purpose Flour – This recipe turns out best with AP flour, but you can use a gluten-free flour blend if needed.
- Cornstarch – Cornstarch helps give these cookies a soft texture! If you don’t have any on hand, it can be omitted, but your cookies won’t bake up as soft.
Substitutions and Swaps – Buttercream Frosting
- Unsalted Butter – If you only have salted butter on hand, you can use it in place of the unsalted butter. Just be sure to omit the salt that this frosting recipe calls for. You can also use vegan butter in its place.
- Heavy Cream – Whipping cream, coconut cream, or alternative milk (soy, almond, oat, coconut) will work fine in this frosting recipe if that’s what you have on hand.
- Vanilla Extract – Other extracts can also be used in place of the vanilla extract if needed.
How Many Cookies Does This Recipe Make?
This recipe can be used to make 30, 2 1/2-inch cookies. The yield and bake time will vary based on the size and shape of the cookie cutter you use.
Tips for Making the Best Polar Bear Cookies
- Liberally flour your counter before you roll out your cookie dough and move it around while you roll and cut your cookies.
- Really cream together the butter, cream cheese, and granulated sugar in the first step of this recipe. It helps incorporate air into the dough, which makes fluffy and soft cookies.
- Don’t overwork the cookie dough! It can overwork the gluten and result in tough and dense cookies.
- Roll the cookie dough out to a consistent thickness of 1/3 inch. If some are thicker or thinner than others, they may over- or under-bake in the oven.
- Chill the cookie dough. It helps prevent your cookies from spreading while they bake.
- Don’t overbake the cookies. Err on the side of underbaking your cookies, and remember that the cookies continue to bake for a few minutes once they’re out of the oven.
- Feel free to get creative with what you use to make the polar bear’s face and work with what you’ve got! You can also use fondant if needed.
Making These Polar Bear Cookies in Advance and Storage Tips
You can store frosted cookies in an airtight container for up to 2 days at room temperature, 5 days in the fridge, or in the freezer for a month.
If you want to stack the cookies on top of one another, I recommend chilling them thoroughly before doing so and adding a layer of parchment paper between them. The buttercream will firm up when it’s chilled, but won’t set hard like royal icing.
This cookie dough can also be frozen for up to 1 month if wrapped tightly in plastic wrap and stored in an airtight container. If I do freeze the cookie dough, I like to move the cookie dough to the fridge the night before I plan to roll it out and bake the cookies.
Baked, unfrosted cookies can also be frozen! These cookies last for up to a month if frozen in an airtight container.
I recommend waiting to frost them until they’ve thawed to room temperature.
Move them to the fridge the day before you plan to eat them, then let them sit out at room temperature for a few hours before frosting them.
Let Me Know What You Think!
If you try this recipe for polar bear cookies, I’d love to hear what you think! Please leave a rating and let me know your thoughts by sharing a comment.

Polar Bear Cookies
Equipment
Ingredients
Soft-Batch Cream Cheese Cookies
- 3/4 cup (1 1/2 sticks) unsalted butter, room temperature 170g
- 1/2 cup or 4 oz. full fat cream cheese, room temp 113g
- 1 1/2 cups granulated sugar 300g
- 1 large egg, room temperature 56g
- 2 tsp vanilla extract or vanilla bean paste 8g
- 3 cups all-purpose flour 375g
- 1 Tbsp cornstarch 8g
- 1/2 tsp baking powder 2g
- 1/2 tsp fine salt 3g
Buttercream Frosting for Cookies
- 1 cup unsalted butter, room temperature 226g
- 1 Tbsp vanilla extract or vanilla bean paste 12g
- 1/2 tsp fine salt 3g
- 3 1/2 cups powdered sugar 454g or 1 lb. box
- 1/4 cup heavy whipping cream, room temperature 60g
Instructions
Soft-Batch Cream Cheese Cookies
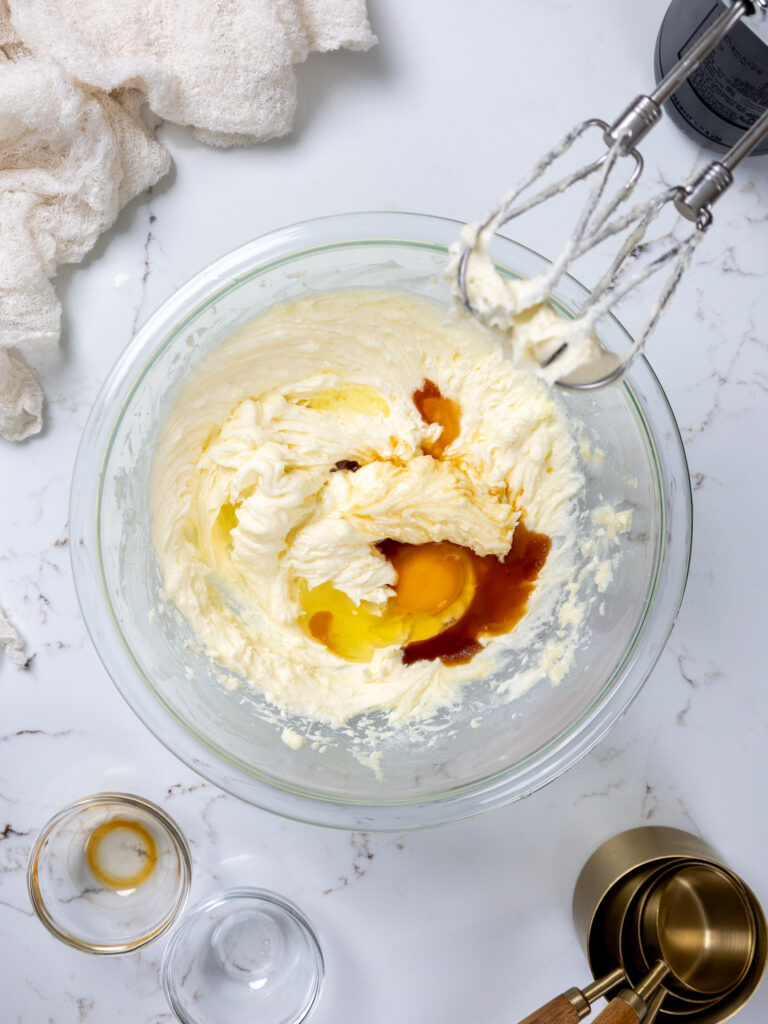
- In a large bowl or the bowl of a stand mixer, beat 3/4 cup butter and 1/2 cup cream cheese on medium speed with a hand mixer or whisk attachment until smooth.
- Next, add in 1 1/2 cups granulated sugar and mix on a medium-high speed for a couple of minutes, until the mixture becomes lighter in color.
- Add in 1 egg and 2 tsp vanilla extract. Mix on a medium speed until incorporated.
- In a separate bowl, whisk together 3 cups flour, 1 Tbsp cornstarch, 1/2 tsp baking powder, and 1/2 tsp salt.
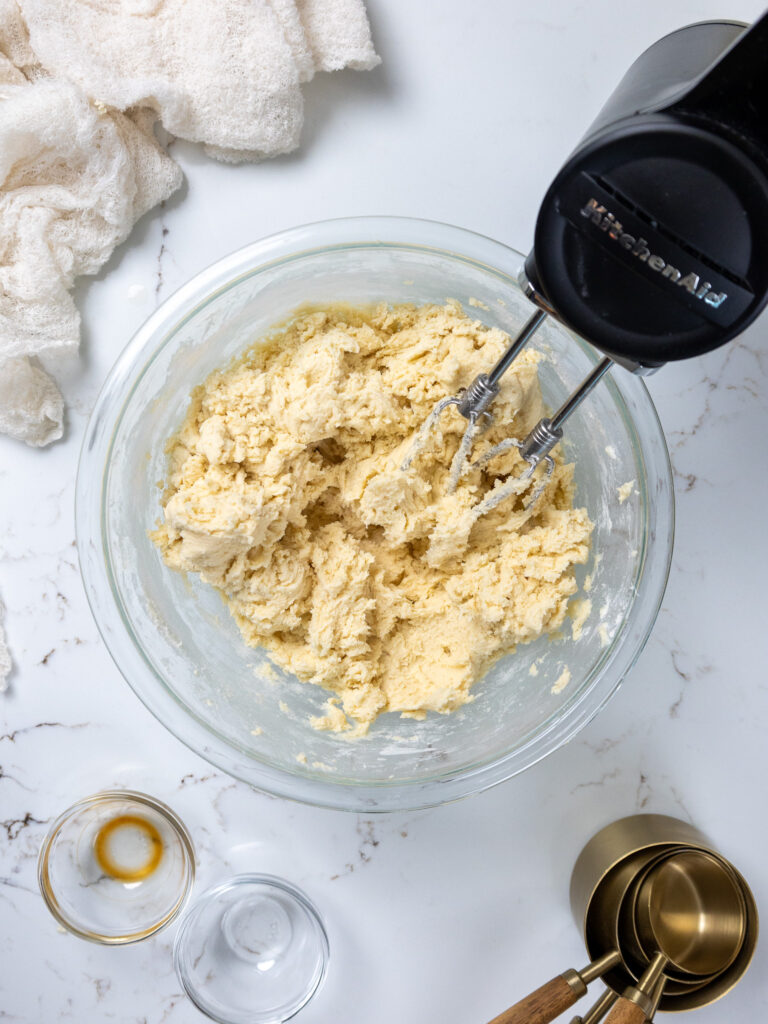
- Add the flour mixture into the butter mixture in two additions, mixing on a low speed until it is JUST incorporated. Scrape the sides of the bowl with a rubber spatula between additions.
- At this point, the dough should still be pretty sticky. Divide the dough in half and wrap each portion of dough in a piece of plastic wrap. I like to flatten the dough out into a rectangle that's about 1/2 inch tall to make it easier to roll out once it's chilled.
- Chill the dough in the fridge for about 2 hours, in the freezer for 30 minutes, or in the fridge overnight. If you chill the dough overnight, let it sit out at room temperature for about 10 minutes before trying to roll it out. This will make it easier to roll out!
- Turn on the oven to 350°F/175°C for about 30 minutes before you plan to roll out the dough, and line two large baking sheets with silicone baking mats or parchment paper. Set aside.
- Take one piece of dough out of the fridge or freezer, leaving the other in there to continue to chill. Unwrap the cookie dough and lay the plastic wrap out flat on your counter. We will be rolling out the cookie dough on the plastic wrap to make cleanup a breeze and to make it easier to cut out the cookies. Dust both sides of the cookie dough and your rolling pin with flour.
- Roll the dough to be 1/3 inch thick and cut out 2 1/2 inch circles with a flour-dusted cookie cutter. If you don't have a circle cutter that size, use a round glass that's similar in size. Use a kitchen brush to brush any excess flour off the cookies and place them on the prepared baking sheets. The cookies don't spread much as they bake, so you can place them about 1 inch apart.
- Use a 3/4-inch circle cutter to cut out smaller circles from the remaining dough to make the ears of the bears. If you don't have a cutter this size, use a small bottle cap that's similar in size. You will need twice as many small circles as you cut out of the bigger circles so that each bear can have two ears. Use the same small cookie cutter to cut out a small bit of each little circle to help the ears sit flush against the larger circles (see picture above). Place two of these on the side of each big circle cookie and gently press down where the dough meets to help them stick together.
- Chill the cut-out cookies one more time in the fridge for 15 minutes or the freezer for 5 minutes to help them keep their shape as they bake.
- Bake one sheet of cookies at a time. Bake for 12-14 minutes on the top rack of your oven (bake time can vary based on the size of the cookies). Keep a close eye on the cookies and be sure to pull them out before the edges start to brown.
- Let the baked cookies cool on the pan for about 15 minutes, then transfer to a wire rack to finish cooling.
- While the first batch bakes and cools, knead together the cookie dough scraps and rewrap them in plastic wrap. Pop them back in the fridge to chill.
- Pull out the 2nd chilled portion of dough and repeat steps 9-12. Then repeat with the chilled dough scraps.
Buttercream Frosting
- Beat 1 cup of butter on a medium speed for 30 seconds with a paddle attachment, until smooth.
- Mix in 1 Tbsp vanilla paste or vanilla extract and 1/2 tsp salt on a low speed.
- Gradually mix in 3 1/2 powdered sugar and 1/4 cup of heavy cream. Scrape the sides and bottom of the bowl as needed with a rubber spatula. Beat on low until the ingredients are fully incorporated and the desired consistency is reached.
- If the frosting seems too thick, add in additional cream (1 Tbsp at a time). If the frosting is too thin, add more powdered sugar (a quarter of a cup at a time).
- Place frosting into a large piping bag fitted with a medium round piping tip (like a Wilton 10) and seal the top with a large rubber band. If you don't have that type of piping tip, you can just cut a 1 cm opening at the base of the piping bag. Set aside.
Decorating These Polar Bear Cookies
- Pour about 1 cup of white sanding sugar or granulated sugar into a small bowl. Set aside.
- Once the cookies have fully cooled, pipe a thin layer of frosting on top of one of the cookies.
- Gently press the cookie into the sanding sugar until the entire top is covered. This should even out the frosting.
- Pipe a small oval towards the bottom of the cookie to be the bear's muzzle. Gently press a large chocolate chip into the top of the muzzle to be the nose, and use black sprinkles to make the polar bear's eyes and red or pink sprinkles to make the polar bear's ears. If you don't have quite the right sprinkles, feel free to improvise with whatever you have on hand! You can also use fondant to make the facial features.
- Repeat with the remaining cookies, then enjoy!
Notes
How Many Cookies Does This Recipe Make?
This recipe can be used to make about 30, 2 1/2-inch circular cookies. The yield and bake time will vary based on the size and shape of the cookie cutter(s) you use. This recipe can be halved to make fewer cookies (use half a scrambled egg in the dough), but I don’t recommend doubling it unless you have a commercial (8 qt.) stand mixer.Making These Polar Bear Cookies in Advance and Storage Tips
You can store frosted cookies in an airtight container for up to 2 days at room temperature, up to 5 days in the fridge, or for up to a month in the freezer. If you want to stack the cookies on top of one another, I recommend chilling them thoroughly before doing so and adding a layer of parchment paper between them. The buttercream will firm up when it’s chilled, but won’t set hard like royal icing. This cookie dough can also be frozen for up to 1 month if wrapped tightly in plastic wrap and stored in an airtight container. I like to move the cookie dough to the fridge the night before I plan to roll it out and bake the cookies. Baked, unfrosted cookies can also be frozen! These cookies last for up to a month if frozen in an airtight container. I recommend waiting to decorate them until they’ve thawed to room temperature. Move them to the fridge the day before you plan to eat them, then let them sit out at room temperature for a few hours before frosting them.Tips for Making the Best Polar Bear Cookies
- Really cream together the butter, cream cheese, and granulated sugar in the first step of this recipe. It helps incorporate air into the dough, which makes fluffy and soft cookies.
- Don’t overwork the cookie dough! It can overwork the gluten and result in tough, dense cookies.
- Roll the cookie dough out to a consistent thickness of 1/3 inch. If some are thicker or thinner than others, they may over- or under-bake in the oven.
- Take the time to chill the cookie dough. It helps prevent your cookies from spreading while they bake and helps them bake up with a soft texture.
- Liberally flour your counter before you roll out the cookie dough, and move the dough around while you roll and cut the cookies.
- Don’t overbake your cookies. Err on the side of underbaking your cookies, and remember that the cookies continue to bake for a few minutes once they’re out of the oven.
- Feel free to get creative with what you use to make the polar bear’s face and work with what you’ve got! You can also use fondant if needed.
Nutrition
Other Recipes You Might Like:


I love your design. I made these using my own sugar cookie recipe (I was short on time and know mine really well) and a crusting buttercream. The bears brings such joy to the little ones (and the adults).
Thank you for sharing your craft and next time I will try out your recipe.
Hi Jonna,
I totally agree 🙂 This design would work with most sugar cookie recipes and crusting buttercreams, and I’m glad you were able to use this as inspo!! Thank you for sharing!
Thinking about making these cookies for my cookie box, but do you know if the frosting would smear if I individually wrapped them?
Hi Katie,
If you keep the cookies chilled the buttercream will stay firm! The sanding sugar and chocolate chip nose also help prevent it from getting messed up. But if they’re at room temperature and stacked the frosting can get messed up. Wrapping them individually should help prevent that though!
Made them for Christmas!! Such clear instructions and they turned out perfectly. Thank you so much for this recipe.
If I needed to individually package these, would it be better to decorate with chocolate melts so it will actually harden and not smoosh into the packaging?
Or maybe royal icing? I’ve never worked with that before
Hi Molly,
Great question!! Are you shipping them? If you want the decorations on the cookies to be hard, I’d definitely recommend royal icing! It sets firm and makes packaging a lot easier. Here is my sugar cookie recipe which includes my royal icing recipe: https://chelsweets.com/cream-cheese-sugar-cookie-recipe/
Hope that helps, and that your cookies turn out great!!
Can I make these, package them individually in heat sealed baggies, and freeze them, or will freezing the cookies frosted changed the sanding sugar?
Hi Monica,
Great question! You can totally freeze these cookies like that, that should work great! Hope that helps, happy baking!
@Chelsweets,
Wonderful! I can’t wait to make these! Your recipes never disappoint!
Hi Monica,
Aw thank you!! I hope they turn out amazing 🙂
sooo cute!! thinking of trying these with sweetened fine shredded coconut rather than sanding sugar!!
Oh that would be so cute!! I love that idea Emma!!!! Let me know how they turn out 🙂
Beautiful!! I want to attempt these for Christmas this year! What did you use for the mouth for the little bears? =-)
Thank you Agnes!! I have a container of black strand sprinkles (like these: https://amzn.to/4q9bJMm) that I used! I sifted through them to find ones that were slightly curved to make it look like they were smiling. Hope that helps, happy baking!
I have not tried this recipe yet but had a quick question. Would I be able to sub cake flour for the AP + Corn Starch? I have some that I need to get through and thought this might be a good opportunity
Hi Evanna,
You can substitute cake flour for the AP + cornstarch! That should work great 🙂 Hope that helps, and that your cookies turn out amazing!!
These taste the best, even if you don’t want to make them as polar bears…but the polar bars are the cutest!
haha right?!?!? they’re *almost* too cute to eat 😉 keyword almost!!!
These are so, so cute! I can’t wait to make them. Do you think they would ship well?
Hi Jenni,
Thank you!! Sadly these aren’t the best for shipping, just because of the buttercream :/ You could make this design with royal icing though, and that would ship a lot better! Hope the helps, happy baking!
Can I replace the heavy cream in the frosting with a smaller quantity of milk?
Hi Avani,
Great question! You totally can do that! Just start with a tiny bit, and see what the texture is like. You can always add more, but you can’t take it back once you add it! Hope that helps, happy baking!
I couldn’t find exactly the same ingredients for decorating the bears so did my best with what I could find. They don’t look exactly like the pics but they are still so cute and tastes even better. My family and coworkers loved them. The frosting is Aaamazing! Great recipe!
Hi Jen,
It can be hard to find the exact same things, but I’m glad you worked with what could find and that they still turned out great!! 🙂 Thanks for sharing!
Will the frosting last for shipping if wrapped appropriately?
Hi Linda,
This buttercream will stay good at room temperature for up to 2 days, so if you shipped it overnight it might be ok, but otherwise you may want to use royal icing instead of buttercream. Hope that helps, happy baking!
Thank you so much for this great cookie. Not only is this a cute design, the cookie tastes delicious. My family says so haha.
Hi Carl,
Thank you so much!! That makes me so happy to hear, and I’m glad your family loved them too 🙂