
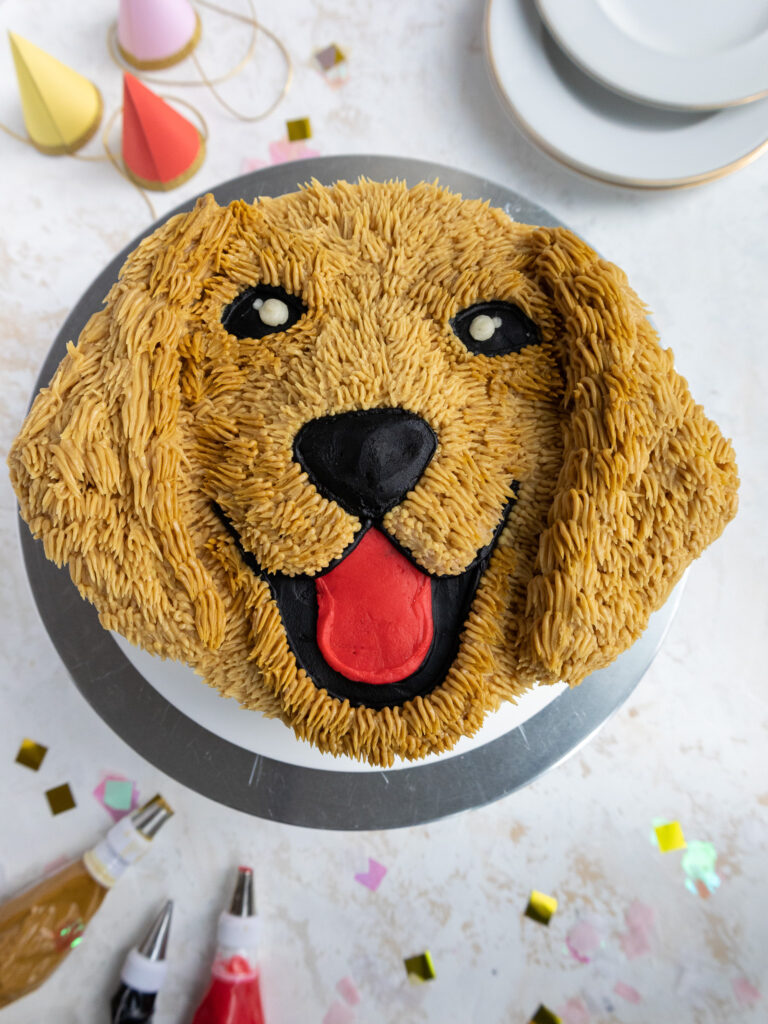
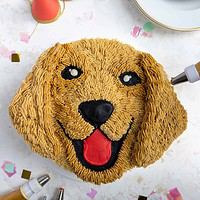
Golden Retriever Cake
This cute golden retriever cake is made with tender vanilla cake layers and decorated with delicious, homemade buttercream frosting.
Making This Golden Retriever Cake: Step-by-Step Tutorial
Let’s walk through each step of this cake together to make sure it turns out as amazing as possible! I’ve also included a video below.
I figured it might be helpful to know what tools I use too, so I’ve shared a list below.
Not all of these are mandatory, but they make the process a lot easier. If you don’t have all these things on hand, feel free to improvise and work with what you have.
- Two 8-inch cake pans
- Serrated Knife
- Offset Spatula
- 3 Small Piping Bags
- 1 Large Piping Bag
- 1 Plastic Coupler
- 2 Small Round Piping Tips (like a Wilton 10)
- 1 Small Grass Piping Tips (like a Wilton 233)
- 2 Very Small Round Piping Tips (like a Wilton 3)
- Small Acetate Sheet (I cut these down into smaller squares with scissors)
- Gel Food Coloring – Red, and black
- 2 Large Chocolate Squares (I use squares from a bar like this)
- Electric Hand Mixer or Stand Mixer
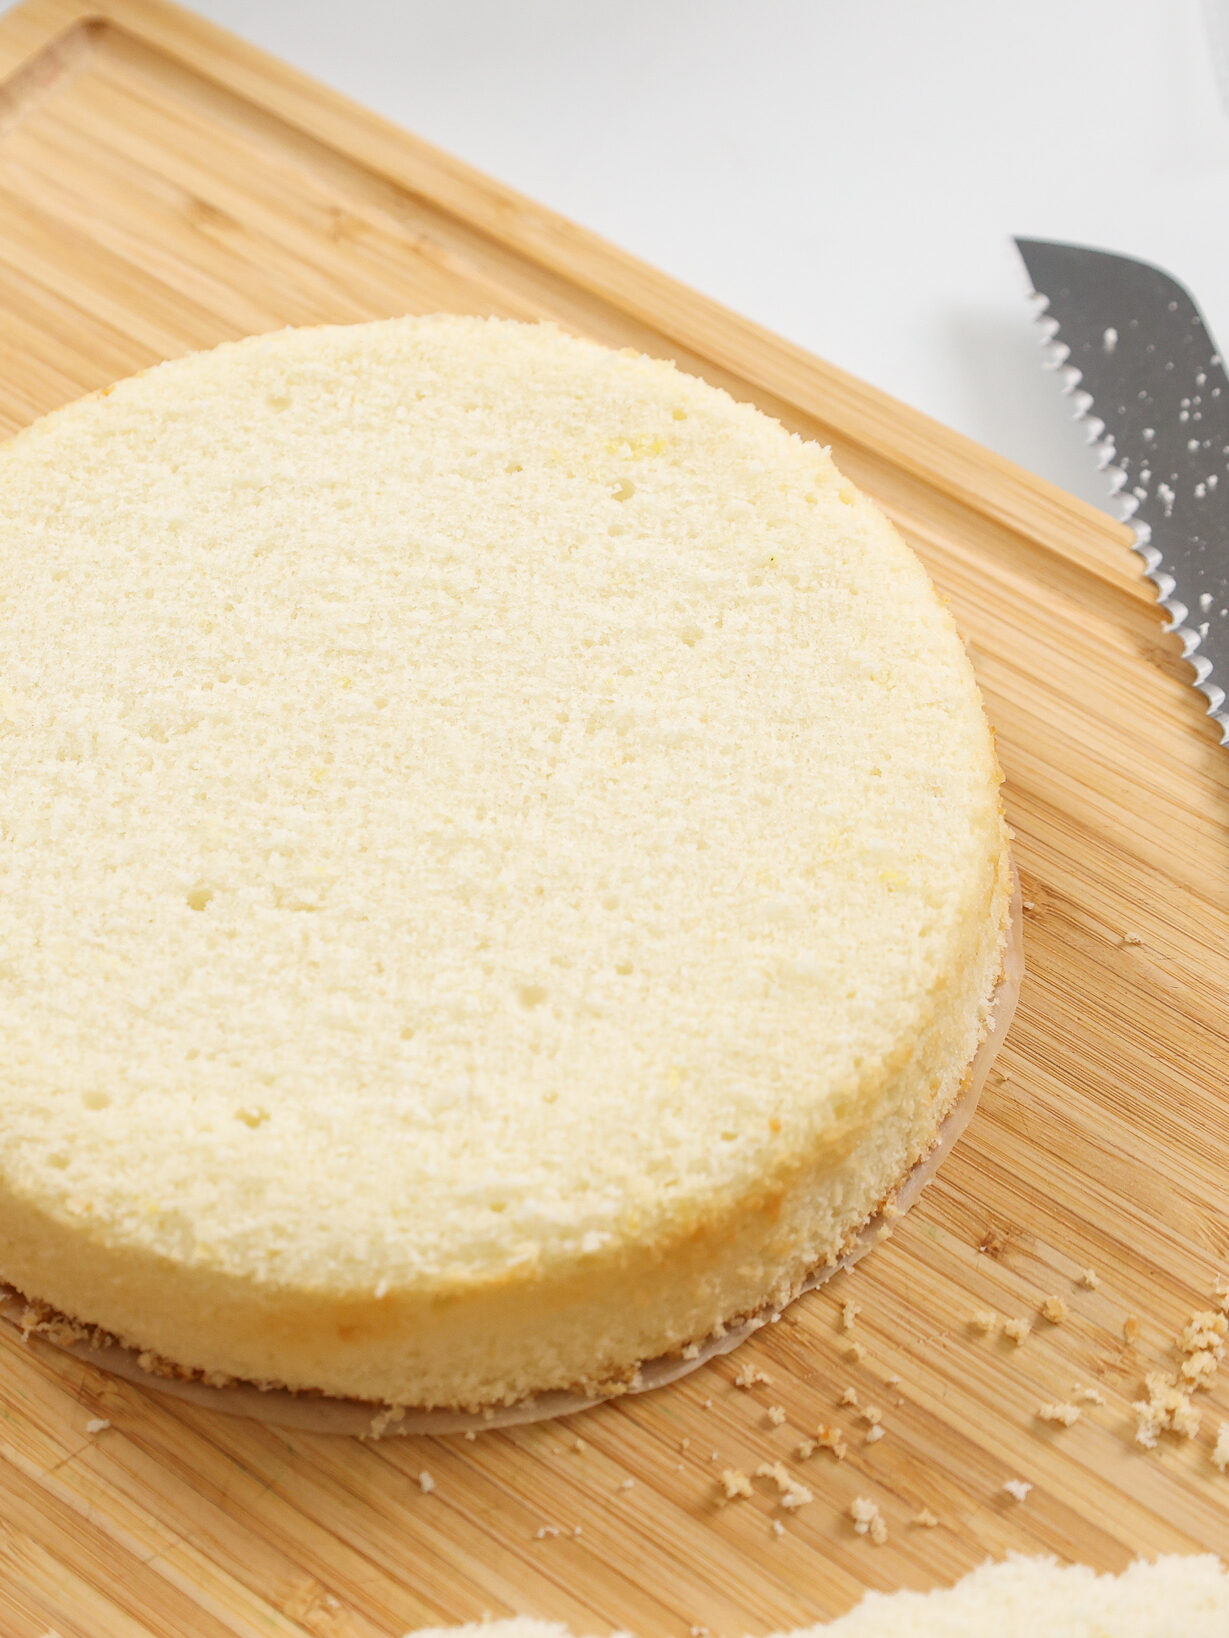
Step 1: Bake the Vanilla Cake Layers
The first step is to make the vanilla cake layers. Preheat the oven and line 2, 8-inch cake pans with parchment paper and spray with nonstick spray.
Bake the cake layers for 33-35 minutes, or until a toothpick inserted into the middle of the cake comes out with a few moist crumbs.
Let the cake layers cool in their pans for about 20 minutes, then carefully flip them out of the pan and onto a wire rack to finish cooling.
If you make these in advance, wrap and freeze them at this point. Take them out of the freezer about 20 minutes before you want to assemble the cake.
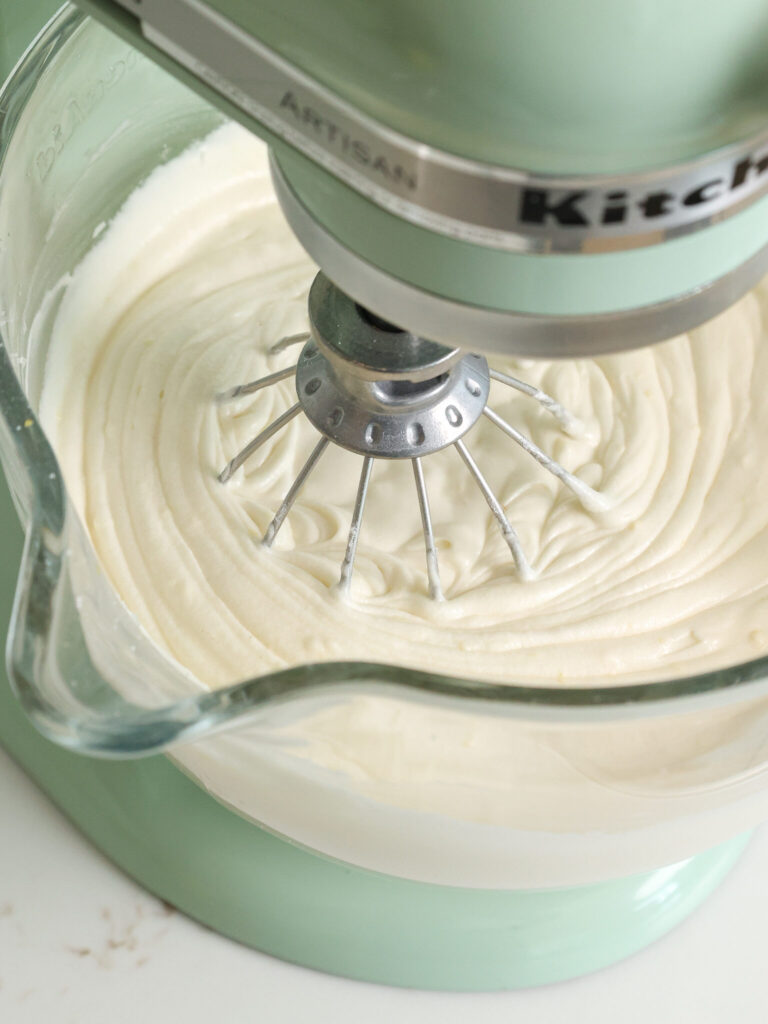
Step 2: Make the Buttercream Frosting
Next, we work on the buttercream frosting. I chose to make this cake with American buttercream, but any type of frosting should work great on this cake.
I find American buttercream is sturdier and easier to color, which is why I chose to use it for this design.
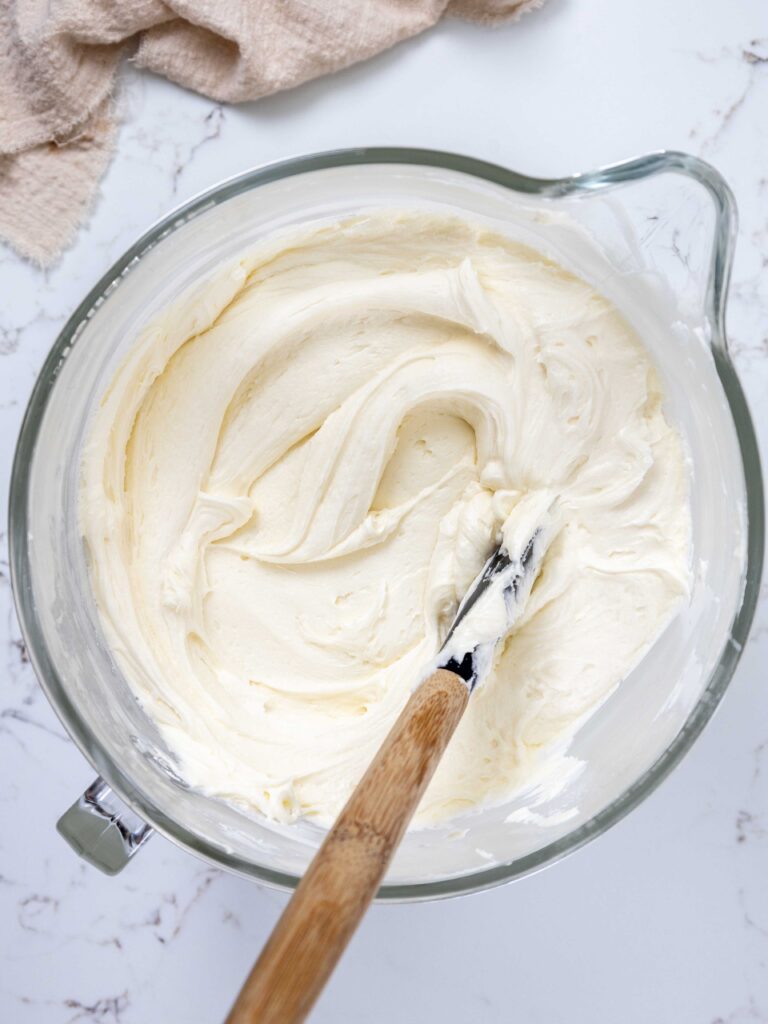
If the frosting seems too thick after mixing all the ingredients, add in additional heavy cream or milk (1 tablespoon at a time).
Or if the frosting is too thin, add in more powdered sugar (1/4 cup at a time).
If you’re unsure how thick your frosting should be, you can learn what consistency you’re looking for in my frosting consistency post.
Wait to color the buttercream until the cake is crumb coated.
Step 3: Stack and Crumb Coat the Cake
Stack and frost the cake layers on a greaseproof cake board or flat plate using a dab of frosting to help stick the first cake layer to the board.
Spread an even layer of buttercream between the cake layers with a large offset spatula. Place the top cake layer upside down to make it easier to get sharp corners.
Add a thin coat of frosting around the cake to fully cover the cake layers.
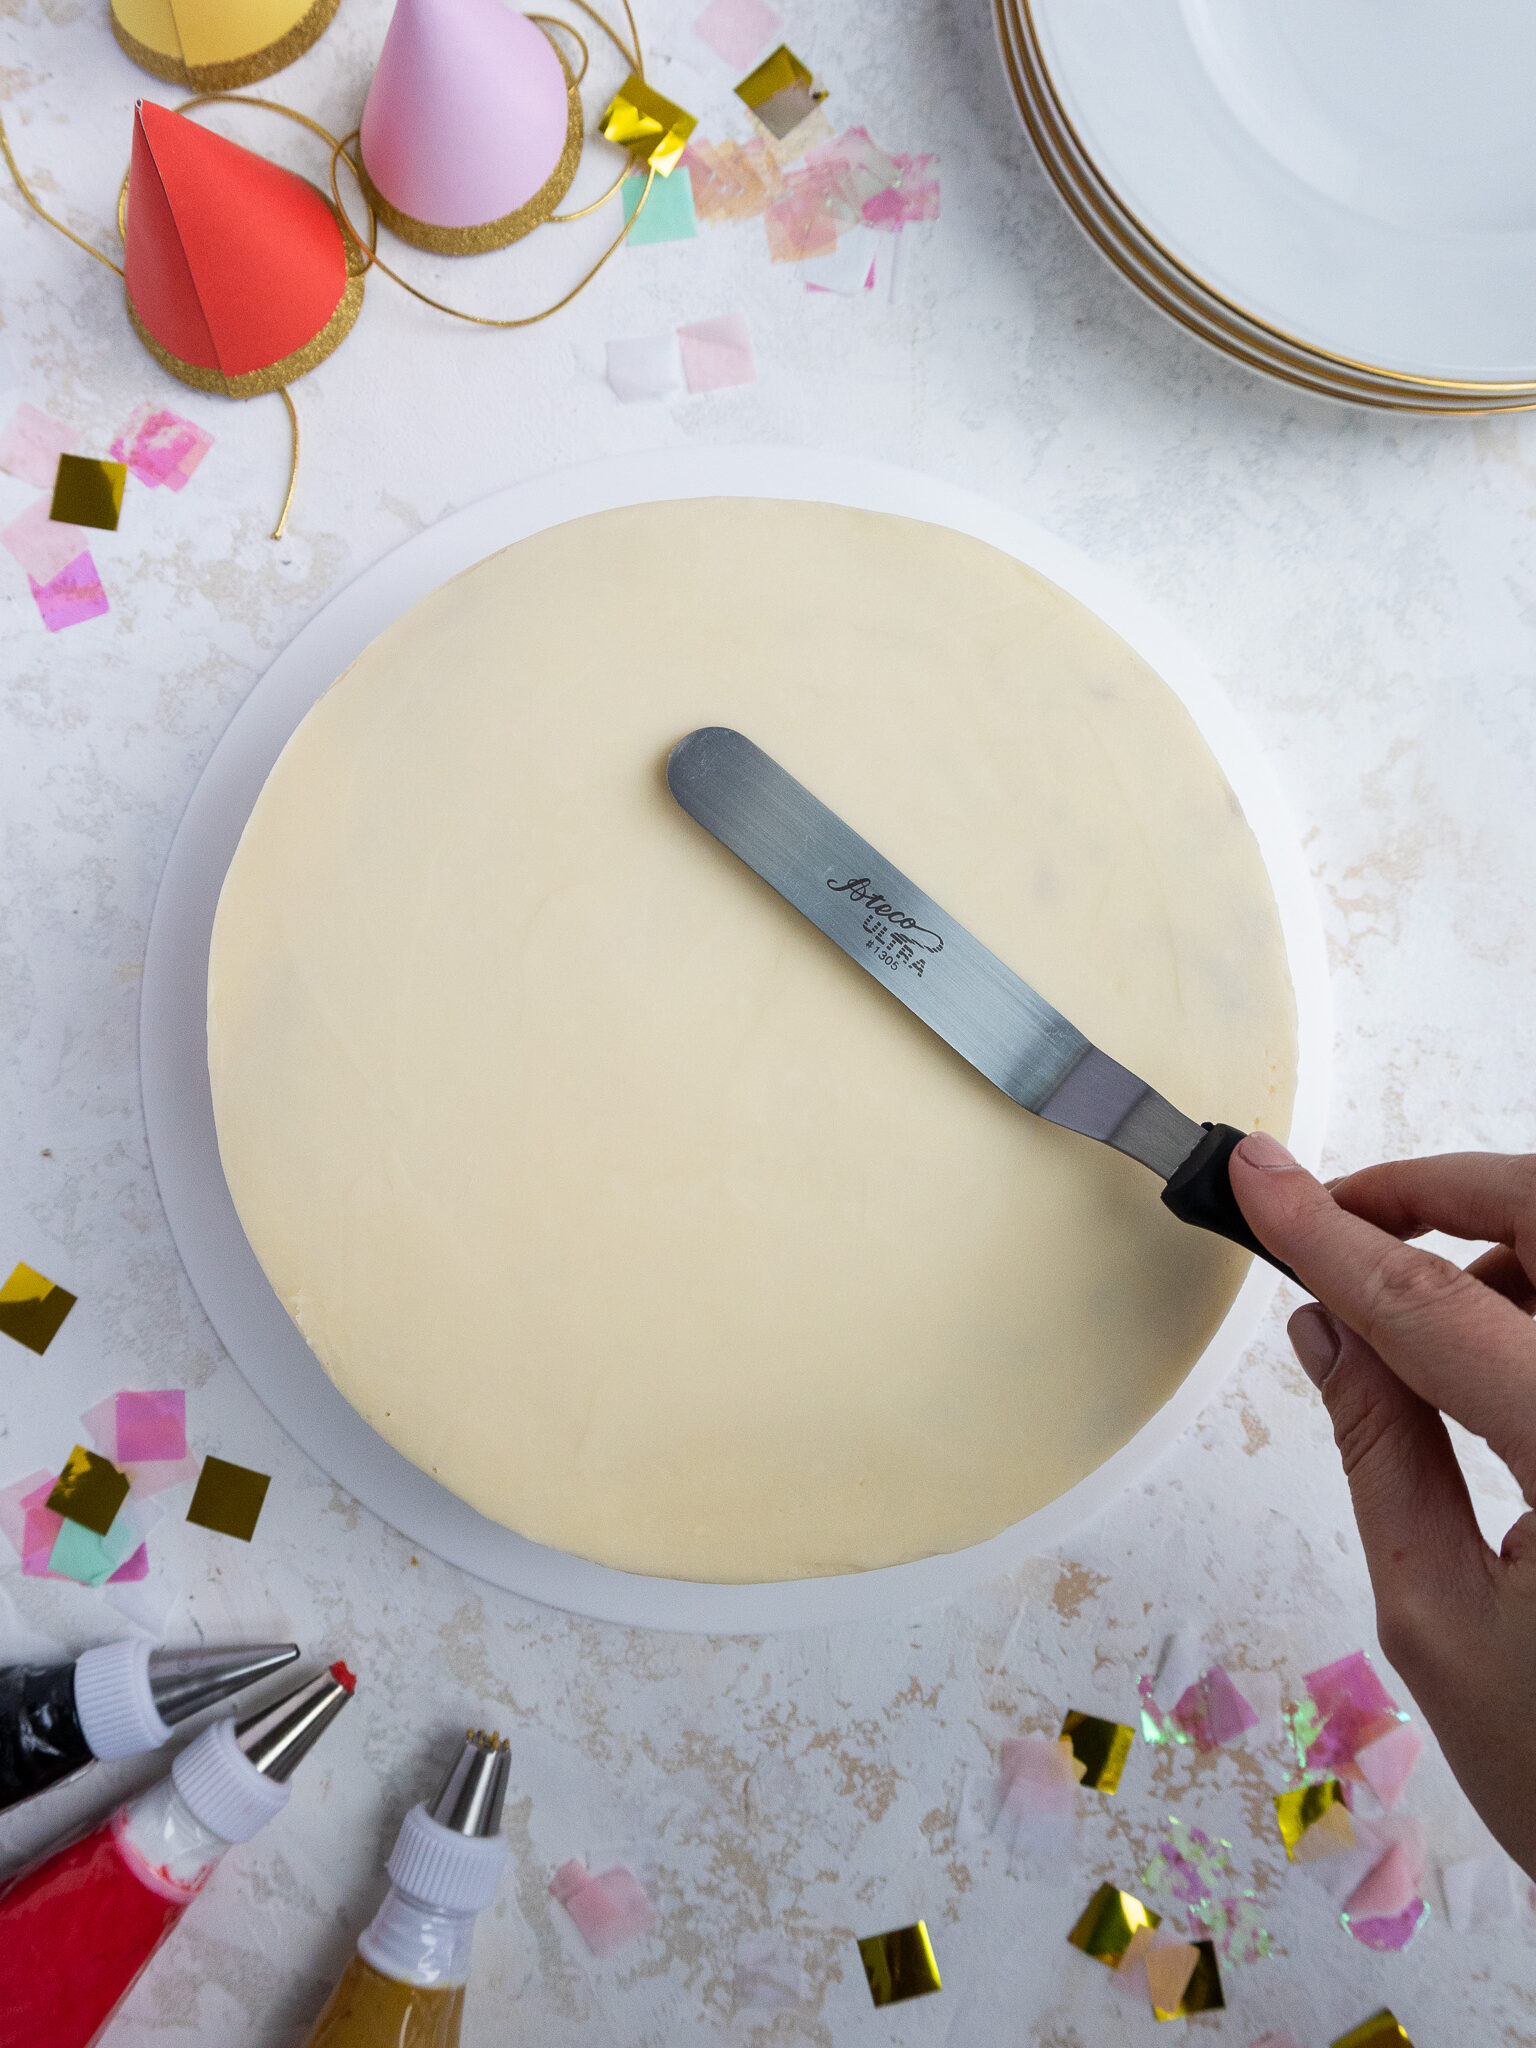
Smooth using a bench scraper, then chill the cake in the fridge (20 minutes) or freezer (10 minutes) until the frosting is firm to the touch.
Step 4: Color the Buttercream
While the cake chills, color the remaining buttercream. Use gel food coloring to make tan, red, and black buttercream.
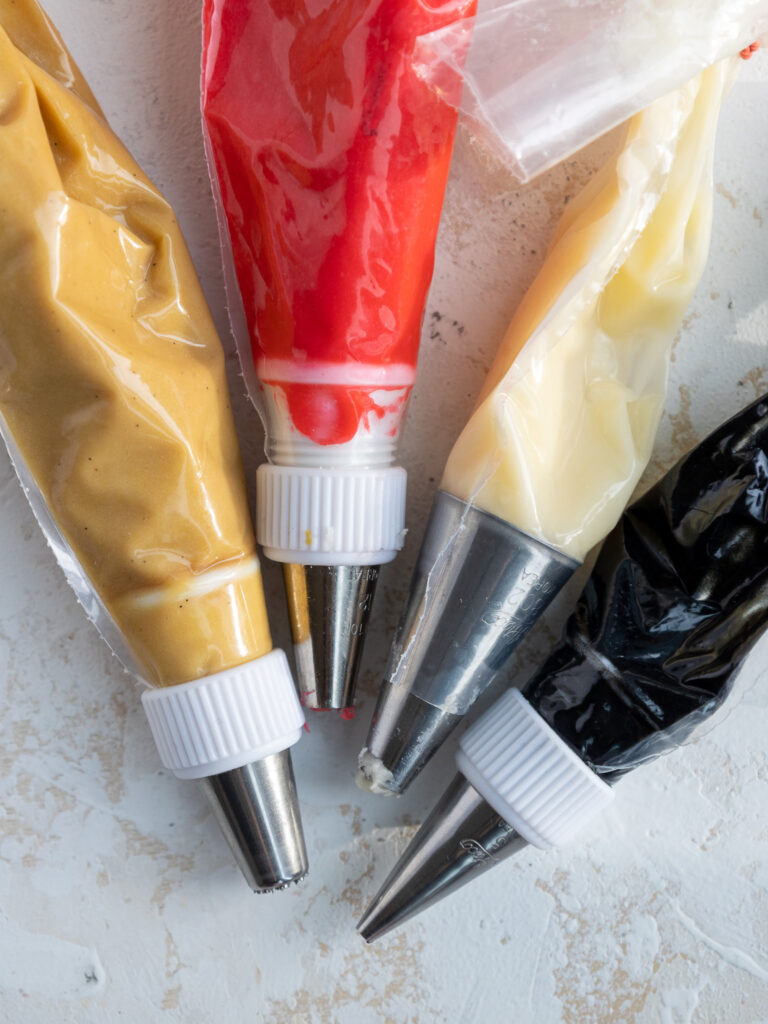
Place the buttercream in piping bags and seal the top of the bag with a rubber band or clip.
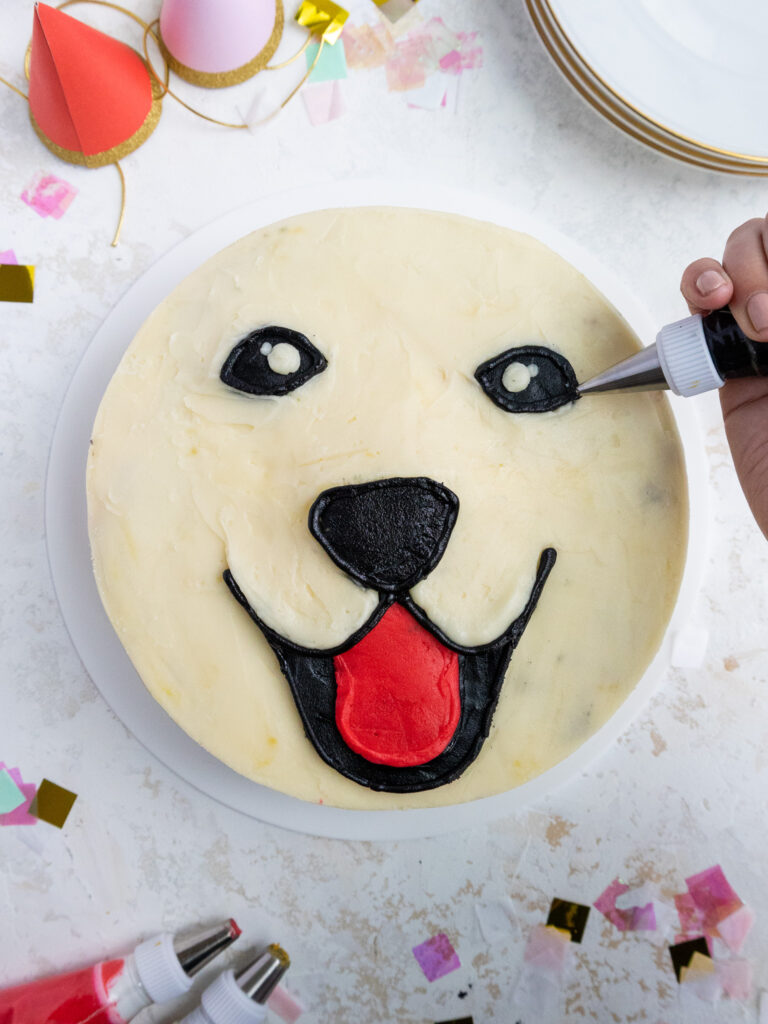
Step 5: Pipe on the Details
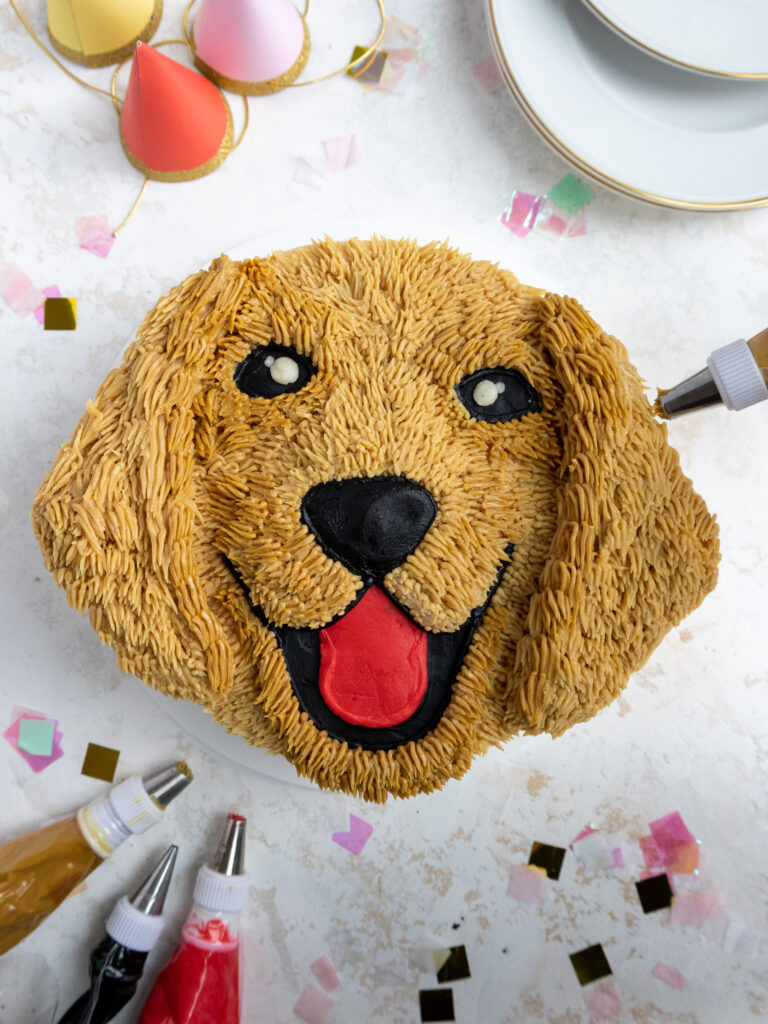
Then use a toothpick or scribe to trace out where you want to pipe the golden retriever’s face.
This helps ensure that the golden retriever’s face will be even and properly spaced out.
Pipe white buttercream on the muzzle / nose of the golden retriever and smooth it into a small mound using an offset spatula. This helps give the face a bit of depth.
Then use the white, black, and red buttercream to pipe on the golden retriever’s eyes, mouth, and nose.
Fill in the rest of its face with tan buttercream fur using a small grass piping tip. Be mindful of what direction you pipe the fur in.
I tried to pipe it in different directions to follow the natural flow of fur on a golden retriever’s face and to give the cake a bit more dimension.
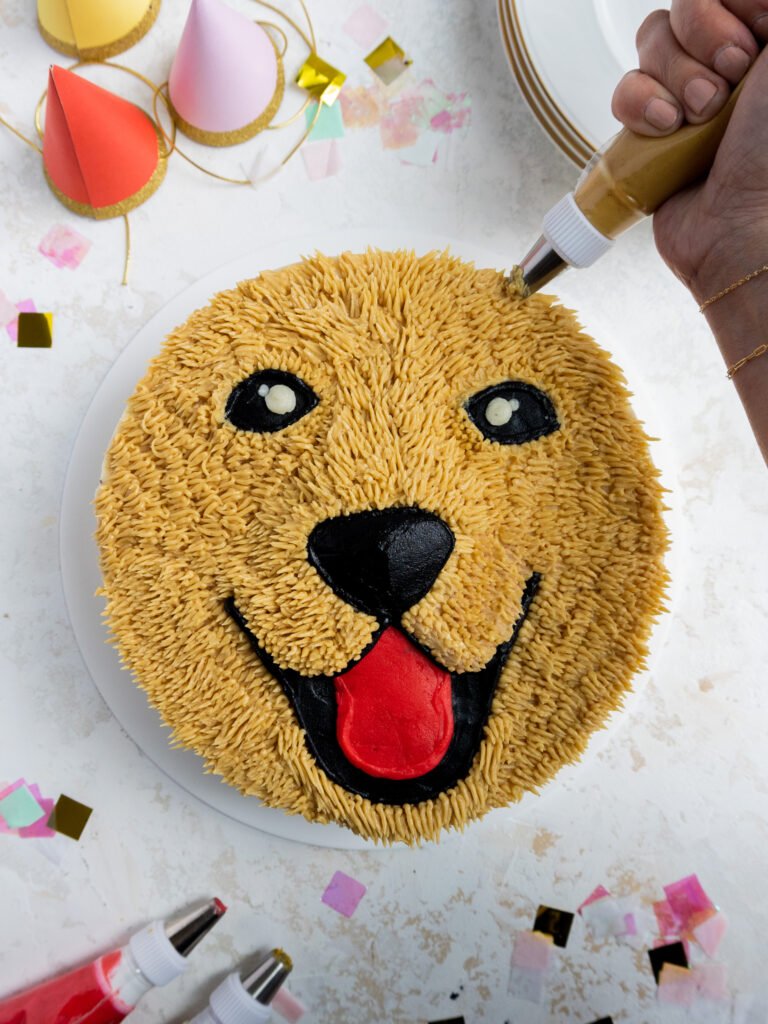
This can take a bit of time, so be patient and give your hand breaks as you go.
If you notice the heat from your hands is melting the frosting and changing its consistency, wrap the piping bag in a couple of layers of paper towel or in a thin kitchen towel.
Press two chocolate squares into the sides of the cake.
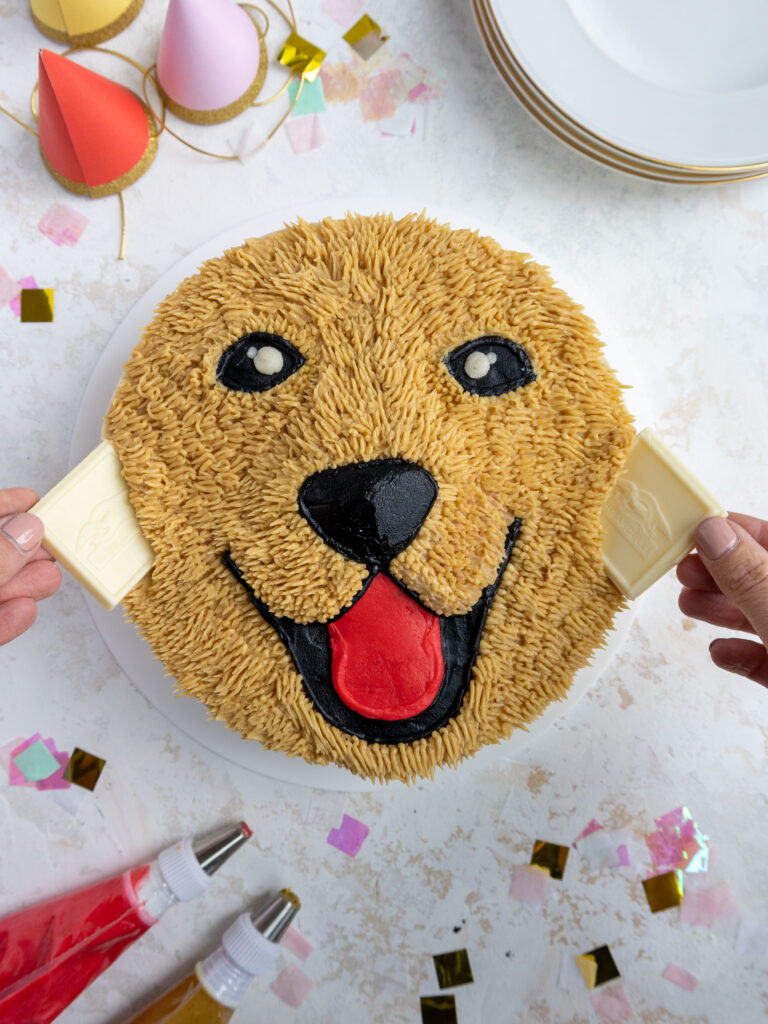
The positioning might look a little odd at first, but I promise it’ll look good once you pipe on the ears!
Cover the chocolate squares and edge of the cake with layers of tan buttercream to look like golden retriever ears. It takes quite a bit of buttercream to build up the ears and give them the right dimension, but the buttercream can get heavy if you add it all on at once!
I recommend piping a layer of buttercream, chilling the cake to let the frosting firm up, then adding another layer of frosting. Repeat until the ears are built up enough to outline the golden retriever’s face.

This cake can sit out at room temperature for up to 2 days, be stored in the fridge for up to a week, or be kept in the freezer for up to a month.
Substitutions and Swaps – Vanilla Cake Layers
This cake recipe uses quite a few ingredients and I know you might not have them all on hand. Or if you have food allergies or restrictions, I’ve got you covered.
Below are some swaps and substitutions that can be made in this cake recipe.
- All Purpose Flour – This recipe turns out best with AP flour, but you can use a gluten-free flour blend or cake flour if that’s all you have on hand.
- Granulated Sugar – I do not recommend reducing the amount of sugar or changing the type of sugar, as it will change the texture of the cake layers.
- Unsalted Butter – If you only have salted butter on hand, you can use it in place of the unsalted butter in this recipe. Just be sure to omit the salt that this cake recipe calls for. You can also use vegan butter in its place (and also omit the salt)!
- Egg whites – I use egg whites out of a carton to avoid wasting any yolks! You can also use 5 egg whites or 3 whole eggs if needed. Or if you have an egg allergy you can use flaxseed eggs or an egg replacer.
- Buttermilk – You can also use full fat yogurt, sour cream, whole milk, or an alternative yogurt or milk (almond, soy, oat) if you’re dairy free.
- Vegetable Oil – You can use any flavorless oil in this recipe. Canola or even sunflower oil would work great!
- Vanilla Extract – Other extracts can also be used in place of the vanilla extract. Feel free to use almond, lemon, or even coconut extract.
Substitutions and Swaps – Buttercream Frosting
- Unsalted Butter – If you only have salted butter on hand, you can use it in place of the unsalted butter. Just be sure to omit the salt that this frosting recipe calls for. You can also use vegan butter in its place!
- Heavy Cream – Whole milk or alternative milk (soy, almond, oat) will work fine in this frosting recipe too.
- Vanilla Extract – Other extracts can also be used in place of the vanilla extract.
- Food Coloring – I highly recommend using gel food coloring to color the frosting. It gives the buttercream a vibrant color without throwing off the consistency of the frosting.
Making This Golden Retriever Cake in Advance and Storage Tips
You can make these cake layers in advance and freeze them. This breaks the process up and makes it more approachable. Cake layers can be wrapped and stored in the freezer for up to a month.
You can also make the frosting ahead of time or save any leftover frosting! It can be stored in piping bags or an airtight container in the fridge for up to a month, or in the freezer for up to 3 months.
If you store it in a large container, be sure to give it a good stir once it thaws to get the consistency nice and smooth again.
This cake can sit out at room temperature for up to 2 days or be stored in the fridge for up to 5 days.
Tips for Making the Best Golden Retriever Cake:
- Properly measure the flour (spoon it into the cup measure, then level) or use a kitchen scale to weigh it.
- Ingredients at room temperature mix together better. Set out any cold ingredients ahead of time.
- Chill the cake layers in the freezer for about 15 minutes before assembling the cake. This makes it a lot easier to stack and frost.
- I used piping bags to decorate this cake, but you can also use Ziplock bags if you don’t have piping bags! I recommend using the freezer type because they’re a bit sturdier. Cut a 1 cm hole in the corner of each.
- If you notice the heat from your hands is melting the frosting and changing its consistency, wrap the piping bag in a couple of layers of paper towel or in a thin kitchen towel.
- Use gel food coloring to color the buttercream. It creates vibrant colors without throwing off the consistency of the buttercream.
- Make a vegan or dairy free golden retriever cake if needed! Use your favorite type of dairy free milk to replace the buttermilk and heavy cream and use vegan butter sticks in place of the butter. For the eggs, I recommend using an egg replacer like this.
Making this Golden Retriever Cake in Different Sizes
One batch of batter can also be used to bake 3, 6-inch cake layers, or 1, 9- or 10-inch cake layer.
You can also use this recipe to bake a 9×13-inch sheet cake! Bake for 30-40 minutes at 350 F / 175 C.
Let Me Know What You Think!
If you try this golden retriever cake recipe, I’d love to hear what you think of it! Please leave a rating and comment below.
And don’t forget to tag me @chelsweets and use the #chelsweets on social media so that I can see your amazing creations!
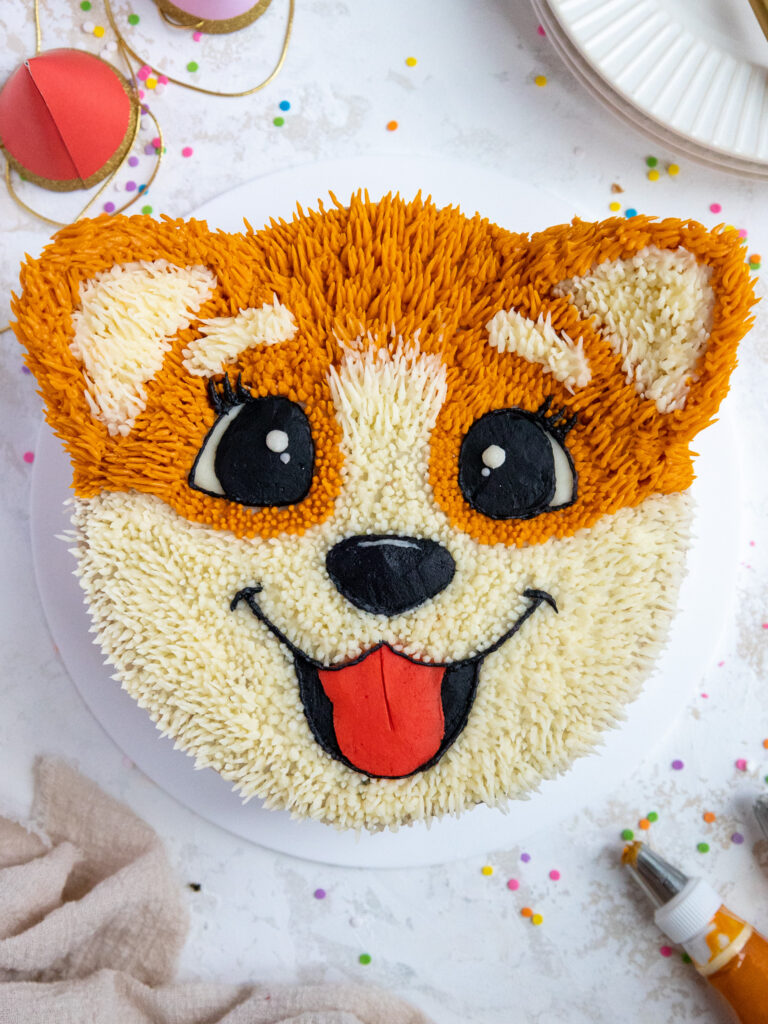
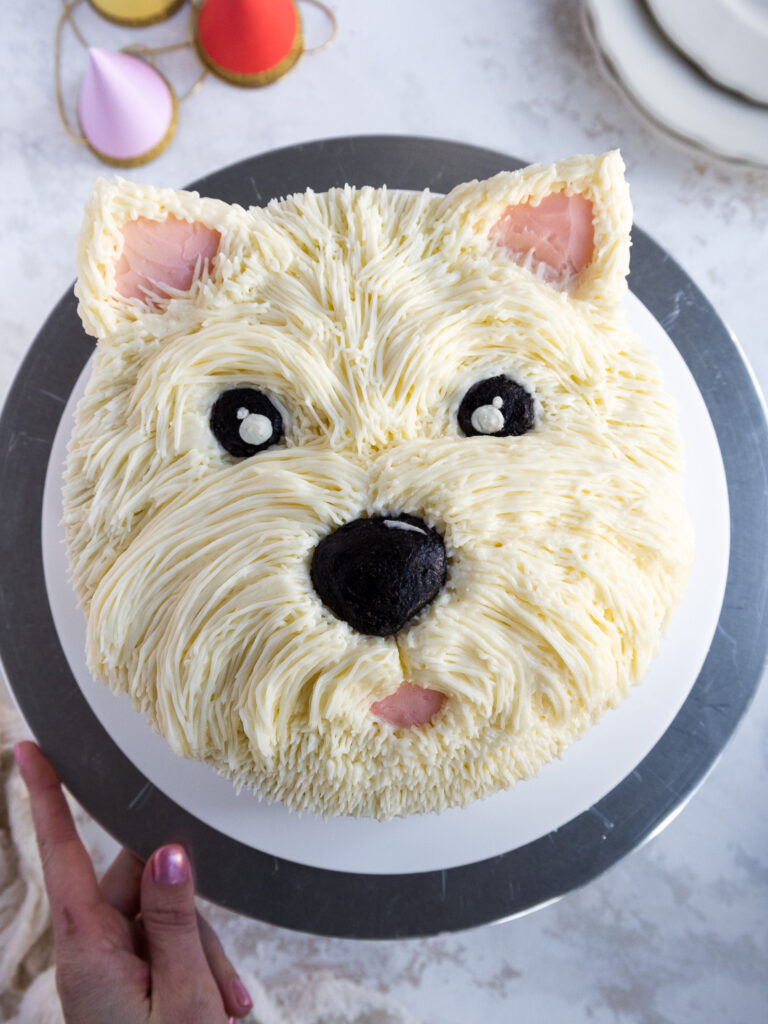
Other Recipes You Might Like:

Golden Retriever Cake
Ingredients
Vanilla Cake
- 2 cups + 2 Tbsp all-purpose flour 270g
- 2 cups granulated sugar 400g
- 1 1/2 tsp baking powder 6g
- 1/2 tsp fine salt 3g
- 2/3 cup (1 1/3 sticks) unsalted butter, room temperature 150g
- 2/3 cup carton egg whites or 5 large egg whites, room temperature 155g
- 1 cup buttermilk, room temperature 240g
- 1 Tbsp vegetable or canola oil 14g
- 1 tsp vanilla extract or vanilla bean paste 4g
- gel food coloring if desired
Vanilla Buttercream Frosting
- 2 cups unsalted butter, room temperature 452g
- 7 cups powdered sugar 907g or a 2 lb. bag
- 1/3 cup heavy whipping cream, room temperature 80g
- 1 Tbsp vanilla extract or vanilla bean paste 12g
- 1/2 tsp fine salt 3g
- 1 tsp unsweetened cocoa powder, sifted 4g
- yellow gel food coloring
Recommend Equipment
- Two 8-inch cake pans
- Serrated Knife
- Offset Spatula
- 3 Small Piping Bags
- 1 Large Piping Bag
- 1 Plastic Coupler
- 2 Small Round Piping Tips like a Wilton 10
- 1 Small Grass Piping Tips like a Wilton 233
- 2 Very Small Round Piping Tips like a Wilton 3
- Small Acetate Sheet I cut these down into smaller squares with scissors
- Gel Food Coloring – Yellow, Red, and Black
- 2 Large Chocolate Squares
- Electric Hand Mixer or Stand Mixer
Instructions
Vanilla Cake Layers:
- Preheat oven to 350°F / 175°C. Line two 8-inch pans with parchment rounds and grease with non-stick baking spray.
- Mix together 2 cups + 2 Tbsp all-purpose flour, 2 cups granulated sugar, 1 1/2 tsp baking powder, and 1/2 tsp salt in a large bowl. Use a stand mixer with a paddle attachment or hand mixer to mix on a low speed until combined.
- Mix in 2/3 cup (1 & 1/3 stick) unsalted butter slowly into the dry mix, on a medium-low speed. Continue to mix until no large chunks of butter remain, and the mixture becomes crumbly.
- Pour in 2/3 cup or 5 large egg whites and mix on low until just incorporated and the batter looks wet.
- Mix in 1 cup of buttermilk, 1 Tbsp of vegetable oil, and 1 tsp vanilla extract on a low speed. Scrape the sides and bottom of the bowl as needed with a rubber spatula, then beat on a medium speed for about 30 seconds to make sure everything is properly mixed together. This also helps lighten the texture of the cake layers a bit.
- Divide batter evenly between the prepared cake pans. I like to use a digital kitchen scale to weigh my pans and ensure they all have the same amount of batter. This guarantees the layers will bake up to be the same height.
- Bake for 33-35 minutes, or until a toothpick comes out with a few moist crumbs. Let the pans cool for 10 minutes, then run a small offset spatula around the perimeter of the pan to separate the cake from the pan.
- Once the layers are fully cooled, carefully flip the pans, and remove the layers. Use a serrated knife to level the top of the layers right before you plan to assemble your cake.
Vanilla Buttercream Frosting:
- While the cake layers bake and cool, make the vanilla buttercream frosting.
- Beat 2 cups of unsalted butter on a medium speed for 30 seconds with a paddle attachment or hand mixer until smooth.
- Gradually mix in 7 cups of powdered sugar and 1/4 cup of heavy cream on a low speed. Scrape the sides and bottom of the bowl as needed with a rubber spatula.
- Once the frosting is fully mixed and smooth, add 1 Tbsp of vanilla extract and 1/2 tsp salt. Mix on the lowest speed for a couple of minutes to help make the frosting silky smooth.
- If the frosting seems too thick, add additional cream (1 teaspoon at a time). If the frosting is too thin, add more powdered sugar (a quarter of a cup at a time). If you're unsure how thick your frosting should be, you can learn what consistency you're looking for in my frosting consistency post.
- Wait to color the buttercream until the cake is filled and crumb-coated. Cover the frosting flush with plastic wrap to prevent crusting, then set aside.
Assembling This Cake:
- Stack and frost the cake layers on a greaseproof cake board or flat plate using a dab of frosting to help stick the first cake layer to the board.
- Spread an even layer of buttercream between the cake layers with a large offset spatula. Place the top cake layer upside down to make it easier to get sharp corners.
- Add a thin coat of frosting around the cake to fully cover the cake layers. Smooth using a bench scraper, then chill the cake in the fridge (20 minutes) or freezer (10 minutes) until the frosting is firm to the touch.
Coloring the Buttercream Frosting:
- While the cake chills, color the remaining buttercream.
- Scoop 1/3 cup of uncolored buttercream into a piping bag fit with a small, round piping tip (like a Wilton 3). Seal the top of the bag with a rubber band or clip. Set aside.
- Color 2 Tbsp of buttercream red with gel food coloring. Place the frosting into a piping bag fit with a small, round piping tip (like a small, round piping tip (like a Wilton 10). Seal the top of the bag with a rubber band or clip. Set aside.
- Color 1/3 cup of buttercream black with gel food coloring. Place the frosting into a piping bag fit with a coupler and a small, round piping tip (like a Wilton 10), and seal the top of the bag with a rubber band or clip. Set aside.
- Color the remaining buttercream a golden tan color by mixing in 1 tsp of cocoa powder and a very small drop of yellow gel food coloring. Mix until combined and evenly colored. Place the frosting in a large piping bag fit with a small grass piping tip (like a Wilton 233). Seal the top of the bag with a rubber band or clip. Set aside.
Decorating This Golden Retriever Cake:
- Use a toothpick or scribe to trace out where you want to pipe the golden retriever's face. This helps ensure that its face will be even and properly spaced out.
- Pipe white buttercream on the muzzle/nose of the golden retriever to create a small mound and smooth using an offset spatula. This helps give the face a bit of depth.
- Then use the black, red, and white buttercream to pipe on the golden retriever's eyes, mouth, and nose like in the pictures above. Use a small, round tip (Wilton 10) to pipe on the pupils and nose, and a very small, round tip (Wilton 3) to pipe on the smile lines.
- Cover in the rest of its face and the sides of the cake with tan buttercream fur using a small grass piping tip. Be mindful of what direction you pipe the fur in. I tried to pipe it in different directions to follow the natural flow of fur on a golden retriever's face and to give the cake a bit more dimension. This can take a bit of time, so be patient and give your hand breaks as you go. If you notice the heat from your hands is melting the frosting and changing its consistency, wrap the piping bag in a couple of layers of paper towel or a thin kitchen towel.
- Press two, large chocolate squares (at least 1.5 x 1.5 inches) into the top edge of the cake at a slight angle (see picture above for positioning). Cover them with layers of tan buttercream to look like golden retriever ears. It takes quite a bit of buttercream to build up the ears and give them the right dimension, but it can get heavy if you add it all on at once! I recommend piping a layer of buttercream, chilling the cake to let the frosting firm up, then adding another layer of frosting. Repeat until the ears are built up enough to outline the golden retriever's face.
- Once the ears are on, use some of the remaining buttercream to pipe a bit more buttercream fur above the eyes, underneath the mouth/on the chin, and around the nose to give the cake a little more dimension. Then enjoy!
Video
Notes
Tips for Making the Best Golden Retriever Cake
- Properly measure the flour (spoon into the cup measure, then level) or use a kitchen scale.
- Make sure the ingredients are at room temperature to help them mix together better.
- Wait to level the cake layers until they are completely cooled.
- Make sure the buttercream is the right consistency. This will make the cake much easier to decorate.
- Use gel food coloring to color the buttercream. It creates vibrant colors without throwing off the consistency of the buttercream.
- If you notice the heat from your hands is melting the frosting and changing its consistency, wrap the piping bag in a couple of layers of paper towel or in a thin kitchen towel.
- If your cake layers turn out less than perfect, read my cake troubleshooting guide to see where things might've gone awry.
I’d like to make this cake. I’m wondering about the ears. Are you recovering the side of the cake along with the two chocolate pieces. Is there a video of the ears being iced?
Thank you in advance for more details on doing the ears.
Hi Helene,
I do cover the sides of the cake with frosting, but you don’t have to! I just piped it into kind of a mound to give it a little bit more depth. This video shows the process a bit but is super short: https://www.instagram.com/p/Cn93kTzp1ht/
Sorry I don’t have a longer video! Hope that helps, happy baking!
I used your icing design and decorating tips and found them very helpful, especially the idea of carving the face into the crumb coat with a toothpick.
However, like the other commenter mentioned, I found the written and video directions for the ears not detailed enough and therefore difficult to follow. Press the chocolate squares into the cake… On the sides? On the top? At an angle? I think this is the first place I fell off track.
Then cover the chocolate to look like ears… I kept layering and layering, in different directions from the rest of the “fur,” and I still found the ears very unconvincing, not at all like your photo. It’s a shame because the rest of the cake decor, thanks to your directions, turned out beautifully.
I could really use some additional guidance!
Hi Ellie,
I’m so sorry about that!! In the pictures in the blog post there is a photo showing how I press the chocolate squares into the cake and at what angle, which I think will help clarify some of your questions. I’ve also updated the recipe card to share more details on how to add the frosting to the ears.
It takes quite a bit of buttercream to build up the ears and give them the right dimension, but the buttercream can get heavy if you add it all on at once! I recommend piping a layer of buttercream, chilling the cake to let the frosting firm up, then adding another layer of frosting. Repeat until the ears are built up enough to outline the golden retriever’s face.
I hope that helps for the future, happy baking!
Made this golden retriever cake for my grandsons second birthday and it was a hit! I traveled with all my pans and cake tools to Texas to make it..I had one day and it is a little tricky! My grass tip didn’t work that well and I wish I had put a base coat of the red yellow fur frosting first..but I made it work and everyone was very impressed. Especially my grandson!
Omg that is so much dedication!!! You have one lucky grandson 🙂 Thank you for sharing Carole!!
I made this one, with whipped cream… i liked the result, i wonder if i can post a picture here of my cake ? Thank you for the tutorial, made this on my golden’s birthday!
Ugh I wish we could share picture on here, but the technology isn’t quite set up for it for some reason! I’d love to see it, I bet it turned out amazing!!!
Can I use your cream cheese frosting to decorate this cake?
You absolutely can! My cream cheese frosting is pretty firm so it will work just fine for all the piping on this cake. Hope that helps, and that your cake turns out amazing 🙂