
Berry Chantilly Cake
I’ve wanted to make a berry Chantilly cake for the longest time, and this Spring I finally got around to it!!
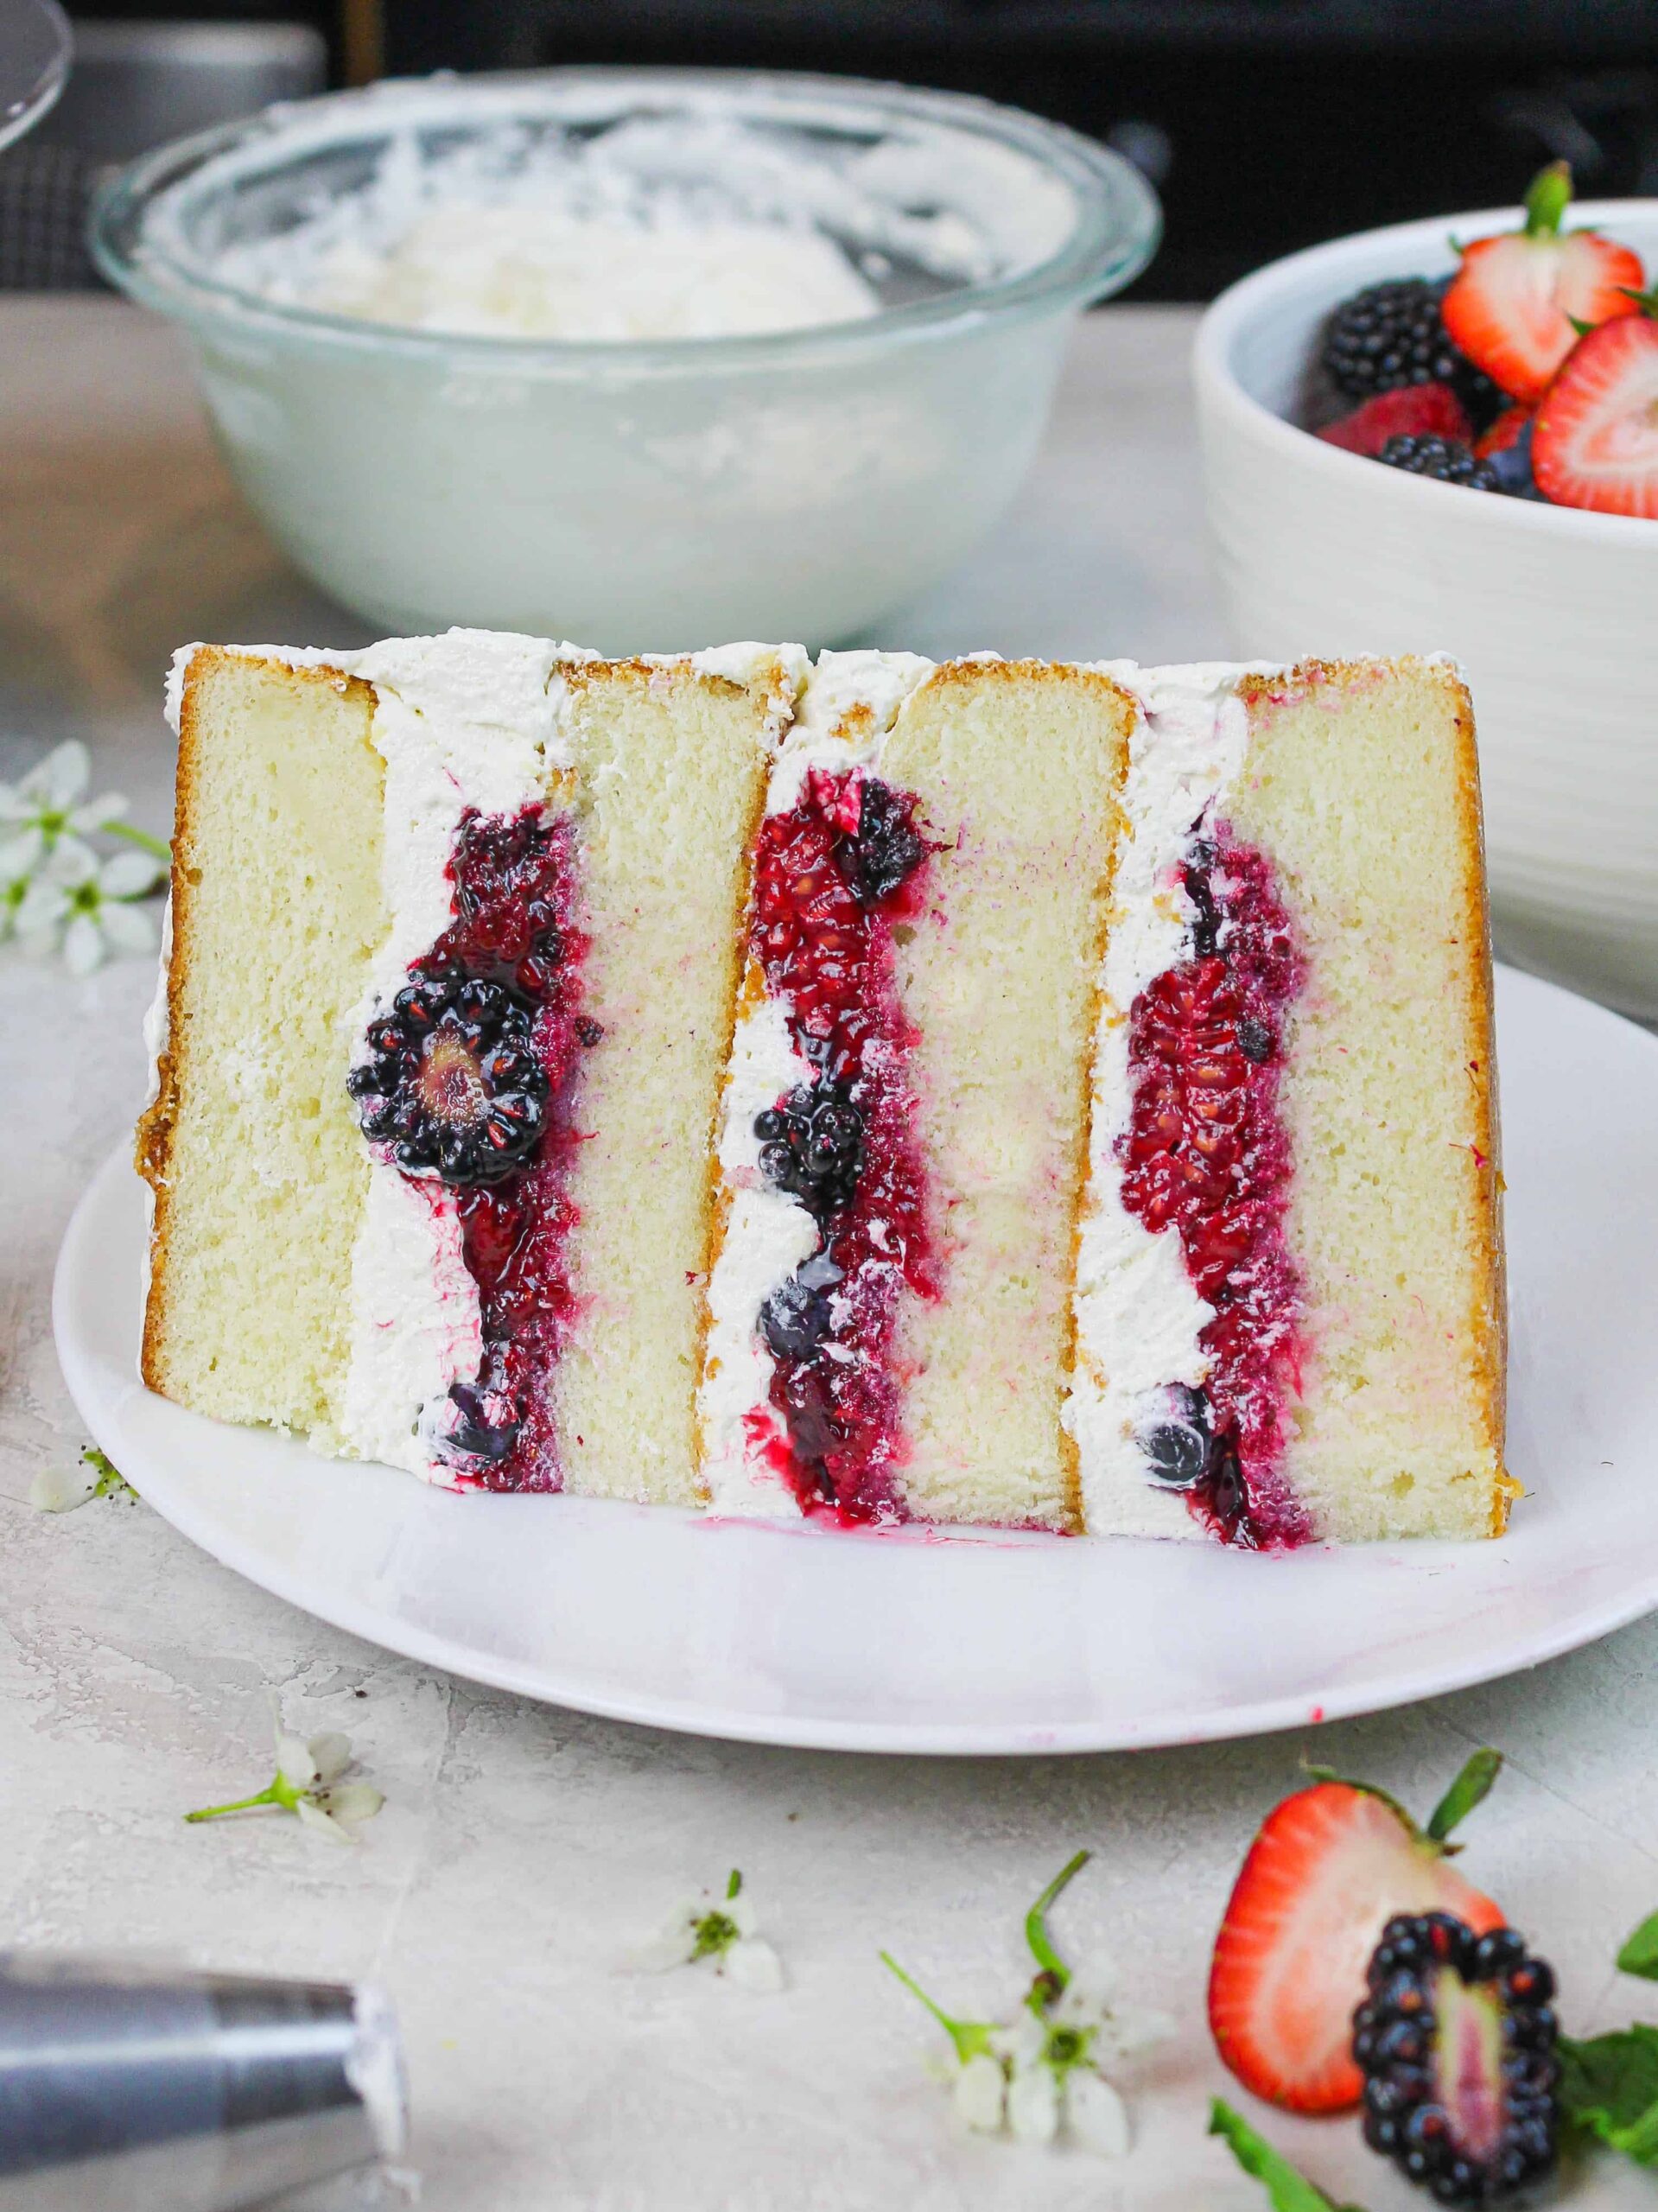
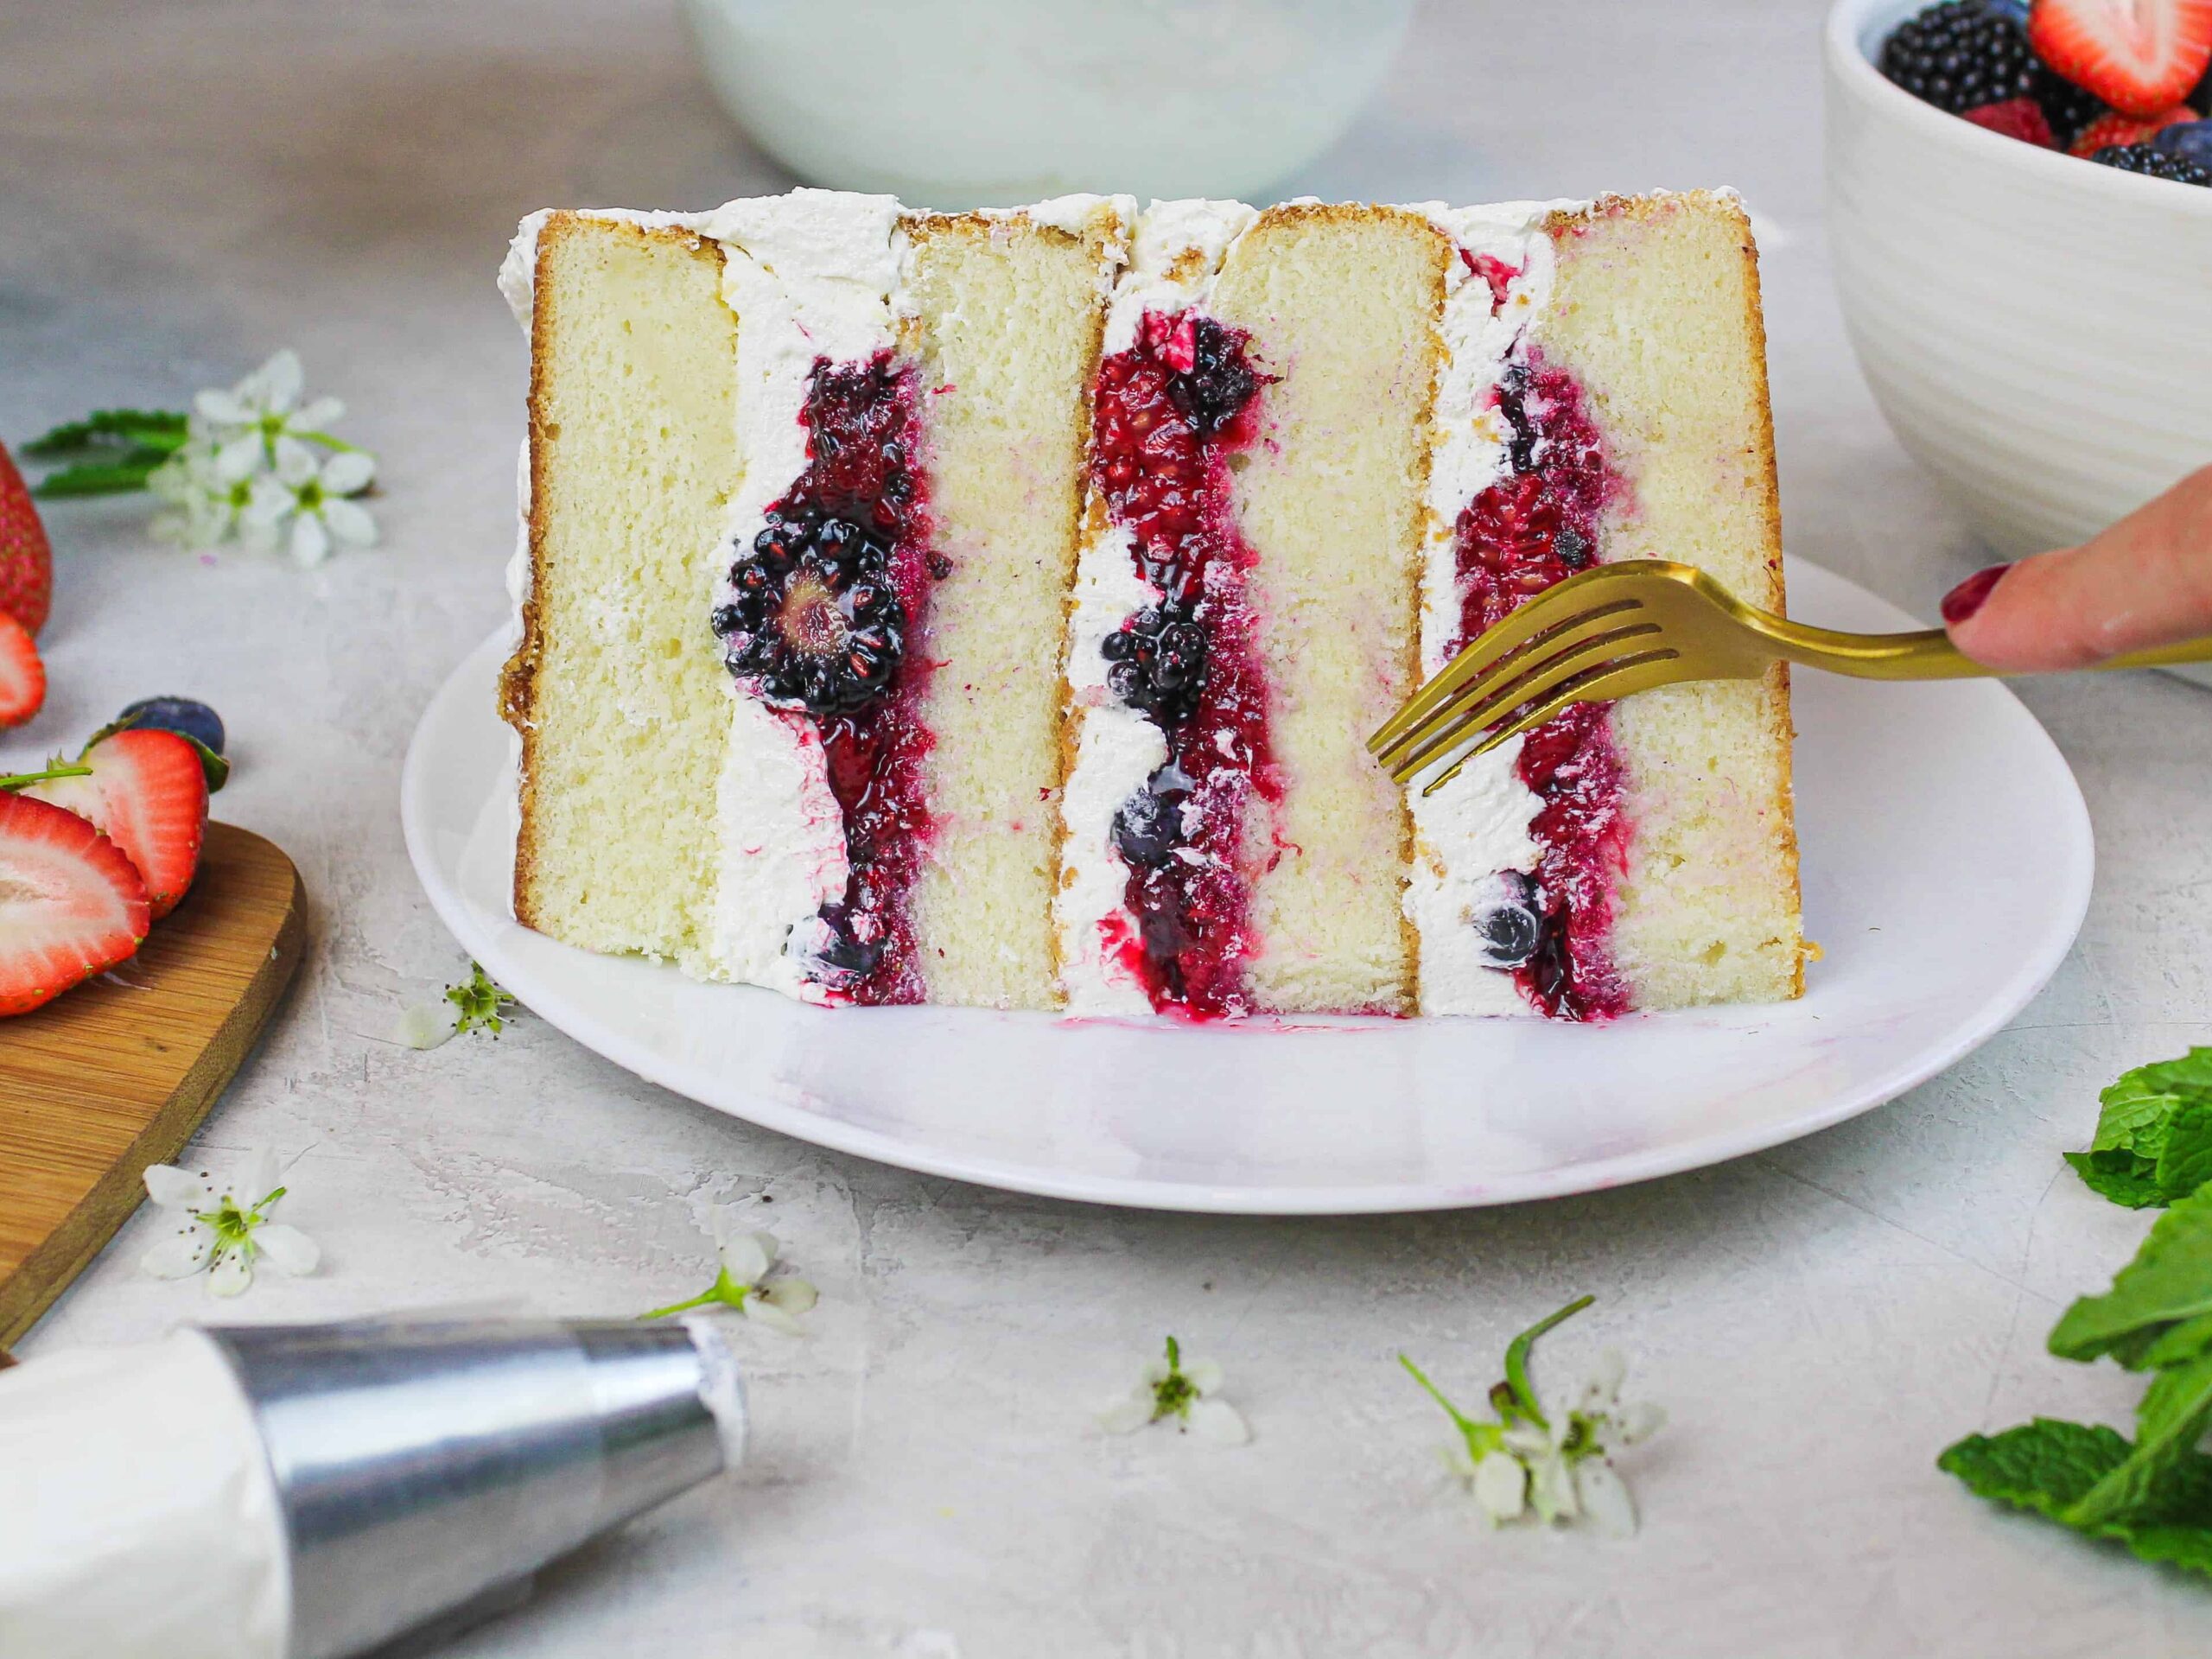
Berry Chantilly cakes are usually made with soft white cake layers, frosted with a Chantilly cream, and filled with loads of fresh berries. Sounds pretty incredible, right??
It’s a crowd favorite, with over a hundred 5-star reviews!! Including the one below:

The Trick to Making This Mixed Berry Cake Filling
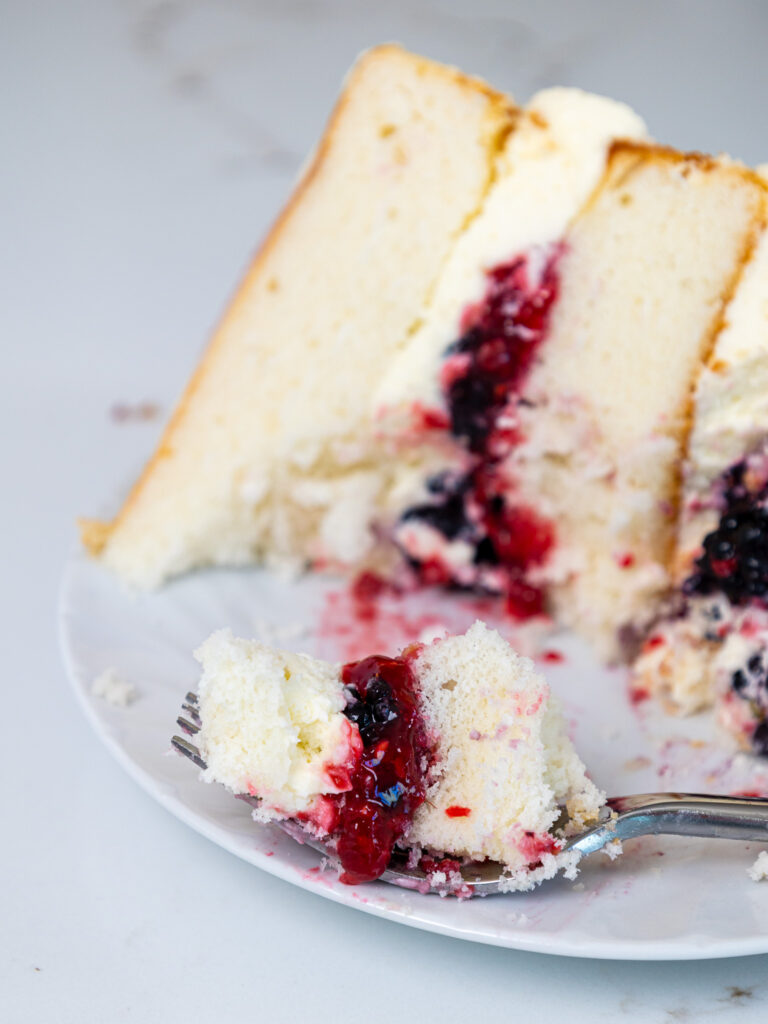
My favorite part of this cake is the mixed berry cake filling. It’s packed with flavor and adds so much flavor to this cake.
While you could just add fresh berries between the cake layers, I find that cooking down a mixture of berries with sugar and a touch of lemon really concentrates the flavor.
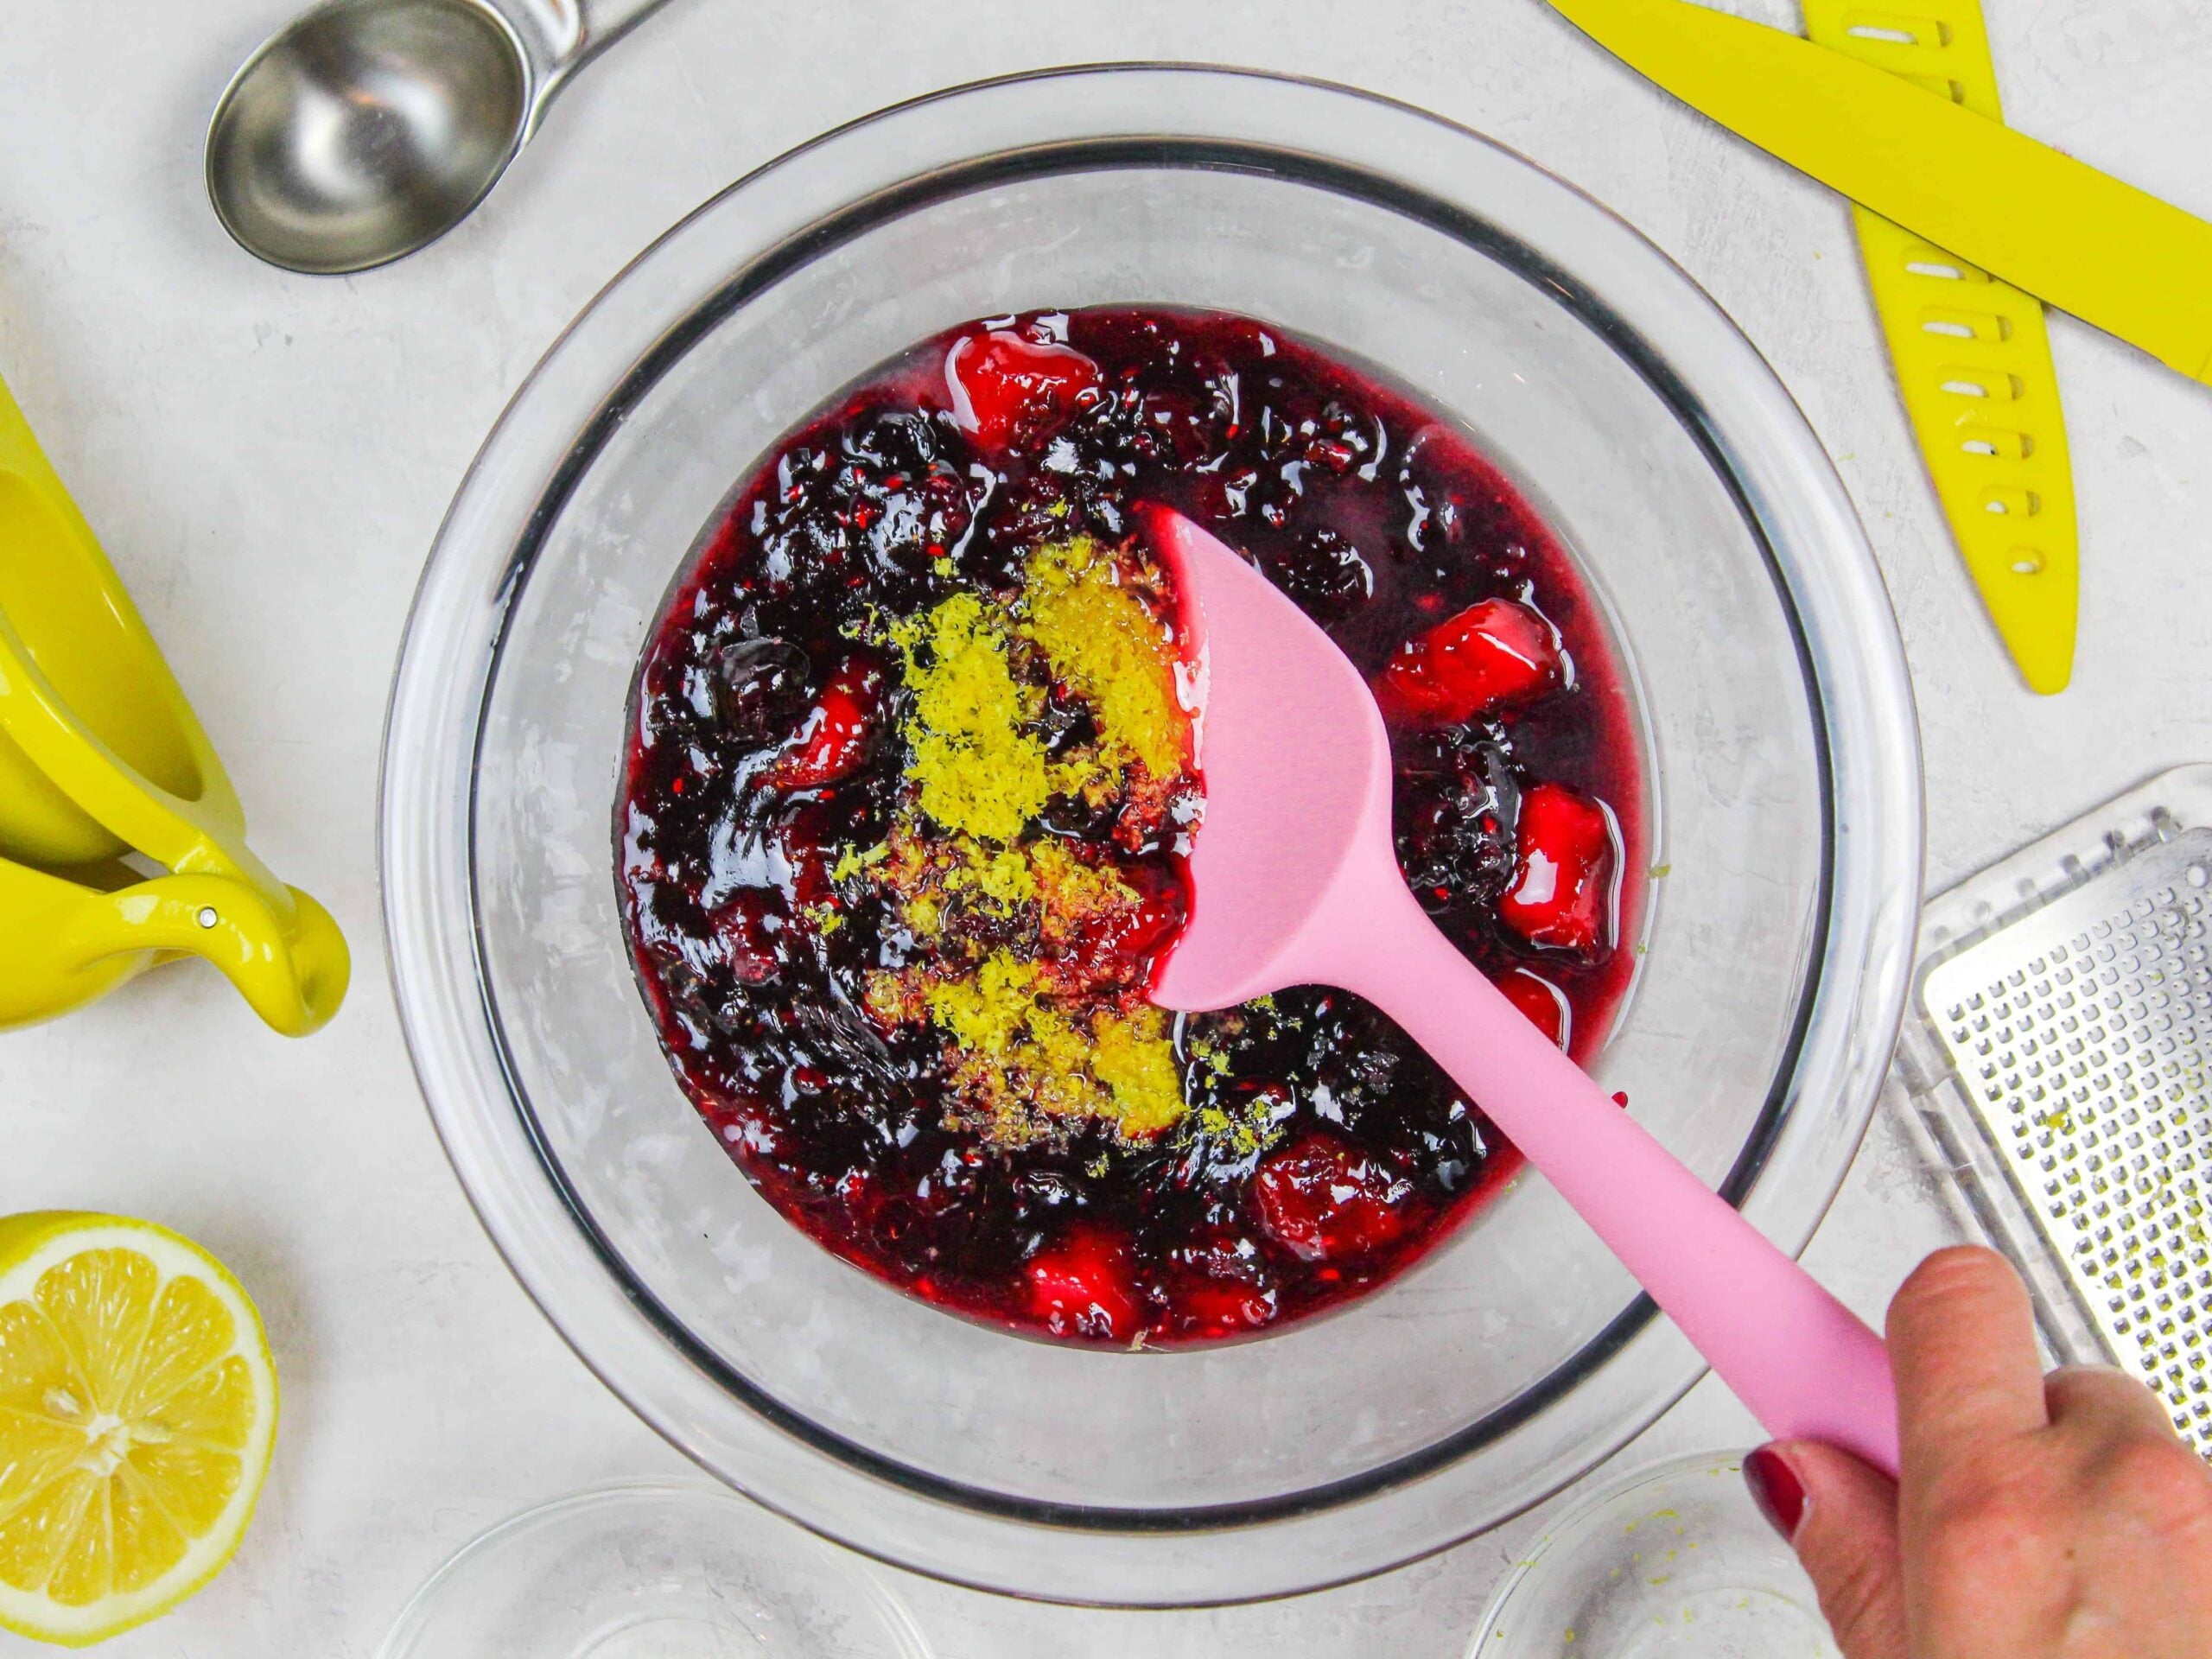
To help thicken the filling, I like to add a slurry of cornstarch and water. It makes it so much easier to add the filling between the cake layers.
This also prevents the juices from seeping out of the cake once it’s assembled.
I love berries so much that I actually pressed fresh berries on top of the filling before covering it with frosting! This adds another layer of texture to this cake, which I am a huge fan of.
The Importance of Leveling Your Cake Layers
Usually, I say that leveling your cake layers is optional. Most of my cake recipes bake up pretty flat, so it is possible to assemble your cake without trimming the tops.
However, I highly recommend leveling your cake layers for two reasons.
The first reason is that by removing the caramelization from the top of the cake layer, you allow your cake layers to soak up that delicious berry filling!!
The second reason is that this cake ends up being super tall! Leveling your cake layers makes it a lot easier to stack your cake layers. It also makes the cake more stable.
My Spin on This Whipped Cream Frosting
Chantilly cream is usually made with a stabilized whipped cream base, and that’s exactly what we make with this recipe!
This recipe uses cream cheese to stabilize the whipped cream and give it an incredible flavor.
The end result is a fluffy, perfectly balanced whipped frosting that pairs perfectly with the ripe berries.
Decorating This Berry Chantilly Cake
The last thing to consider about this cake is how you want to decorate it!
I wanted to decorate this cake in an elegant yet simple way that lets the ingredients in this cake be the star of the show.
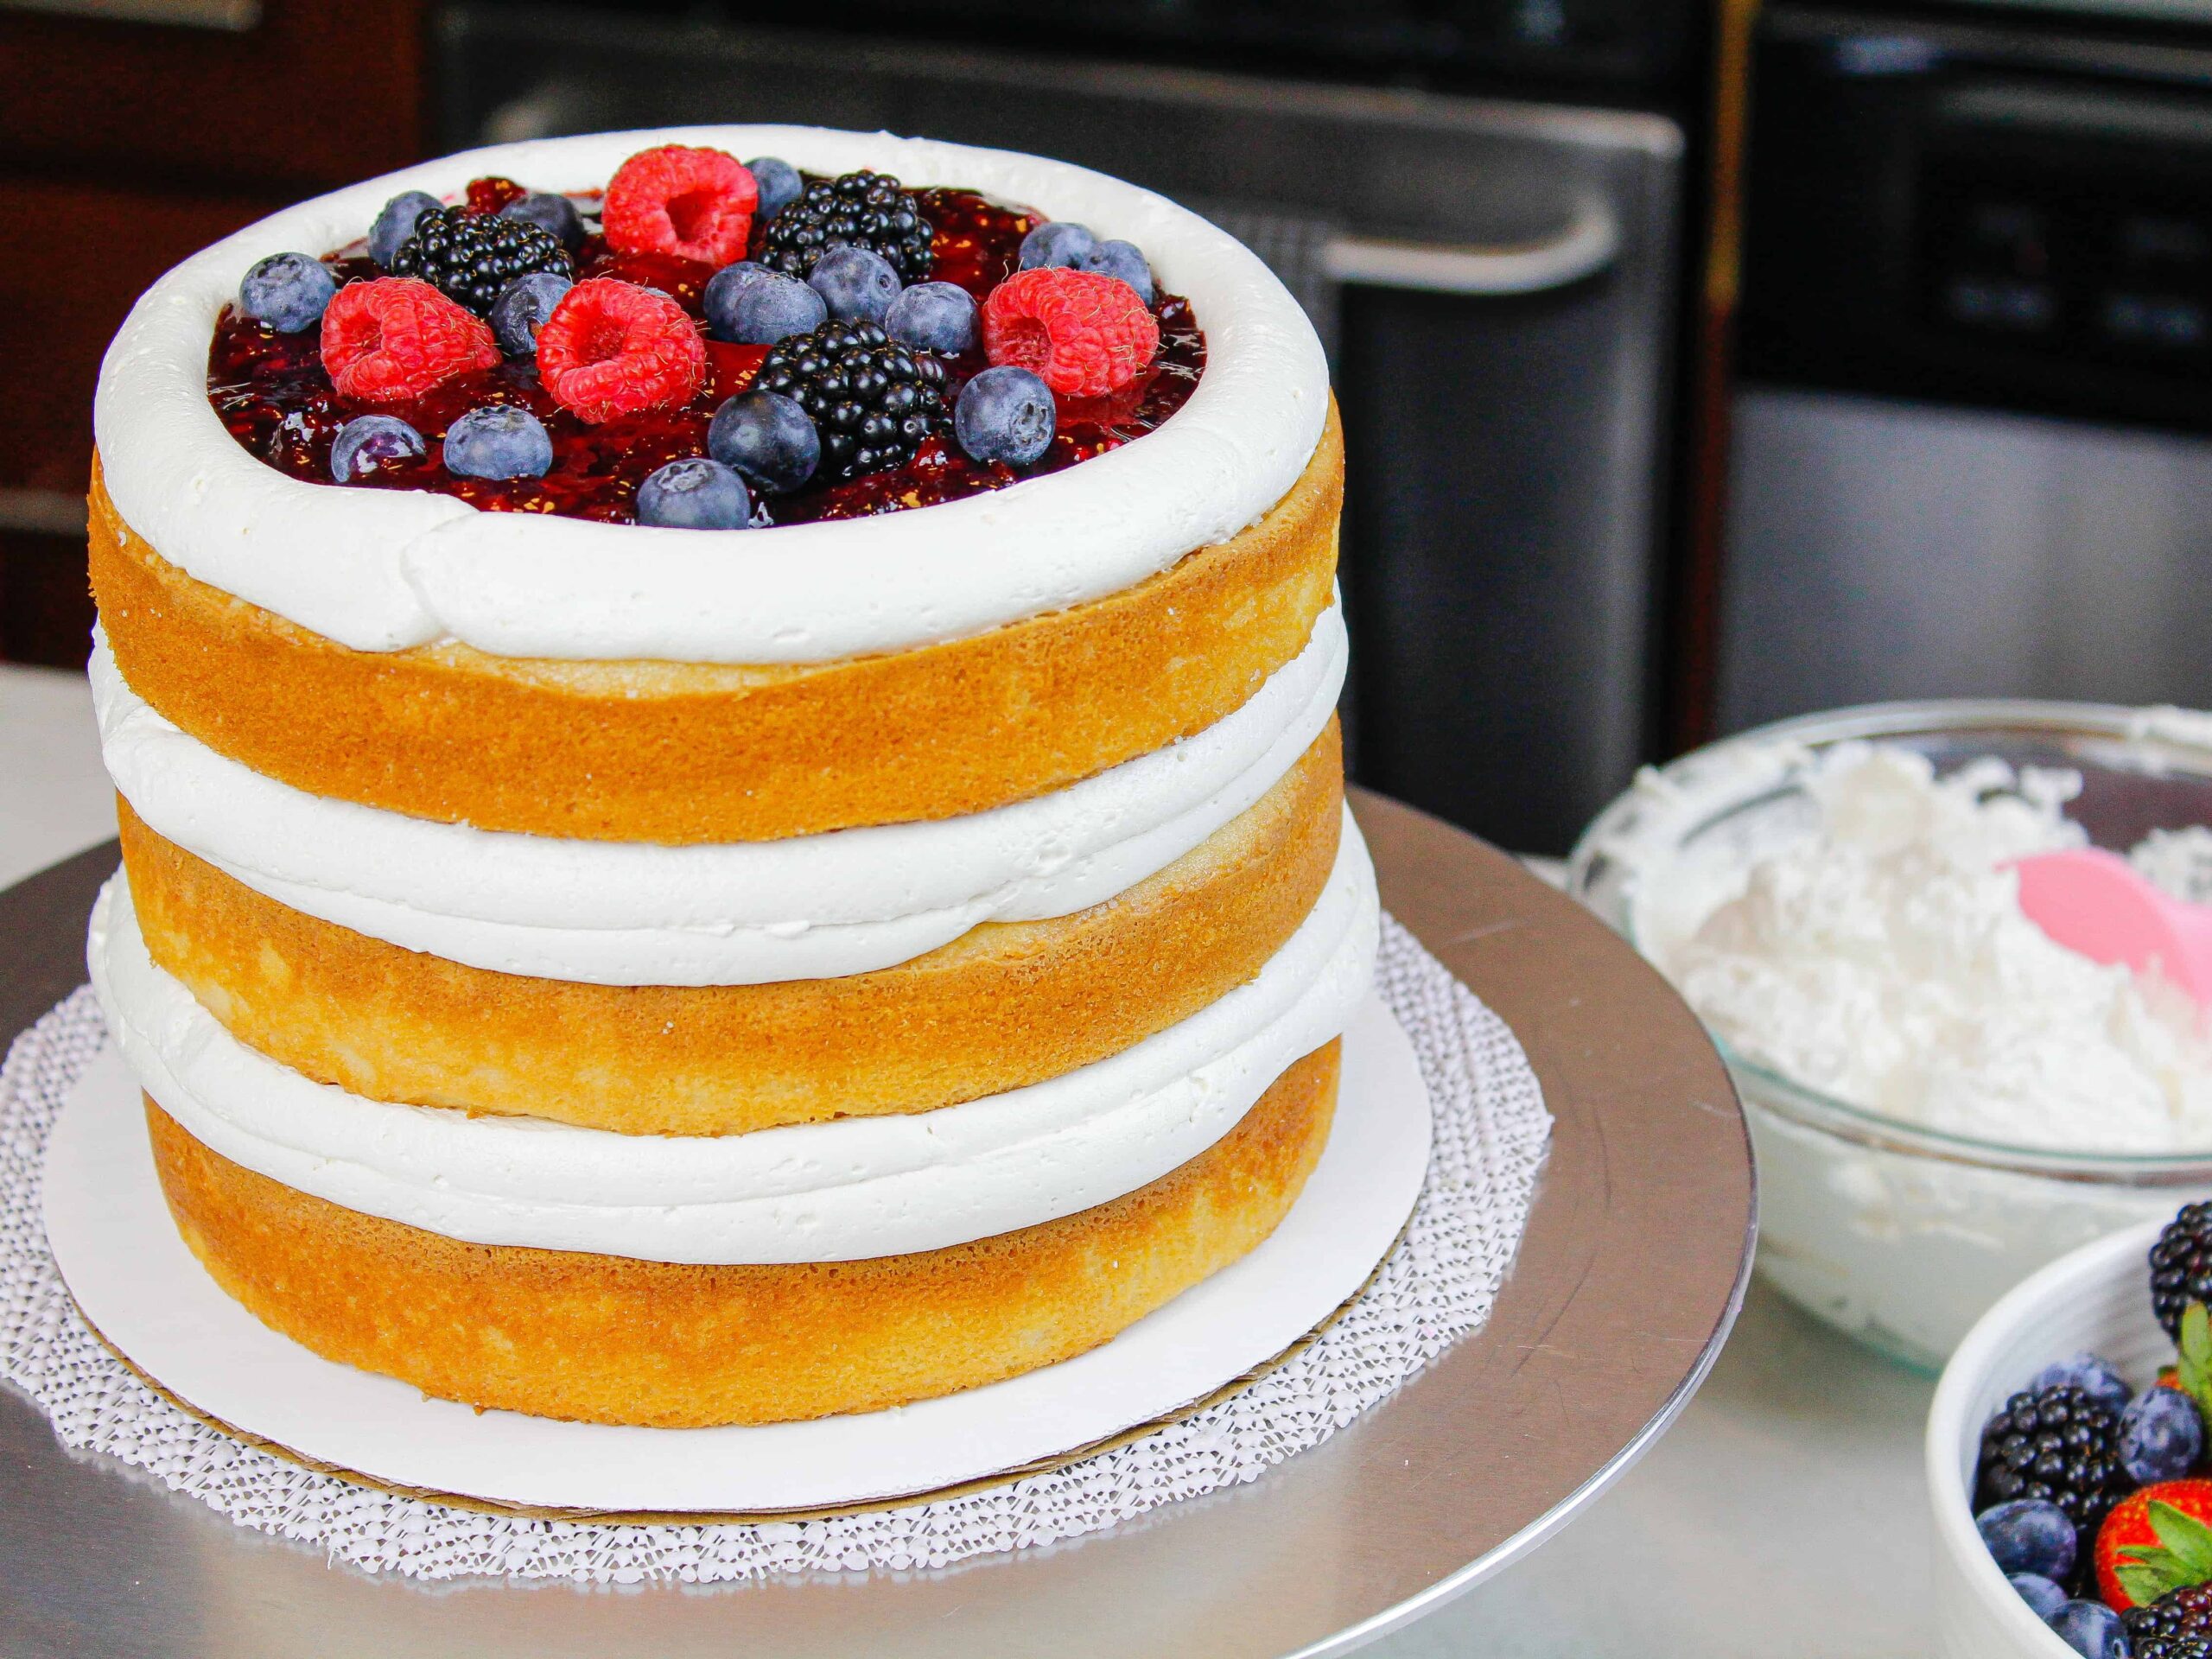
I chose to decorate this cake in a semi-naked style. This lets those delicious vanilla cake layers peek through the frosting!
With that in mind, I decided to pile the same fresh berries that were used in my cake filling on top of this cake.
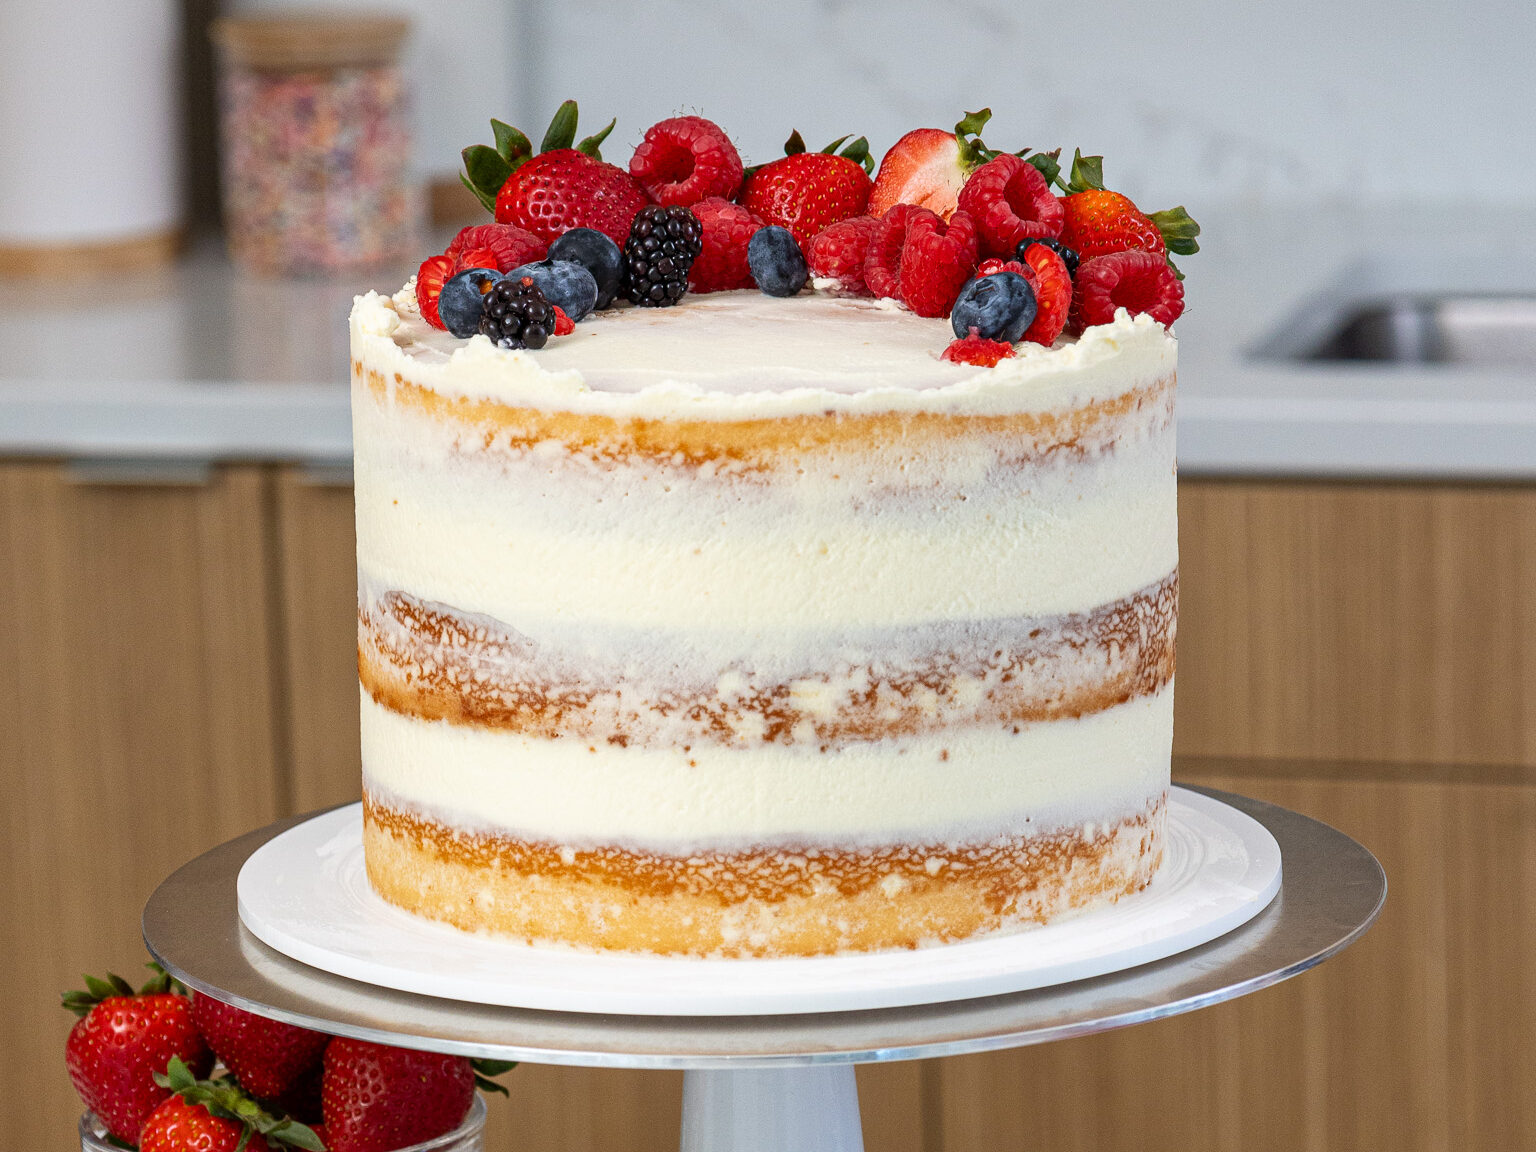
You can decorate this cake however you like, but I swear sometimes all you need are some fresh berries!
Substitutions and Swaps – Vanilla Layers
This recipe uses quite a few ingredients, and I know you might not have them all on hand. Or if you have food allergies or restrictions, I’ve got you covered.
Below are some swaps and substitutions that can be made in this cake recipe.
- Cake Flour – This recipe turns out best with cake flour, but you can use a gluten-free flour blend if needed or all-purpose flour if that’s all you have on hand.
- Granulated Sugar – I do not recommend reducing the amount of sugar because it will change the texture of the cake layers.
- Unsalted Butter – If you only have salted butter on hand, you can use it in place of the unsalted butter in this recipe. Just be sure to omit the salt that this cake recipe calls for. You can also use vegan butter in its place (and also omit the salt)!
- Egg whites – I like to use the pasteurized egg whites that come in a carton, but you can also use 7 fresh egg whites or 4 whole, large eggs. If you have an egg allergy, you can try using flaxseed eggs or an egg replacer.
- Sour Cream – You can also use full-fat yogurt, buttermilk, whole milk, or an alternative yogurt or milk (almond, soy, oat) if you’re dairy free.
- Vegetable Oil – Any flavorless oil can be used in this recipe. Canola or even sunflower oil would work great!
Substitutions and Swaps – Whipped Cream Frosting
- Heavy Cream – Light or heavy whipping cream will both work in this recipe, but I prefer heavy whipping cream (36-40% fat).
- Cream Cheese – The full-fat version that comes in a block works best. I highly recommend using Philadelphia for the best results. Avoid organic cream cheese as it has different stabilizers, which make it harder to whip up.
Making this Berry Chantilly Cake in Different Sizes
One batch of batter is about 1800g or 10 cups, so I add roughly 600g to each of my cake pans when using 3, 8-inch cake pans.
You can also use one batch of batter to make 2, 9-inch cake layers or 4, 6-inch cake layers. Bake time will be a few minutes longer at 350°F/175°C.
If you want to make a tiered cake with this recipe, check out my cake batter calculator to see how many batches of batter you’ll need.
If you want to make berry chantilly cupcakes, bake them at 350°F/175°C for 18-21 minutes. One batch of batter will make about 3 dozen cupcakes (yield will vary based on the size of your liners).
Tips for Making the Best Berry Chantilly Cake
- Properly measure your flour (spoon into the cup measure, then level) or use a kitchen scale to measure your dry ingredients.
- Ingredients at room temperature mix together better. Set out any cold ingredients ahead of time.
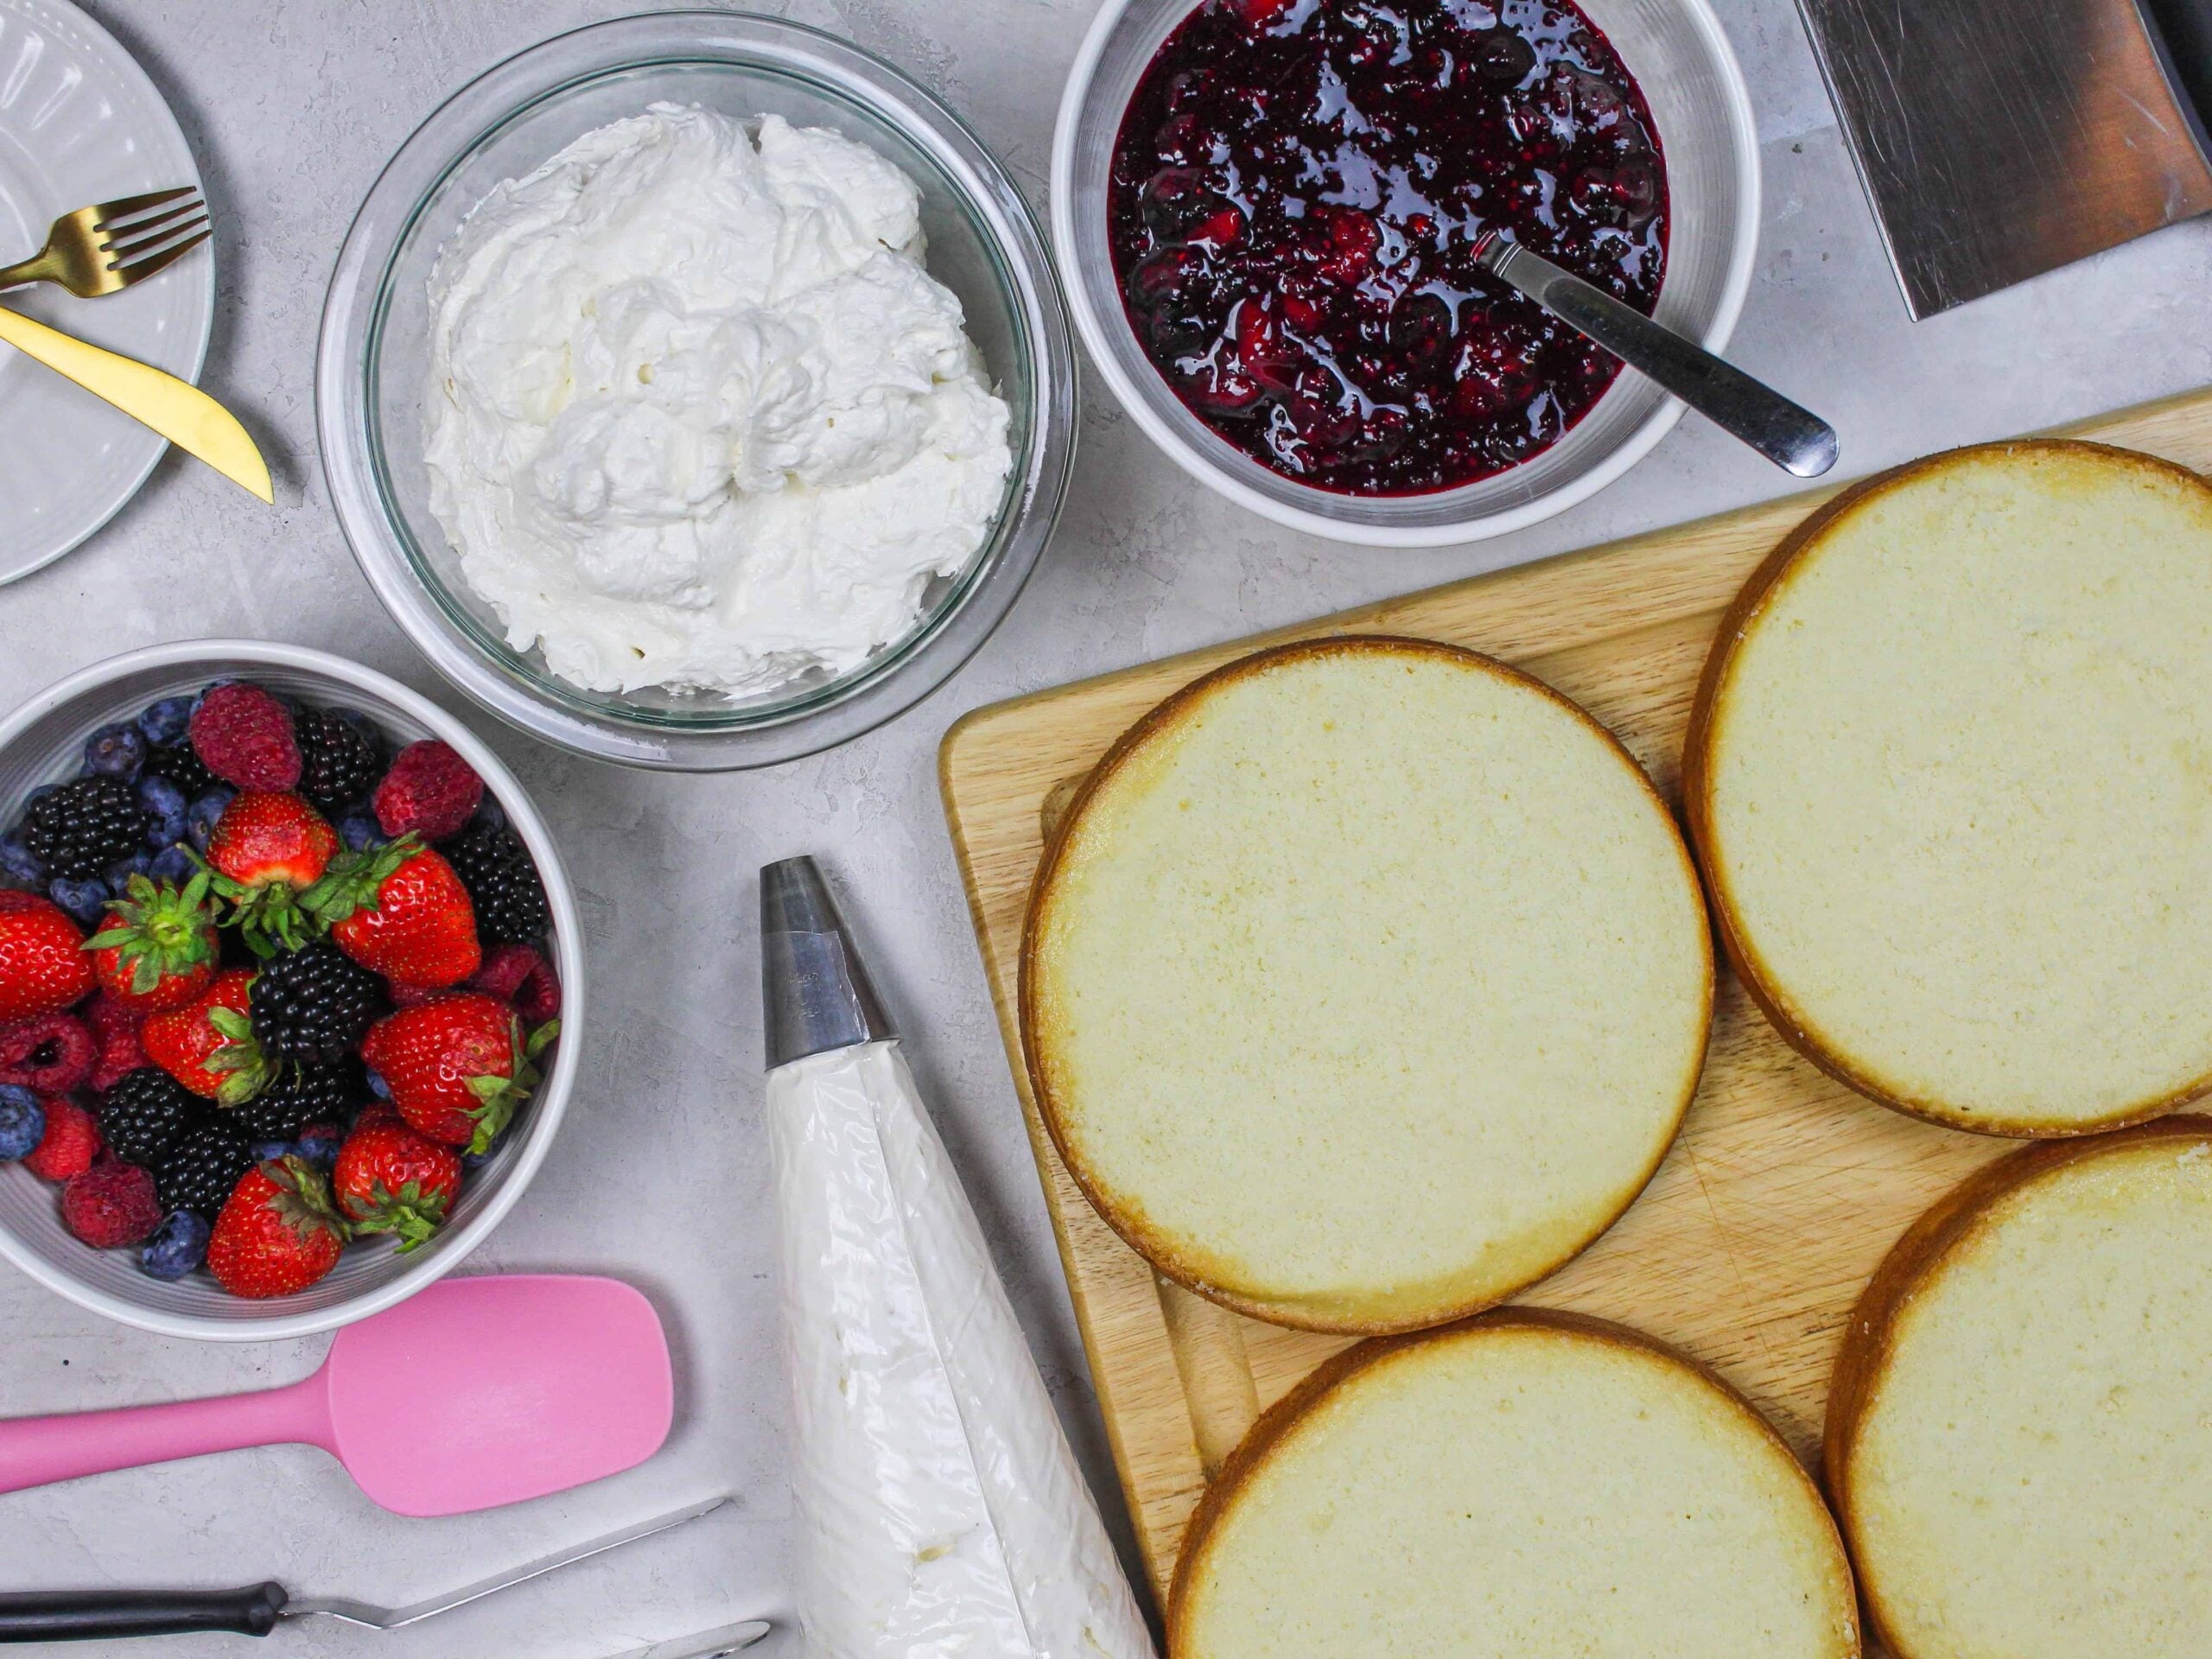
- Level the room temperature or thawed cake layers with a serrated knife to make them easier to stack and fill. This also lets the berry filling seep into the cake layers.
- Use fresh berries for the cake filling if they are in season, and frozen if they aren’t.
- Chill your cake layers in the freezer for about 20 minutes before assembling the cake, to make it easier to stack and frost.
Making These Cake Layers in Advance and Storage Tips
I highly recommend making the components of this cake in stages. It breaks the process up and makes it so much more approachable!
The berry filling can be made up to a week in advance and stored in the fridge.
The cake layers can also be made in advance and frozen for up to a month. They taste just as great when they’re frozen as when they’re freshly baked, I promise!
You can make the frosting ahead of time or save any leftover frosting! It can be stored in an airtight container or piping bag in the fridge for up to 3 days and will keep its shape. There’s no need to re-whip it once you’re ready to use it; just use it cold straight from the fridge.
If you cut into the cake and have leftovers, use any remaining frosting to cover the cut section to keep it moist and store it in the fridge for up to a week.
Let Me Know What You Think!
If you try this berry Chantilly cake recipe, I’d love to hear what you think of it! Please leave a rating and comment below with your thoughts.
And don’t forget to tag me @chelsweets and use #chelsweets on social media so that I can see your amazing creations.
Berry Chantilly Cake
Ingredients
Berry Cake Filling
- 2 cups fresh or frozen mixed berries like raspberries, blackberries, blueberries etc. 290g
- 1/2 cup granulated sugar 100g
- 1 Tbsp water, room temperature 15g
- 1 Tbsp cornstarch 8g
- 1 Tbsp fresh lemon juice 12g
- 2 tsp lemon zest – about 1 large lemon 6g
Soft Vanilla Cake Layers
- 3 cups cake flour 360g
- 3 cups granulated sugar 600g
- 2 1/2 tsp baking powder 10g
- 1 tsp fine salt 6g
- 1 cup (2 sticks) unsalted butter, room temperature 226g
- 1 cup carton egg whites or 7 large egg whites, room temperature 240g
- 1 1/2 cups full-fat sour cream, room temperature 360g
- 2 Tbsp vegetable or canola oil 28g
- 1 tsp vanilla extract or vanilla bean paste 4g
Fluffy Cream Cheese Frosting
- 1 cup (8 oz) full-fat cream cheese, cold 226g
- 1 cup powdered sugar 125g
- 1 tsp vanilla extract or vanilla bean paste 4g
- 2 1/2 cups heavy whipping cream, cold 600g
Decorations
- 1-2 cups fresh berries
- fresh mint sprigs
- edible flowers
Instructions
Berry Cake Filling
- Make the filling first so that it has time to cool and thicken. It needs a few hours to cool.
- Pour 2 cups of mixed berries and 1/2 cup of sugar into a large saucepan over medium heat and bring to a simmer.
- In a separate small bowl, stir together the 1 Tbsp of cornstarch and 1 Tbsp of water to make a slurry. Pour the slurry into the saucepan and stir to combine.
- Let the berry mixture cook for several minutes until it thickens, stirring constantly. If you use frozen berries it will take a few minutes longer to thicken. Once the mixture has thickened, turn off the stove and mix in 1 Tbsp fresh lemon juice and 2 tsp lemon zest.
- Pour into a separate bowl and set aside to cool. To accelerate the cooling process, cover the bowl with plastic wrap and place it in the fridge.
Vanilla Cake Layers
- Preheat the oven to 350°F / 175°C. Line and grease three 8” pans or four 7” pans with parchment rounds. You can also use this recipe to make 4, 6-inch cake layers but the bake time will be a few minutes longer. If you don't have 4 cake pans, the batter can sit at room temperature for a few hours. Bake as many layers at a time as you can at a time.
- Whisk together 3 cups cake flour, 3 cups sugar, 2 1/2 tsp baking powder, and 1 tsp salt in the bowl of a stand mixer or a large bowl.
- Mix in 1 cup of room-temperature butter slowly with a paddle attachment on a low speed. Continue to mix until no large chunks of butter remain, and the mixture looks like moist sand.
- Pour in 1 cup of egg whites and mix on low until just incorporated.
- Add in 1 1/2 cups sour cream, 2 Tbsp oil, and 1 tsp vanilla extract. Mix on a low speed until the batter is smooth.
- Scrape down the sides and bottom of the bowl with a spatula, then beat on a medium speed for 30 more seconds to make sure everything is properly combined.
- Divide the batter evenly between the prepared cake pans and bake for 33-36 minutes or until a toothpick comes out with a few moist crumbs. Let the pans cool for 10 minutes, then run an offset spatula around the perimeter of the pan to separate the cake from the pan. Place cake layers on a wire rack to finish cooling.
- Place the cake pans into the freezer for 45 minutes to accelerate the cooling process. Once the layers are fully cooled, carefully flip the pans, and remove the layers from the pans. Use a serrated knife to level the tops of the layers. Set aside.
Whipped Cream Frosting
- Chill your mixing bowl and whisk attachment in the freezer for 30 minutes to help this whipped cream frosting whip up better.
- Place 1 cup (8 oz. block) of cold cream cheese into the chilled mixing bowl and mix on a medium-low speed until smooth.
- Pour in 1 cup of powdered sugar, and mix on low at first to avoid powdered sugar clouds/explosions. Increase the speed to medium-high once the powdered sugar is incorporated, and mix for about 1 minute. Scrape the bowl with a rubber spatula as needed throughout this process.
- Add in 1 tsp of vanilla extract, then turn the mixer to a medium-high speed and gradually pour in 2 1/2 cups of cold heavy cream. I like to do this in about 4 additions and focus on pouring the heavy cream down the side of the bowl to prevent it from splattering.
- Watch the mixture closely once the heavy cream is fully mixed in. It should thicken and take shape shortly after this (mine usually does within about 30 seconds of mixing in the heavy cream). Take care not to over-mix your whipped cream frosting!! It will become soupy and sadly, you won't be able to fix it.
- As soon as you see the frosting start to take shape, turn off your mixer and do a quick whisk test. Dunk your whisk attachment into the frosting, then put it out and flip it upside down. The frosting should keep its shape and form a nice peak. If it doesn't, continue to mix the frosting on a medium-high speed for 30-second intervals until it does.
- Place 2/3 of the frosting into a large piping bag and cut a 2 cm opening at the tip of the bag.
Assembling This Berry Chantilly Cake
- Build this cake on a greaseproof cake board or flat plate using a dab of frosting to help stick the first cake layer to the board.
- Pipe a thick frosting ring (about 1-inch wide) around the edge of the cake layer to act as a frosting dam for the berry filling.
- Spread a thick layer of cooled berry filling into the ring of frosting. Top with additional fresh berries (optional) and cover with an even layer of whipped cream frosting. Flip the top cake layer upside down to make it easier to frost.
- Add a thin layer of frosting around the cake to fully cover the cake layers. We're going for a semi-naked look, so it's ok if you can see the cake layers peeking out through the frosting.
- Smooth using a bench scraper, then chill the cake in the fridge (30 minutes) or freezer (10 minutes) until the frosting is firm to the touch.
- Top the cake with fresh berries and edible flowers, then enjoy!
Video
Notes
Substitutions and Swaps
If you need to make any substitutions or swaps in this recipe, please check out the section on ingredient substitutions in the post above.Making this Berry Chantilly Cake in Different Sizes
One batch of batter is about 1800g or 10 cups, so I add roughly 600g to each of my cake pans when using 3, 8-inch cake pans. You can also use one batch of batter to make 2, 9-inch cake layers or 4, 6-inch cake layers. Bake time will be a few minutes longer at 350°F/175°C. If you want to make a tiered cake with this recipe, check out my cake batter calculator to see how many batches of batter you’ll need. If you want to make berry chantilly cupcakes, bake them at 350°F/175°C for 18-21 minutes. One batch of batter will make about 3 dozen cupcakes (yield will vary based on the size of your liners).Tips for Making the Best Berry Chantilly Cake
- Properly measure your flour (spoon into the cup measure, then level) or use a kitchen scale to measure your dry ingredients.
- Use a serrated knife to level your cake layers once they’re fully cooled to let the berry filling seep into the cake layers.
- Use fresh berries for the cake filling if they are in season, and frozen if they aren’t.
- Chill the cake layers in the freezer for about 20 minutes before assembling the cake, to make it easier to stack and frost.
- If your cake layers turn out less than perfect, read my cake troubleshooting guide to see where things might’ve gone awry.
Making This Berry Chantilly Cake in Advance
I highly recommend making the components of this cake in stages. It breaks the process up and makes it so much more approachable! The berry filling can be made up to a week in advance and stored in the fridge. The cake layers can also be made in advance and frozen for up to a month. They taste just as great when they’re frozen as when they’re fresh, I promise! You can make the frosting ahead of time or save any leftover frosting! It can be stored in an airtight container or piping bag in the fridge for up to 3 days and will keep its shape. There’s no need to re-whip it once you’re ready to use it; just use it cold straight from the fridge. If you cut into the cake and have leftovers, use any remaining frosting to cover the cut section to keep it moist and store it in the fridge for up to 2 days.Nutrition
Other Recipes You Might Like:
Hi Chelsweets! This cake looks amazing! Do you have to use the golden sugar? I can’t find it anywhere with the current situation.
I just love all the recipes! Thank you!!!
Hi Angel,
I order mine on amazon: https://amzn.to/2JXk8QS
If you’re in real pinch you can use granulated sugar in place of the golden sugar in this recipe <3
Hi! This looks absolutely amazing!! Could we substitute the golden sugar with regular sugar? Love your recipes btw!
Hi Nessy,
If you are having a hard time getting your hands on golden sugar, you can use regular granulated sugar in place of the golden sugar in this recipe!
Can I prepare the filling in advance?
Hi Yanira,
You totally can! Once it’s made, place it in an airtight container and store it in the fridge! It stays good for up to 5 days. Hope that helps, happy baking!
This cake looks and sounds amazing!! Would it be possible to half everything? Would everything else still work? Sadly we don’t have enough people to feed so a two layered cake would work better.
Hi Selam,
Thanks! You can totally halve the entire entire recipe 🙂
Hi Chelsweets!
This cake looks amazing thank you for the recipe. I am one who LOVES frosting… probably too much LOL! That said I’ve had a lot more experience buying cakes than making them and now I’d really like to try for myself. I am wondering if it will work to try to double the frosting recipe? Will that be too much ingredients in one regular stand mixer and would it cause the recipe to not come out right? Thanks, Kate
Hi Kate,
Haha I love that! It would be pretty difficult on your mixer to make a double batch, and I actually am not sure it would fit!! You could probably fit a double batch in a 5 qt bowl, but it’d probably be easier to make the two batches separately <3
Hi! This looks absolutely amazing, but i cant find cake flour in my city. How can I substitude it? Can I use apf instead? Thank you!
Hi Alina,
You can definitely use AP flour in place of the cake flour if that’s what you have on hand! So sorry for the delayed response!!
@Alina, you can use a combination of AP and cornstarch I just don’t remember the ratio.
Hi Chelsweets,
What flour what I use to substitute for cake flour; plain or self raising?
Hi Ravina,
You can use all-purpose flour in place of the cake flour in this recipe, but it will make the cake a tiny bit more dense!
@Ravina, I don’t recommend self-raising flour (this is what UK recipes use) as it has more than just flour and may change the structure of the cake.
Hi Chelsweets – Thanks for sharing this recipe! This cake sounds so perfect for Spring. I only have 9 inch baking pans – I’m wondering if the batter would divide into two 9 inch pans? Or should I wait until I purchase some more sizes. Any advice would be appreciated!! 🙂
Hi Kari,
I am so sorry for the delayed response!
Thanks!! This recipe should bake up great in 2, 9-inch cake pans 🙂 Hope that helps, happy baking!
Hi. I plan on making this for a birthday but the recipient doesn’t like mascarpone. Should I just use your cream cheese frosting recipe? Do you have a stabilized whipped cream recipe to share as well?
Hi Caitlin,
You can use additional cream cheese in place of the mascarpone in this recipe! Sadly I haven’t shared a stabilized whipped cream recipe yet, but I’m hoping to later this month! stay tuned <3
Hi Chelsweets! We have more cake leftover, can we leave it out overnight or should we refrigerate it? Thanks!
Hi Leah,
So sorry for the delayed response! I would cover the cut section with some leftover frosting or slice it up and put it in an airtight container, and refrigerate it!! The frosting can spoil if left out at room temp for too long. Hope that helps, happy baking!!
Hi, if I want to give it to someone tomorrow, do you suggest making it today or tomorrow? And cab I make it with normal sugar if I dint find the domino sugar?
By the way I love all you recipes 🙂
Hi Kyra,
I am so sorry for the delayed response!! This can be made with regular in place of the golden sugar in a pinch, and it can be made the day before if you want! The berry filling tastes even better the second day. Hope that helps for the future, happy baking!
Thank You!
This cake just looks sooo amazing!! I was wondering if this cake can be made as a 2 tier cake? Any suggestions?
Wow, this cake looks SO yummy!! I was wondering if you can make a 2 tier cake out of it? Any suggestions?
Aw, this cake looks SO yummy! I was wondering if it would be possible to make a 2 tier cake out of it? Any suggestions?
Hi Maija,
It is such a yummy recipe 🙂 You could totally make a 2 tiered cake out of it. I’d suggest making 1 1/2 batches of the entire recipe, and making an 8 inch and 6 inch tier with 3 cake layers in each tier! hope that helps, happy baking!
@Chelsweets,
Hi. I’m
Going to make this for a small wedding with 8 inch and 6 inch tiers… you think it will withstand okay and not get too soggy ..
Hi Suzy,
Because of the fresh fruit in this cake, I’d be nervous about making it for a wedding. I suppose if you make it the day off and the cake stay indoors in a cool room it could work, but the idea makes me scared!!
it is very amazing recipe. Thank you for the recipe.
Aw thank you Dierdre!! 🙂
If you make the cake a few days in advance does it dry it out? Do you need to apply a simple syrup when you are ready to assemble to keep it moist?
Do you need to apply simple syrup if you bake it a few days in advance?
Hi Caitlin,
Normally I’d say, but since this is a semi naked cake it’s probably not a bad idea!
I have tried making the frosting twice but it ends up very liquidy, do you know anything I could do to fix the problem?
Hi Niovis,
If the frosting is soupy, chill it in the fridge for 30 minutes intervals, then rewhip it! repeat until it’s the right consistency. In general, if your frosting turns out soupy, it’s because the meringue / bowl was too warm when you added the butter, or your butter was too soft. Hope that helps for the future <3
My husband has a wheat allergy, but I really want to try this! Any recommendations on making the layers gluten free??
Hi Rebecca,
You can use GF flour cup for cup, just be sure to really overmix the batter to help give it structure and let the batter sit for at least 30 minutes before baking it (to help the GF flour absorb some of the moisture from the batter). Hope that helps, happy baking!
Yes, thank you for asking this question! I had the same problem tonight. I hope the 30mins of cooling will work!
This looks amazing! I am so excited to try this. Would you happen to have measurements for a 6 inch tier version of this cake? That would be amazing!
Hi Jessica,
Thanks!! Sadly I don’t :/ But I’d recommend making 2/3 of this recipe to make a 6 inch layer cake with 3 layers. Sorry I can’t be of more help!
What can I do if my consistency of my frosting is not thick? How can I get it thick?
Hi Melissa,
You can chill it in the fridge to help it thicken up, then rewhip it until the consistency is right <3
How you gonna say we can store it in the fridge, take it out and give it a good mix and it will be fine? My icing was PERFECT before I put it in the fridge, took it out later, stirred it up a bit so it wouldn’t be hard, and it breaks. Was not broken before I put it in the fridge…
Hi Sophie,
You’re only supposed to but the frosting in the fridge if it’s too thin! Do you mean you made your frosting in advance, and stored it in the fridge?
If you let it thaw to room temp after its been chilled, then stir it for a while it should come together! Even if it’s broken at first, if you mix it for long enough I promise it should become smooth again. Hope that helps!
Hello Chelsea!
I love your videos I also tried your Go to Vanilla Cake and it turned out great.
I have a request. Can you please make a Stranger Things Cake.(without fondant).
Thank you very much I will really appreciate it.I am trying to make it for my own birthday in September but I was looking for recipes I didn’t found anything.I saw your channel and started doing your recipes they’re good so i can resist.Please I hope you will fulfill my request.
Hi Adbullah,
Thank you, you’re too sweet! I’m actually not really making decorative cakes right now because of the shortages of ingredients. However, a fun idea for a stranger things cake that doesn’t use fondant is my christmas lights cake, which I share here: https://chelsweets.com/2018/12/24/easy-christmas-lights-cake/
Hope that helps, happy baking!
My daughter and i made this together for her 17th birthday. The measurements were exact and it came out perfect. It reminds me of strawberry shortcake with whipped cream but on steroids. The cake on its own is amazing and moist. Excellent job on the recipe!
Hahaha so happy to hear that Andie! I love that comparison 😛 Thank you so much for sharing!!
Hi!! Would i be able to make a buttercream frosting instead of Mascarpone Cream Cheese Frosting?
Hi Caitlin,
For sure! This cake would taste great with a regular buttercream too 🙂
I was wondering if we had to use the Domino sugar for this recipe I have all the ingredients except that and don’t want to go to the store lol.
Hi Lili,
You can use regular granulated sugar if that’s what you have on hand <3
Hi please could I have the recipe for the 3 layer cake! ? I’m making it today, thank you ?
Hi Mia,
I’m not sure what 3 layer cake you mean! You can use this recipe to make 3, 8″ cake layers <3 Hope that helps!
Hi Chelsea,
I attempted this cake over the weekend, and while the frosting and the compote were a success, sadly something went wrong with the cake. Potentially one of my errors was to over-mix the batter, since you said in the recipe that the key is to not do that. What would be a sign that the batter was mixed too much? It seemed very light prior to being poured into the tins.
Thank you.
Regards,
Peter.
Hi Chealsea I was wondering where you bought the golden sugar because i really want to make this but I just can’t seem to find the golden sugar? Thank you so much for this recipe!!! So excited to make this!!!!!!??
Absolutely amazing!!! I had frosting left over…can I freeze it?
Hi!
I am trying to make a dairy free version of this cake. I was able to find a vegan version of the all ingredients except for the Mascarpone. Would this cream cheese frosting be okay without that ingredient?
I notice that your cake has four layers, and I would like to try this but only want three layers? Do you have tips/suggestions as to how to cut this recipe down to make less cake layers/frosting? I know I could just separate the layers into three pans as opposed to four, but I am worried about 1. The layers being too thick even after trimming them down, and 2. Food waste.
Please I need help, my egg whites and the sugar were fluffy as a marshmallow and then I added the very soft butter but then it never went back to fluffy it’s just more like liquid I don’t want to start all over please help!!
I’d like to say that this is the best cake I’ve ever made!! It is DIVINE! Starting with the cake batter, it is so easy to make, it tastes delightful. It bakes super evenly if you follow the recipe and let all the ingredients be room temperature. The cake comes out super fluffy. and with the perfect consistency to cut and layer. I made 2X9inch cakes ( larger than what the recipe asks for ) I later realized that I should have doubled the filling. It is so tasty and tangy!… but sadly I didn’t have enough to put a lot in my 9 inch cakes (totally my bad!) As for the frosting, again, it is super easy to make, the instructions are very clear, and it comes out spectacular to decorate. It has a delicious, mellow taste. It is going into my favorite recipes tab! I’m so happy to have found you and your recipes! Thank you!
I made this cake for my niece’s baby shower and it was SPECTACULAR! I followed the recipe to the tee (the only thing I forgot was to put another layer of frosting over the berry compote, it was still fantastic) and it was possibly the best cake I have ever baked, and tasted! Everyone raved about it, even my very picky mom, who said it tasted professionally made. Every element was delicious, from the berry compote to the frosting, seriously just delicious and perfect in every way! Inloved the Golden Sugar too, I’ll definitely be baking with it again!
My icing did the same thing. I am thinking I can replace half of the butter with shortening.
The cake and berry filling part of this recipe are great, but I made this frosting over twice and wasted 14 eggs. Not only was it soupy even after refrigerating the meringue before adding the butter, refrigerating it after, remixing many times, making sure everything was room temp, but it didn’t even taste good. Do not make this buttercream substitute for a different frosting.
Hi im wondering how you got your ingredients converted to grams… for this it says 3 cups of cake flour is 360g but plugging it into the app i use it had cake flour at 269.724g.
Hello,
Do you know if with this frosting I can decorate with piping tips? Is there anything else I could add into the frosting for it to be stiff so it doesn’t melt while I pipe it into flowers ? Thank you!
Hi.I made this cake for my sons girlfriends birthday they said it was yummy but I found my filling started to look curdled when adding the butter is this I’d how outs meant to look or be?
Thanks Dayle
Hi, I’m going to be making this cake soon and was wondering where you get you edible flowers from, or if you have an suggestions on where to buy them from! Thanks!
Hello, I made this cake today and it was delicious! I did not use your recommended domino golden sugar and just used regular sugar. The cake turned out very dense, like pound cake, which still tastes good, but I wondered it it was supposed to be more fluffy and airy? Also, I had troubles with the frosting, where it was soupy. I think it was from my butter being too soft and the meringue mixer being just slightly warm. I tried stabilizing it with some cream of tarter and/or cornstarch before I saw a comment made my another person to just put it in the fridge for 30 minutes and then re-whip it after. It did work, but because of the stabilizing agents, my frosting was not smooth, but a lumpy whipped cream texture (kind of like an over whipped whipped cream) after a 30 min chill and re-whipping it. I still made it work and everyone at the gathering loved it with no complaints. Will definitely try this recipe again.
I just made this amazing cake! My kitchen is completely sticky, but I have never made anything this amazing. I wish I had beat the whites for longer…my only regret.
Looks great! I had to laugh, because, I’ve been thinking lately that we live in a time where the trend is whatever is easiest… no hems, zippers sewn on the outside, non-tailored window coverings, etc., and now cakes too! Funny, but I wonder how many people of a certain age would think this wasn’t finished…LOL!
Hey Chelsea
Can you use normal egg whites instead of pasteurized egg whites?
I’m sorry to bother you!
Hi! Can you pipe this frosting or is it not stable enough? I want to cover the outside with rosettes.
Thanks!
Can the recipe for the cake be turned into cupcakes?
This was so fun to make! Unfortunately my frosting turned out not great where it *looked* grainy but wasn’t. The texture was smooth when you feel it, but it looked totally grainy when spreading and piping. Do you think it was because I undermixed, overmixed, or something else? Thank you!
I made this Golden Chantilly cake for Mother’s Day. It was Phenomenal! My store was out of golden sugar so I used 1 tablespoon of dark brown sugar per cup of white sugar and blended it. It looked exactly like the Dominos golden sugar.
Hi. Made this last year and it was perfect, even though i couldn’t find the golden sugar.
Tried again today WITH the golden sugar. Got the meringue to whip perfectly but once butter and the cheeses were added it turned to a curdled consistency. I threw it out, started over and the same thing happened. I just wasted over a lb of butter plus all the other ingredients.
Any idea what happened. So sad because it’s supposed to be a birthday cake.
@?Andie Monteleone?,
I had the same thing happen!! I’m afraid to try again and waste it all!
Hello,
I am planning to make a 2-layer sheet cake for a party in late June. My pans are 13.7” x 10.5” x 2.3” (34.7cm x 26.6cm x 5.8cm). How many batches of frosting would I need to frost and pipe a border? Also, can this frosting hold up to the heat or should I omit the cream cheese and mascarpone cheese? Lastly, could I substitute frozen fruit for the fresh fruit you put on the cake? If so, should I defrost the fruit overnight in the fridge and blot it to reduce moisture or how should I prepare the fruit? Thank you.
Hi, there! I know the berry filling will hold up well in the freezer by itself, but have you tried to freeze an assembled/frosted cake with this filling? I’m not sure if the berries will turn the cake soggy as it thaws. Thanks for your help!
I’m in love with this recipe..THANKYOUU SO MUCH!
I had some trouble with the frosting. I didn’t seem to have any problems till added the cheeses. Then it got soupy and slightly lumpy. I tried mowing more and putting I fridge but never got better. I made it twice and never got better. Any suggestions?
Hello!
I recently discovered your channel and have been binge watching!! I love all of your cakes!!
This recipe looks amazing and I would like to recreate it. Where would I get edible flowers??
Thank you so much for taking the time to share all of your bakes! Keep them coming;-)
Can we use fruit filling instead of berries
Fruit I mean summer fruits
Hi! Can I use this recipe to make cupcakes?
I was so excited to make this for my friends wedding cake. I made the meringue 3 times and failed each time. I even waited until it was room temp before adding butter and set my timer for 10 minutes until I added the butter. Not sure what I am doing wrong. So frustrating!
I definitely plan to try this recipe. Does the frosting pipe well since it has both mascarpone and cream cheese in it?
I am looking forward to making this cake and it’s a stunner! I would like to clarify that you used a “wisk” for mixing the Cake ingredients versus a paddle attachment. Normally when using the Reverse creaming method it’s done with the paddle so before I get started on it I just wanted clarification.
Many thanks
In your frosting ingredients list you mention there are 2 cups (or 400g) of sugar but in the frosting method it says to heat only 1/2 cup of sugar with the egg whites until dissolved. Which is the correct amount?
Perhaps I’m reading this wrong but in the icing recipe it says 2 cups of sugar and in the instructions it says 1/2 cup. What is the correct amount?
I was following the instructions and only used 1/2 cup. It came our very soupy. I tried the fridge trick but when I remixed it the icing curdled. Any suggestions for next time?
The recipe calls for 2 cups of sugar in the ingredients list for the icing, but the directions only mention 1/2 cup of sugar. Am I missing something? I tried the icing twice and haven’t been successful yet. Looks disconnected and soupy. Still would like to get it right but had to opt for tub icing. Cake was amazing with berry filling.
The frosting ingredients and the directions for the frosting have two different sugar measurements. Which one is correct, 2 cups or 1/2 a cup?
Hiii. I made the SMBC and it turned out perfect! BUT the moment i added the mascarpone cream cheese mixture to the SMBC it curdled an become watery/curdled.???
What can i do to fix this or what could be causing this? Please help.
Hi Chelsweets
How can I adjust the recipe for a 4 layered cake with 9 inch pans?
Hi! There’s a discrepancy with the Swiss meringue directions. The recipe calls for 2 cups of sugar but in the instructions it says add only a 1/2 cup to the egg whites. I did that and realized when it was all said and done, that my buttercream was too buttery. I should’ve known that didn’t sound right but I didn’t realize until it was too late! ?
Hi I am trying to make this cake but your ingredients list says 2 cups of sugar for the icing but the method only asks for 1/2 cup?!?
I love this recipe! The vanilla cake layers are delicious.
I think there may be a mistake in the buttercream. The recipe calls for 2 cups of sugar, but then the directions have you put in 1/2 cup of sugar into the egg whites. I’ve tried to make it twice and it doesn’t work with the half cup of sugar.
I found this recipe and it looked so lovely I spent all evening making it. When I got to the frosting section, I started out ok with the egg whites and half cup of sugar I took out of the 2 cups called for in the ingredient list but the directions never say t what stage to add the additional sugar. I read it through several times but it’s never mentioned. I know this is an older post but you might want to update the directions.
I’m so sorry about that! I’ve updated the recipe card to fix this. Apologies Maxine <3
While reading the frosting ingredients and then the method, I noticed a typo. You say to add 1/2 cup sugar with the egg whites, but then you don’t say where to add the remaining 1 1/2 cups of sugar. Since I can’t wait for a reply, I’m going to wing it and add all the sugar to the whites since it all needs to dissolve so you dont feel the sugar grains in the frosting. Hope I’m right??!!
Hi Kirsten! I am so sorry about that typo. The good news is that your guess was totally right!! It should be 2 cups of sugar mixed in with the egg whites.
I appreciate you letting me know & have updated the recipe to reflect this. Thank you!!
Hi, so the frosting instructions say to add 1/2 cup of sugar to egg whites on the stove. When do I add the rest of the sugar? It calls for 2 cups. I can’t find where it says to add it. I think I may have bombed this batch! ?
I made this as a wedding cake as well as 250 compote filled cupcakes for the wedding guests. It all turned out beautifully! Everyone raved about it!
I did have an issue with the last batches of frosting not standing up no matter how much I whipped it. It curdled, almost like cottage cheese. Since I made like 15 batches of the frosting that morning (I made them all back to back) the only thing I could come up with was the egg whites I used. All the other batches were made with free range lightly pasteurized egg whites (in a carton). I had run out of that and used regular egg whites (in a carton) that were ultra pasteurized. Everything else was exactly the same ingredients and temperature. Do you have any thoughts? I may be using this for another wedding in a couple of months, so I’d love to hear them!
Hi Elodie,
So happy to hear that everyone loved this recipe!! That’s super interesting about the last batch, I haven’t run into that problem but that could definitely be it! I’d stick with the type of egg whites with you’d had success with in the future.
Cannot figure out why equal parts of surfer to flour in this recipe. On the back of Swabs Down cake flour box is a simple recipe using 2 c sugar to 3 c flour. The berry filling is also very sweet so I would not make this recipe unless I cut back on the sugar in the cake.
Hi Sheri,
A majority of my cake recipes use relatively equal ratios of sugar and flour. It gives the cake layers a tender texture and a level of sweetness I enjoy! I’ve been recipe testing for years and I prefer this ratio. Lots of recipes use different ratios though.
If you’re looking for a less sweet cake recipe I’d suggest trying to my layered angle food cake: https://chelsweets.com/layered-angel-food-cake/
Hope that helps, happy baking!
Hi, would it be okay to use the whole eggs or does it have to be egg whites only. I love your recipes!
Hi Tangia,
The cake portion of the recipe turns out best with egg whites, but 5 large eggs can also be used to make the cake layers. Happy baking!
Just made this but my frosting is too thin how to I get it thicker and more whipped like rather than soupy. HELP!!!
Hi Allyson,
I’m so sorry to hear that! Sometimes that can happen if the meringue was too warm, or if the cream cheese, butter, or mascarpone cheese were too warm :/ It can also happen if your kitchen is really warm.
The best way to save it is to pop the bowl and whisk in the fridge for 10-15 minutes, then rewhip it . Repeat this process until it gets thicker and gets its shape back. Hope that helps for next time and that you were able to salvage this batch, happy baking!
Hi – I love this recipe! I am wondering how well the modified icing would dye? I’m looking for a sky blue color, would the gel-food coloring only allow a lighter baby blue?Or do you have another icing you recommend for dying with this cake recipe?
Hi Sam,
This is a great question! This frosting can be difficult to color bright colors like sky blue with gel food coloring, but you should be able to if you use the microwave method (https://www.youtube.com/watch?v=LMVSrOen54s), which works so well with this type of frosting!! Hope that helps, happy baking!
Does the Swiss meringue frosting need mascarpone cheese and cream cheese?
Hi Kyla,
I love this frosting with the mascarpone cheese and cream cheese, but if you want to omit them just add in an additional 1/2 cup of unsalted butter in their place. Hope that helps, happy baking!
Beautiful. I want to offer this beauty as a wedding cake option for my sister. I’m a home baker and read your answer to making this a 2 tier cake. What would your answer be for a 3 tier cake??
Thank you for sharing your recipes and tips!
Hi Hayley,
Thank you!! My tips would be the same for a 3 tiered cake 🙂 As long as it’s properly supported with dowels you should be good to go. Hope that helps, happy baking!
4/29 – Prepped the frosting last night. It wasn’t creamy like I hoped it would be. This morning it still seems ‘grainy’. Would you advise to put it back in the mixer to smooth it out? I’m wondering if I put the butter in too soon, or too quickly. 🙁
Thanks for the tips — Paula
Hi Paula,
I’m so sorry to hear that. If it feels like it has a grainy texture when you rub it between your fingers, it means that the egg white and sugar mixture at the start of the recipe wasn’t cooked for long enough and the sugar didn’t fully dissolve.
If it just looks kind of broken, it might just need to come to room temperature and be remixed. I’d recommend letting the frosting sit out until it’s room temp then mixing it on a low speed with a paddle attachment for about 5-10 minutes and seeing if that helps! That should do the trick if it was just a little bit warm when it was being mixed last night. Hope that helps!!
This is delicious. Very large 3 x 8” cake pans. Feeds a crowd which is what I needed. I used regular granulated sugar. Also made one and a half x’s the frosting recipe and it was perfect. I generously frosted the entire cake, decorating the the top with peaks around the edge and a pool of the fruit filling and fresh berries in the middle. I received raving reviews. I will make this again. Thank you for a lovely recipe.
Hi Nancy,
I love that!! It sounds like it turned out AMAZING!!! 🙂 Thank you so much for sharing!!
This batch of frosting covers how big a cake? And how big is the cake and how many cake does the measurements make
Hi Preeti,
This recipe can be used to make three, 8” cake layers or four, 7” cake layers, and feeds about 24 people. One batch of the frosting makes about 8 cups of frosting, which is enough to fill and frost a 7-inch or 8-inch layer cake. Hope that helps, happy baking!
ive had the famous cake that’s similar this from a very popular store (lol) and they use mascarpone in the frosting I believe as well as like every other blogger who’s made their own version…I love the taste of the mascarpone frosting but mascarpone is so expensive for 8 oz. You use cream cheese which caught my eye…do you think it gives a similar taste? tryna save money without sacrificing taste haha
Hi Sadia,
Great question! The flavor of the whipped cream frosting is a tiny bit stronger in this recipe than if you use mascarpone, but I think it actually tastes better that way!! I think it balances the berry filling perfectly 🙂 Hope that helps, let me know what you think of it if you try it!!
I love your recipes but I find that cake flour is soooo drying — that cakes aren’t moist and almost like a dry, angel food cake. Can I substitute cake flour for all-purpose flour? Thanks!
Hi Najia,
You can use regular AP flour in place of the cake flour if you want. Hope that helps, happy baking!
Hi,
Can I sub Marscapone for cream cheese and if making for a party with an hour travel time will it hold up or should I assemble on site
Hi Nikki,
Great question! You can sub mascarpone for cream cheese, but I’d recommend doing half mascarpone cheese and half cream cheese. As long as the cake is fully chilled, and you blast your car AC or store the cake in a large cooler it should hold up. I’d recommend fully frosting the sides of the cake though and not doing a semi naked look. That should help it keep its structure a little better. Hope that helps, happy baking!
@Chelsweets,
This turned out so good. I used all Marscapone but next time will do half and half. The cake itself was incredible.
YAY!! So happy to hear that Nikki 🙂
Hi! I just tried making this recipe for my daughter’s birthday cake. The cake itself came out perfect. Unfortunately the icing fell apart. I followed the recipe to the letter. It seemed set up when I made it and I followed the storing instructions as I made it the day before. I went to ice the cake and it just fell apart. It basically became soup, dripping down the sides. I felt pretty disappointed as everything took a good amount of time to make! I didn’t over whip or under whip and I’ve made whipped cream frostings before that have been fine. Never with cream cheese though and maybe that was my downfall! The icing tastes delicious, even as a soup, but unfortunately I won’t be able to serve it as it isn’t holding up. I may scrape it off and try another icing recipe.
Hi Leah,
So sorry to the hear the icing portion of this recipe didn’t go as planned! My first thought about why this might have caused this is the cream cheese that you used! Did you use organic cream cheese? I find that regular, boxed Philadelphia cream cheese works best. Organic cream cheese has different stabilizers in it which make it stickier/softer, and I find it makes the frosting thinner. Which type of cream cheese did you use? Hopefully we’ll be able to figure out what happened!
WOW. This cake was absolutely amazing! I made it for my friend’s birthday and everyone thought I bought it from a bakery. Definitely saving this recipe for future use.
Hi Azia,
So happy to hear you all loved this recipe!! 🙂 Thank you for sharing!!
Hi,
I was wondering if you can reduce the amount of sugar? Have you ever tried this recipe with less?
Thank you!
Hi Lisa,
If you reduce the amount of sugar in the cake batter, it will have a negative impact on the texture of the layers. I don’t recommend it! However, you can add sugar to the frosting and filling if you want. Hope that helps, happy baking!
You said something about the Swiss meringue buttercream in this recipe (maybe halfway down the page?) but I don’t see the actual recipe including SMBC?
Hi Jessica,
So sorry about that! The original version of this recipe used a SMBC base for the frosting, but I’ve updated it to simplify the recipe so it not longer does. If you want the original recipe with the SMBC, I’m happy to email it you. Hope that helps, happy baking!
I made this cake for our Christmas dessert this year. I love the cake recipe. I love the filling (though I strained it to remove seeds). The frosting tasted great-HOWEVER- I wouldn’t use it again. I made it yesterday and prepped it in piping bags for today’s assembly. I whipped it to stiff peaks and it held its shape nicely- until today when I assembled. I think the cream cheese has too much moisture and that’s what caused it to loosen up overnight. I used full fat Philadelphia cream cheese and heavy whipping cream. I don’t think the ingredients are the issue here. Cream cheese just doesn’t hold up in frosting very well. I should have known better. I took a risk and well, it didn’t really pay off. I made up a batch of stabilized whipped cream using gelatin and repaired the loose mess of a frosting job the best I could. I was going for the bare sided cake, however the frosting just dripped down the sides after using it to make a dam for the filling. The stabilized whip cream covered most of the issues though I’m not entirely sure the dams will hold overnight. It’s resting in the fridge. Fingers crossed it will make it to the Christmas dessert table. Even if it looks a mess, I know it will taste delicious. The components separately are lovely and fresh. If you are planning to make this cake, I would definitely go with the Swiss meringue frosting that is showing in the video. It will hold shape perfectly and does not have the issue that the frosting in the recipe has.
I don’t see any reviews on this cake since it was updated so I thought I would comment. I have been into baking and making cakes for the past few years. I almost solely make Chelsweets cakes because they always turn out so great! Unfortunately, this one was a miss for me. The flavors are great! There is nothing wrong with the taste- It’s wonderful. Where the issue lies is the whipped cream cheese frosting. It is a nightmare to work with. Despite having the consistency it should’ve at the beginning, it just deflates and melts as you frost the cake even if you refrigerate it in between steps. It also doesn’t firm up in the freezer as you frost the different layers. I made this for my daughters birthday that is on sunday so tomorrow I may have to try to scrape off the whipped cream cheese frosting and try to save it with another frosting. I know the recipe was updated to make it easier and more approachable but I think I would’ve much rather put in the work up front with the swiss merengue frosting from the original recipe rather than put in all the work only for it to turn out to be a mess. I would’ve loved to see an updated video with the new recipe to see if this is a me problem. I truly do love Chelsweets and I have never been disappointed. And even with this one, the taste is there! It is just very difficult to make a soupy frosting look pretty.
Hi Angel,
I’m so sorry to hear this didn’t turn out for you :/ That is such a bummer, and so frustrating!!
What type of cream cheese did you use to make the frosting? I find that some organic cream cheeses or the type that comes in a tub does not work as well as the full-fat, block type. I honestly only use Philadelphia when I’m baking (not sponsored just truly the best for baking!!), and I think it has a lower moisture content than other brands.
The updated filling uses my stabilized whipped cream recipe, which should keep it’s shape in the fridge for a few days! I don’t have an updated long form video on this recipe, but I did share a video of it on social media, here’s the link: https://www.instagram.com/p/CtzKs69Mfpa/
I originally updated this recipe to try to make it more straight forward for home bakers, but recipes really are a balance between work/effort and taste/end result. I’m happy to email you the original recipe if you want!!
Can i make the cake a day before and keep it in the fridge?
Hi Brittany,
I try not to make this cake too far in advance because it isn’t fully frosted on the sides and because the fruit can start to get a little weird/dehydrated as it sits! With that in mind, it should be ok to make a day before and keep in the fridge. Hope that helps, happy baking!
I want to make this recipe but I was reading comments and I’m confused. There is no mention of mascarpone cheese in ingredients listed. Not sure what to do?
Hi Lisa,
Apologies for the confusion! I share in my post that I revamped this recipe to simplify it last year, and the updated version doesn’t include mascarpone. If you want the original recipe with mascarpone, please email me at chelsweets@gmail.com and I’ll send it to you 🙂 Hope that helps, happy baking!
i just wanted to say i made this (followed the recipe to a T) and it turned out so delicious! The cake was so fluffy, and I got soo many compliments! And it really wasnt that hard.
Thank you!
YAY!! I am so happy to hear that Gab 🙂 Thank you for sharing!!!
Hi there, I made the cakes, loving the texture, but they didn’t rise much ?, also I want to make the frosting, but if I freeze the cake with the frosting as a filling only will it be ok when I take it out for serving on the main day? I need it in 5 days
Thank you
Hi Rizwana,
Don’t worry, that’s normal! These layers don’t rise up a ton because they use the reverse creaming method to make the batter. If you’re just using the frosting as a filling it can be frozen for up to 5 days and then thawed the day you want to serve it. I’d recommend transferring it to the fridge the night before you want to eat it to let it thaw gradually. Hope that helps, happy baking!
Hi!
I tried this recipe and everything turned our great
Just my Chantilly cream wasn’t stable enough
What could be the reason? The cream wasn’t whipped enough or it was over whipped
Thanks
Hi Tanisha,
Glad to hear the recipe turned out great, but that’s a bummer that the cream wasn’t stable enough! As long as the mixture didn’t look like curdled, I’d say it might have been slightly underwhipped. The cream cheese might have been underwhipped too?? Could be either of those things!
This looks amazing! I’m going to make my daughter’s birthday cake and would like to use this recipe. I see you mentioned two different icings. Which one is easiest to smooth? Which is better in your opinion? I’m going to make a 3 layer and decorating in a masquerade theme. Wondering which would be better to create a smooth/textured final coat. Thanks!
Great questions! I think the original icing is the easiest to smooth. I’ll email you the original recipe so you can make that version! I love the current frosting in this recipe because it’s super easy to make, but it doesn’t smooth quite as well as the original (which is a Swiss meringue based frosting). Hope that helps, happy baking!
Hi! I can’t wait to try this recipe! Would using mascarpone cheese would for the frosting recipe instead of cream cheese?
Hi Karina,
That should work just fine! I’d just make sure there isn’t any excess moisture in the mascarpone cheese (squeeze out any excess with a paper towel if there is!). Hope that helps, happy baking!
This was the best flavor cake. I made it for my friend’s birthday and she said service that they couldn’t.This was the best cake she’s ever tasted.
Should I trim the cake tops before I freeze the cake layers. I have to make ahead, I have lots of cooking to do for my sister’s that are coming to visit.
Thank you
I am so excited right now to be making this cake. My daughters favorite and it’s her birthday. I don’t usually bake but this is a beautiful recipe and not really that difficult , follow her directions and hints and tips. I will post a picture when I’m done. THANK YOU ?
I made this cake last summer for my daughters birthday. I made it 6 layers 2 tiers and the entire thing was eaten. My family all still talk about this cake and how unbelievably delicious it was! I have made it a few times since and still just as good!
Hi Kaylee,
I am so happy to hear that!!! Thank you so much for sharing 🙂
0/10 the icing becomes liquid after an hour and definitely cannot make in advance. Ruined the persons birthday this was for. I’m very disappointed
So sorry to hear that Robyn! I’ve had this frosting sit in my fridge for days and keep it’s shape. May I ask what type of cream cheese you used? It can have a huge impact on how this frosting turns out. I recommend using full fat cream cheese, that comes in a brick! Also philadelphia works best, I find organic cream cheeses tend to seem more watery. Hopefully we’ll be able to figure out what happened to avoid this in the future!
Hi Chelsey,
I made this cake for my 91 year old mother-in-law’s birthday in March. I’ve made a similar cake many times but this cake recipe is now my favorite cake batter & frosting to use with a berry filling. I just baked the cake for Easter & waiting for it to cool. I’ll wrap the layers in plastic wrap to freeze which I’ve done before. I’ll make the fruit filling Friday to chill overnight then make the frosting & assemble Saturday. I do have to travel about 1 hour & 45 min to get to her home along with all the Easter food I prepare. Luckily, I’ve got a great container to transport the cake safely & glad it’s not too hot to travel!
Happy Easter!
Hi Deb,
This absolutely made my day—thank you so much for sharing!! I’m so touched that you made this cake for your 91-year-old mother-in-law’s birthday, and now again for Easter. ? I love how thoughtfully you planned everything out, from freezing the layers to traveling with the cake (and all the Easter food—go you!!). It sounds like it’s going to be such a special celebration, and I hope everyone loves it!
Wishing you and your family a very Happy Easter!
I made this delicious cake for my daughter’s graduation celebration. It was amazing and everyone loved it. I replaced the vanilla cake flavoring with pistachio. I baked the cakes and made the berry filling on Tuesday. I wrapped and froze the cakes. I made the frosting Friday afternoon and kept it refrigerated. I transported all ingredients to the site and assembled a four layer cake in about 15 minutes. It was beautiful and so delicious. Thanks for all your make ahead tips for a stress free celebration.
Hi Debra,
I’m so honored this cake got to be part of such a special celebration—congrats to your daughter!! The pistachio twist sounds absolutely dreamy, and I’m so impressed with your planning and assembly game. Four layers in 15 minutes?! You crushed it! So happy the make-ahead tips helped make it all a little less stressful 🙂 Happy baking!
Best cake I have ever made and I make MANY each year. My family raved about it too!! I am also making another batch of the berry filling- I use it as jam and my family loves it!
omg yessssss!!!! I am so happy to hear that Ava 🙂 Thank you for sharing!
I’ve never made a cake like this before! The time and work was well worth it. Everyone raved about it and no one can stop eating it! Delicious!!! Not overly sweet. Perfect density and moist.
Hi Danielle,
This makes me so happy to hear! I’m so glad all that time and effort paid off—and even more thrilled that everyone loved it. There’s nothing better than making something from scratch and having it be a total hit. Thanks so much for sharing your experience!
I used this recipe for one of the tiers in a wedding cake and it was a hit! This is the second time using your cake your recipes (1st was the brown butter cake) and they turned out moist with a perfect texture that’s not too spongy or dense. Thank you, for all the work you put into crafting these recipes!
Hi Cali,
Ahh this makes me so happy to hear!! I’m honored that my recipe was part of a wedding cake—that’s such a big moment! And I’m thrilled to hear both the brown butter and this cake were a hit. Thank you for trusting my recipes and taking the time to leave such a kind note 🙂
Excellent recipe!
I made it twice:
1. once as a trial (coz i had a special occasion a few days later and wanted to make sure it turns out good). I substituted egg whites with 4 whole eggs as suggested in the post.
2. Second time (event day) got a lot of “wows” from the crowd. This time no substitutions.
This recipe will definitely be my go to recipe! Thank you so much.
C.
A friend made this cake for me and it was one of the best cakes I’ve ever had. So delicious! I want to make it for a friend’s birthday soon. I plan on making all the parts in advance but when would you say is the soonest I can assemble the cake without it drying out? Can I assemble it the night before to be served the following night? TIA!
Hi Su,
That’s so sweet, what a full-circle cake moment! I love that you’re paying it forward.
Yes, you can absolutely assemble the cake the night before and serve it the next evening, it’ll still be moist and delicious as long as it’s stored properly. Here’s how to keep it from drying out:
– Once assembled, store the cake in the fridge, loosely covered with plastic wrap or in a cake carrier (just make sure it’s airtight).
– Take it out about an hour before serving to let it come to room temp. The flavors and texture are best when it’s not cold.
Hope that helps and that the cake turns out amazing!! Happy baking 🙂
Do you think I could halve this recipe to make a mini 4” layered cake? We’re just doing a special dinner for my sons “half birthday” haha but theres only 4 of us.
Hi Angel,
I do think you could do that!! The layers will be slightly thicker, or you also could make 2 6-inch cake layers 🙂 Hope your son’s cake turns out amazing!
I made this cake over the summer and my sisters Absolutely loved it. So I thought I’d share it with the rest of my family, but I need to travel with it for 5 hours. Do you have any recommendations? How I can do this cake and travel for 5 hours with it?
Thank you!
Hi Lori,
The frosting for this cake isn’t the most stable just because it’s basically stabilized whipped cream! It keeps it’s shape if it’s fully chilled, but you may want to use a slightly more stable frosting like Swiss Meringue! If you have a large cooler you could put the cake in with a bunch of ice packs, it could be ok, but 5 hours is a pretty long trip! Hope that helps, and that whatever you decide to do, it turns out amazing!
Love this recipe and how you wrote it but this is my first time making a cake- now, when I have the cake made how do I store this cake before the event & how long can it stay out room temp during the event?
Hi Maria,
So happy to hear that, and thank you! Once the cake is fully assembled, I recommend storing it in the fridge because of the frosting and fresh berries. You can chill it uncovered for about 30 minutes to firm up the frosting, then loosely cover it with plastic wrap or place it in a cake box and keep it refrigerated until the event.
For the best texture, let the cake sit at room temperature for about an hour before serving so the cake layers can soften up a bit. Since this cake has a dairy-based frosting and fresh fruit, I wouldn’t leave it out for more than about 2 hours total at room temperature, especially if the room is warm. If it’s outside or in a hot space, I’d keep that window even shorter and bring it out closer to serving time. Hope that helps, happy baking!!