
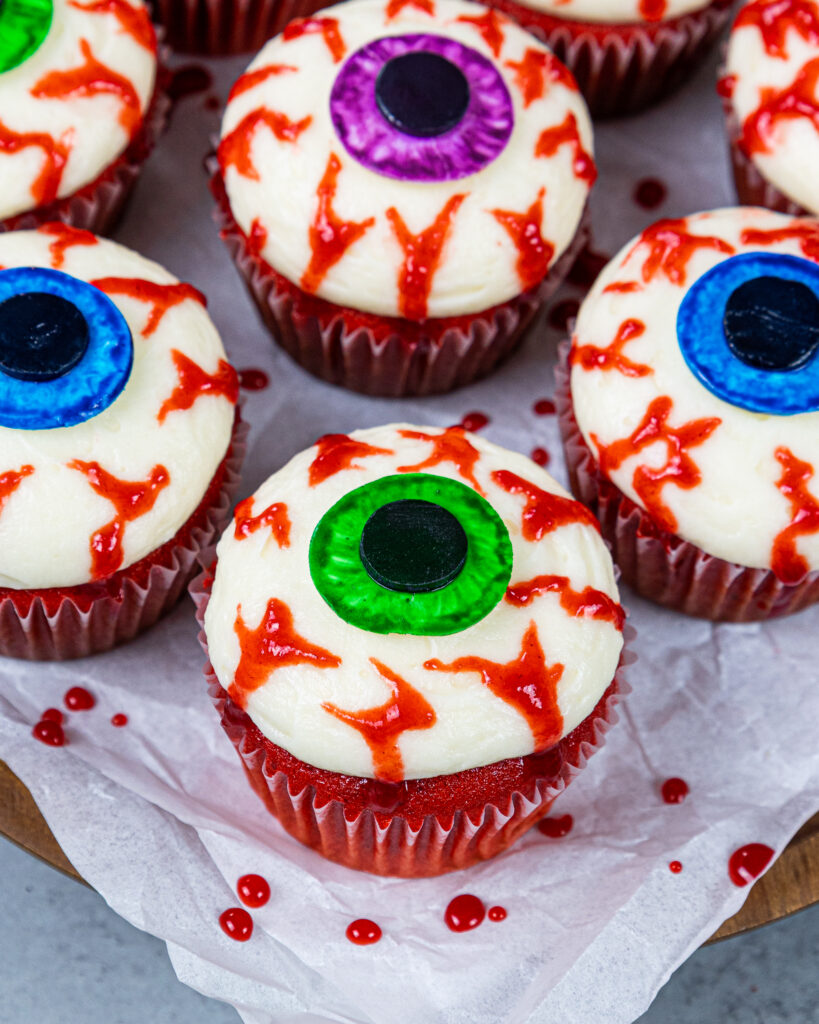
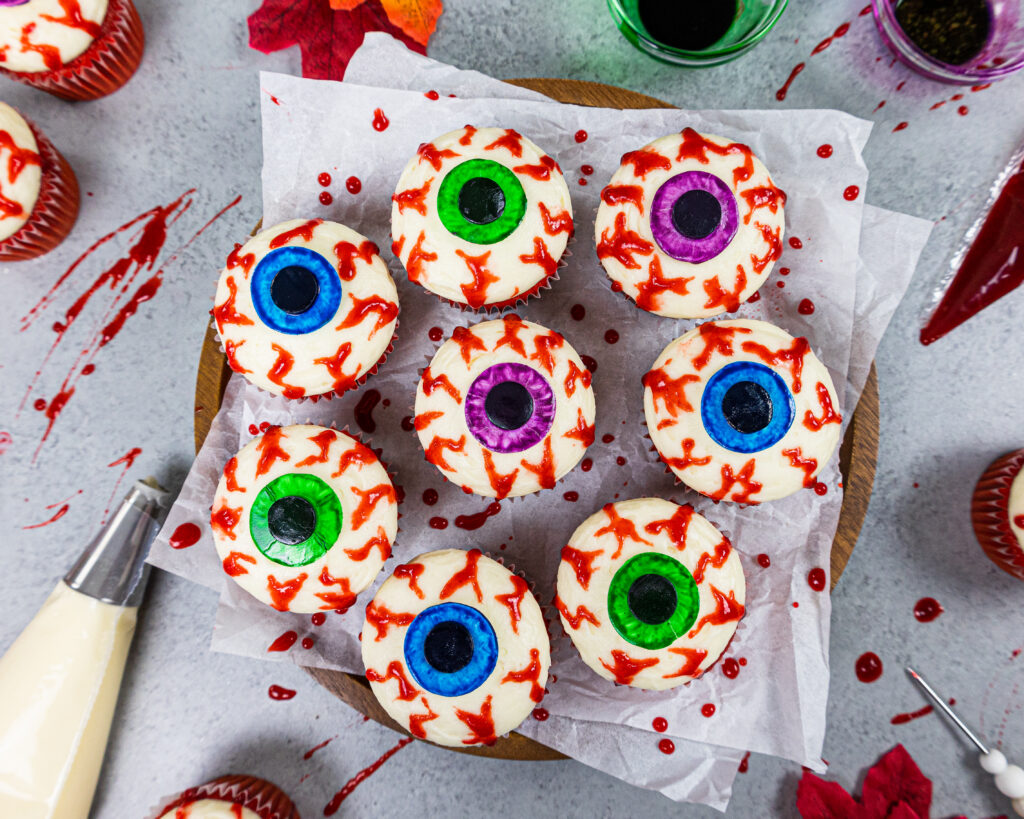
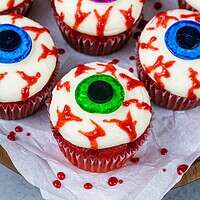
Eyeball Cupcakes
These eyeball cupcakes are the perfect Halloween dessert!! They’re equal parts scary and delicious!!
They’re made with moist red velvet cupcakes, homemade buttercream frosting, and raspberry jam veins.
How to Make these Spooky Halloween Eyeball Cupcakes
Let’s walk through each step that goes into decorating these bloody eyeball cupcakes to help yours turn out as amazing as possible! I’ve also included a video tutorial below.
Step 1: Make the Colorful Irises
Start by making the fondant irises. Knead the white fondant in your hands to warm it up, then roll it out and cut out 12 circles that are roughly 1-inch in diameter.
I like to use a small circle cutter, but a bottle cap would work too! If you find your fondant is sticking to your counter, dust it with a little bit of cornstarch.
Mix a couple drops of gel food coloring with a teaspoon of either clear alcohol (like vodka or white rum) or clear extract (like almond or lemon) in a small container or ramekin.
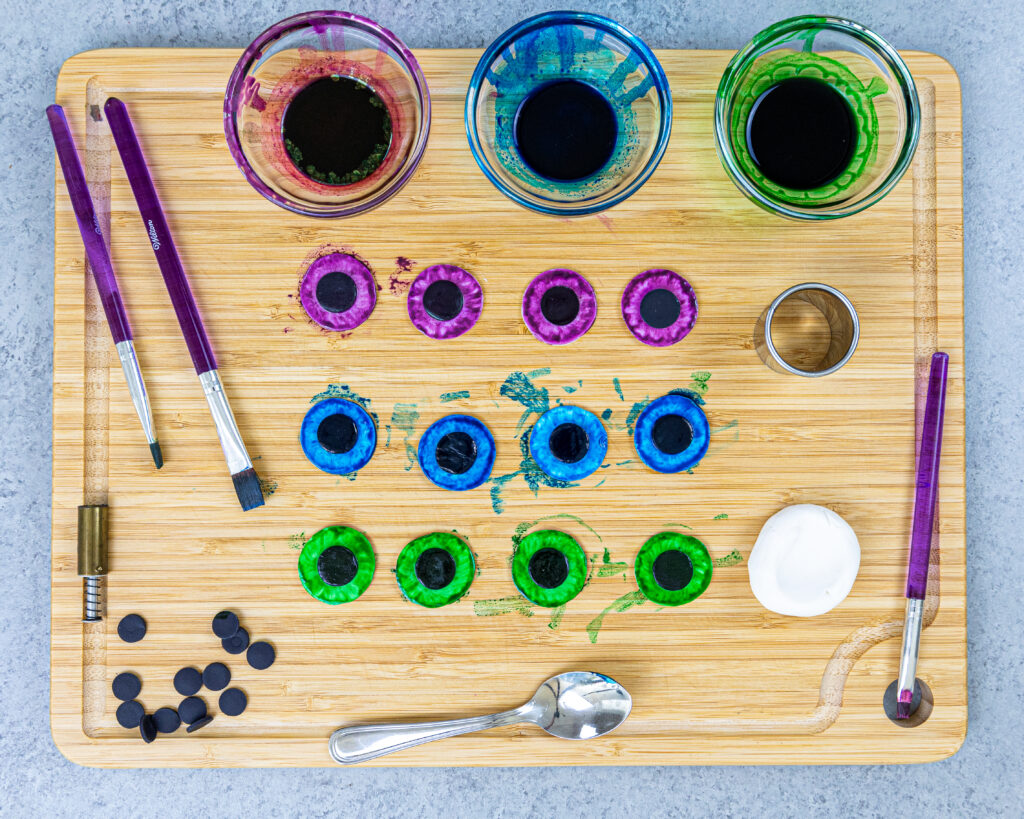
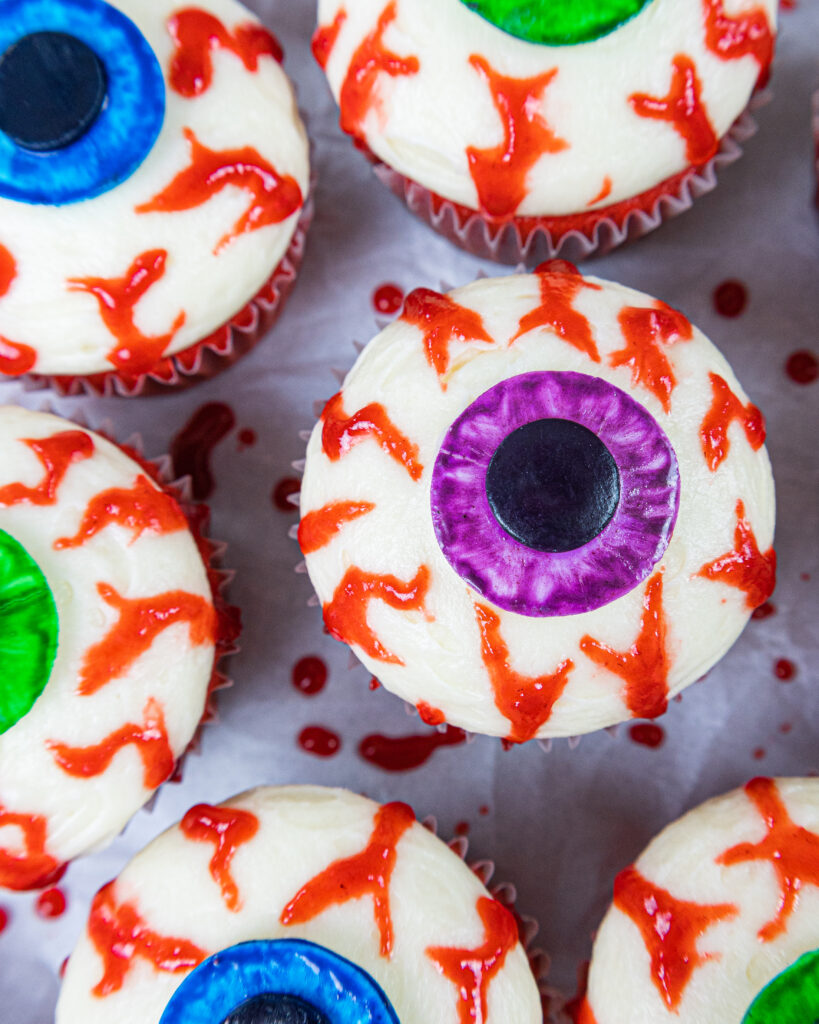
You can make all your eyes the same color or make them a variety of colors! I used blue, purple and green gel food coloring.
Paint the top of the white circles with a somewhat thick layer of the gel food coloring mixture. Don’t worry if they look a little bit streaky at this point.
Roll out black fondant next and cut out 12 small circles that are about 1/3 inch in diameter to make the pupils.
Place the pupils in the center of each painted iris. The gel food coloring paint should have started to thicken by now.
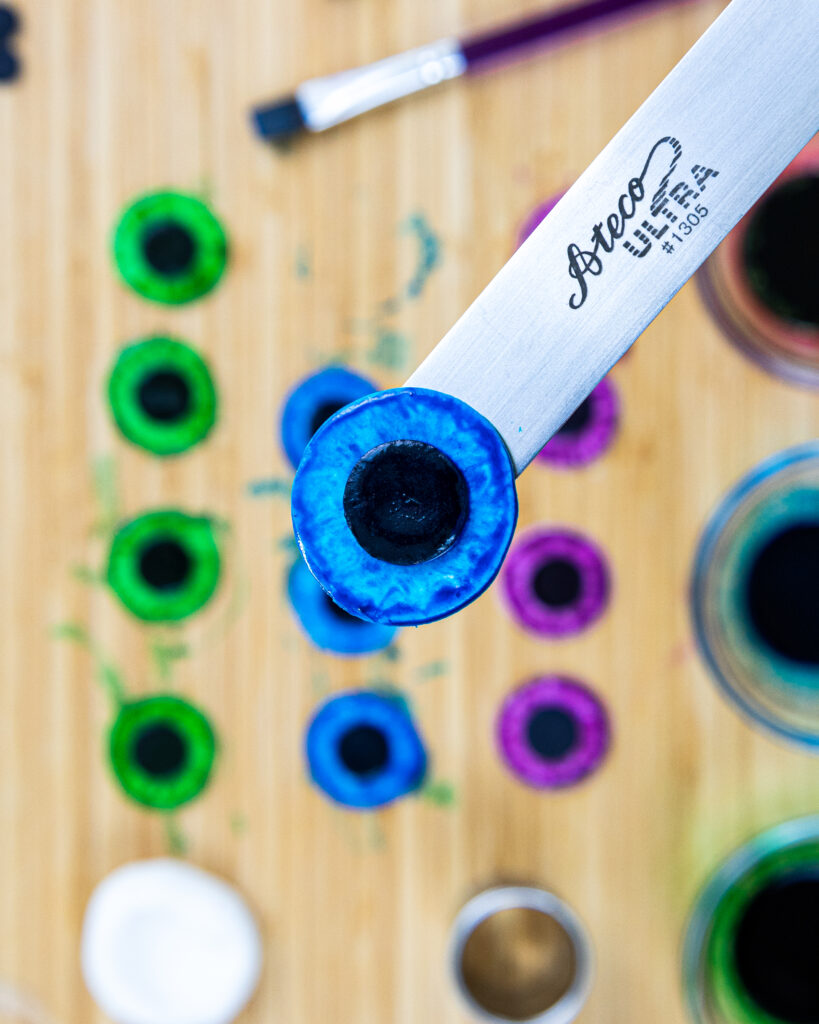
Use the paint brush to pull the paint from the edge of the pupil out to the edge of the iris. This should give it a cool streaky look that makes the eyes look spookier!
If the paint is still too wet and isn’t streaking, let it dry for 5-10 more minutes then try again.
Set aside to let the paint dry.
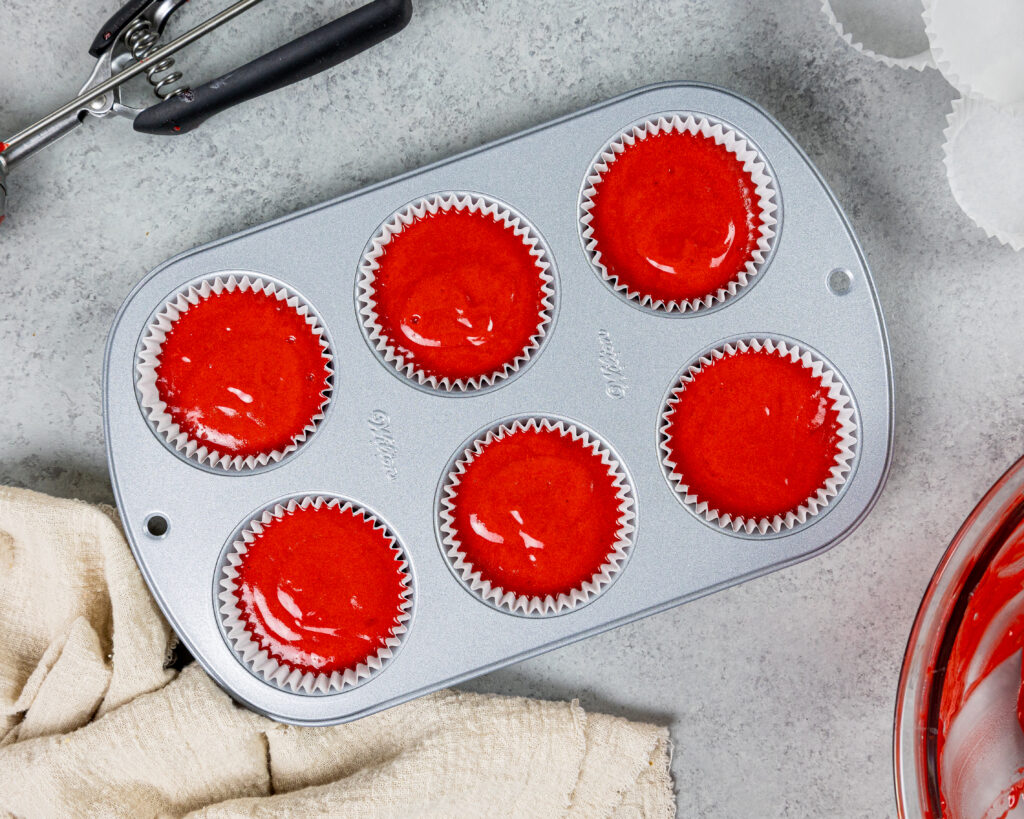
Step 2: Make the Red Velvet Cupcakes
The next step is to make the delicious red velvet cupcakes.
They need to cool completely to room temperature before you can frost them, so I like to make them before I make the frosting.
Divide the batter evenly between the cupcake liners and bake for about 17-20 minutes or until a toothpick comes out with moist crumbs.
Remove the cupcake pan from the oven and let them cool in the pan for 10 minutes.
Carefully remove the cupcakes from the pan and place on a wire rack to finish cooling.
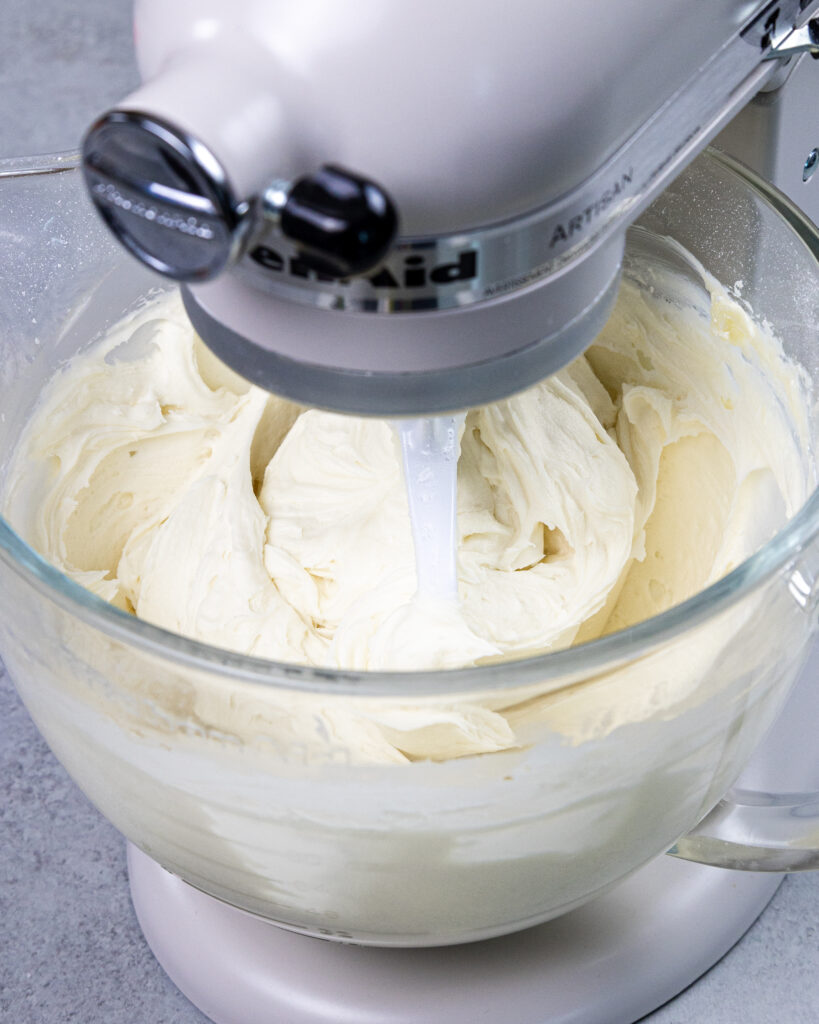
Step 3: Make the Vanilla Buttercream Frosting
As I wait for my cupcakes to cool I usually make my buttercream. This recipe makes a half batch of my favorite American buttercream.
If your frosting seems too thick after mixing together all your ingredients, add in additional cream (1 tablespoon at a time). Or if the frosting is too thin, add in more powdered sugar (quarter of a cup at a time).
If you’re unsure how thick your frosting should be, you can learn what consistency you’re looking for in my frosting consistency post.
If you don’t like sweet frosting, I recommend making a half batch of my Swiss meringue buttercream or using a half batch of my Russian buttercream.
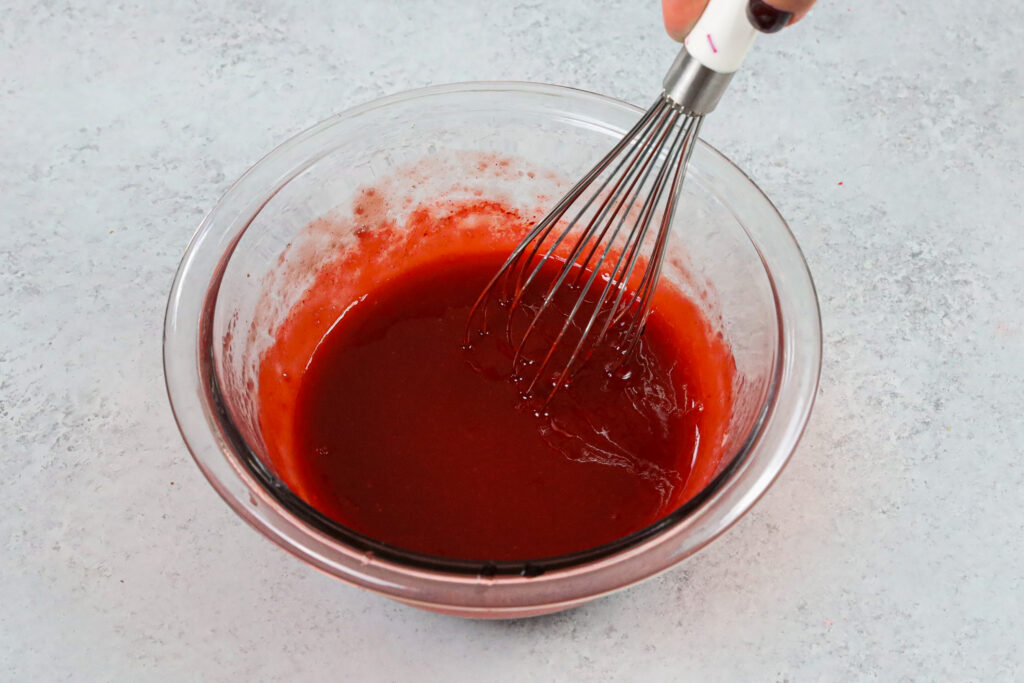
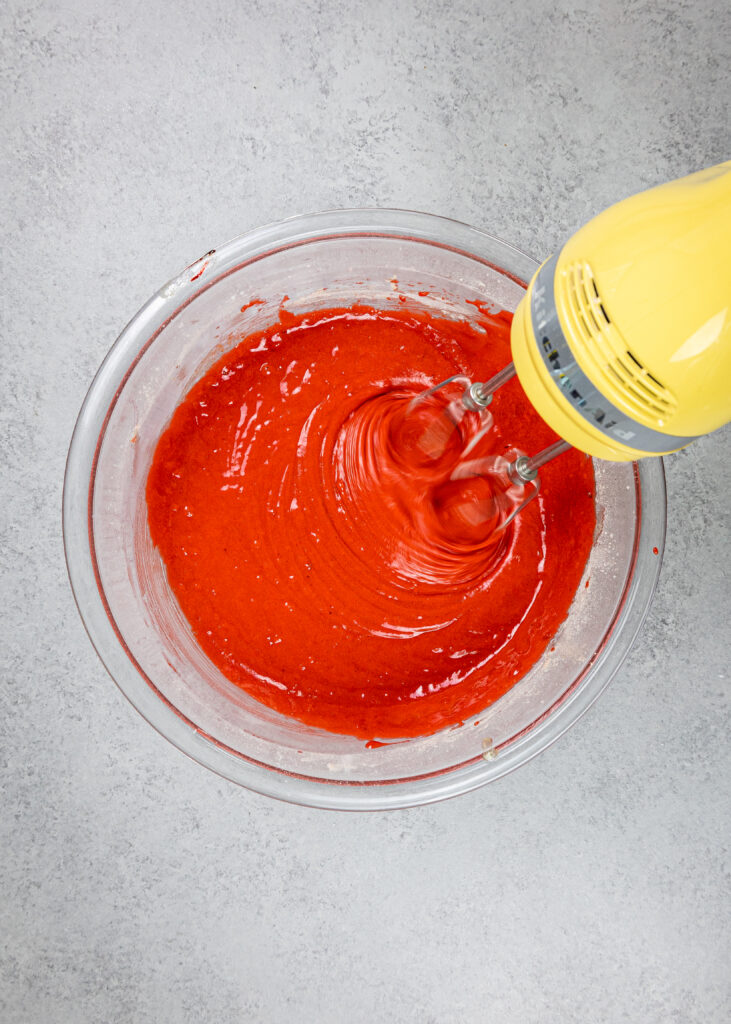
Step 4: Make the Edible Blood
Place the seedless raspberry jam, 2 tablespoons of water and 1/4 tsp of red gel food coloring in a small bowl.
Whisk together until the jam has a thin, smooth consistency and is bright red.
Place in a small piping bag fit with a small round piping tip and seal the top with a rubber band or clip.
If you don’t have a small piping tip you can just snip a very small opening at the base of the bag. Prop the tip of the bag up so that the blood doesn’t flow out of the bag and set aside.
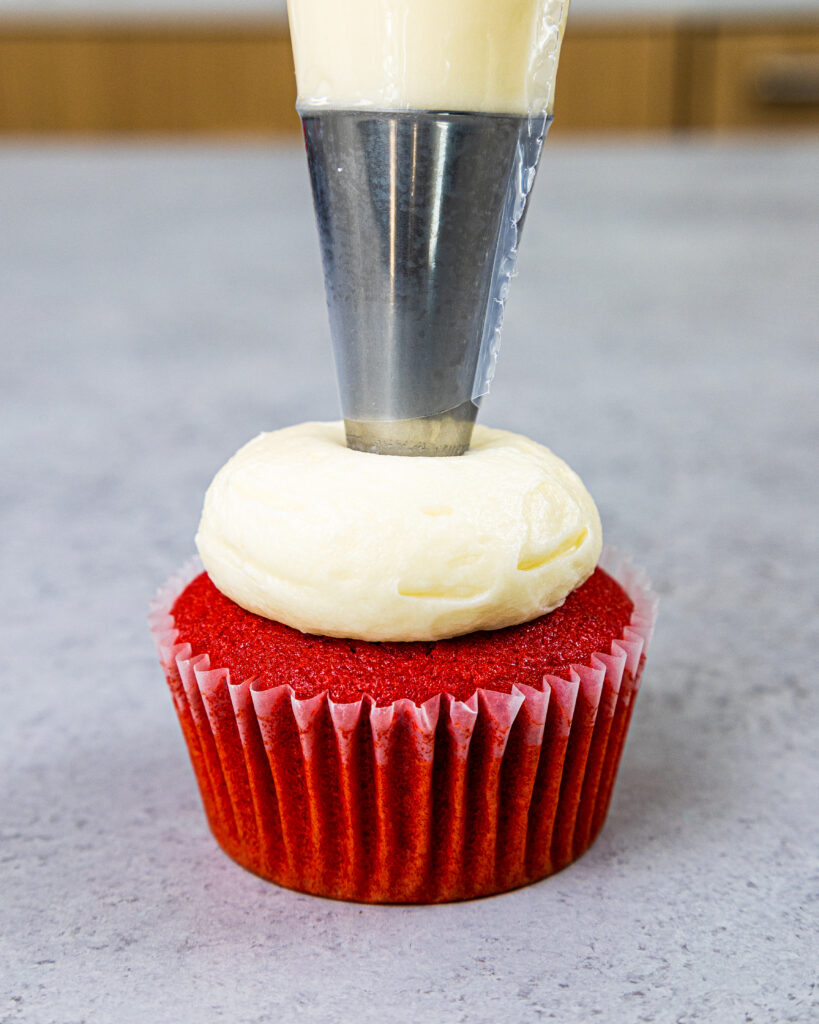
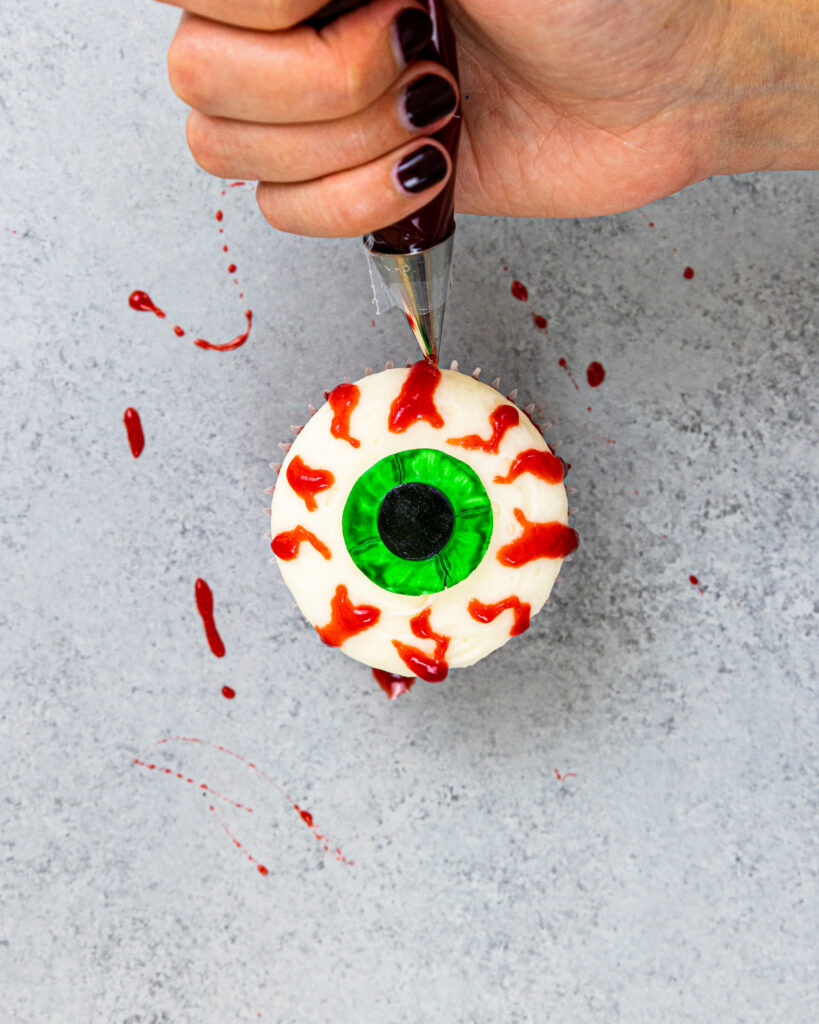
Step #5: Pipe the Buttercream Frosting on the Cupcakes
Once the cupcakes are fully cooled, pipe a large mound of buttercream on top of each cupcake. Tap the cupcake gently against the counter to help the buttercream settle down into a smooth mound.
Step 6: Decorate with the Colorful Irises and Edible Blood Veins
Use a small offset spatula to place an iris in the center of the cupcake, then chill the cupcakes in the fridge for 15 minutes to let the buttercream firm up a bit.
This will make it easier to pipe the veins on these cupcakes.
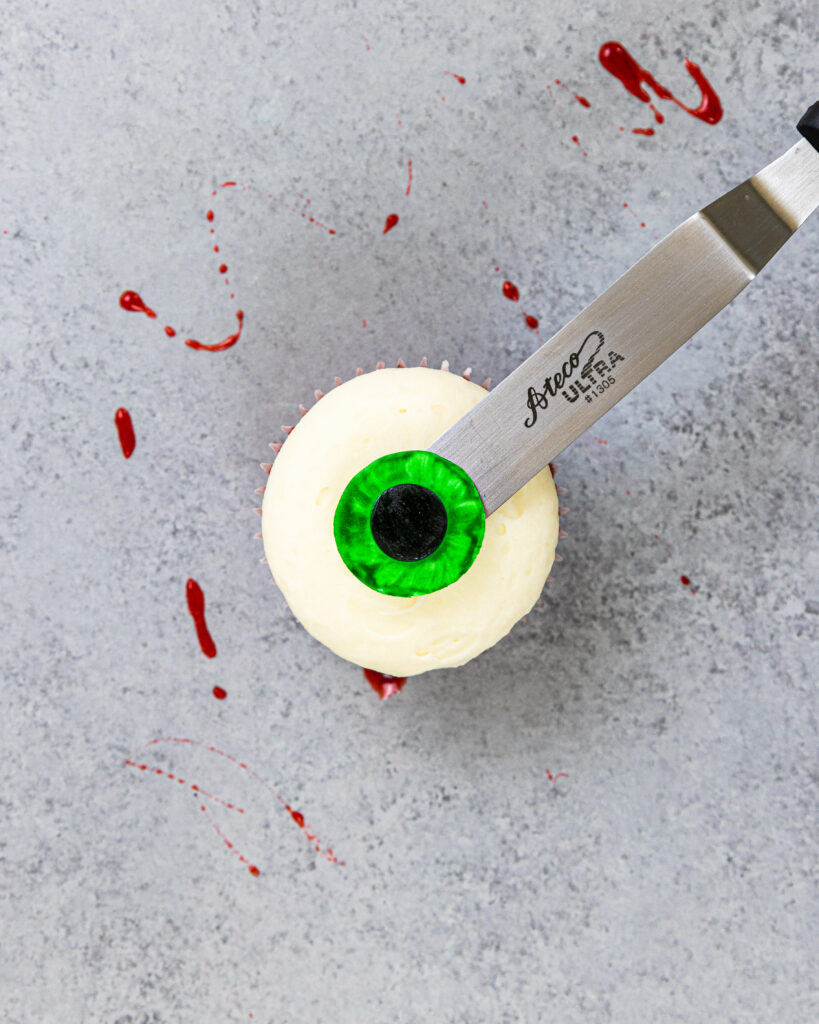
Carefully pipe veins along the sides of the cupcakes with the edible raspberry jam blood.
Repeat with remaining cupcakes, then enjoy! These cupcakes taste best fresh, but frosted cupcakes can sit out at room temperature overnight in an airtight container or be stored in the fridge for up to 3 days.
Substitutions and Swaps in These Eyeball Cupcakes
While I love this recipe just the way it is, I know some of you might not have all of these ingredients on hand!
Below are some swaps and substitutions that can be made in this recipe:
- Cake Flour – This recipe turns out best with cake flour, but you can use a gluten free flour blend if needed.
- Unsweetened Cocoa Powder – Dutch processed cocoa powder will work in this recipe too.
- Vegetable Oil – You can use any flavorless oil in this recipe. Canola or sunflower oil would work great!
- Unsalted Butter – You can use salted butter in place of the unsalted butter in this recipe if needed. Just be sure to omit the salt that this frosting recipe calls for. You can also use vegan butter in its place!
- Heavy Cream – Whole milk or alternative milk (soy, almond, oat) will work in this frosting if that’s what you have on hand.
- Seedless Raspberry Jam – If you can’t find seedless raspberry jam, you can also use seedless strawberry jam, strawberry jelly, or raspberry jelly. You might need to add a touch more water to the mixture if you use jelly though!
- Water – If you want to make edible fake blood without food coloring you can use beet or cranberry juice instead of water to naturally add more color to your edible blood.
- Red Gel Food Coloring – You can use gel or liquid food coloring in this recipe, but gel food coloring works best! It gives the mixture a vibrant color without throwing off the consistency. You can also use natural red food coloring.
Tips for Making the Best Halloween Eyeball Cupcakes:
- Ingredients at room temp mix together better. Set the cold ingredients ahead of time.
- Properly measure your flour (spoon into the cup measure and then level) or use a kitchen scale to measure your dry ingredients.
- Mix your cupcake batter just until the ingredients are incorporated. This will ensure your cupcakes are tender and fluffy.
- Use a cookie scoop to easily fill your cupcake liners. It also makes sure your cupcakes end up being the same height.
- Bang your cupcake pan on the counter before putting it in the oven. This brings any air bubbles that are trapped in the batter to the surface.
- Seal off the top of your piping bags with a rubber band to prevent any frosting or edible blood from seeping out the top of the bag and make the piping bags easier to use.
Making These Eyeball Cupcakes in Advance & Storage Tips:
Make your cupcakes in advance! If stored unfrosted in an airtight container, they can last for 2 days at room temp, up to a week in the fridge, or up to 3 months in the freezer.
Make your frosting ahead of time too or save any leftover frosting! Store it in an airtight container in the fridge for up to a month or the freezer for 3 months. Be sure to give it a good stir once it thaws to get the consistency nice and smooth again.
Frosted cupcakes can sit at room temperature for 3 hours or in the fridge for up to 3 days in an airtight container. However, I find frosting them right before serving is best.
Let Me Know What You Think!
If you make these bloody eyeball cupcakes, I’d love to hear what you think! Please leave a rating below.
Also tag me @chelsweets and use the #chelsweets so that I can see your amazing creations on social media!
Other Posts You Might Like:

Eyeball Cupcakes
Ingredients
Red Velvet Cupcakes
- 1 1/3 cups cake flour 160g
- 1 Tbsp unsweetened cocoa powder, sifted 5g
- 1 1/2 tsp baking powder 6g
- 1/4 tsp fine salt 2g
- 4 Tbsp (1/2 stick) unsalted butter, room temperature 56g
- 2/3 cup granulated sugar 133g
- 2 large eggs, room temperature 112g
- 1/2 cup buttermilk, room temperature 120g
- 1/3 cup vegetable or canola oil 73g
- 1 tsp vanilla extract or vanilla bean paste 4g
- 1/2 tsp red gel food coloring or 1 Tbsp liquid food coloring
Vanilla Buttercream Frosting
- 1/2 cup (1 stick) unsalted butter, room temperature 113g
- 1 tsp vanilla extract or vanilla bean paste 4g
- 1/4 tsp fine salt 2g
- 2 cups powdered sugar 250g
- 2 Tbsp heavy whipping cream, room temperature 30g
Edible Fake Blood
- 1/3 cup seedless raspberry or strawberry jam 95g
- 2 Tbsp water 30g
- 1/4 tsp red gel food coloring or 1 tsp liquid food coloring – optional
Suggested Tools / Decoration
- 1/3 cup White Fondant
- 2 Tbsp Black Fondant
- Small Paint Brush
- Gel Food Coloring blue, purple, and/or green
- Electric hand mixer or stand mixer
- Muffin tin
- Cupcake liners
- Small Whisk
- Large Piping Bag
- Large Round Piping Tip like a Wilton 2A
- Small Piping Bag
- Small Round Piping Tip like a Wilton 3
Instructions
Fondant Iris:
- Start by making the fondant irises. Knead the white fondant in your hands to warm it up, then roll it out and cut out 12 circles that are roughly 1-inch in diameter. I like to use a small circle cutter, but a bottle cap would work too! If you find your fondant is sticking to your counter, dust it with a little bit of cornstarch.
- Mix a couple drops of gel food coloring with a teaspoon of either clear alcohol (like vodka or white rum) or clear extract (like almond or lemon) in a small container or ramekin. You can make all your eyes the same color or make them a variety of colors! I used blue, purple and green gel food coloring.
- Paint the top of the white circles with a somewhat thick layer of the gel food coloring mixture. Don't worry if they look a little bit streaky at this point.
- Roll out black fondant next and cut out 12 small circles that are about 1/3 of an inch in diameter to make the pupils. Place the pupils in the center of each painted iris. The gel food coloring paint should have started to thicken by now. Use the paint brush to pull the paint from the edge of the pupil out to the edge of the iris. This should give it a cool streaky look that makes the eyes look spookier! If the paint is still too wet and isn't streaking, let it dry for 5-10 more minutes then try again.
- Set aside to let the paint dry.
Red Velvet Cupcakes:
- Preheat oven to 350 F / 175 C and line a standard sized muffin tin with 12 cupcake liners.
- In a medium-sized bowl, sift together the dry ingredients (cake flour, cocoa powder, baking powder and salt). Set aside.
- In a large bowl, cream together the butter and granulated sugar with either a hand mixer or with a stand mixer fit with a whisk attachment. Mix on a medium-high speed for about a minute. The mixture should become lighter in color.
- Mix in the eggs on a medium speed until fully incorporated. Scrape the sides and bottom of the bowl with a rubber spatula as needed.
- Mix in the buttermilk, vegetable oil, vanilla extract, and food coloring on a low speed until combined and evenly colored.
- Mix the dry ingredients into the wet ingredients in two installments on a low speed, mixing just until you can no longer see streaks of flour. Scrape the sides and bottom of the bowl with a rubber spatula as needed.
- Divide the batter evenly between the cupcake tins and bake for about 17-20 minutes (or until a toothpick comes out with moist crumbs).
- Remove the cupcake pan from the oven and allow them to cool in the pan for 10 minutes.
- Carefully remove the cupcakes from the pan and place on a wire rack to finish cooling.
Vanilla Buttercream Frosting:
- Beat the butter on a medium speed for 30 seconds with a paddle attachment until smooth.
- Add in the vanilla extract and salt and beat on low until fully incorporated.
- Slowly mix in the powdered sugar on a very low speed. Mix in the heavy cream half way through to make the frosting easier to mix.
- Mix on low for a minute or two to give your frosting a super smooth consistency.
- If the frosting seems too thick, add in additional cream (1 Tbsp at a time). If the frosting is too thin, add in more powdered sugar (1/4 cup at a time).
- Place the frosting in a piping bag fitted with a large round piping tip (like a Wilton 2A) and seal the top of the bag with a rubber band or clip. Set aside.
Edible Blood Recipe:
- Place the seedless raspberry jam, water and red gel food coloring in a small bowl. Whisk together until the jam has a thin, smooth consistency and is bright red.
- Place in a small piping bag fit with a small round piping tip and seal the top with a rubber band or clip. If you don't have a small piping tip you can just snip a very small opening at the base of the bag. Prop the tip of the bag up so that the blood doesn't flow out of the bag and set aside.
Eyeball Cupcake Cupcake Decoration:
- Once the cupcakes are fully cooled, pipe a large mound of buttercream on top of each cupcake. Tap the cupcake gently against the counter to help the buttercream settle down into a smooth mound.
- Use a small offset spatula to place an iris in the center of the cupcake, then chill the cupcakes in the fridge for 15 minutes to let the buttercream firm up a bit. This will make it easier to pipe the veins on these cupcakes.
- Carefully pipe veins along the sides of the cupcakes with the edible blood, then enjoy!
Video
Notes
Making Mini Eyeball Cupcakes
If you want to make mini eyeball cupcakes, this recipe can be baked in mini muffin tins! It makes about 40 mini cupcakes, and they only need to bake for 9-10 minutes at 350 F / 175 C.Tips for Making the Best Eyeball Cupcakes
- Ingredients at room temp mix together better. Be sure you set out any cold ingredients ahead of time.
- Properly measure your flour (spoon into the cup measure and then level) or use a kitchen scale to measure your dry ingredients.
- Mix your cupcake batter just until the ingredients are incorporated. This will ensure your cupcakes are tender and fluffy.
- Use a large cookie scoop to easily fill your cupcake liners. It also makes sure your cupcakes end up being the same height.
- Bang your cupcake pan on the counter before putting it in the oven. This brings any air bubbles that are trapped in the batter to the surface.
- Seal off the top of your piping bags with a rubber band to prevent any frosting from seeping out the top of the bag and make the piping bags easier to use.
Eyeball Cupcake Variations:
- To make gluten free eyeball cupcakes, swap in your favorite gluten free flour blend for the AP flour this recipe calls for, and be sure to over-mix your batter and let it sit for at least 30 minutes before baking for best results.
Hey there!! Love all your recipes! Quick question about the red velvet cupcake recipe you list here. I noticed it doesn’t have vinegar as one of the ingredients, is this because you used baking powder instead of baking soda? Thanks so much!
@Khrista,
Salut, je pense que si tu n’as pas de babeurre que tu mélanges le lait avec un peu de vinaigre blanc et dans la recette elle a utilisé le babeurre c’est pour ça qu’il n y as pas de vinaigre.
@Khrista,
Hey i think that if you don’t have buttermilk you can use milk + a little bit of vinegar and in the recipe she used buttermilk that’s why she didn’t use the vinegar
I tried them out today and they turned out great. I was a bit skeptical because this was the first time I’d seen a red velvet recipe that didn’t require extra vinegar. But I got that red velvet taste. Thank you for sharing Chelsea??