
Conversation Heart Cookies
These adorable little conversation heart cookies bake up deliciously soft and chewy and are decorated with royal icing.
They’re the same size and just as fun as conversation heart candies, they just taste better (IMO)!

I made these as part of my Valentine’s Day cookie boxes, and they were the perfect addition!
How to Make These Conversation Heart Cookies
To make sure these cookies turn out as amazing as possible, let’s walk through each step together.
I’ve also shared a video and a list of the tools/equipment I used to make these cookies. Don’t worry if you don’t have everything on hand, you can always improvise with what you have.
- Hand mixer or stand mixer
- Parchment paper or 2 silicone baking mats
- 2 large baking sheets
- Small heart cookie cutter – mine was 3/4 inch
- 7 small piping bags
- Edible Red Marker
Step 1: Make the Cream Cheese Sugar Cookies
Begin by making the sugar cookie dough, following the recipe card at the bottom of this post.
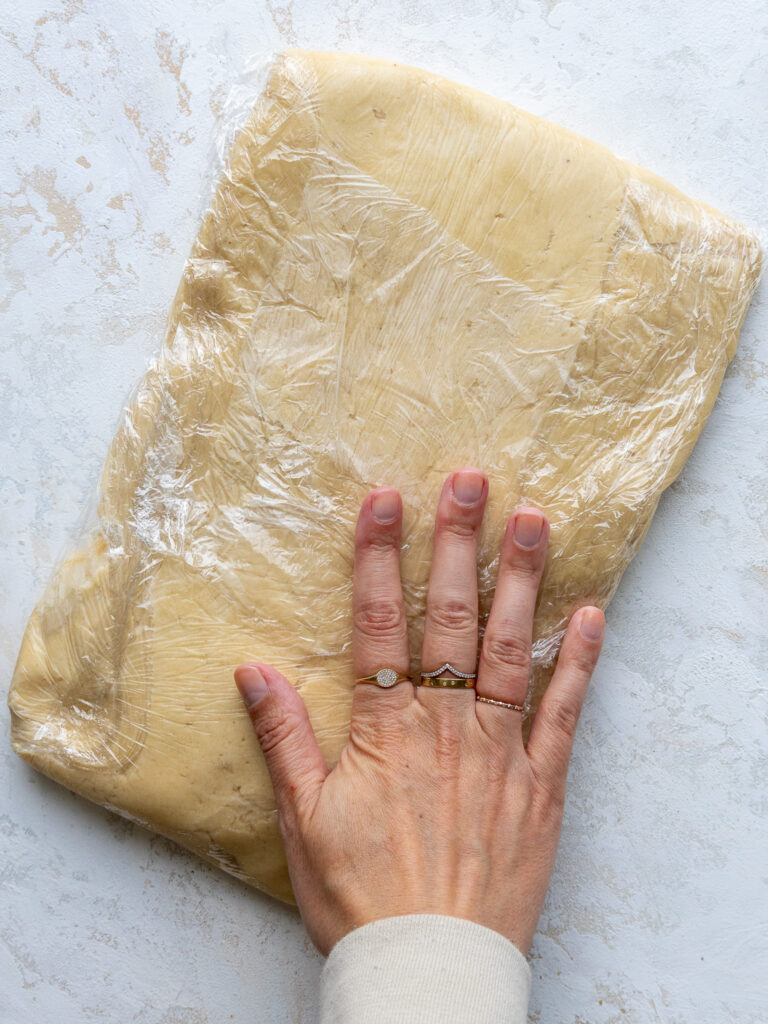
The dough should be pretty thick and sticky. Divide the dough in half and wrap each portion in a piece of plastic wrap.
I like to flatten the dough into a rectangle that’s about 1/2 inch tall to make it easier to roll out once it’s chilled.
Chill the dough in the fridge for about 2 hours or in the freezer for 30 minutes.
Preheat the oven to 350 F / 175 C for about 30 minutes before you plan to roll out the dough, and line two large baking sheets with silicone baking mats or parchment paper. Set aside.
Take one piece of dough out of the fridge, leaving the other in there to continue to chill. If you put the cookie dough in the freezer, let it sit at room temperature for 5-10 minutes to soften up a bit before trying to roll it out.
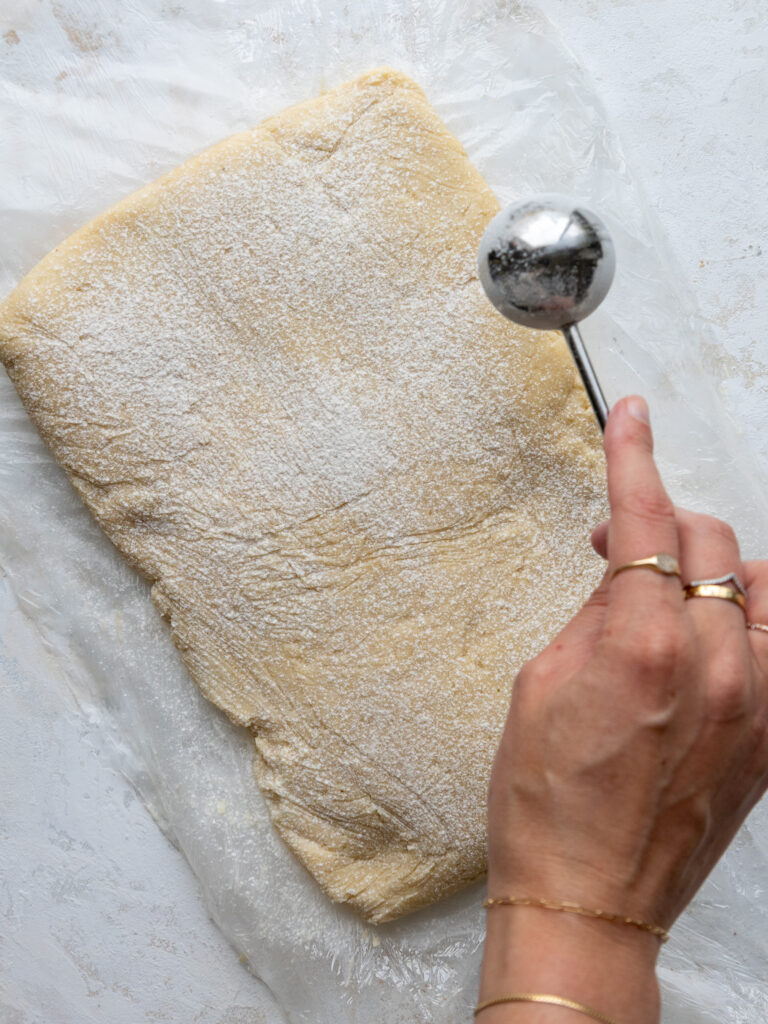
Unwrap the cookie dough and lay the plastic wrap out flat on your counter. Dust both sides of the cookie dough and your rolling pin with flour.
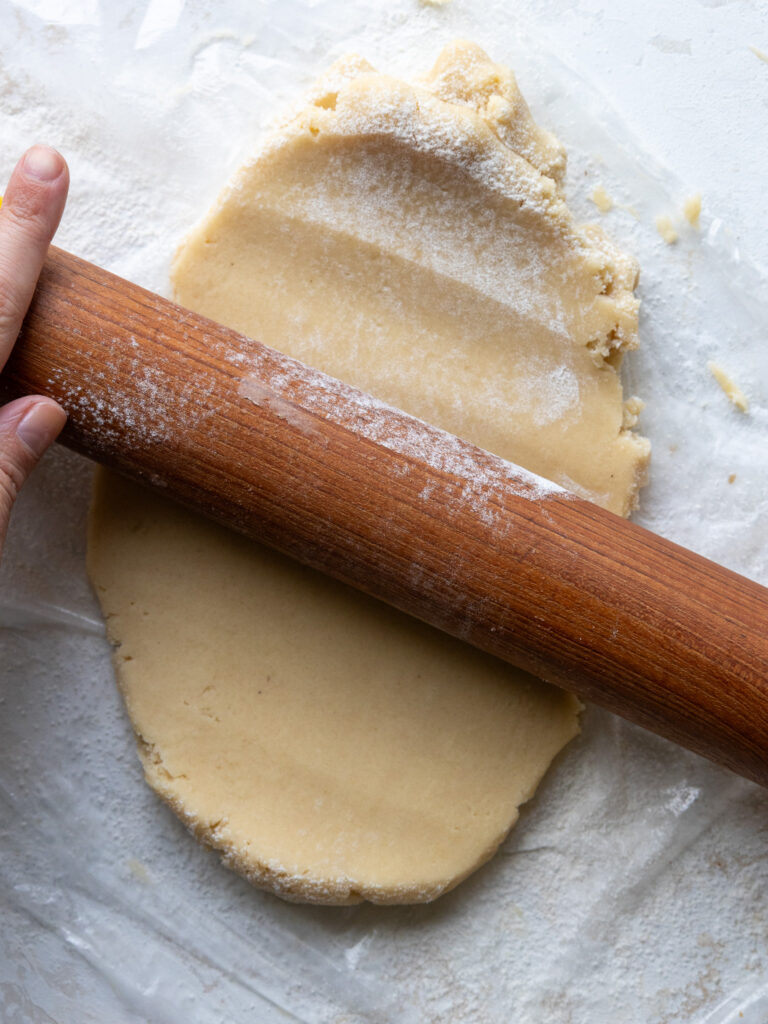
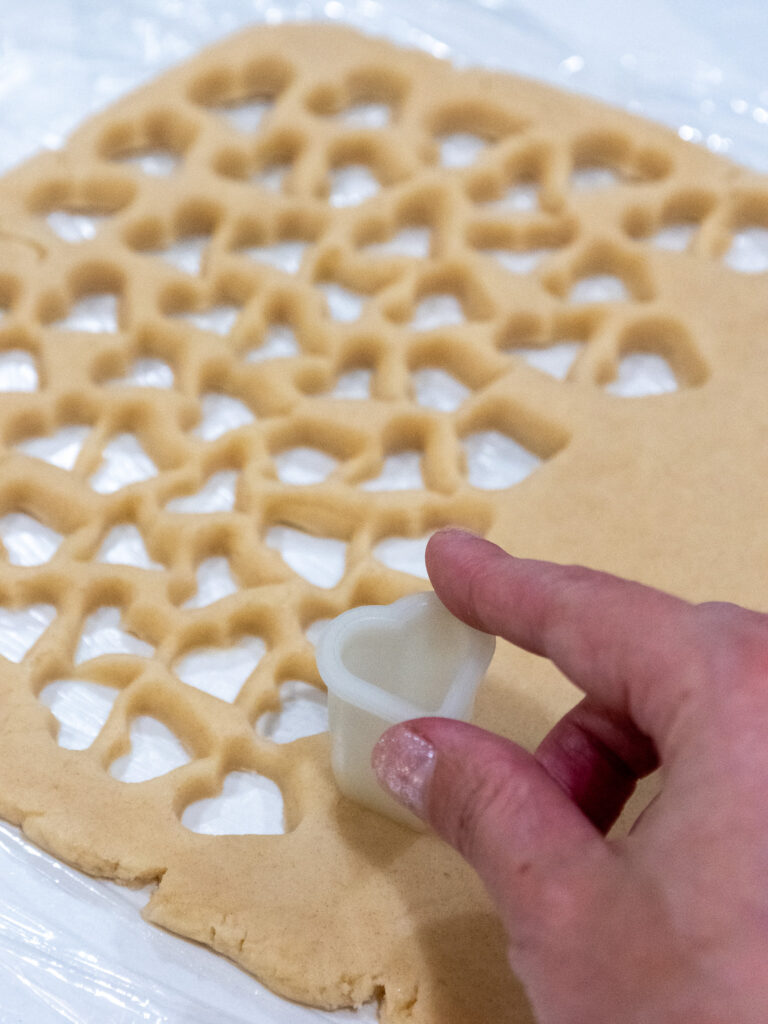
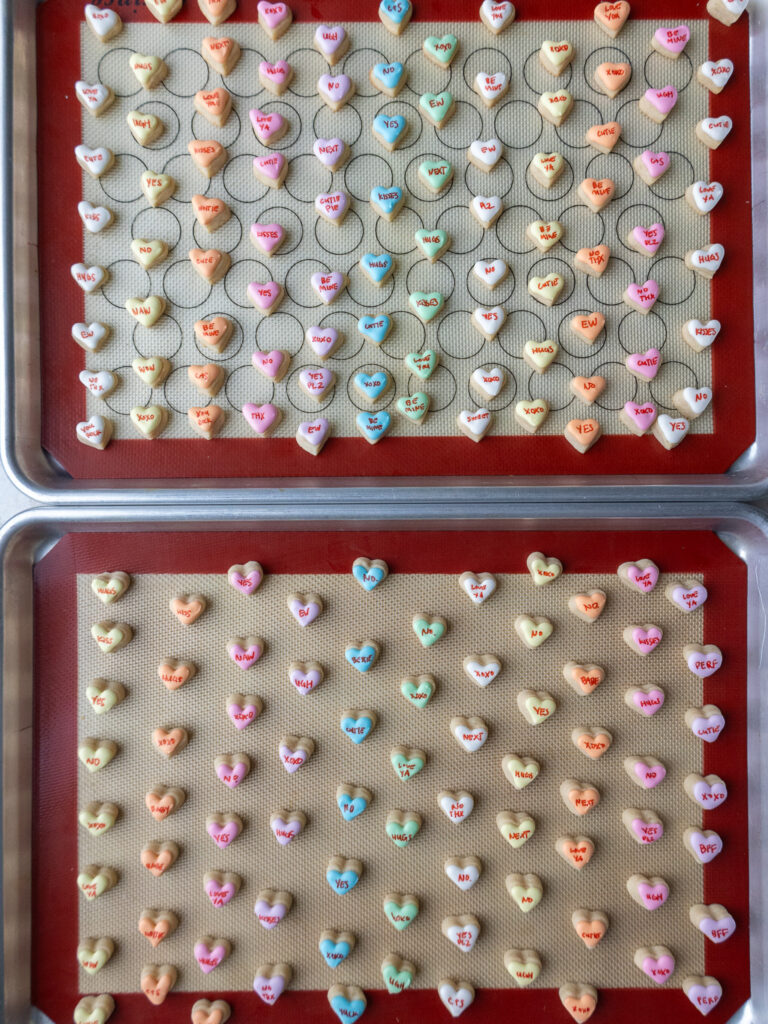
Roll the chilled dough to be 1/3 inch thick (these rolling pin rings help a ton with getting a consistent thickness) and use a small heart cookie cutter (mine is 3/4 inch) to cut out as many heart cookies as you can.
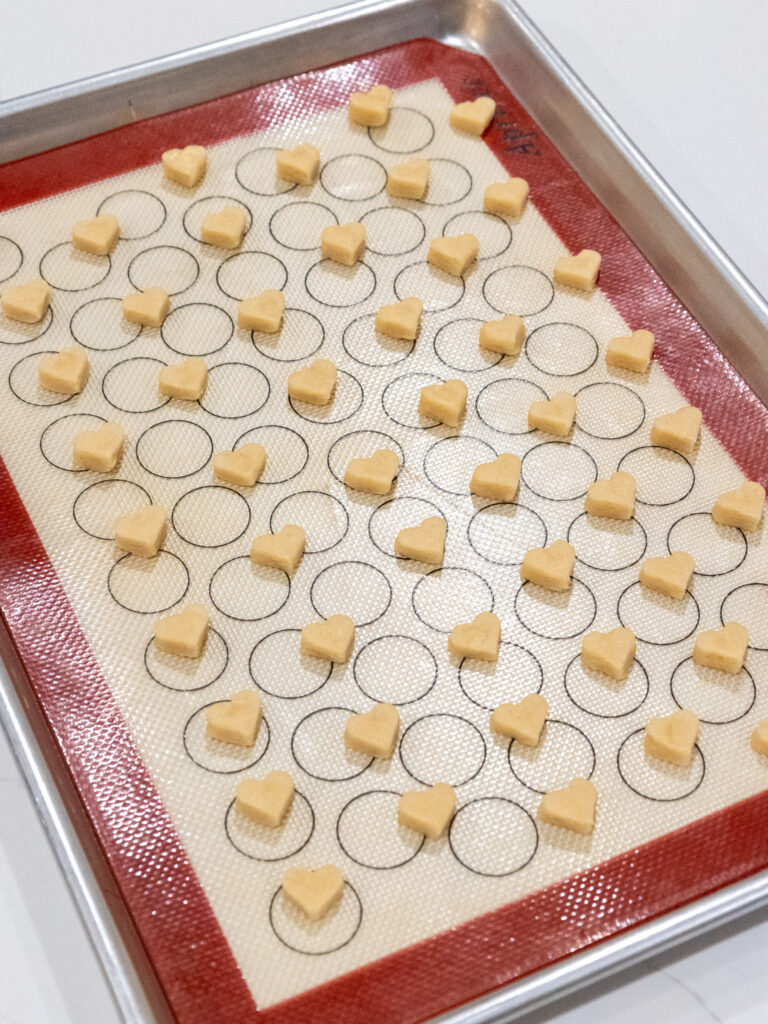
The cookies don’t spread much as they bake, so you can place them about 1/2 inch apart.
Chill the cut-out cookies one more time in the fridge for 15 minutes or the freezer for 5 minutes to help them keep their shape as they bake.
Bake one sheet of cookies at a time for about 10 minutes on the middle rack of your oven (bake time can vary based on the cookies’ size and the dough’s thickness).
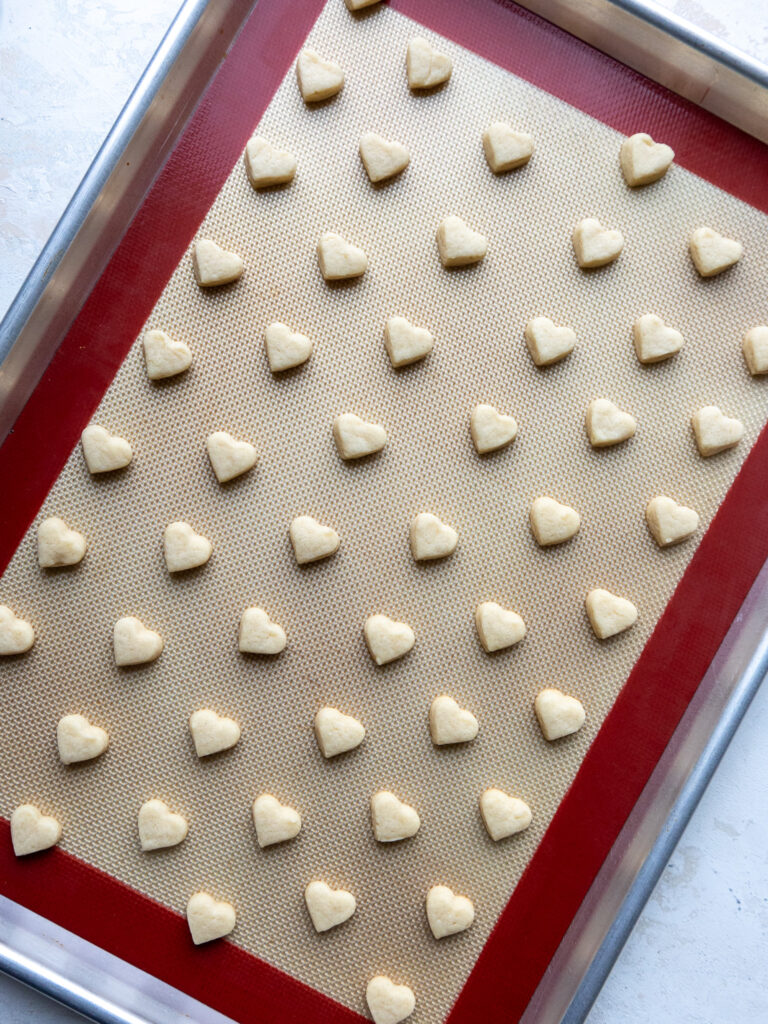
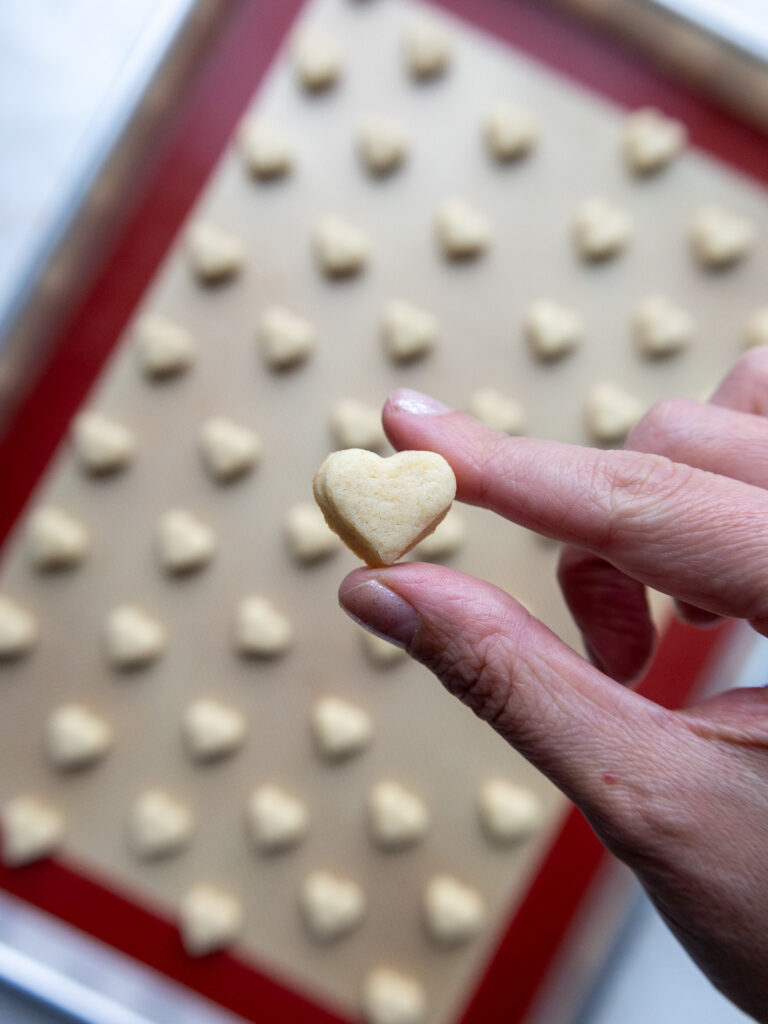
Keep a close eye on the cookies and be sure to pull them out before the edges start to brown. Let the baked cookies cool on the pan for about 15 minutes, then transfer to a wire rack to finish cooling.
While the first batch bakes and cools, knead together the cookie dough scraps and rewrap them in plastic wrap. Pop them back in the fridge to chill.
Pull out the 2nd chilled portion of dough and repeat the steps above. Then repeat with the chilled dough scraps.
Step 2: Make the Royal Icing
While the cookies bake and cool, make the royal icing.
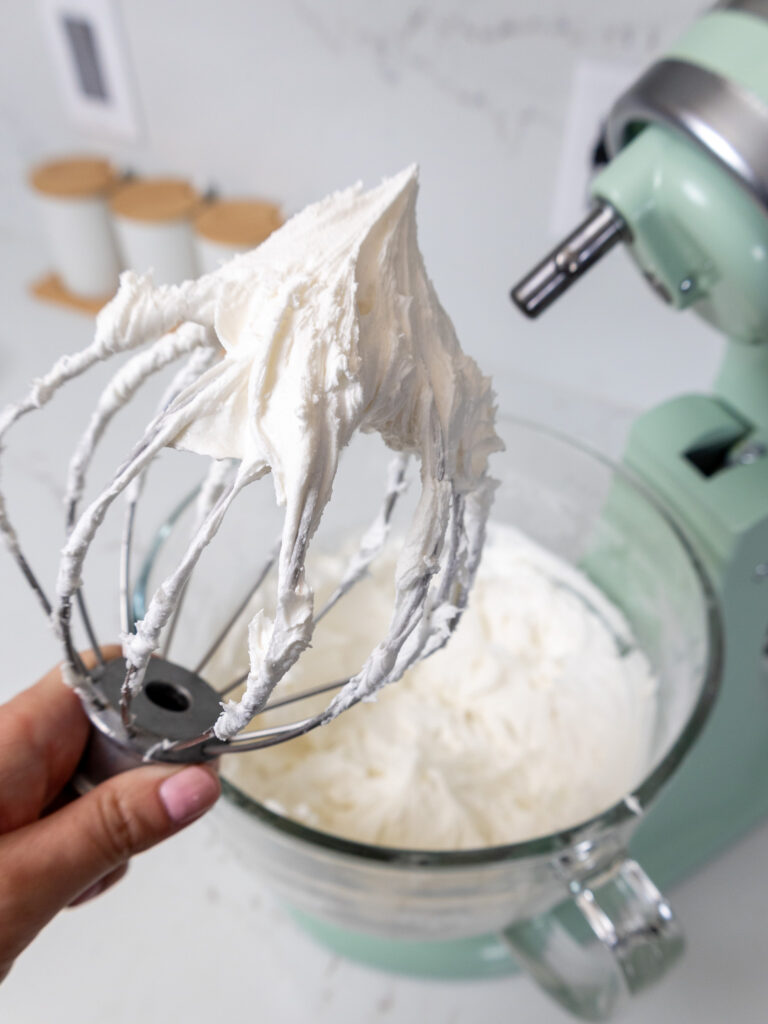
Whisk together the powdered sugar and meringue powder in a large bowl or the bowl of a stand mixer.
Add in the water and vanilla or almond extract and mix on a medium speed with a paddle or whisk attachment until stiff peaks form.
This usually takes me about 3 minutes with a hand mixer or 2 minutes with a stand mixer.
Step 3: Testing the Consistency of the Icing – The Figure 8 Test
Mix in additional water 1 Tbsp at a time until a thick flood consistency is reached.
I usually use 2 to 3 Tbsp of water, but it can vary from batch to batch. Scrape the sides and bottom of the bowl to make sure the water is being incorporated into all of the icing.
To test the consistency, lift the spatula up and let the icing run off while drawing a figure 8.
The icing should keep its shape, but melt into the rest of the icing if you wiggle the bowl a bit like in the picture below.
I forgot to take a picture of the uncolored icing at this stage while shooting this project, but this picture of tan icing in the same consistency should help as a visual aid!
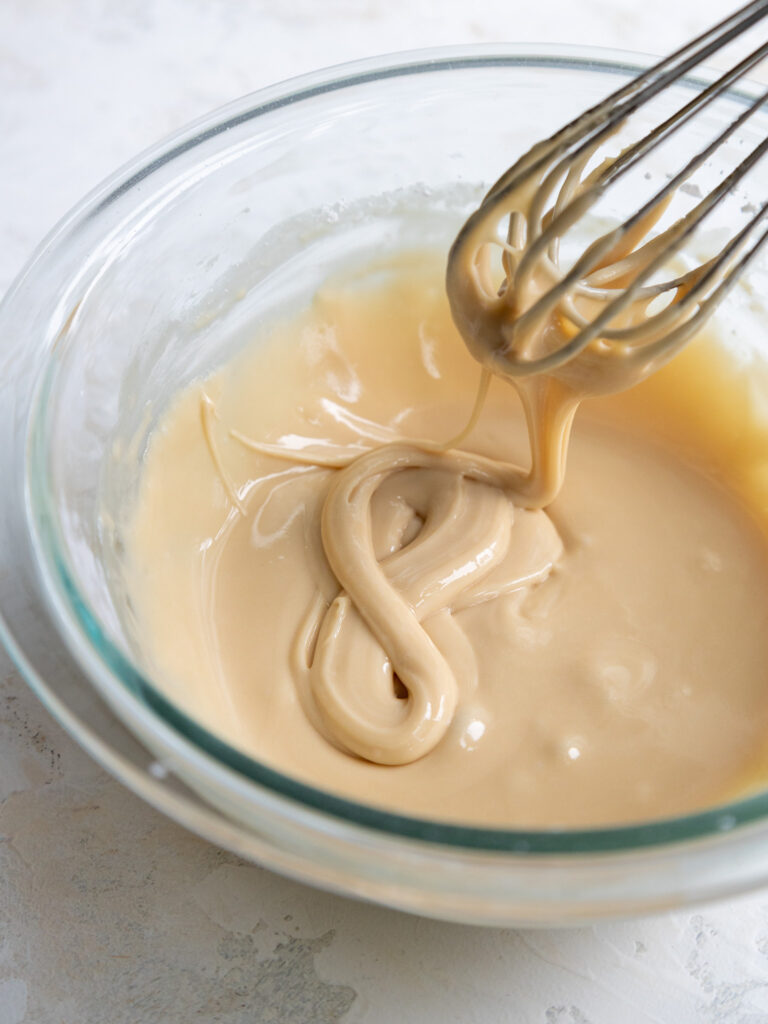
If it’s too stiff, add a tiny bit more water. Or if it’s too thin, add more powdered sugar, 1 Tbsp at a time.
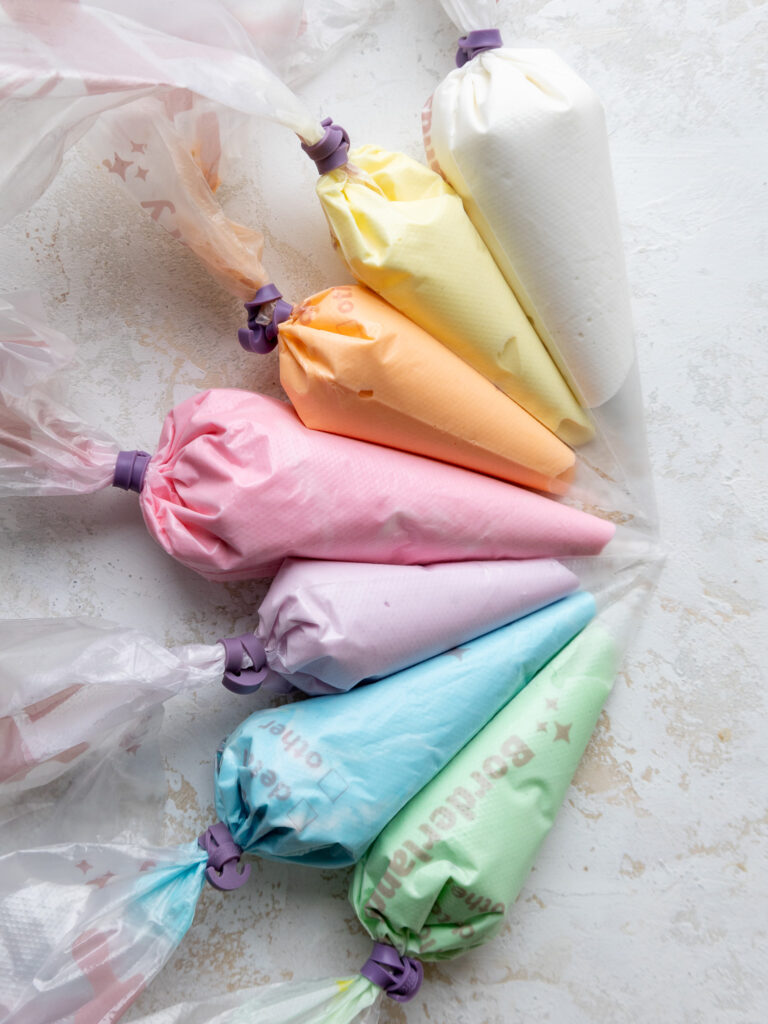
Then it’s time to color the icing. You should have roughly 18 ounces of icing. Scoop 3 ounces (1/3 cup) of icing into a separate small bowl.
Add a very small drop of yellow gel food coloring (about 1/2 tsp), and stir until evenly colored. We’re trying to make pastel shades, so you only need a tiny bit of food coloring.
Scoop a small amount of the icing into a small piping bag and seal the top. Before you color the rest of the icing, do one more consistency test. Cut the tip of the piping bag to create a very small opening (1-2 millimeters).
Pipe the yellow icing on top of one of the cookies and see how the icing settles. It should be thick enough to keep its shape and settle into itself after a bit of time and the help of a scribe.
If it doesn’t, you may need to add a tiny bit more water to the icing. Or if it’s too thin and is seeping over the edges of the cookie, you can add more powdered sugar.
Repeat this test as needed until the consistency of the icing is right, then fill the piping bag with the rest of the yellow icing and set aside.
Step 4: Color the Rest of the Royal Icing
Next, scoop 3 ounces (1/3 cup) of icing into the same bowl and add a small drop of orange gel food coloring. Stir until the icing is evenly colored, then scoop it into a small piping bag and seal the top. Set aside.
Repeat this process to make pastel orange, pink, purple, blue, and green icing. Set aside.
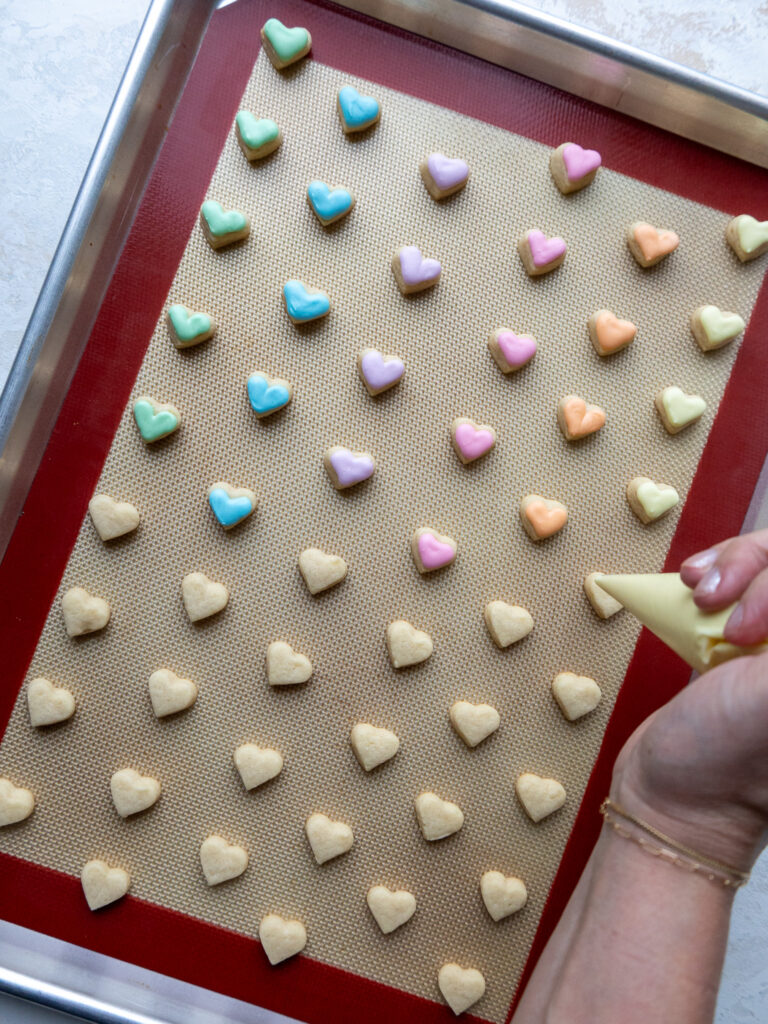
Step 5: Decorate the Cookies
When you’re ready to decorate the cookies, cut the tips of the piping bags to create a very small opening (1-2 millimeters).
You can always cut the opening wider, but you can’t make it smaller once you cut it. I find it’s a lot easier to control the icing as you decorate the cookies if you have a small opening.
Then, use the different colored icing to pipe a heart on top of each little cookie. If there are any parts where the icing isn’t settling, use a scribe or toothpick to help the icing settle smoothly.
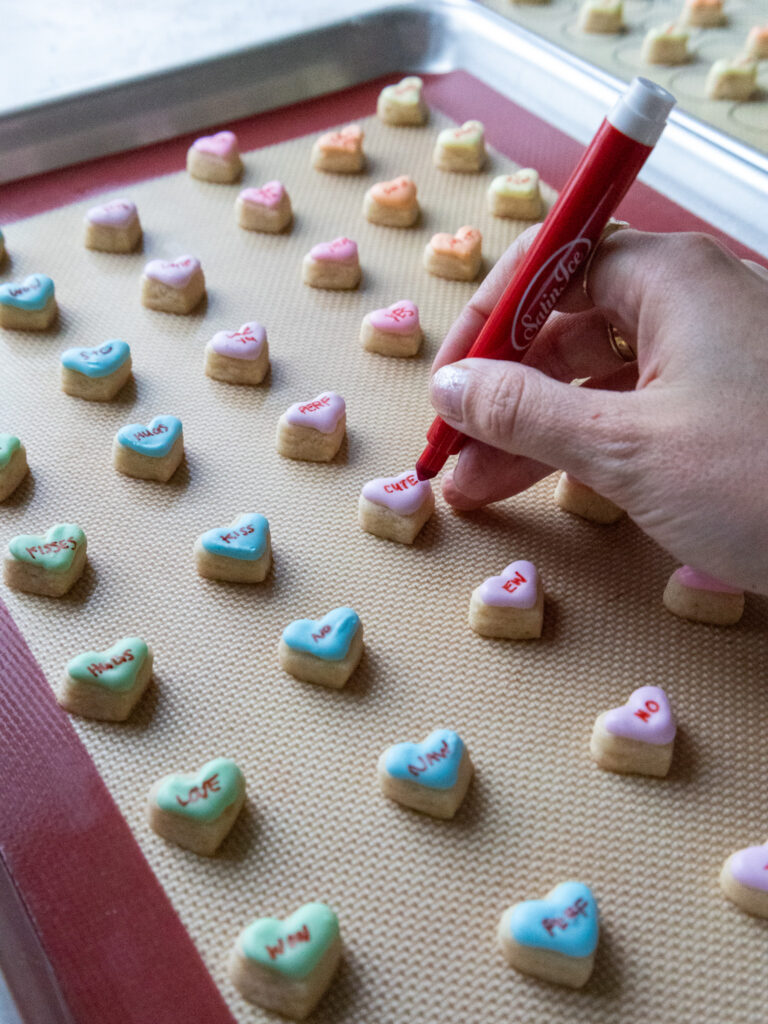
Let the cookies dry for a couple of hours or until the icing is firm to the touch, then use a fine-tipped edible red marker to write cute little phrases on top of each cookie.
These cookies can be stored in an airtight container for up to two weeks at room temperature or up to 3 months in the freezer.
Substitutions and Swaps – Conversation Heart Cookies
While I love this recipe just the way it is, I know you might not have all these ingredients on hand! Or you might have food restrictions or allergies.
Below are some swaps and variations that can be made in this recipe.
- Unsalted Butter – If you only have salted butter, you can use it and omit the salt that this recipe calls for. You can also use vegan butter.
- Cream Cheese – I recommend using the full-fat cream cheese that comes in a block.
- Granulated Sugar – I do not recommend reducing the amount of sugar or changing the type of sugar as it will change the spread of these cookies.
- All-Purpose Flour – You can use a gluten-free flour blend if needed in place of the AP flour in this recipe.
- Cornstarch – Cornstarch helps give these cookies a soft texture! If you don’t have any one hand it can be omitted, but your cookies won’t bake up as soft.
- Almond Extract – I love the hint of almond extract in these cookies, but if you have a nut allergy you can use vanilla extract or a different extract in place of the almond extract.
- Meringue Powder – This ingredient is a must for the royal icing. It has stabilizers (usually cornstarch and sugar) which help the icing easily whip up. For this reason, I don’t recommend using dried egg white powder as a substitution.
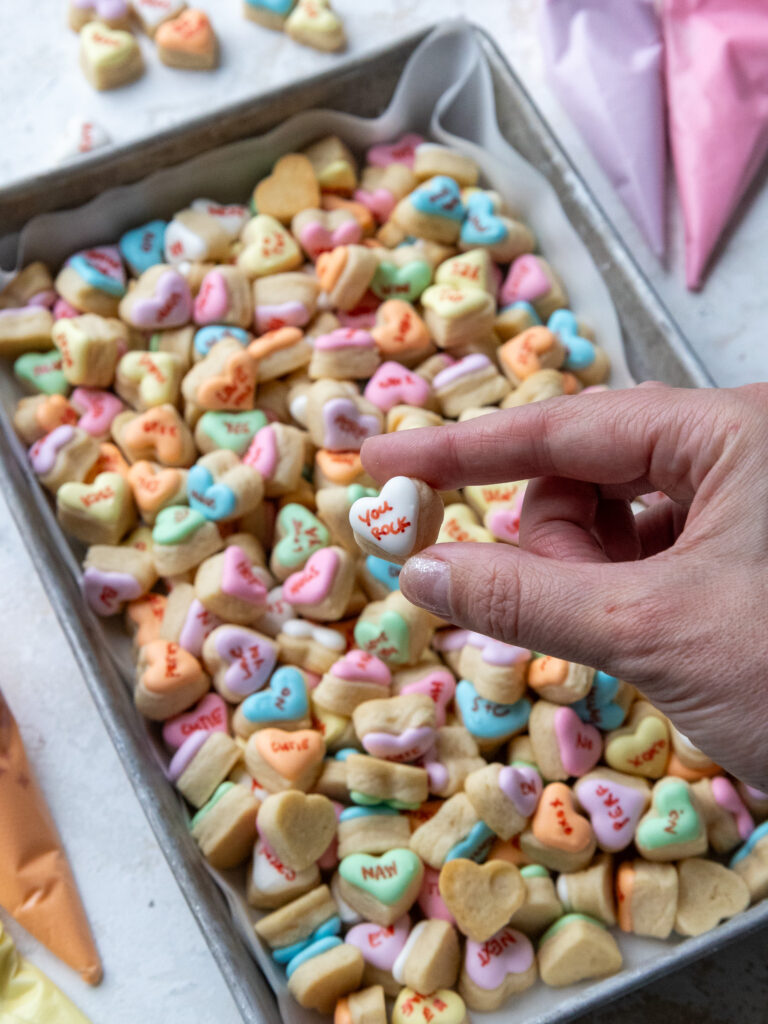
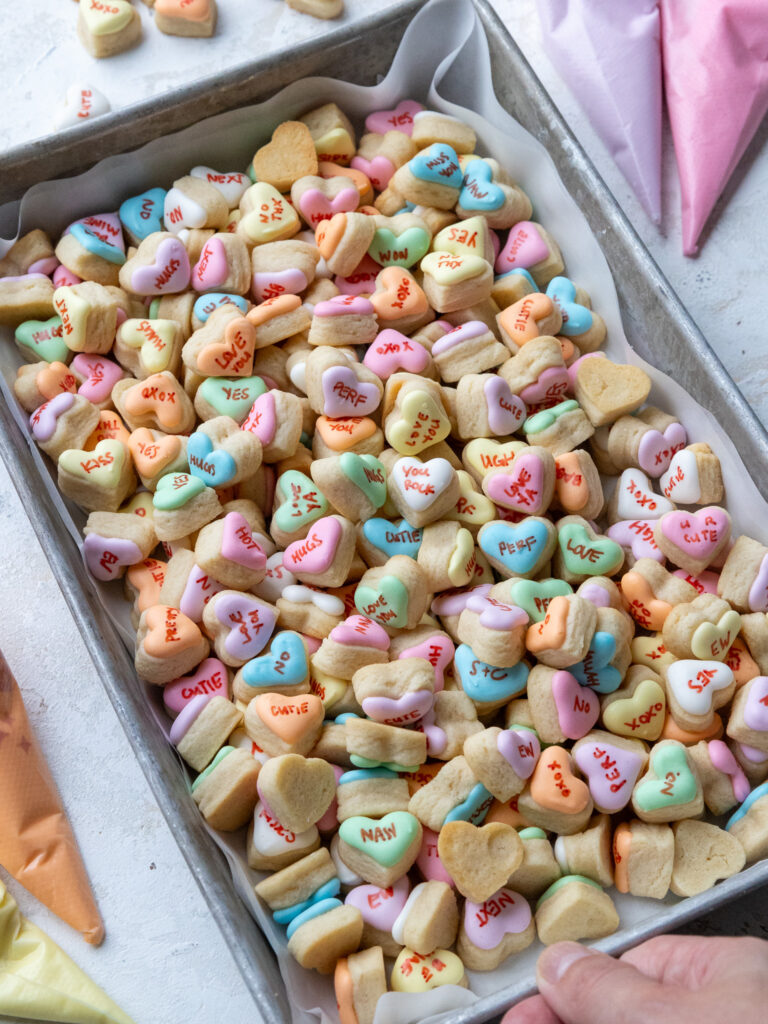
How Many Cookies Does this Recipe Make?
This recipe can be used to make about 300 little heart cookies. The yield and bake time will vary based on the size and shape of the cookie cutter you use, and the thickness of your dough.
I used a 3/4-inch heart cutter but wasn’t able to find that size on Amazon. I’ve linked a similar-sized, 1-inch heart cutter.
This recipe can be halved to make fewer cookies (use half a scrambled egg in the dough), but I don’t recommend doubling it unless you have a commercial (8 qt.) stand mixer.
Tips for Making the Best Conversation Heart Cookies
- Really cream together the butter, cream cheese, and granulated sugar in the first step of this recipe. It helps incorporate air into the dough which makes soft cookies.
- Roll the cookie dough out to a consistent thickness of 1/3 inch. If some are thicker or thinner than others, they may over- or under-bake in the oven.
- Take the time to chill the cookie dough. It helps prevent your cookies from spreading while they bake and helps them bake up with a soft texture.
- Don’t overbake the cookies. Err on the side of underbaking your cookies and remember that the cookies continue to bake for a few minutes once they’re out of the oven.
- Avoid leaving the icing uncovered for long periods or it will crust! Either use it immediately or cover it with plastic wrap.
- Use gel food coloring to color the icing. It helps create perfect pastel colors without throwing off the consistency of the icing.
- Make and color the icing right before you plan to decorate the cookies. Otherwise, the icing can separate!
Making These Cookies in Advance and Storage Tips
You can store decorated cookies in an airtight container for up to 2 weeks at room temperature or for up to 3 months in the freezer.
If you want to stack the cookies on top of one another, I recommend adding a layer of parchment paper between them.
This cookie dough can also be frozen for up to 1 month if wrapped tightly in plastic wrap and stored in an airtight container. I like to move the cookie dough to the fridge the night before I plan to roll it out and bake the cookies.
Baked, un-iced cookies can also be frozen! These cookies last for up to a month if frozen in an airtight container. I recommend waiting to decorate them until they’ve thawed to room temperature.
Move them to the fridge the day before you plan to eat them, then let them sit out at room temperature for a few hours before icing them.
Let Me Know What You Think!
If you make these conversation heart cookies, I’d love to hear what you think! Please leave a rating and comment below.
And if you share on social media, tag me @chelsweets and use #chelsweets so I can see your delicious creations!
Other Posts You Might Like:


Conversation Heart Cookies
Ingredients
Cream Cheese Sugar Cookies
- 3/4 cup (1 1/2 sticks) unsalted butter, room temperature 170g
- 1/2 cup or 4 oz. full fat cream cheese, room temp 113g
- 1 1/2 cups granulated sugar 300g
- 1 large egg, room temperature 56g
- 2 tsp almond extract, optional 8g
- 2 tsp vanilla extract or vanilla bean paste 8g
- 3 cups all-purpose flour 390g
- 1 Tbsp cornstarch 8g
- 1 tsp fine salt 6g
- 1/2 tsp baking powder 2g
Royal Icing (adapted from Wilton)
- 3 1/2 cups powdered sugar 454g or a 1 lb. box
- 3 Tbsp meringue powder 28g
- 1/4 cup water, room temp 60g
- 2 Tbsp vanilla or almond extract 24g
- Additional water to bring to a flooding consistency
- Yellow, Orange, Pink, Purple, Blue, and Green gel food coloring
Instructions
Cream Cheese Sugar Cookies
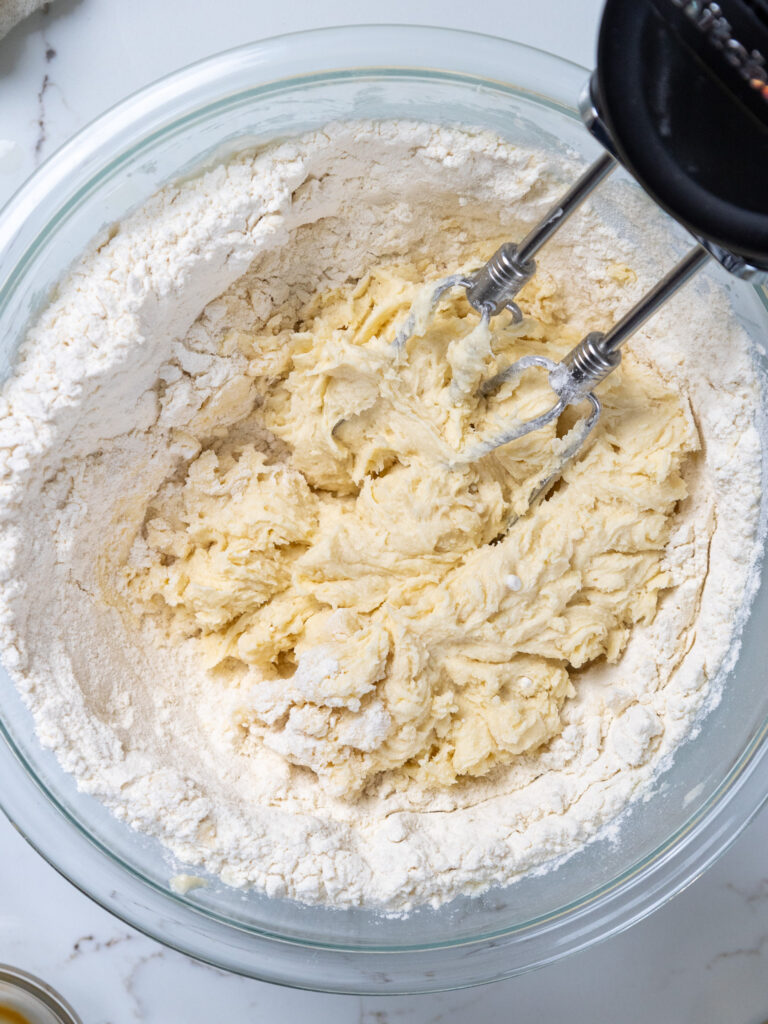
- In a large bowl or the bowl of a stand mixer, beat 3/4 cup butter and 1/2 cup cream cheese on medium speed with a hand mixer or whisk attachment until smooth.
- Next, add 1 1/2 cups granulated sugar and mix on a medium-high speed for a couple of minutes, until the mixture becomes lighter in color.
- Add in 1 egg, 2 tsp almond extract (optional), and 2 tsp vanilla bean paste or vanilla extract. Mix on a medium speed until incorporated.
- In a separate bowl, whisk together 3 cups flour (use a scale or fluff the flour in the bag, then spoon it into the measuring cup and level it), 1 Tbsp cornstarch, 1 tsp fine salt, and 1/2 tsp baking powder.
- Mix the dry ingredients into the butter mixture on a low speed until it is JUST incorporated. Scrape the sides of the bowl with a rubber spatula between additions.
- At this point, the dough should still be pretty thick and sticky. Divide the dough in half and wrap each portion of dough in a piece of plastic wrap. I like to flatten the dough out into a rectangle that's about 1/2 inch tall to make it easier to roll out once it's chilled.
- Chill the dough in the fridge for about 2 hours or in the freezer for 30 minutes. Preheat the oven to 350 F / 175 C for about 30 minutes before you plan to roll out the dough, and line two large baking sheets with silicone baking mats or parchment paper. Set aside.
- Take one piece of dough out of the fridge, leaving the other in there to continue to chill. If you put the cookie dough in the freezer, let it sit at room temperature for 5-10 minutes to soften up a bit before trying to roll it out. Unwrap the cookie dough and lay the plastic wrap out flat on your counter. We will be rolling out the cookie dough on the plastic wrap to make cleanup a breeze and make cutting out the cookies easier. Dust both sides of the cookie dough and your rolling pin with flour.
- Roll the chilled dough to be 1/3 inch thick (these rolling pin rings help a ton with getting a consistent thickness) and use a small heart cookie cutter (mine is 3/4 inch) to cut out as many heart cookies as you can. The cookies don't spread much as they bake, so you can place them about 1/2 inch apart.
- Chill the cut-out cookies one more time in the fridge for 15 minutes or the freezer for 5 minutes to help them keep their shape as they bake.
- Bake one sheet of cookies at a time for about 10 minutes on the middle rack of your oven (bake time can vary based on the cookies' size and the dough's thickness). Keep a close eye on the cookies and be sure to pull them out before the edges start to brown.
- Let the baked cookies cool on the pan for about 15 minutes, then transfer to a wire rack to finish cooling.
- While the first batch bakes and cools, knead together the cookie dough scraps and rewrap them in plastic wrap. Pop them back in the fridge to chill.
- Pull out the 2nd chilled portion of dough and repeat steps 9-11. Then repeat with the chilled dough scraps.
Royal Icing
- While the cookies cool, make the royal icing. This can be made a few hours in advance, or potentially the night before, but the icing can separate as it sits, so I don't recommend making it any further ahead of time.
- Whisk together 3 1/2 cups of powdered sugar and 3 Tbsp of meringue powder in a large bowl or the bowl of a stand mixer.
- Add 1/4 cup water and 2 Tbsp vanilla or almond extract (I prefer the taste of almond extract). Mix on a low speed with a stand mixer and paddle attachment or hand mixer to incorporate the liquid, then increase to a medium speed and mix until stiff peaks form (see picture above). It's ok to stop the mixer and check the stiffness – I usually check a few times before it's ready. This usually takes me about 3 minutes with a hand mixer or 2 minutes with a stand mixer. Scrape around the sides and bottom of the bowl with a rubber spatula to ensure everything is properly mixed together.
- Mix in additional water 1 Tbsp at a time until a thick flood consistency is reached. I usually use 2 to 3 Tbsp of water, but it can vary from batch to batch. Scrape the sides and bottom of the bowl to make sure the water is being incorporated into all of the icing. To test the consistency, lift the spatula up and let the icing run off while drawing a figure 8. The icing should keep its shape, but melt into the rest of the icing if you wiggle the bowl a bit. If it's too stiff, add a tiny bit more water. Or if it's too thin, add more powdered sugar, 1 Tbsp at a time.
- Then it's time to color the icing. You should have roughly 18 ounces of icing. Scoop 3 ounces (1/3 cup) of icing into a separate small bowl. Add a very small drop of yellow gel food coloring, and stir until evenly colored. We're trying to make pastel shades, so you only need a tiny bit of food coloring. Scoop a small amount of the icing into a small piping bag and seal the top.
- Before you color the rest of the icing, do one more consistency test. Cut the tip of the piping bag to create a very small opening (1-2 millimeters). Pipe the yellow icing on top of one of the cookies and see how the icing settles. It should be thick enough to keep its shape and settle into itself after a bit of time and the help of a scribe. If it doesn't, you may need to add a tiny bit more water to the icing. Or if it's too thin and is seeping over the edges of the cookie, you can add more powdered sugar. Repeat this test as needed until the consistency of the icing is right, then fill the piping bag with the rest of the yellow icing and set aside.
- Next, scoop 3 ounces (1/3 cup) of icing into the same bowl and add a small drop of orange gel food coloring (about 1/2 tsp). Stir until the icing is evenly colored, then scoop it into a small piping bag and seal the top. Set aside. Repeat this process to make pastel orange, pink, purple, blue, and green icing.
Decorating These Conversation Heart Cookies
- When you're ready to decorate the cookies, cut the tips of the piping bags to create a very small opening (1-2 millimeters). You can always cut the opening wider, but you can't make it smaller once you cut it. I find it's a lot easier to control the icing as you decorate the cookies if you have a small opening.
- Then, use the different colored icing to pipe a heart on top of each little cookie. If there are any parts where the icing isn't settling, use a scribe or toothpick to help the icing settle smoothly.
- Let the cookies dry for a couple of hours or until the icing is firm to the touch, then use a fine-tipped edible red marker to write cute little phrases on top of each cookie. These cookies can be stored in an airtight container for up to two weeks at room temperature or up to 3 months in the freezer.
Video
Notes
Substitutions and Swaps
Please refer to the substitutions and swaps section in the post above for all the ingredient variations that can be used in this recipe.How Many Cookies Does This Recipe Make?
This recipe can be used to make about 300 heart cookies. The yield and bake time will vary based on the size of the cookie cutter(s) you use and the thickness of the dough. This recipe can be halved to make fewer cookies (use half a scrambled egg in the dough), but I don't recommend doubling it unless you have a commercial (8 qt.) stand mixer.Making These Conversation Heart Cookies in Advance and Storage Tips
You can store decorated cookies in an airtight container for up to 2 weeks at room temperature or for up to 3 months in the freezer. If you want to stack the cookies on top of one another, I recommend adding a layer of parchment paper between them. This cookie dough can also be frozen for up to 1 month if wrapped tightly in plastic wrap and stored in an airtight container. I like to move the cookie dough to the fridge the night before I plan to roll it out and bake the cookies. Baked, un-iced cookies can also be frozen! These cookies last for up to a month if frozen in an airtight container. I recommend waiting to decorate them until they’ve thawed to room temperature. Move them to the fridge the day before you plan to eat them, then let them sit out at room temperature for a few hours before icing them.Tips for Making the Best Conversation Heart Cookies
- Really cream together the butter, cream cheese, and granulated sugar in the first step of this recipe. It helps incorporate air into the dough which makes fluffy and soft cookies.
- Don’t overwork the cookie dough! It can overwork the gluten and result in tough, dense cookies.
- Roll the cookie dough out to a consistent thickness of 1/4 inch. If some are thicker or thinner than others, they may over- or under-bake in the oven.
- Take the time to chill the cookie dough. It helps prevent your cookies from spreading while they bake and helps them bake up with a soft texture.
- Don’t overbake your cookies. Err on the side of underbaking your cookies and remember that the cookies continue to bake for a few minutes once they’re out of the oven.
- Avoid leaving the icing uncovered for long periods of time or it will crust! Either immediately place it in piping bags or cover it with plastic wrap.
- Make and color the icing right before you plan to decorate the cookies. Otherwise, the icing can separate.
Hobby Lobby has a package of 3 small Heart cutters 1 is 3/4″ https://www.hobbylobby.com/crafts-hobbies/clay-molding-sculpting/clay/heart-clay-cutters/p/23108 gad_source=1&gclid=CjwKCAiA2JG9BhAuEiwAH_zf3pg5eMnn4p7PXMwemBBSVi_yKVEZFy1O9Q3Kpwfysa0MhNjAiH-yYBoCa-kQAvD_BwE
Hi Kathryn,
Thank you so much for sharing, that is so helpful!! 🙂 Happy baking!
Help! I can’t write on them without the icing cracking!
Hi Rachel,
So sorry to hear that!! How long did you let the cookies/icing dry for? Usually that happens if the icing hasn’t fully hardened, and depending on how thick you pipe the icing it can take a few hours or even overnight for it to fully dry. That would be my first guess, but if that isn’t it we can keep troubleshooting and try to figure out why that happened!
Hi! Do we think the marbled icing technique will work on these or are they too small?
Hi Dianna,
It depends on what size of cookie cutter you use, but the one I used is quite small and I think marbling would be challenging for these. However if you use a slightly larger cutter than me it could work! Hope that helps, happy baking!
how did you make the envelope cookie design from 2025
Hi Nancy,
Great question! I used my sugar cookie recipe (here’s the link: https://chelsweets.com/cream-cheese-sugar-cookie-recipe/), outlined the cookies, flooded the cookies, then added lines on top to look like an envelope. Once all that was dry, I used pink icing that was outline consistency to pipe on the heart. I also show the process quickly in the last half of this video: https://www.instagram.com/p/DFq5CcOyxkT/
Hope that helps, happy baking!
Delicious cream cheese cookie base, these are the perfect snackable size. Everyone loved them. The are quite the time investment but I’d say they were worth it.
Hi Erica,
I’m so glad you loved them! The cream cheese base really does make them extra soft and flavorful.
And I totally agree, they def take some time to make, but are so worth it 🙂 Thanks for sharing!!