
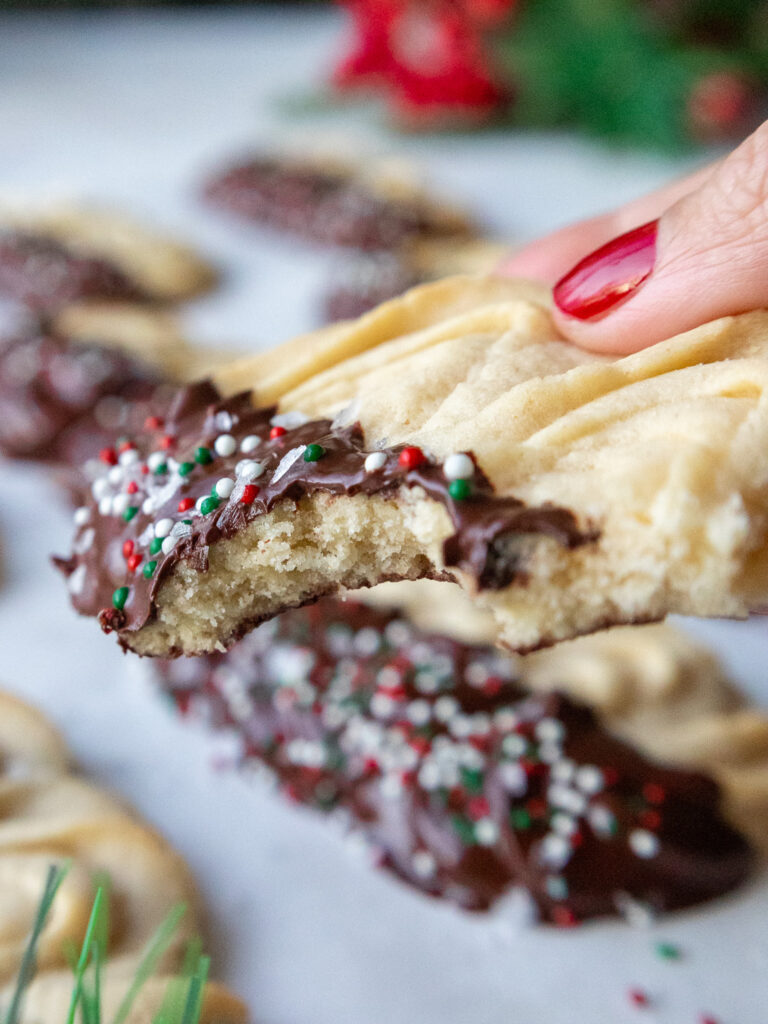
Chocolate Dipped Butter Cookies
These festive, chocolate-dipped butter cookies are always perfect for the holidays.
They bake up tender, buttery, and with a delicious hint of almond. And getting to pipe the dough makes them so much fun to make!
Let’s Make These Butter Cookies Together!
To make sure these cookies turn out as amazing as possible, let’s walk through each step together.
Below is a list of equipment I used to make these but feel free to improvise if you don’t have all of these on hand.
Recommended Tools and Equipment
- Stand mixer or electric hand mixer
- 2 large, flat baking sheets
- 1 large piping bag
- Large, close star piping tip (like an Ateco 848)
Step 1: Prep Your Fridge and Make the Dough
Before you start on the batter, make room in your refrigerator or freezer for baking sheets! The piped cookies will need to chill in the fridge for 30 minutes or the freezer for 10 minutes before being baked. Sadly the dough can’t be chilled before it’s piped or else it’ll be too thick to pipe.
Line 2 large baking sheets with parchment paper or silicone baking mats. Set aside.
In a large bowl, using a handheld mixer or a stand mixer fitted with a paddle attachment, beat 1 cup of room temperature butter and 3/4 cup granulated sugar together on medium-high speed for a couple of minutes until it looks light and fluffy.
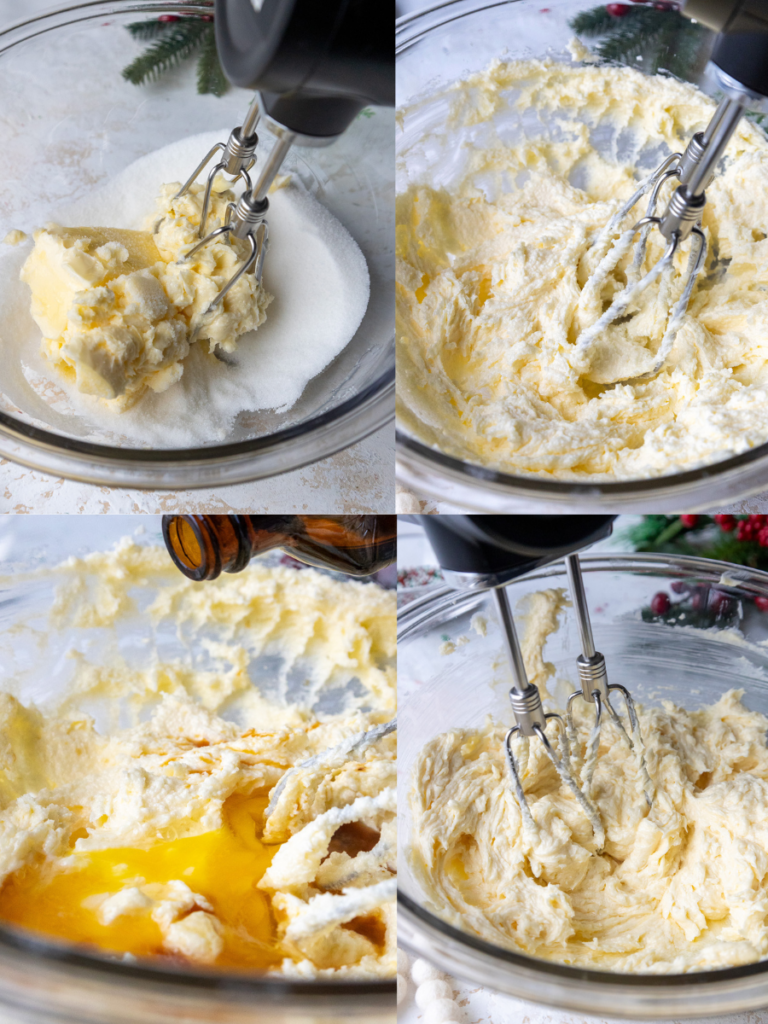
Add 1 large egg, 1 Tbsp vanilla extract, and 2 tsp almond extract. Beat at a medium-high speed until combined. Scrape the sides and bottom of the bowl with a rubber spatula as needed.
Mix in 2 1/4 cups of flour and 1 tsp fine salt on a low speed until mostly combined, then increase the speed to medium-high and beat until completely combined, smooth, and thick but pipeable.
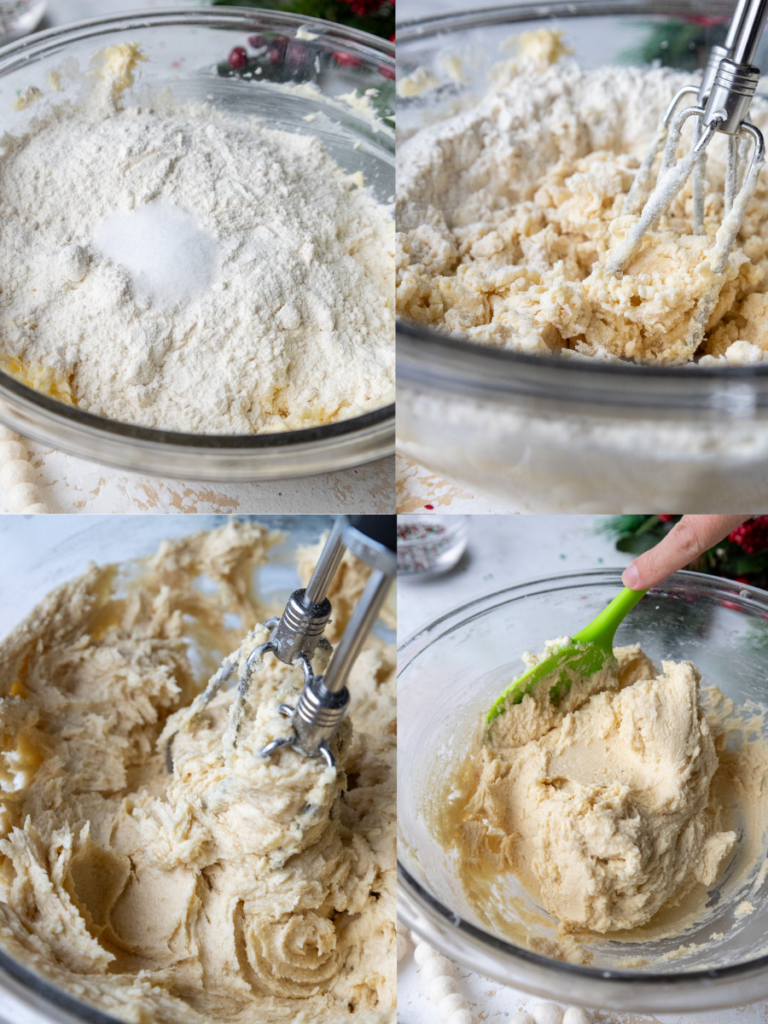
Step 2: Test the Consistency of the Dough
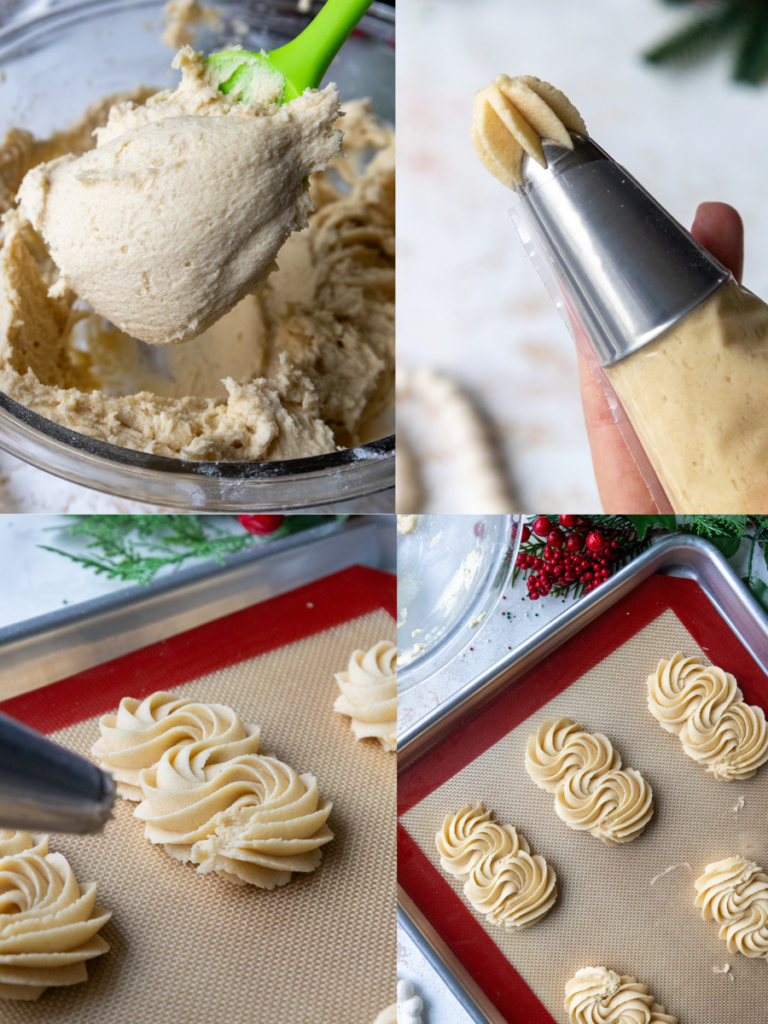
Fit a large piping bag with a large, closed star tip (I like to use an Ateco 848). Before we fill the entire bag, we’re going to test the consistency of the dough and make sure it’s right. Scoop about 1/2 cup of dough into the bag, and pipe a small, 3-inch swirl or squiggle.
If you’re able to pipe a swirl successfully, scoop the rest of the dough into the bag and seal the top with a rubber band or clip.
If the dough is too thick, scoop the swirl back into the bowl of dough and mix in a tsp of milk. Repeat as needed until the dough is pipeable.
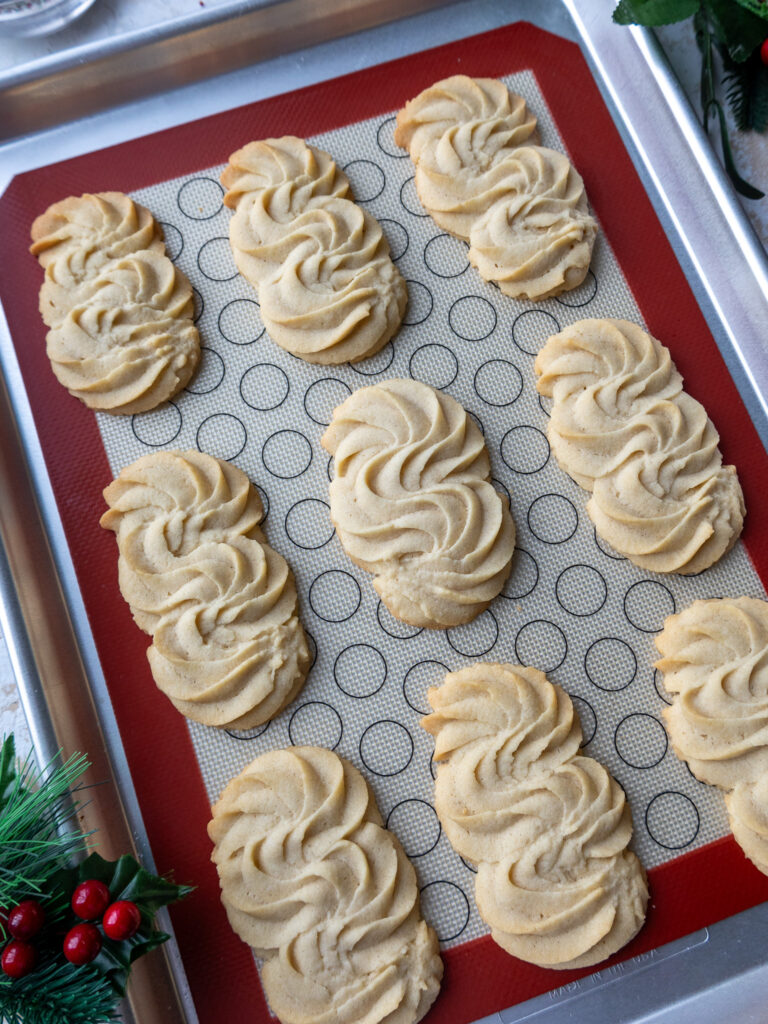
Step 3: Pipe Out the Rest of the Dough
Pipe 3-inch swirls or squiggles (I basically just pipe the number 3 to make my squiggles!) on the prepared baking sheets, spacing them about 2 inches apart.
Take your time as you do this and give your hand a break between trays.
Place the baking sheets in the refrigerator for at least 30 minutes or the freezer for 15 minutes.
While the dough chills, preheat the oven to 350°F / 175°C.
Step 4: Bake the Cookies
Once the oven is fully preheated, bake one tray of cookies at a time on the middle rack of your oven for 14-17 minutes or until the sides are just beginning to brown. The cookies will spread as they bake but should still keep their shape.
Remove the cookies from the oven and let them cool on the baking sheet for 10 minutes before transferring them to a wire rack to finish cooling.
Step 5: Decorate the Cookies
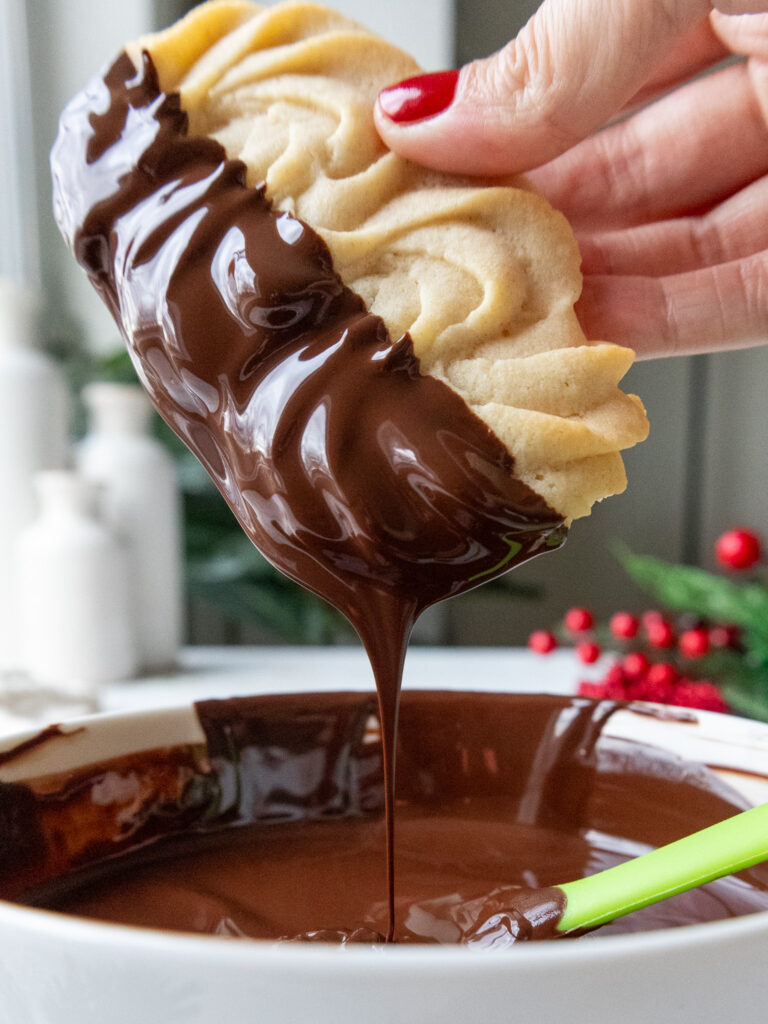
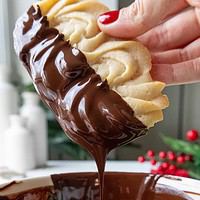
As the cookies cool, melt 1 cup of milk or dark chocolate in a small bowl using a double boiler or microwave (heat in 20-second increments, stirring between). You can use chopped-up chocolate bars, chocolate chips, or chocolate couvertures.
Once fully melted, mix in 2 tsp of coconut, vegetable, or canola oil to help thin the chocolate. This will make it easier to dip the cookies.
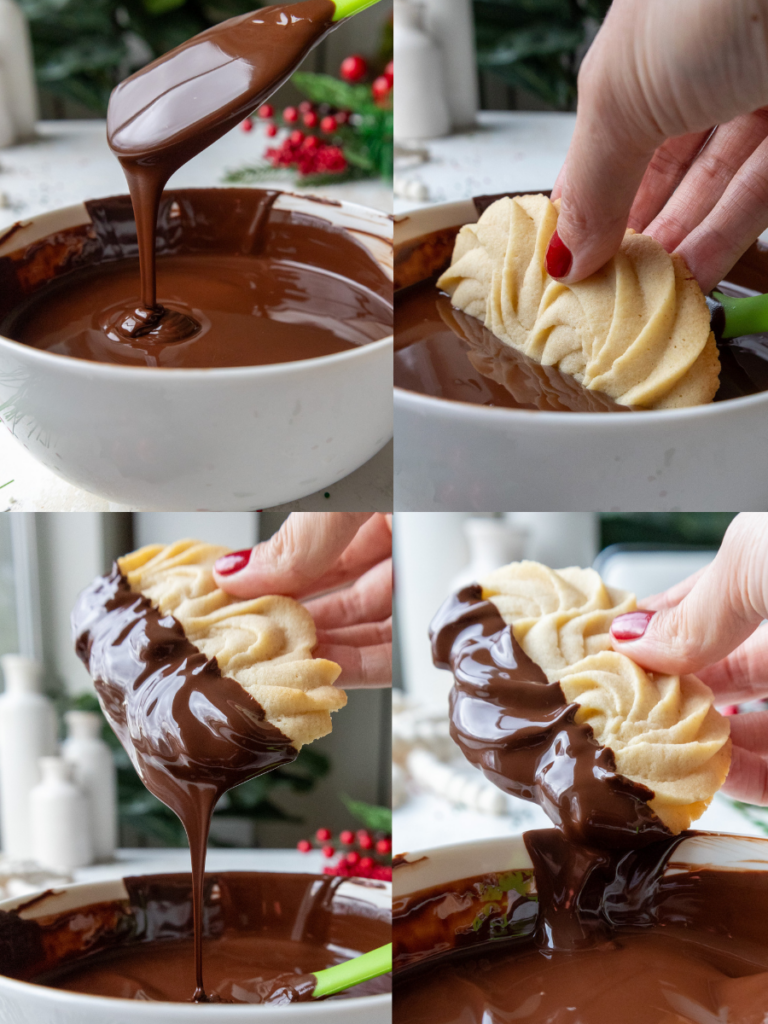
Cover a baking sheet with parchment paper. Dip the cookies halfway in the melted chocolate, then let any excess chocolate drip off before scraping off the bottom of each cookie along the edge of the bowl.
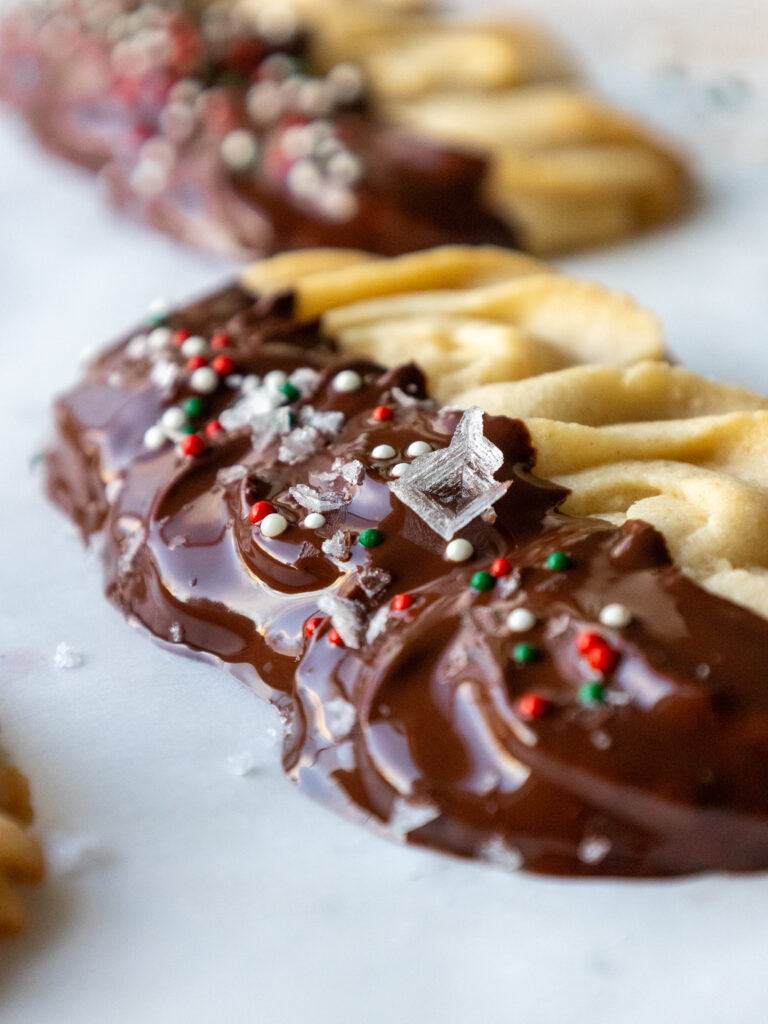
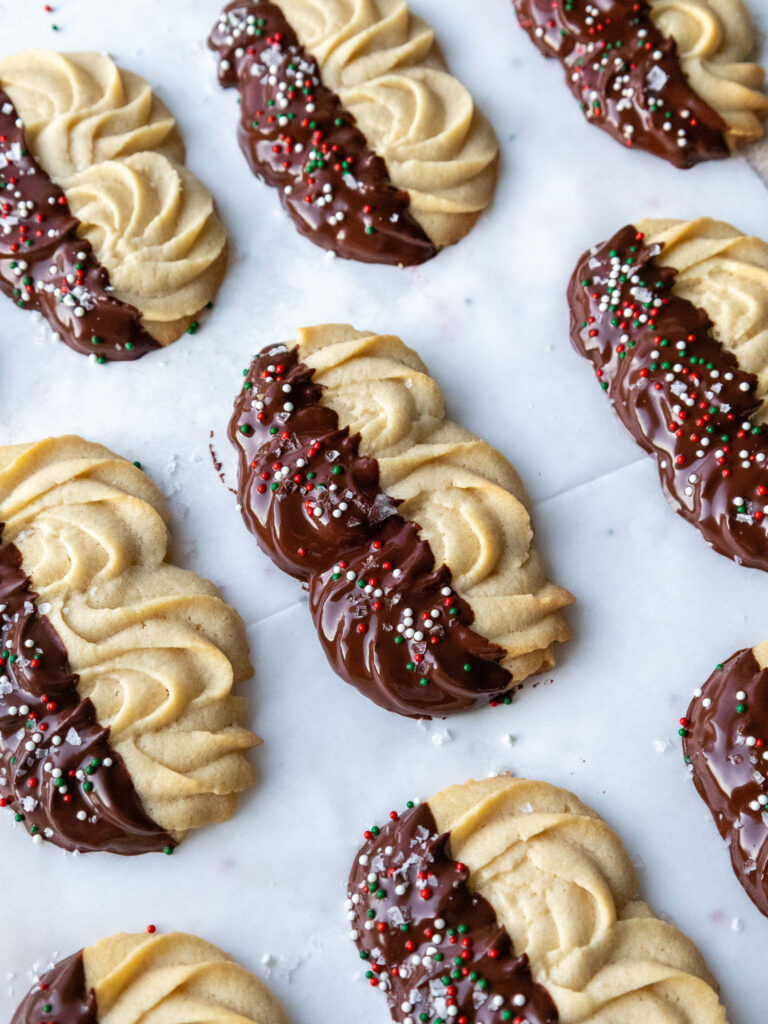
Top with a sprinkle of flakey sea salt and/or holiday sprinkles. Place the dipped cookies on a parchment-lined baking sheet and either let them firm up at room temperature for 30 minutes or in the fridge for 15 minutes.
These cookies can be stored in an airtight container at room temperature for up to 5 days or in the refrigerator for 1 week.
Butter Cookie Ingredients & Substitutions
While I love this recipe just the way it is, I know you might not have all these ingredients on hand! Or you might have food restrictions or allergies.
Below are some swaps and variations that can be made in this recipe.
- Unsalted Butter – If you only have salted butter, you can use it and omit the salt that this recipe calls for. You can also use vegan butter, but it will cause the cookies to spread more.
- Granulated Sugar – This recipe turns out best with granulated sugar. I wouldn’t recommend changing the amount or type of sugar, as it will impact the spread of the cookies.
- All-Purpose Flour – You can use a gluten-free flour blend if needed in place of the AP flour in this recipe.
- Almond Extract – I love this recipe with almond extract, but you can use vanilla or another extract in place of it if needed.
How Many Cookies Does This Recipe Make?
This recipe makes about 14 large cookies. The yield can vary a lot based on the size and shape of the cookies, along with the piping tip that you use.
Can I Make These Cookies In Advance?
Piped and unbaked cookie dough can be stored on the baking sheet and covered with plastic wrap or foil in the refrigerator for up to 2 days before being baked.
Pipe and unbaked cookie dough can also be frozen for up to 2 months. The cookies can be baked straight from the freezer, but will need a couple of extra minutes of bake time.
Baked and dipped cookies can also be frozen for up to 2 months.
Tips for Making the Best Butter Cookies
- Space your cookies about 2 inches apart before baking them. They will spread as they bake.
- If you mess up piping a cookie, don’t worry! You can always scoop the dough back into the bag and try again.
- This dough is THICK! It will take a lot of hand strength to pipe the cookies, so give your hand a break when needed. While it might seem hard to pipe, keep in mind that the firmer the dough, the better it will keep its shape.
- Don’t over-bake your cookies! They’re done as soon as the edges are just beginning to brown.
- Pipe the cookies to be similar in size to help the cookies bake evenly.
Let Me Know What You Think!
If you make these chocolate-dipped butter cookies, I’d love to hear your thoughts! Please leave a rating and comment below.
Or if you share on social media, be sure to tag me @chelsweets and use #chelsweets so I can see your delicious creations!
Chocolate-Dipped Butter Cookies
Ingredients
Butter Cookies
- 1 cup unsalted butter, room temperature 226g
- 3/4 cup granulated sugar 150g
- 1 Tbsp vanilla extract or vanilla bean paste 15g
- 2 tsp almond extract 10g
- 1 large egg, room temperature 56g
- 2 1/4 cups all-purpose flour – fluffed, spooned & leveled 290g
- 1 tsp fine salt 6g
Decorations – Optional
- 2 Tbsp nonpareil sprinkles
- 1 cup milk, semi-sweet, or dark chocolate chips, melted 175g
- 2 tsp vegetable or canola oil 10g
- flakey sea salt – garnish
Recommended Tools and Equipment
Instructions
Butter Cookies
- Before you start on the batter, make room in your refrigerator or freezer for baking sheets! The piped cookies will need to chill in the fridge for at least 30 minutes or in the freezer for 15 minutes before being baked. Sadly the dough can't be chilled before it's piped or else it'll be too thick to pipe.
- Line 2 large baking sheets with parchment paper or silicone baking mats. Set aside.
- In a large bowl, using a handheld mixer or a stand mixer fitted with a paddle attachment, beat 1 cup of room temperature butter and 3/4 cup granulated sugar together on medium-high speed for a couple of minutes until it looks light and fluffy.
- Add 1 large egg, 1 Tbsp vanilla extract or vanilla bean paste, and 2 tsp almond extract. Beat at a medium-high speed until combined. Scrape the sides and bottom of the bowl with a rubber spatula as needed.
- Mix in 2 1/4 cups of flour (it's important the flour is properly measured! Make sure it's fluffed, spooned into the measuring cup, then leveled, or use a kitchen scale) and 1 tsp fine salt on a low speed until mostly combined, then increase the speed to medium-high and beat until completely combined, smooth, and thick but still pipeable.
- Fit a large piping bag with a large, closed star tip (I like to use an Ateco 848). Before we fill the entire bag, we're going to test the consistency of the dough and make sure it's right. Scoop about 1/2 cup of dough into the bag, and pipe a 3-inch swirl or squiggle. If you're able to pipe a squiggle successfully, scoop the rest of the dough into the bag and seal the top with a rubber band or clip. It takes a bit of hand strength, but the thicker the dough is the better it will keep its shape as it bakes! However, if the dough is too thick to pipe, scoop it back into the bowl of dough and mix in a tsp of milk. Repeat as needed until the dough is pipeable.
- Pipe 3-inch swirls or squiggles (I basically just pipe the number 3 to make my squiggles!) on the prepared baking sheets, spacing them about 2 inches apart. Take your time as you do this and give your hand a break between trays. Place the baking sheets in the refrigerator for at least 30 minutes or the freezer for 15 minutes. While the dough chills, preheat the oven to 350°F / 175°C.
- Once the oven is fully preheated, bake one tray of cookies at a time on the middle rack of your oven for 14-17 minutes or until the sides are just beginning to brown. The cookies will spread as they bake but should still keep their shape.
- Remove the cookies from the oven and let them cool on the baking sheet for 10 minutes before transferring them to a wire rack to finish cooling.
- As the cookies cool, melt 1 cup of milk or dark chocolate in a small bowl using a double boiler or microwave (heat in 20-second increments, stirring between). You can use chopped-up chocolate bars, chocolate chips, or chocolate couvertures. Once fully melted, mix in 2 tsp of coconut, vegetable, or canola oil to help thin the chocolate. This will make it easier to dip the cookies.
- Cover a baking sheet with parchment paper. Dip the cookies halfway in the melted chocolate, then let any excess chocolate drip off before scraping off the bottom of each cookie along the edge of the bowl. Top with a sprinkle of flakey sea salt and/or holiday sprinkles. Place the dipped cookies on a parchment-lined baking sheet and either let them firm up at room temperature for 30 minutes or in the fridge for 15 minutes.
- These cookies can be stored in an airtight container at room temperature for up to 5 days or in the refrigerator for 1 week.
Video
Notes
How Many Cookies Does This Recipe Make?
This recipe makes about 14 large cookies. The yield can vary a lot based on the size and shape of the cookies, along with the piping tip that you use.Can I Make These Cookies In Advance?
Piped and unbaked cookie dough can be stored on the baking sheet and covered with plastic wrap or foil in the refrigerator for up to 2 days before being baked. Pipe and unbaked cookie dough can also be frozen for up to 2 months. The cookies can be baked straight from the freezer but will need a couple of extra minutes of bake time. Baked and dipped cookies can also be frozen for up to 2 months.Nutrition
Other Recipes You Might Like:
Hi Chelsey,
With the piping, once the swirl is piped a) should there be a hole in the middle of the cookie that fills when cooking or should it be piped tight with no hole?,
b) should the tip where I finish off the piping be rough or come to a smooth point and c) should it sit down flat or sit up like piping a cupcake?
Never made the spritz type cookies before but have piped lots of icing!
Yours look wonderful!
Thanks, Jodi
I made a variety of your cookie recipes for my box this year!! I really loved all of them and they all turned out great! I really appreciate how you wrote the measurements in the actual directions instead of having to constantly look back to the recipe. Thank you for sharing!!
Deliciously buttery with the perfect ratio of almond to vanilla, the whole house loved these ones! I am so happy with how stunning they look. My dough was incredibly easy to pipe, so I was very concerned that the cookies would spread out and lose their designs. Thankfully, they looked just as gorgeous when I took them out of the oven as they did when I plopped them in. Great recipe, can’t wait to make more from this baker! I’ll echo another commenter, I love the measurements in the directions. I’d also love it if the grams were also written in the directions, but scrolling a bit up is no biggie. Happy baking!
So happy to hear that Zaida!! And yes I totally hear you, I should start including the gram measurements below too. I’ll try to start implementing that 🙂 Happy baking!!
I am in the final stages of mapping out my Christmas Cookie Box and want to include these, because they look so pretty and also look so yummy! I noticed though, that you don’t say anything about being able to freeze them. Can they be frozen? If so, for how long? If they can’t , can you explain why a plain cookie such as this would not be a good candidate for freezing? Thanks!
Hi Michele,
Can I just start by saying how much I love hearing that you’re mapping out your Christmas cookie boxes?!? And making the cookies ahead of time!! Truly the best way to do it!!
These actually do freeze well, and can be frozen for up to 2 months in an airtight container or ziplock baggie! Hope that helps, and that your cookie boxes turn out AMAZING!! (I know they will!!)
@Chelsey White Thanks for the actual recipe I echo all the above coments I use this recipe frequently,while not many recipes let you know all the tricks and secrets thanks for posting. I agree the best tip is important after piping is freezing them so they keep their shape is important prior to baking. Also, if I wanted to make chocolate what ratios in all ingredients would you recomend?
Hi Marlo,
So happy to hear you found all my tips helpful! I haven’t tested out a chocolate version, but I’d say swap 1/4 cup of the AP flour for unsweetened cocoa powder, and maybe add 1 tsp of instant espresso too! If you try it, let me know how it turns out 🙂 Hope that helps, happy baking!
I made a few of your cookies form your series. These are the only ones that didn’t turn out. They flattened out completely and didn’t keep their shape. I did use Becel Plant based butter sticks as I am allergic to dairy but usually they are a 1:1 replacement in any baking. Any ideas as to why this would happen?
Ah I’m so sorry to hear that Liseanne! Sadly the butter in this recipe does have a big impact on the shape of the cookies, and using a plant based butter would cause them to spread more. Usually plant based butter works great in cookie recipes, but this one is more finicky because it’s piped :/
Out of curiosity, what size/type of piping tip did you use? I wish we could upload pictures on here so I could see!
Instead of piping the dough, do you think these would work in a cookie press? Thanks!
Hi Connie,
I haven’t ever used a cookie press, so sadly I’m not sure! If you do try it, I’d say use just a little bit of dough to test it and see how it works! Let me know how it goes if you try it, I’d love to know!
Saw this one on your TikTok and wanted to give it a try. They turned out perfectly and they piped very easily for me. I didn’t need to add any milk to soften. I’d argue these cookies turned out the best of all my cookie baking this year!
AH I am so happy to hear that Kim!! It does sound like they turned out perfectly 🙂 Thank you for sharing, and happy holidays!!!!
I originally started writing this review halfway through, then stopped because I wanted to bake the recipe first and give a fair final opinion.
After doing so… I am confused and disappointed.
I followed the recipe carefully, used properly softened butter, measured my flour with a scale, chilled the dough for over 30 minutes, and still ended up with dough that was tough to pipe, cookies that lost their shape, and a batch that burned after only 14 minutes. My wrists hurt and my confidence is shaken. Sigh.
Hi Zappa,
Oof, I’m really sorry, that sounds so frustrating, especially after you clearly put in the effort to do everything right. I totally get why that would be confusing and discouraging, and wrist pain on top of it is just salt in the wound.
Butter cookie dough can be deceptively finicky. If the dough was tough to pipe, that usually means the butter may have been slightly cooler than ideal (it should be very soft and easily dent when pressed), or the dough may have been a bit overmixed, which can make it firm up fast. On the flip side, cookies losing their shape and browning quickly often points to an oven running hot or the pan being too close to the bottom heating element. Even 15–25°F off can make a big difference with butter-heavy cookies.
None of this means you did anything wrong, and it definitely doesn’t reflect your skills as a baker. These cookies are sensitive to small variables, and when one thing is just a little off, it can snowball fast. I really appreciate you taking the time to fully bake them before sharing your experience, and I’m always happy to help troubleshoot further if you want to give them another go!