
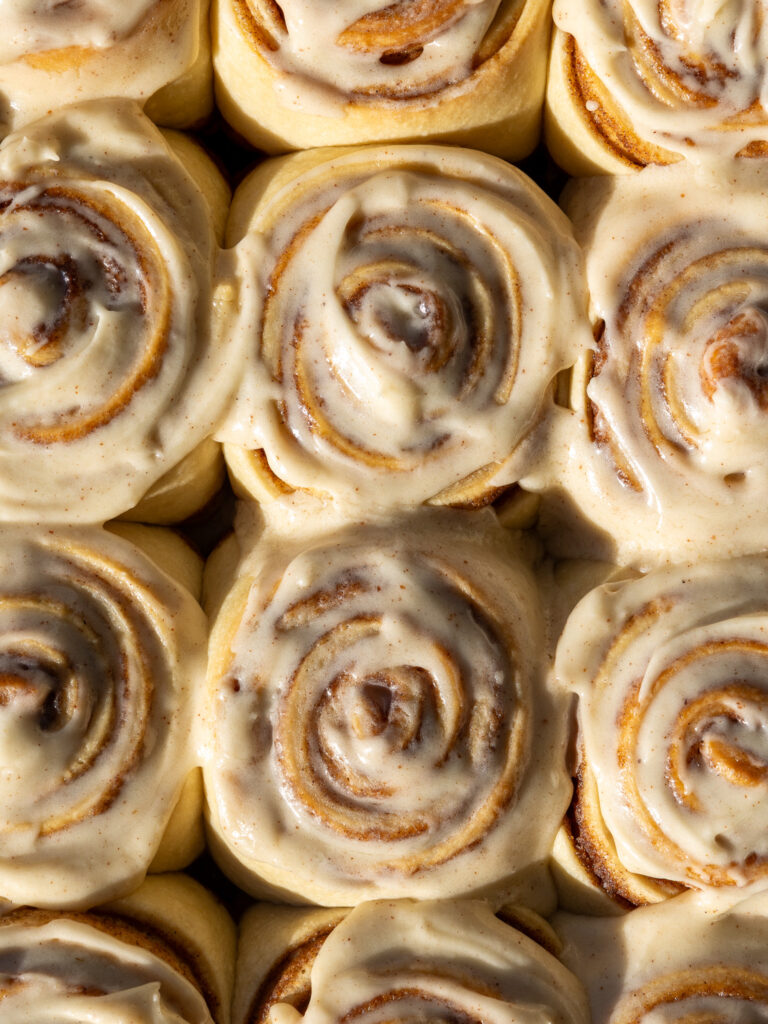
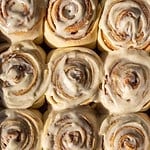
Brown Butter Cinnamon Rolls
These brown butter cinnamon rolls are the perfect Fall twist on one of my favorite recipes!
Brown butter is used in both the dough and filling, and of course, it’s all topped with a brown butter cream cheese icing. It’s a drool-worthy combination that’s sure to become a Fall staple!
How to Make These Brown Butter Cinnamon Rolls
Let’s walk through each step of this recipe to make sure it turns out as amazing as possible!
I’ve also shared a video tutorial in the recipe card at the bottom of this post, along with the tools I used. If you don’t have all of these on hand, feel free to get creative and work with what you’ve got!
Tools / Equipment
- 9×13-inch Metal Pan
- Parchment Paper
- Stand Mixer w/ Dough Hook or Danish Dough Whisk
Step 1: Brown the Butter
The first step is to brown the butter. Get a heatproof bowl out to pour the butter into once it’s done being browned. Set aside.
Place the unsalted butter in a large, light-colored pan over medium heat. Stir the butter the entire time with a rubber spatula to keep it moving.
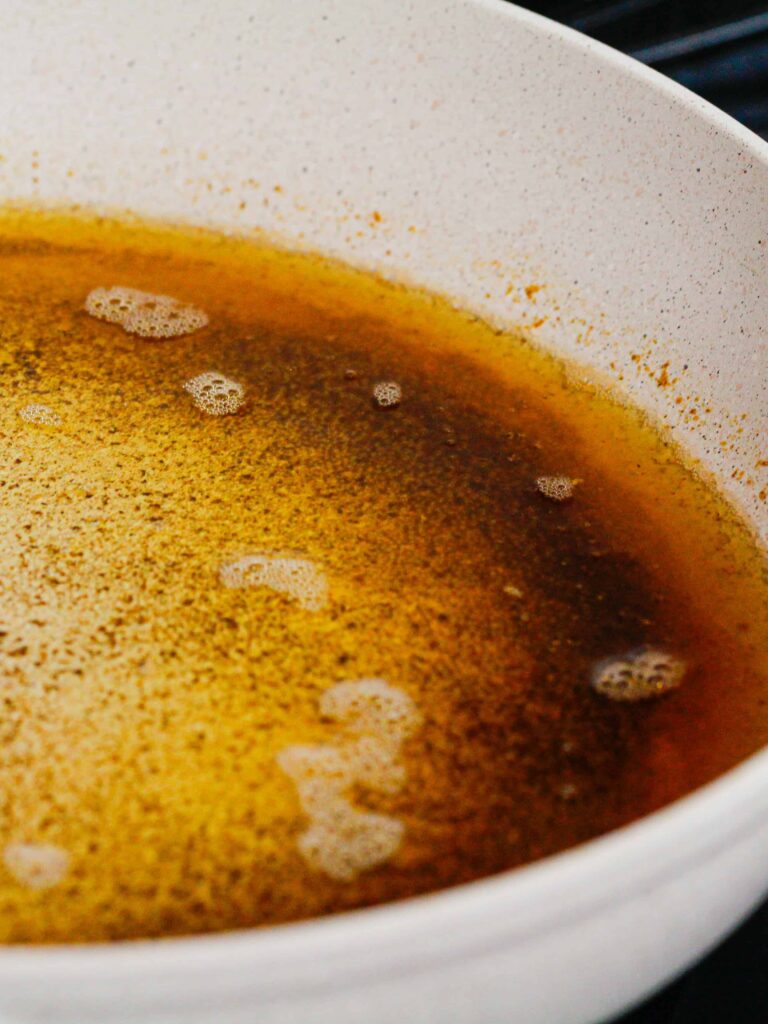
Once melted, the butter will begin to foam and sizzle around the edges. Keep stirring!! The butter should turn golden brown after 5–6 minutes and be topped with a foamy layer of bubbles.
Shortly after this, the foam should kind of fade away, and the milk solids at the bottom of the pan will be a perfectly toasted brown. It should have a strong, nutty aroma.
Immediately remove the pan from heat and pour the butter into a heatproof bowl to stop the cooking process. If left in the hot pan, the milk solids will burn. It can happen in a flash, trust me!!
Step 2: Make the Brown Butter Cinnamon Roll Dough
Preheat your oven to 200°F / 95°C. In a large bowl or the bowl of a stand mixer, combine the flour, instant dry yeast, and fine salt.
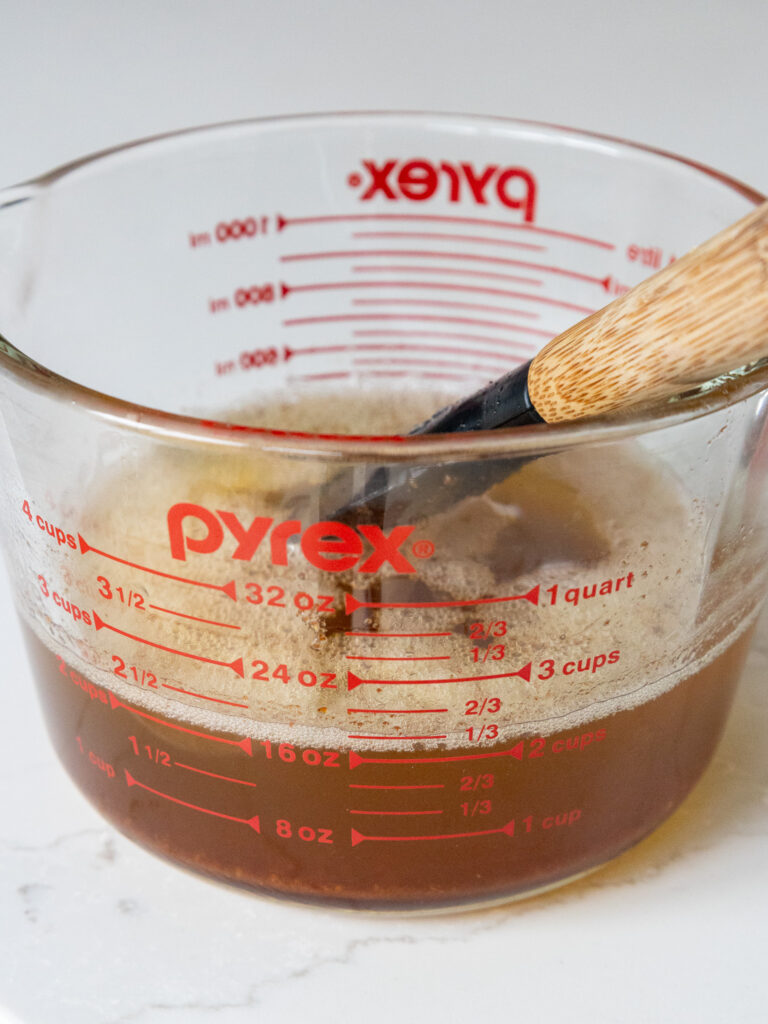
In a separate bowl, combine the milk, melted brown butter, and granulated sugar. Heat for 30-60 seconds in the microwave, then stir to combine the ingredients.
The mixture should feel warm but not hot to the touch. If it’s too hot, it can kill the yeast!
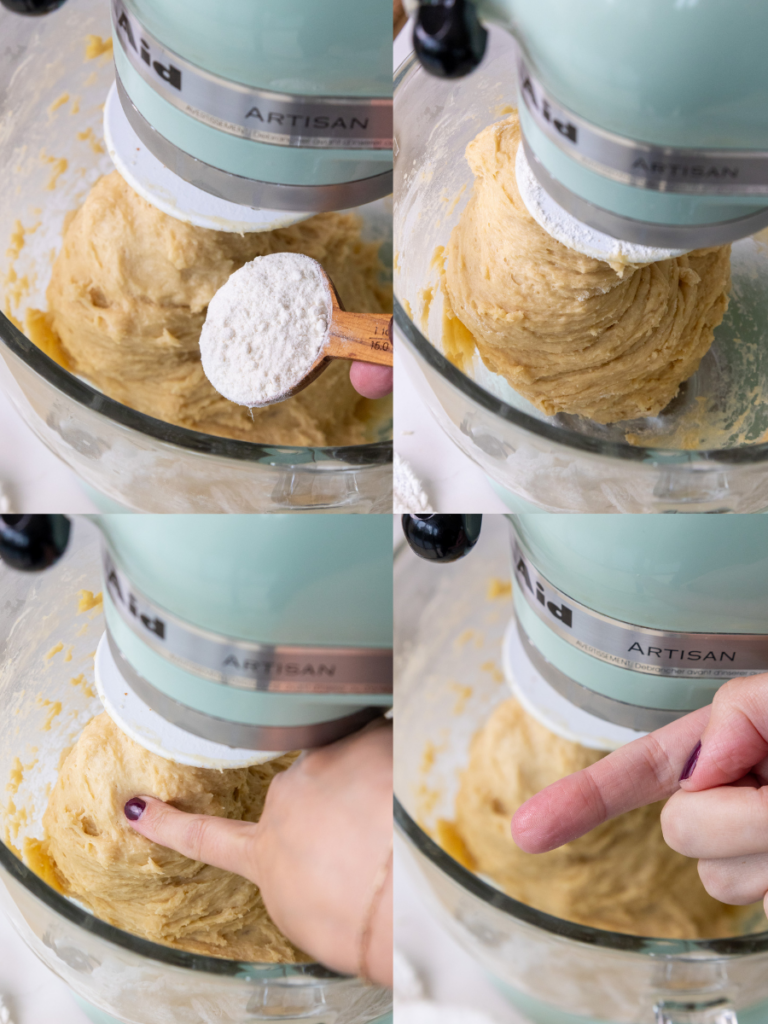
Slowly pour the warm milk mixture into the dry ingredients and mix on medium-low speed with a dough hook or by hand with a dough whisk. If you don’t have a dough whisk, you can use a large wooden spoon.
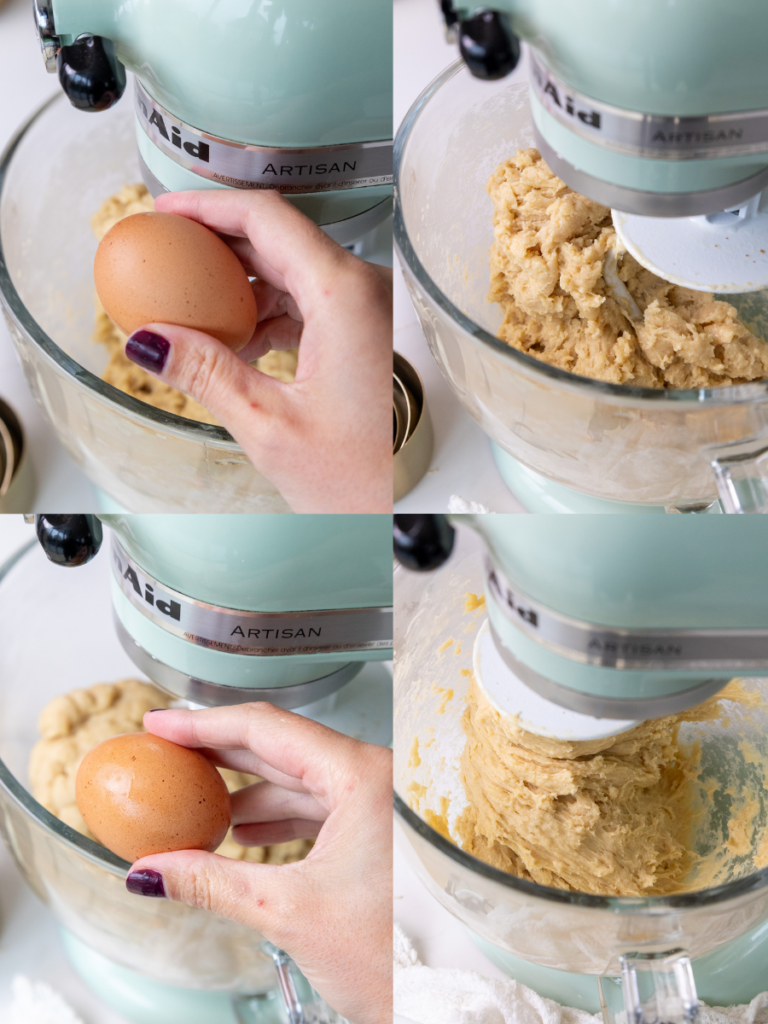
Then add 2 large eggs, one at a time. Mix on a medium speed until a sticky dough ball forms.
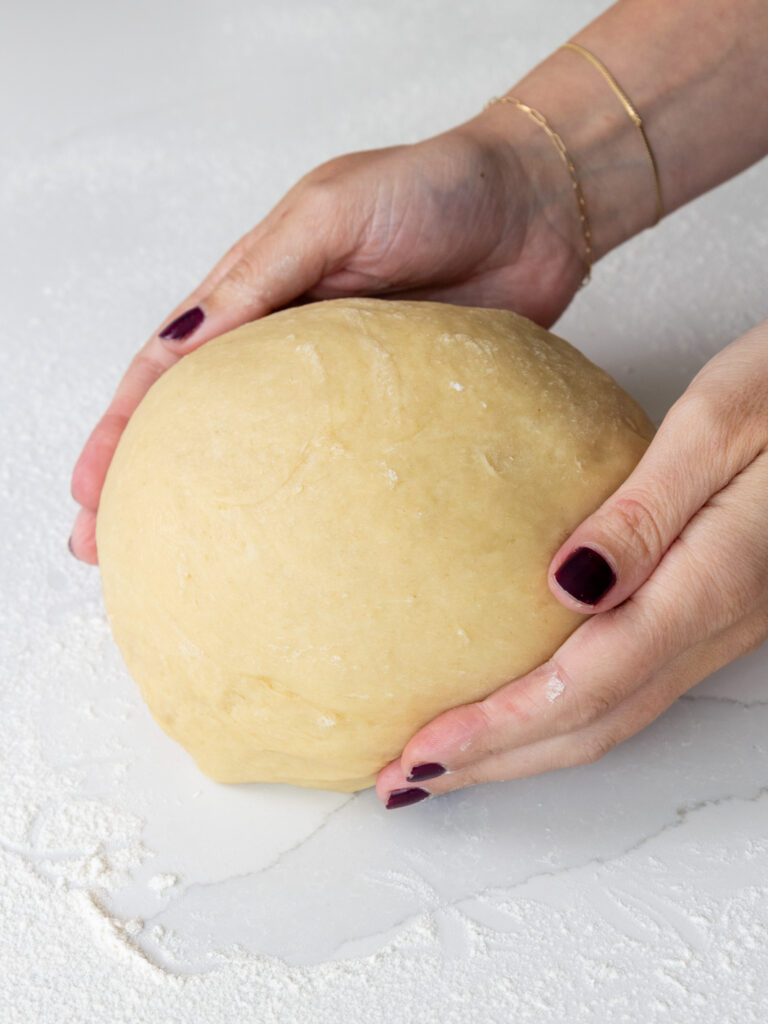
Continue to mix the dough on a medium speed for a couple of minutes until the dough becomes more elastic and looks smooth.
Then mix in additional flour 1 Tbsp at a time on a low speed until the dough begins to leave the sides of the bowl. I usually add 1-2 additional tablespoons of flour.
My favorite way to know if my dough is ready is to poke it with my finger. It should feel tacky but not sticky. As you pull your finger away, there should be no residue on your finger.
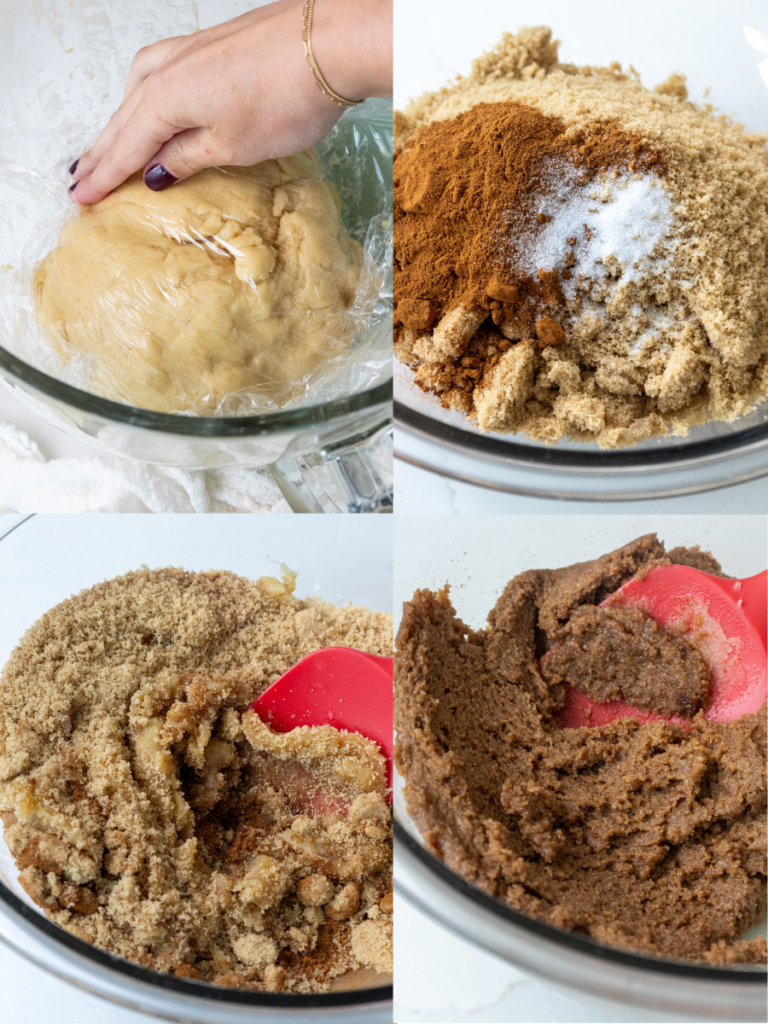
Cover the bowl with plastic wrap and set aside to let the dough rest for 10-20 minutes. This will make it easier to roll out.
Step 3: Make the Brown Butter Cinnamon Roll Filling
While the dough rests, make the cinnamon roll filling. Add the melted brown butter, packed brown sugar, cinnamon, and fine salt into a medium-sized bowl.
Mix together until combined, then set aside. The mixture should have a thick, paste-like consistency.
Step 4: Cut, Roll, and Bake the Cinnamon Rolls
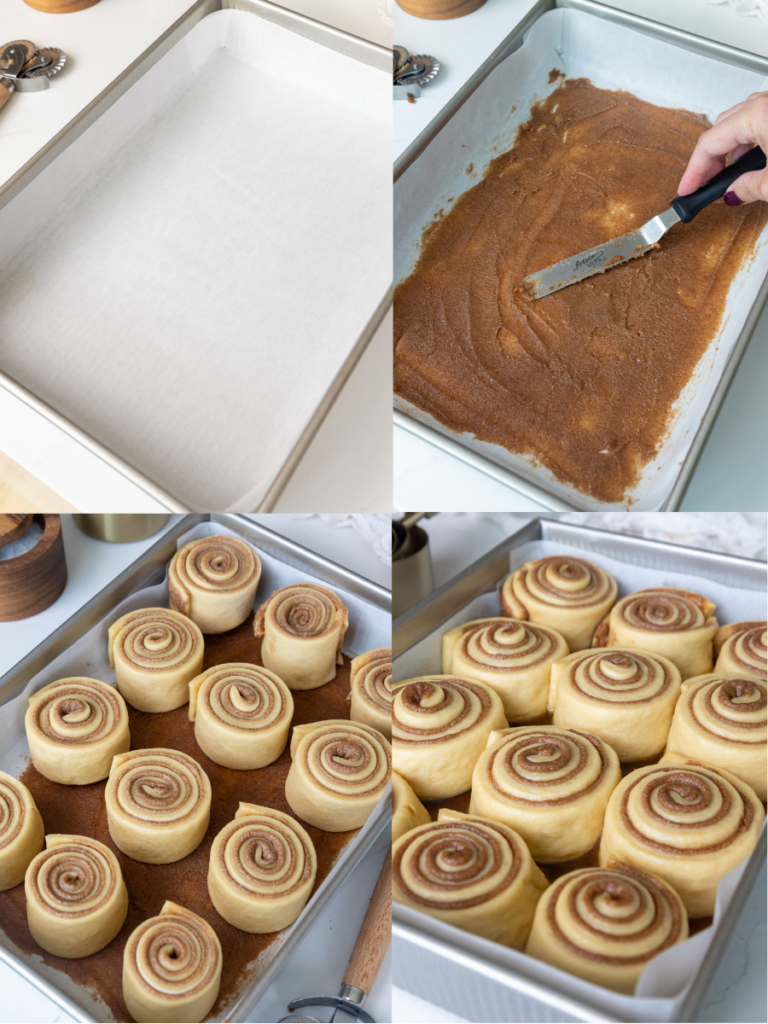
Preheat the oven to 200°F/93°C (to help the cinnamon rolls rise), and line a metal 9×13-inch pan. If you’re making these the day before, don’t preheat the oven. Set aside.
Place the dough on a lightly floured surface and roll it into a large rectangle that’s about 24 in x 18 in. Spread 2/3 of the filling in a thin layer across the dough with an offset spatula or butter knife.
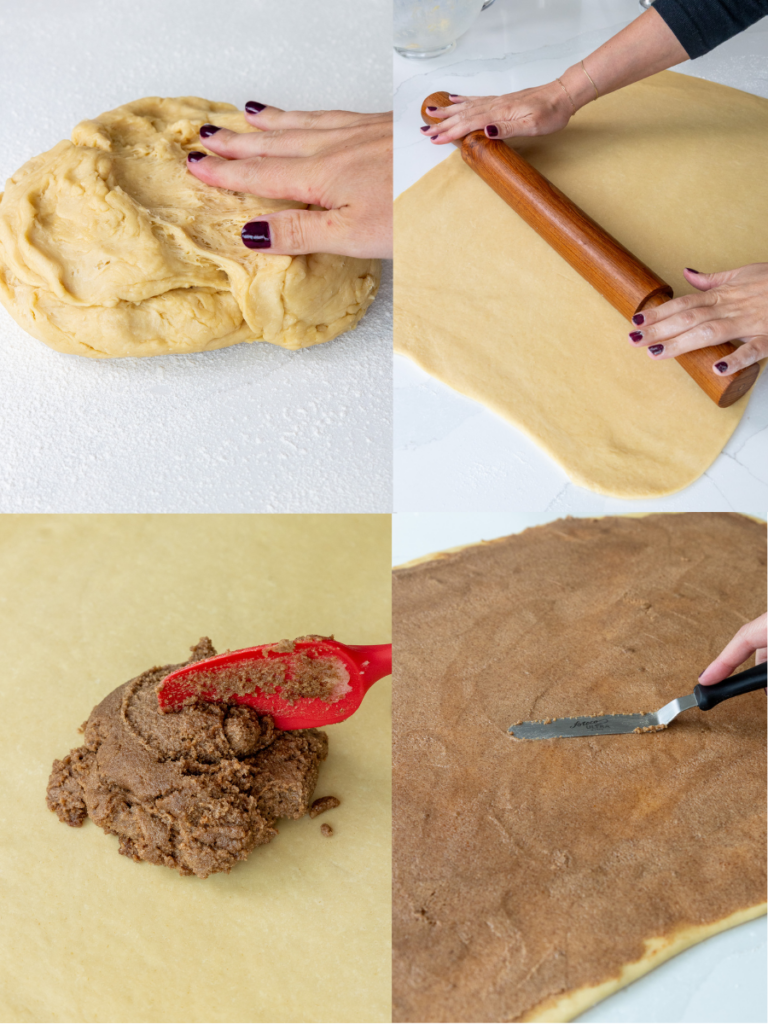
Mix 1/4 cup of heavy cream into the remaining filling, then spread it onto the bottom of the prepared 9×13-inch pan to give them deliciously sticky bottoms.
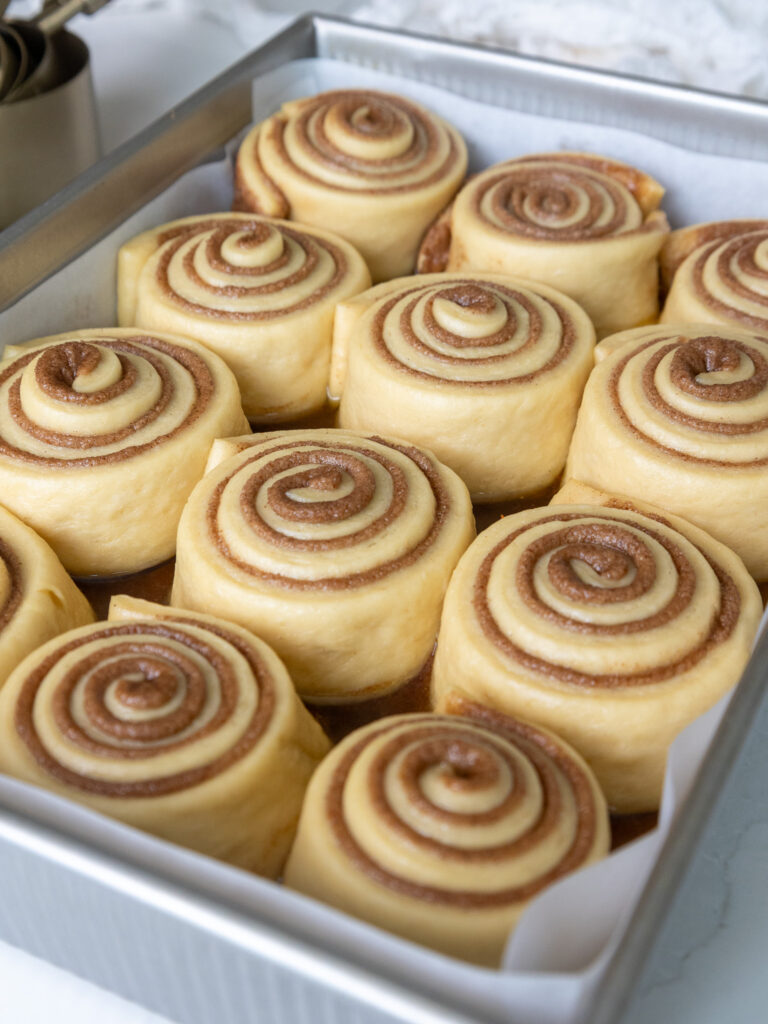
Use a pastry rolling cutter or pizza cutter to cut 12 equal strips that are about 2″ wide – this is why it’s important that the dough is 24″ wide!
If it’s shorter, you may need to cut your strips a bit narrower. Place them in the prepared 9×13-inch pan.
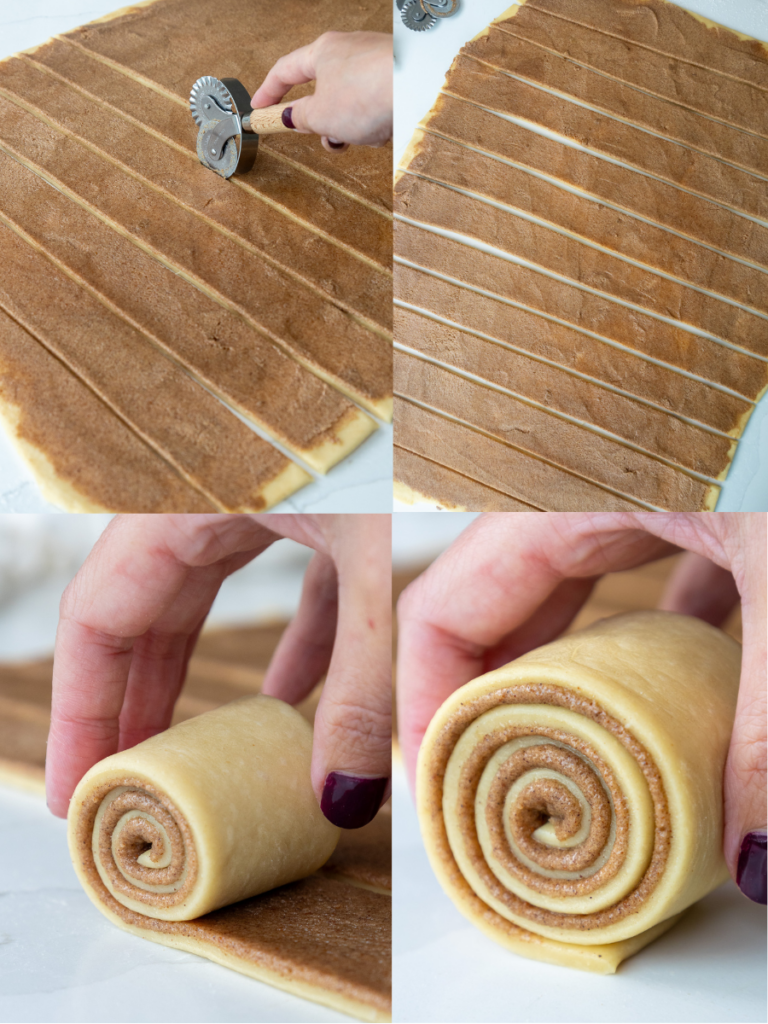
You can also roll the dough into a log and cut each piece with a knife or dental floss if you prefer!
If you are making these cinnamon rolls the night before, cover the cinnamon rolls tightly with plastic wrap and place them in the fridge overnight. Then take them out of the fridge and preheat your oven to 200°F/93°C the following morning. Turn off the oven, cover the rolls with foil, and place the rolls in the warm oven for about 30 minutes to rise.
If you make these the morning of, turn off the oven, cover the rolls with foil, and place the rolls in the oven for about 30 minutes to rise. MAKE SURE YOU’VE TURNED THE OVEN OFF. We want a nice cozy place for the rolls to rise, but we don’t want to bake them yet.
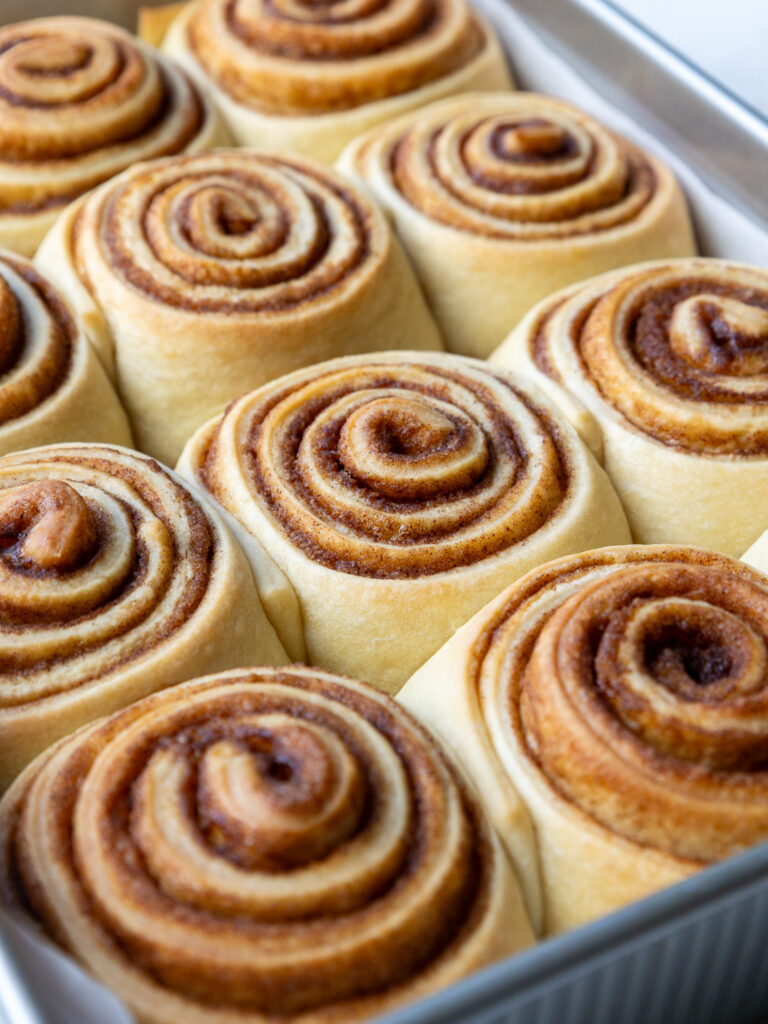
At this point, they should look puffier and have grown about twice in size.
Then preheat the oven to 350°F/175°C. Remove the foil from the pan and bake for 24-28 minutes, or until the rolls are just starting to brown.
Rotate the pan halfway through to help them bake evenly.
Step 5: Make the Brown Butter Cinnamon Roll Icing
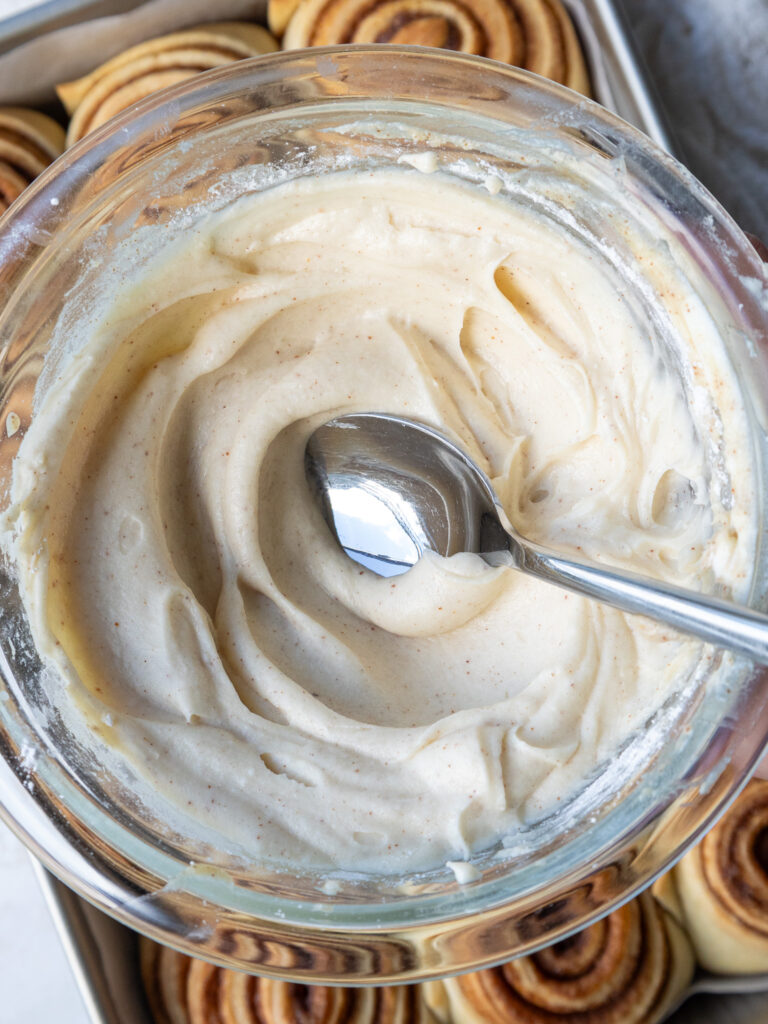
The last step is to make the icing. Mix the softened brown butter, room-temperature cream cheese, vanilla extract, and salt together with a spoon or electric hand mixer.
Then add in the powdered sugar and heavy cream or milk and mix on a low speed until smooth.
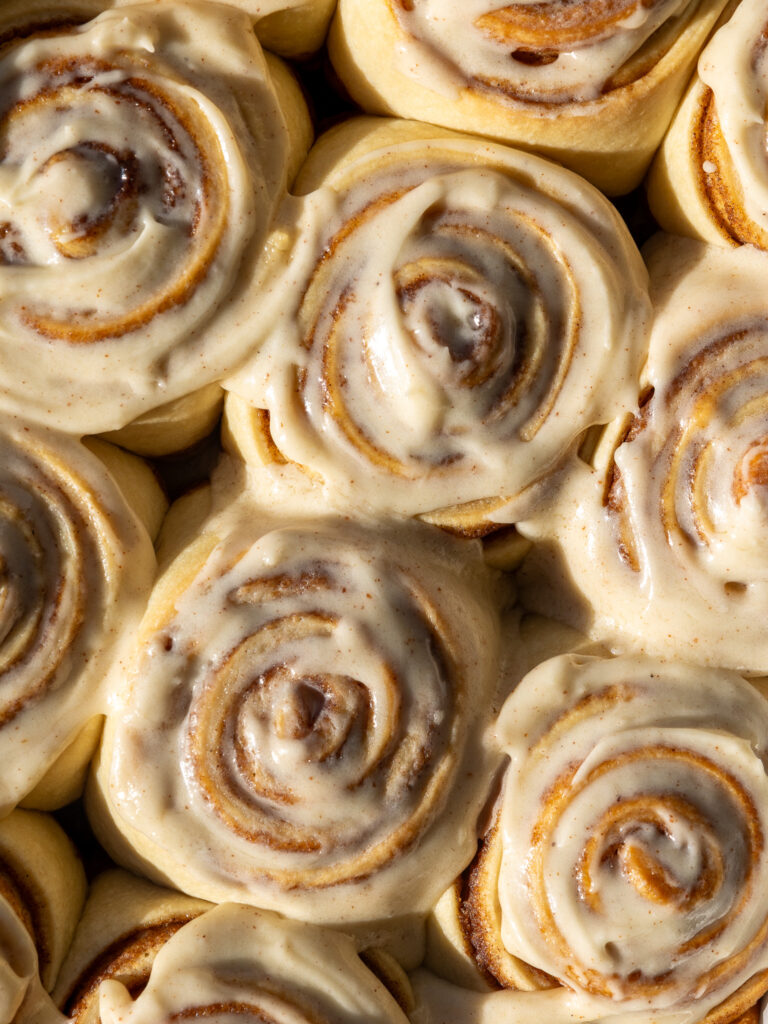
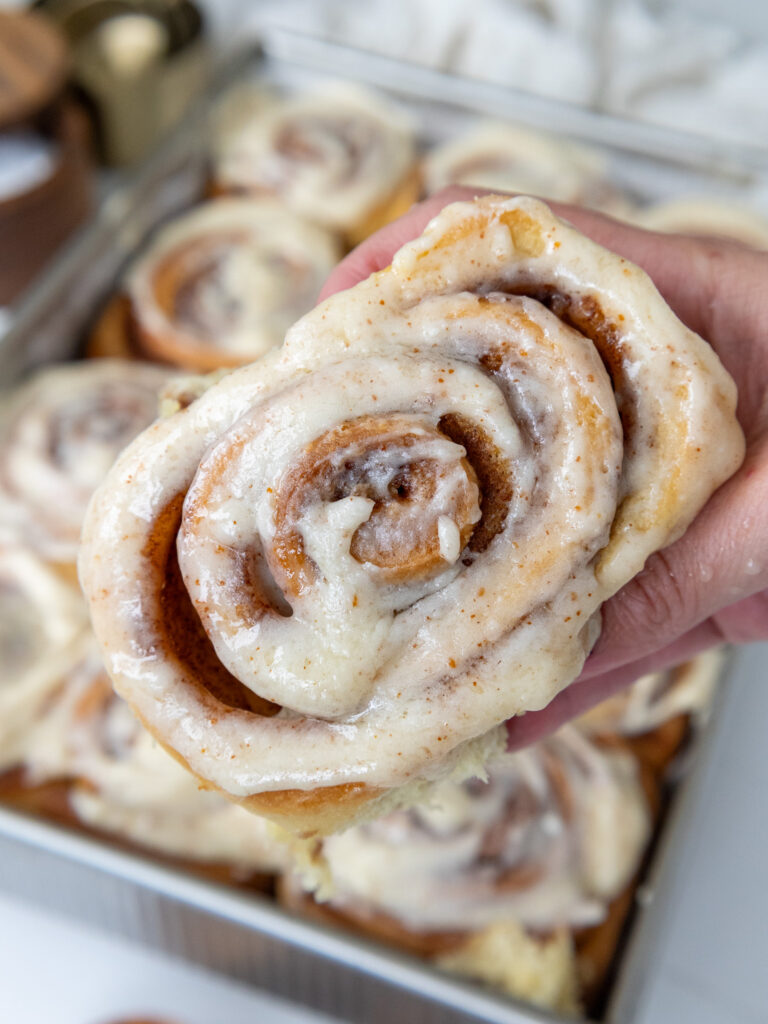
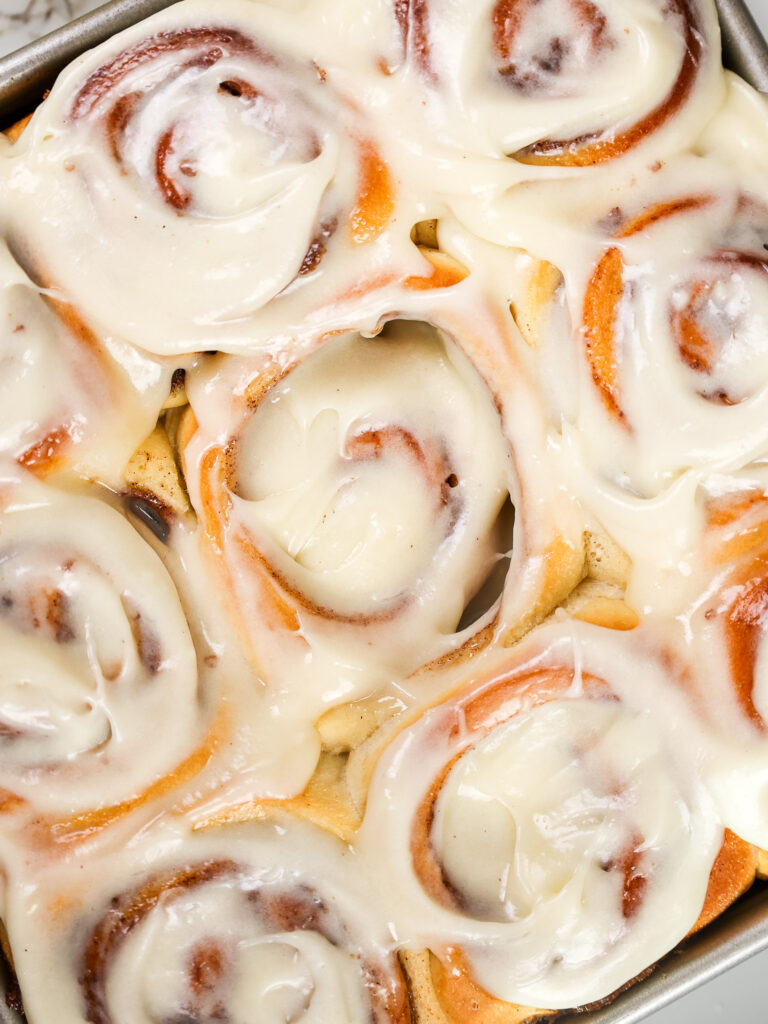
Let the cinnamon rolls cool for about 10 minutes, then spoon the icing over them and enjoy warm!
Making These Brown Butter Cinnamon Rolls By Hand vs. Using a Stand Mixer
This recipe can be made by hand or with a stand mixer and a dough hook.
It is definitely easier to make using a stand mixer, but a little elbow grease never hurt anyone.
Whichever method you use to make the dough, just be sure to knead or mix the dough until it gets an elastic texture and pulls away from the bowl or counter.
Once you get to this point, stop and let the dough rest for about 10 minutes. This little break lets the gluten relax and makes the dough easier to roll out.
If you continue to work the dough, the gluten strands can become too tight. Just like adding in too much flour, this can also lead to dense cinnamon rolls.
It’s pretty easy to sense when the dough is ready if you’re kneading by hand. However, if you’re using a stand mixer, keep a close eye on your dough to ensure you don’t accidentally overwork it.
The Assisted Rise
Another thing that helps these cinnamon rolls turn out soft, fluffy, and tall is an assisted rise.
This recipe uses your oven to help the yeast rise. Don’t worry, the oven is preheated at a low temperature (200°F/ 95°C) and then turned off before you place the cinnamon rolls in there to rise.
The cinnamon roll pan is also covered with foil to ensure no actual baking takes place.
I love this method because in the winter, my house is always cold. It’s almost impossible to find a warm spot for the cinnamon rolls to rise.
No matter what temperature your kitchen is, your cinnamon rolls are guaranteed to rise and puff up with this method.
You also know how long it will take for them to rise (about 30 minutes), rather than anxiously checking on them every 10 minutes to see if they’ve risen.
If your oven has a proof setting, you can also simply turn that on and place the cinnamon rolls uncovered in the oven for about 30 minutes.
Substitutions and Swaps in This Recipe
While I love this recipe just the way it is, I know you might not have all these ingredients on hand!
Below are some swaps and substitutions that can be made in this recipe.
- All-Purpose Flour – I haven’t tested this recipe out with gluten-free flour, but it should work if you use a good blend like King Arthur’s GF flour. Just be sure to knead the dough a bit longer to help give it structure, and bake the rolls for a few extra minutes.
- Instant / Rapid Rise Yeast – You can use active dry yeast in place of the instant yeast in this recipe, just be sure to activate the yeast with warm water and sugar before adding it, and allow the dough to rise for a bit longer (active yeast takes longer to rise than instant).
- Unsalted Butter – If you only have salted butter on hand, you can use it in place of the unsalted butter in this recipe. Just be sure to omit the salt that this recipe calls for. You can also use vegan butter in its place!
- Whole Milk – Most alternative milks work fine in this recipe, including soy, oat, and almond milk.
- Granulated Sugar – I don’t recommend changing the type or amount of sugar used in the dough.
- Brown Sugar – You can use light or dark brown sugar to make the filling for these cinnamon rolls. I prefer using light in this recipe!
Making These Brown Butter Cinnamon Rolls in Advance
If you want to make these cinnamon rolls ahead of time, be my guest! I’m all about working ahead and making life easier.
This recipe can be made the evening before and then baked the following morning.
You can refrigerate these cinnamon rolls overnight once they have been cut and placed in a lined pan. Cover the cinnamon roll pan tightly with plastic wrap, making sure the seal is airtight.
The following morning, take them out of the fridge and preheat the oven to 200°F/93°C. Then turn off the oven, cover the rolls with foil, and place the rolls in the oven for about 30 minutes until they’ve risen.
Once they’ve risen, preheat the oven to 350°F/175°C and bake the cinnamon rolls for 24-28 minutes or until the rolls are golden brown.
You can also bake the cinnamon rolls, then let them cool and freeze them individually.
This is what I do with our leftover cinnamon rolls. I leave the leftover rolls unfrosted, then tightly wrap each roll in a layer of plastic wrap, then foil.
I move individual cinnamon rolls from the freezer to the fridge the night before I want to eat them.
Then in the morning, I unwrap the cinnamon roll and heat it up in the microwave until it’s warm and gooey. This usually takes about 30 seconds in my microwave.
Tips for Making the Best Brown Butter Cinnamon Rolls
- Don’t add too much flour! Add in additional flour 1 Tbsp at a time, and check the dough using the finger test. When you poke the dough with your finger, it should feel tacky but not sticky. As you pull your finger away, there should be no residue on your finger.
- Bake the cinnamon rolls in a metal, 9×13-inch pan if possible! If you have to use a glass pan, reduce the temperature by 25°F and reduce the bake time by a few minutes.
- Try to let the cinnamon rolls cool for about 10-20 minutes, then add the icing. This will allow it to perfectly melt over the cinnamon rolls!
- Store leftover cinnamon rolls or cinnamon rolls made ahead of time in an airtight container to keep them fresh.
Let Me Know What You Think
If you try this recipe for brown butter cinnamon rolls, I’d love to hear what you think! Please leave a rating and comment below.
You can also tag me on social media @chelsweets or use #chelsweets so I can see your creations!!
Brown Butter Cinnamon Rolls
Equipment
Ingredients
Brown Butter
- 2 cups butter unsalted, cold and cut into Tbsp-sized pieces 452g
Brown Butter Cinnamon Roll Dough
- 4 cups all-purpose flour 520g
- 4 1/2 tsp (2 packets) instant dry yeast 14g, 1/2 oz.
- 1 tsp fine salt 6g
- 1 cup whole milk 240g
- 1/2 cup brown butter, melted 113g
- 1/2 cup granulated sugar 100g
- 2 large eggs, room temperature 112g
Brown Butter Cinnamon Roll Filling
- 3/4 cup brown butter, melted 170g
- 1 1/4 cups packed light brown sugar 250g
- 2 Tbsp ground cinnamon
- 1/2 tsp fine salt
- 1/4 cup heavy cream – to be added later 45g
Brown Butter Cream Cheese Icing
- 1/4 cup brown butter, room temperature 56g
- 1/4 cup cream cheese, room temperature 56g
- 2 tsp vanilla extract or vanilla bean paste 10g
- 1/4 tsp fine salt
- 1 cup powdered sugar 125g
- 2 Tbsp heavy cream or milk, room temperature 30g
Instructions
Brown Butter
- The first step is to brown the butter. Get a heatproof bowl out to pour the butter into once it's done being browned.
- Place 2 cups of unsalted butter in a large, light-colored frying pan (to make it easier to see) over medium heat. Stir the butter the entire time with a rubber spatula to prevent the milk solids from burning!
- Once melted, the butter will begin to foam and sizzle around the edges. Keep stirring!! The butter should turn golden brown after 5–6 minutes and be topped with a foamy layer of bubbles. Shortly after this the foam should kind of fade away and the milk solids at the bottom of the pan will be a perfectly toasted brown. It should have a strong, nutty aroma.
- Immediately remove the pan from heat and pour the butter into a heatproof bowl to stop the cooking process. If left in the hot pan, the milk solids will burn. It can happen in a flash, trust me!! Set aside.
Brown Butter Cinnamon Roll Dough
- In a large bowl or the bowl of a stand mixer, combine 4 cups of flour, 2 packets of instant dry yeast, and 1 tsp fine salt.
- In a separate bowl, combine 1 cup milk, 1/2 cup melted brown butter, and 1/2 cup granulated sugar. Heat for 30-60 seconds in the microwave and stir to combine the ingredients. The mixture should be warm but not hot to the touch (otherwise it can kill the yeast!).
- Slowly pour the warm milk mixture into the flour mixture and mix on medium-low speed with a dough hook or by hand. Scrape around the edges with a rubber spatula to make sure all the flour gets incorporated.
- Add 2 large eggs, one at a time. Mix on a medium speed until a sticky dough ball forms. Continue to mix the dough on a medium speed for a couple of minutes until the dough becomes more elastic and looks smooth.
- Then mix in additional flour 1 Tbsp at a time on a low speed until the dough is tacky but no longer sticky (I usually add 1-2 additional Tbsp of flour). It should pull away/no longer stick to the sides of your mixing bowl once it's ready to rest. Another way to test the dough is to tap it with your finger. It should be tacky, but shouldn't stick to your finger or leave any residue on your finger.
- Cover the bowl with plastic wrap and set aside to let the dough rest for 10-20 minutes to allow the gluten to relax. This will make it easier to roll out.
Brown Butter Cinnamon Roll Filling
- While the dough rests, make the cinnamon roll filling. Add 3/4 cup melted brown butter, 1 1/4 cups packed brown sugar, 2 Tbsp ground cinnamon, and 1/2 tsp fine salt to a medium-sized bowl. Mix together until combined then set aside. The mixture should have a thick, paste-like consistency. Set aside.
Cut, Roll & Bake the Cinnamon Rolls
- Preheat the oven to 200°F/93°C (to help the cinnamon rolls rise), and line a metal 9×13-inch pan. If you're making these the day before, don't preheat the oven. Set aside.
- Place the dough on a lightly floured surface and roll it into a large rectangle that's about 24 in x 18 in. Spread 2/3 of the filling in a thin layer across the dough with an offset spatula or butter knife.
- Mix 1/4 cup of heavy cream into the remaining filling, then spread it onto the bottom of the prepared 9×13-inch pan to give them deliciously sticky bottoms.
- Use a rolling pastry cutter or pizza cutter to cut 12 equal strips that are about 2" wide – this is why it's important that the dough is 24" wide! If it's shorter, you may need to cut your strips a bit more narrow. Then roll each cinnamon roll up individually. Place them in the prepared 9 in x 13 in pan. You can also roll the dough into a log and cut each piece with a knife or dental floss if you prefer!
- If you are making these cinnamon rolls the night before, cover the cinnamon rolls tightly with plastic wrap and place them in the fridge overnight. The following morning, take them out of the fridge and preheat the oven to 200°F/93°C. Then turn off the oven, cover the rolls with foil, and place the rolls in the oven for about 30 minutes until they've risen.
- If you make these the morning of, turn off the oven, cover the rolls with foil, and place them in the oven to rise for about 30 minutes. MAKE SURE YOU'VE TURNED THE OVEN OFF. We want a nice cozy place for the rolls to rise, but we don't want to bake them yet.
- At this point, they should look puffier and have grown about twice in size. Preheat the oven to 350°F/175°C. Then bake the rolls for 24-28 minutes, or until they're just starting to brown. Rotate the pan halfway through to help them bake evenly.
Brown Butter Cream Cheese Icing
- While the cinnamon rolls rise and bake, make the brown butter cream cheese icing. Mix 1/4 cup softened brown butter, 1/4 cup of room temperature cream cheese, 2 tsp vanilla extract, and 1/4 tsp salt together with a spoon or electric hand mixer.
- Then mix in 1 cup of powdered sugar and 2 Tbsp of heavy cream or milk at a low speed until it is smooth.
- Let the cinnamon rolls cool for about 10 minutes, then spoon the icing over them and enjoy warm! Store any leftovers in an airtight container at room temperature for a few hours, or in the fridge for up to 5 days.
Video
Notes
Using the Right Type of Yeast: Active vs. Instant Yeast
Be sure you are using instant yeast! It comes in small packets that can usually be found in the refrigerated section of your grocery store. You can use active dry yeast in place of the instant yeast in this recipe, just be sure to activate it in a small bowl with 2 Tbsp of warm water and 1 tsp sugar before adding it to the dough and allow the dough to rise for longer (active yeast takes longer to rise than instant).Making These Brown Butter Cinnamon Rolls in Advance
This recipe can be made the evening before and baked the following morning. I walk through this option in step 5 of “Roll, Cut and Bake the Cinnamon Rolls.”Nutrition
Other Recipes You Might Like:
I just made these and they turned out amazing!!!! So worth the effort! 5 star!
If I was too lazy to make brown butter, could I just sub for regular butter?
absolutely!!
These look amazing. I do have a question about the thickness of the dough when you’re rolling it, I have one of those pre-measuring rolling pins. When rolling out the dough, about how thick would you say the dough is once it reaches the right measurements?
Oh man, it’s tough to say!! I usually go by the dimensions because that way you know you’ll be able to cut 12, even cinnamon rolls and recommend doing the same. If I had to guess, I’d say a little less than a quarter of an inch?
I’ve made these a few times & they are the best cinnamon rolls I’ve ever had in my life. Literally SO amazing. But, if I’m using dry active yeast instead of instant can I still make them the night before & rise in the morning or do you think they will turn out too airy?
I poured the milk into the whole 2 cups of browned butter is there anyway I can still use the butter mixture or do I have to restart
Hi I have a Ceramic pan do I change the baking instructions as if it’s a glass pan ?
That’s exactly what I’d recommend! Hope that helps, happy baking!
Can you give more detail on using active dry yeast instead of instant? How much water do I proof in, and do I need to edit the recipe or wet ingredients since I will have that water?
Oh never mind I see that note now at the bottom
These deserve 10 stars !! I get SO many compliments on these . Is there a way to freeze these ? I’ve had a ton of people want them for Holidays ??
I AM SO HAPPY TO HEAR THAT!! Thank you for sharing Andrea 🙂
@Andrea Miller, hi! did you ever try freezing them? if so, any success?
I count 1 1/2 cups brown butter used in this recipe. Why brown 2 cups of butter?
Hi Ginny,
As you brown the butter, a lot of the water that is in the butter is going to evaporate, which is going to reduce the total volume of the brown butter you end up. This means you need to start with more butter than you will eventually use in the recipe. Hope that helps happy baking!
You have a picture of coating the parchment-lined pan with something, what is it? Why isn’t it listed in the directions?
Hi Ginny,
This part is actually included in step 3 of the “Cut, Roll & Bake the Cinnamon Rolls” section. It’s basically just a bit of the fillng spread beneath the cinnamon rolls to give them super gooey bottoms. Hope that helps, happy baking!
Planning to make these this weekend before a wedding. Any chance I can make them and freeze them prior to baking?
Hi Erin,
Yes, you totally can—and it’s a game changer for prepping ahead! You can freeze unbaked cinnamon rolls right after shaping and before the second rise. Just place them in a greased pan, cover tightly with plastic wrap and foil, and pop them in the freezer.
When you’re ready to bake, take them out the night before, let them thaw in the fridge, and then allow them to rise at room temp until puffy (usually 1–2 hours) before baking as usual. They’ll taste just as fresh and fluffy as if you made them that day!
Hope that helps, happy baking!
I’m constantly searching for the “PERFECT” cinnamon roll recipe, and they always fall short. This recipe was PERFECT—chef’s kiss!!! I love the technique of cutting the strips and rolling the individual cinnamon rolls instead of one large roll, and then cutting. This technique makes for a nicer-looking finished product. I also love the step of combining all of the filling ingredients instead of layering them separately. I basically love everything about this recipe!
I made these for Easter brunch, and everyone loved them. This will be my go-to cinnamon roll recipe. My search is finally over. Thank you so much for sharing!
OMG this is the highest praise Priscilla!!! Thank you so much for sharing 🙂
HOLY MOLY these are so good! i cannot thank you enough for this recipe
So happy you love this recipe!!! It’s def one of my faves 🙂
So the dough only rests for 10/20 minutes, you don’t let is rise before rolling out? I wanted to confirm before I start the recipe. I only read one rise (once rolled and placed in pan to cook). Thank you!
Correct! The dough rests a little bit before being rolled out to let the gluten relax, and then they do an assisted rise once they’re cut and in the pan before being baked 🙂 Hope that helps, and that they turn out great!!
Thank you so, so much for this recipe! ??
The flavor is truly out of this world. It completely blew my mind from the very first bite. It’s perfect the texture, the deep brown butter flavor, the fluffiness of the dough everything is incredibly well done. ???
I’m so grateful for the time and care you put into sharing this recipe. It’s truly a homemade baking treasure. Thank you for creating something this special! ?
Hi Miriam,
This made my day, thank you so much for the incredibly kind words! 🙂 I’m so happy you loved the flavor and texture, thank you for sharing!!
I made these for the second time in a month yesterday! Such a gorgeous recipe, easy to follow and everyone absolutely loved them!
Hi Emily,
Aw, that makes me so happy to hear!! 🙂 When a recipe makes it into the repeat-bake rotation, that’s the best compliment. I’m so glad everyone loved them and thank you for coming back to share!
Currently watching these on their second rise. I accidentally used the last of my brown butter with the last third of my filling and used that on the bottom. Drizzled some heavy cream on after I realized. Hoping they’re still okay. Now I have to brown more butter for my icing ?
Hi Lorr,
I know not everyone feels this way, but I usually think the more butter the better! They should still bake up fine, they’ll just be extra gooey. Hope you still love them!!!
Reporting back to say, ma’am. What have you done. These are BY FAR the best cinnamon rolls ever. Zero comparison. You are a wizard and a queen.
Hahahaha I am so happy to hear that!!! Glad you shared how they turned out, I was nervous!!!!!! 🙂
I’ve not tried these yet , but excited to do so. My question is a silly one, but wanted to double check before I begin. You do remove the foil before baking, correct? I’ve seen other recipes that say only remove the last few minutes. Thank you again for this recipe! I know my family will love it! ?
Hi Stacey,
No worries at all! Yes, you definitely remove the foil before baking them, it’s only on for the proofing part of the process in this recipe 🙂 Hope your cinnamon rolls turn out amazing!!!!!!
So soooo goood!!! Would I be able to make them more than a day in advance?
Would I still put the filling on the pan before putting it in the fridge?
Hi Aiko,
Yes, I’d recommend still putting the filling on the bottom before putting the cinnamon rolls on top and storing them in the fridge if you make them in advance 🙂 Hope they turn out amazing!!
Hi Aiko,
I wish!!! But the yeast gets tired and the dough structure starts to break down :/ So sadly I don’t recommend it!
I didn’t have whole milk so I used buttermilk and they were delicious! I could not for the life of me roll the dough out to the size indicated without it being too thin so I just made it work with nine large rolls that fit the 13×9 pan perfectly when they came out puffy from the oven. And I needed more like 8 extra tablespoons of flour to get it to not stick to the pan. Looking forward to trying more of the cinnamon roll variations. This is such an easy way to make cinnamon rolls when you are short on time or feeling lazy compared to other recipes I’ve tried. The more labor intensive options do not produce better results.
Hi Kathy,
Love that the buttermilk worked well in this recipe 🙂 And thank you for sharing your experience, I’m so glad they turned out great and that you loved them!! Thank you for sharing 🙂
After the assisted rise, do you need to take the pan out while the oven preheats? Also, are you supposed to start timing 24-28 mins after you turn on the preheat setting or after the oven is done preheating?
Hi Tiffany,
Yes, you do need to remove the pan from the oven as it preheats. The 24-28 minutes starts once the oven is fully preheated, and you place the cinnamon rolls in the oven (and have removed the foil). Hope that helps, happy baking!
For the Cream Cheese Icing it says you need 1/4 Cup softened Brown Butter, ai don’t understand so I have to melt another stick of butter for it to be brown butter ? Making this today, Please Help!!!
Hi Audrey,
You brown enough butter (2 cups) at the start of this recipe for the entire recipe! If you follow the amounts listed (1/2 cup for the dough, 3/4 cup for the filling), you should have enough brown butter left over after making the dough and filling to use 1/4 cup of the now room temp brown butter to make the cream cheese frosting. Hope that helps, happy baking!
Hi!! I made these and they were wonderful. My dough was very, very wet to the point I had to add 10 tbs of flour. Any recommendations of where I could’ve gone wrong? Should I let the brown butter come to room temp before microwaving my milk mixture? I didn’t and microwaved the warm brown butter, milk and sugar for 40 seconds. Any help is appreciated!
Hi Lyndi,
I’m so glad you loved them, but I totally get how frustrating that extra-wet dough can be. When it turns out that loose, it’s usually because the butter or milk mixture was a bit too warm, which can soften the flour and make everything feel stickier than it should. Letting the brown butter cool to room temperature before mixing really helps, and I’d warm the milk and sugar separately next time so the mixture doesn’t accidentally get too hot. And depending on your butter brand or kitchen humidity, the dough can run wetter too. Adding a little extra flour is totally normal, but needing that much might suggests the ingredients were too warm early on. You still pulled it off beautifully though! Hope that helps for the future, happy baking!!
Can I use a glass baking dish instead of metal?
Hi Sara,
Short answer is yes, you can use a glass baking dish, but there are a couple things you should know!
Glass heats up more slowly than metal, but once it’s hot, it holds onto heat longer. That means cinnamon rolls in glass often bake a little slower at first, then can brown more on the bottoms and edges by the end. To balance that out, I recommend lowering the oven temp by 25°F and starting to check for doneness a few minutes earlier than the recipe says.
Also, keep an eye on the bottoms. If they’re browning too quickly, you can loosely tent the pan with foil for the last part of the bake. Texture-wise, they’ll still be soft and delicious, just maybe a touch less evenly golden than with metal.
Hope that helps, happy baking!!
Can I use bread flour instead of APF? What would the changes be?
Hi Georgia,
You can use bread flour in place of the APF cup for cup, but the rolls will be a bit less tender and soft. Hope that helps, happy baking!
These are so delicious. They are pretty much the only cinnamon rolls I am allowed to make now because they are that amazing.
omg yessss!!! I am so happy to hear you loved this recipe April, thanks for sharing!
I made these today and they did not turn out well. Hoping you can help me identify where I went wrong.
I didn’t end up having to add any extra flour. after adding in the eggs my dough was in a ball and was not sticky (looked exactly like your video). It took 2 hours to rise after I rolled them up, and they took almost 45 minutes to bake, and they were dense and claggy, not light and pillowy. What may have caused this? my instant yeast was new. my warmed milk, browned butter, and sugar was warm to the touch but not above 95°. what are some things I should look at to avoid these issues when I try again?
Hi Kristy,
I’m so sorry they didn’t turn out the way you hoped! Based on what you described, the two biggest things I’d look at are underproofing and too much flour in the dough, even if you didn’t add any of the extra flour. If the rolls took about 2 hours to rise after shaping and still baked up dense and claggy, that usually means the dough was still a bit underproofed when it went into the oven. With enriched doughs like this, the rise time can vary a lot depending on the temperature of your kitchen, so it’s better to go by how the rolls look than the clock. They should look noticeably puffy and airy before baking.
I’d also double check how the flour was measured, because even a little extra flour can make cinnamon roll dough heavy. If you aren’t already, I recommend using a kitchen scale, or spooning the flour into the measuring cup and leveling it off rather than scooping straight from the bag. Another thing to keep an eye on is the final dough temperature. Even if the milk mixture felt warm, browned butter can cool unevenly or make the dough run a bit cooler overall, which can really slow the rise.
The 45 minute bake time is also a clue that something was off, because that’s much longer than normal. That can happen when the rolls are underproofed, too cold when they go into the oven, or if your oven runs cool. I’d also recommend using an oven thermometer if you have one, just to rule that out. For next time, I’d focus on measuring the flour as accurately as possible, letting the shaped rolls get really puffy before baking, and proofing them in a slightly warm spot to help them rise better. Hope that helps, happy baking!!
Should I leave the foil on when baking & remove halfway through?
Hi Elle,
The foil is just on there for the proofing stage in the oven. Once they are proofed and you remove the pan from the oven and increase the oven temp, you can remove the foil and bake the rolls in the oven. Hope that helps, happy baking!
Absolutely love this recipe and make it at least 2 times a month. I would love if you could post an adjusted recipe to make 24 and even 36 rolls at a time!
Yessssss!!! That is so wonderful to hear Katie:)
I don’t think I have a mixer big enough to make that large of a batch!! My 5 qt kitchenaid barely handles the current amount of dough with the bread hook. But if you have a big enough mixer, you should be able to to double the ingredients!
I love this recipe, I keep making these a few times and I couldn’t stop thinking about them.
Any chance I can halve the recipe?
So happy to hear you love this recipe Ashley! I haven’t halved this particular recipe before, but that should work just fine. If you try it, please let me know how it turns it!
BEST cinnamon roll recipe! I’ve tried a few other recipes, but always come back to this one.
Yessss!! I’m honored 🙂 So happy to hear you love this recipe as much as I do!!