
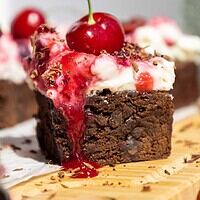
Black Forest Brownies
These black forest brownies are fudgy, decadent, and taste just like a black forest cake! They have the perfect balance of rich chocolate, fluffy whipped cream, and juicy cherries.
How to Make These Black Forest Brownies
To make sure these brownies turn out as amazing as possible, let’s walk through each step together! I’ve also included a video tutorial of the process below.
Step 1: Make the Cherry Topping
Make the cherry topping first so that it has time to cool and thicken before we top the brownies with it.
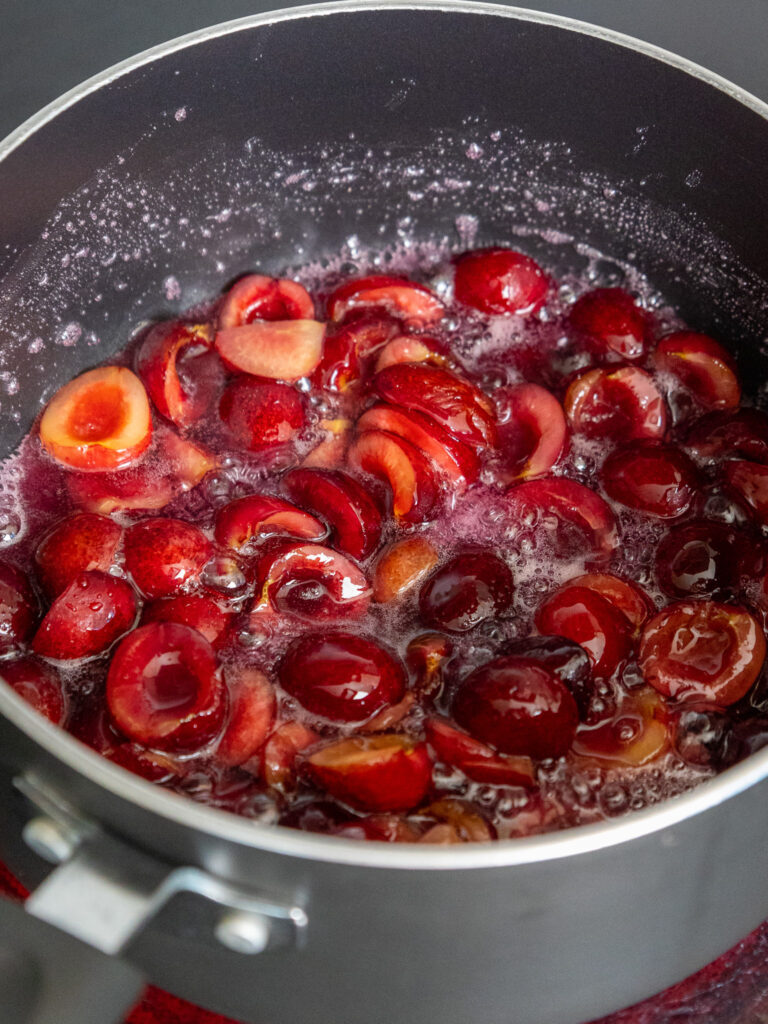
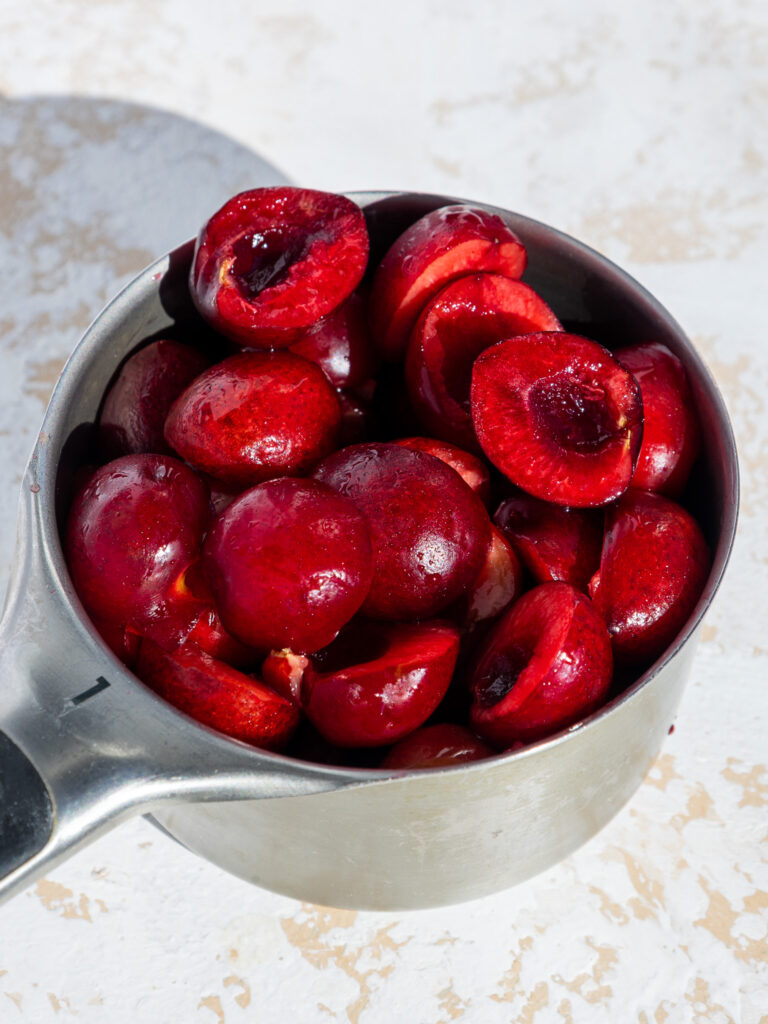
Add the pitted cherries, sugar, and Kirsch Liquor into a medium saucepan. Heat the mixture over medium-high heat until it begins to simmer, stirring constantly.
This usually takes me about 3 minutes, but it will take a bit longer if you use frozen cherries.
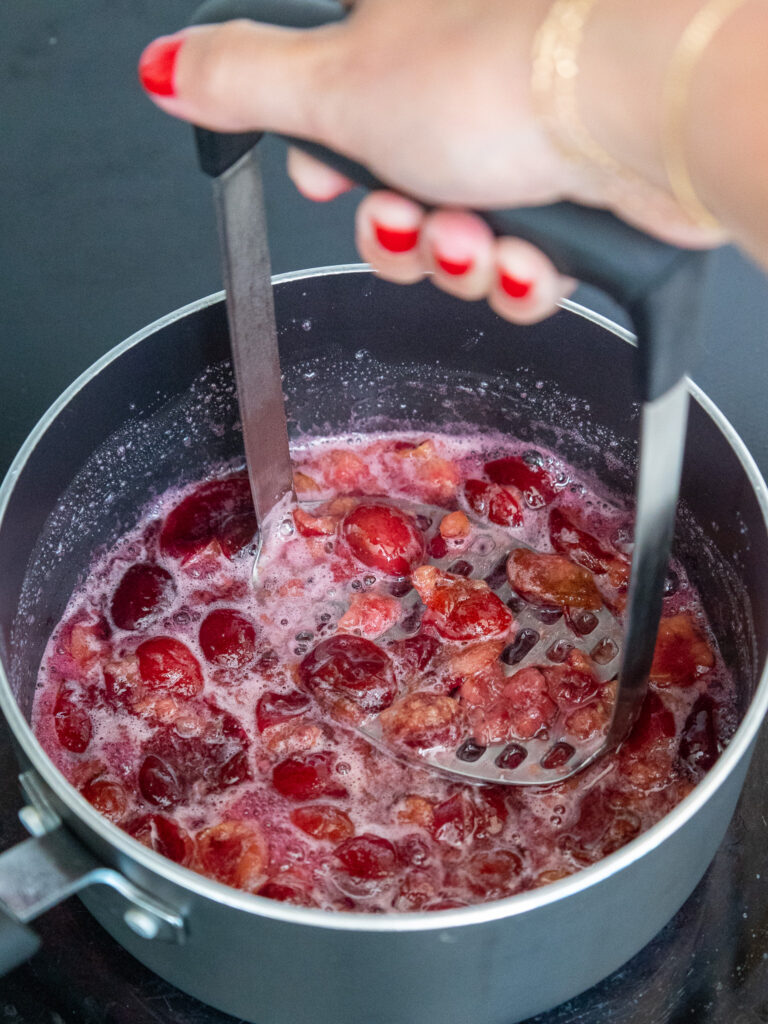
Once it reaches a gentle simmer, reduce the heat to medium-low. Stir the water and cornstarch together in a small bowl until the cornstarch is fully dissolved.
Pour this into the cherry mixture and cook for 3 more minutes until it thickens, stirring frequently.
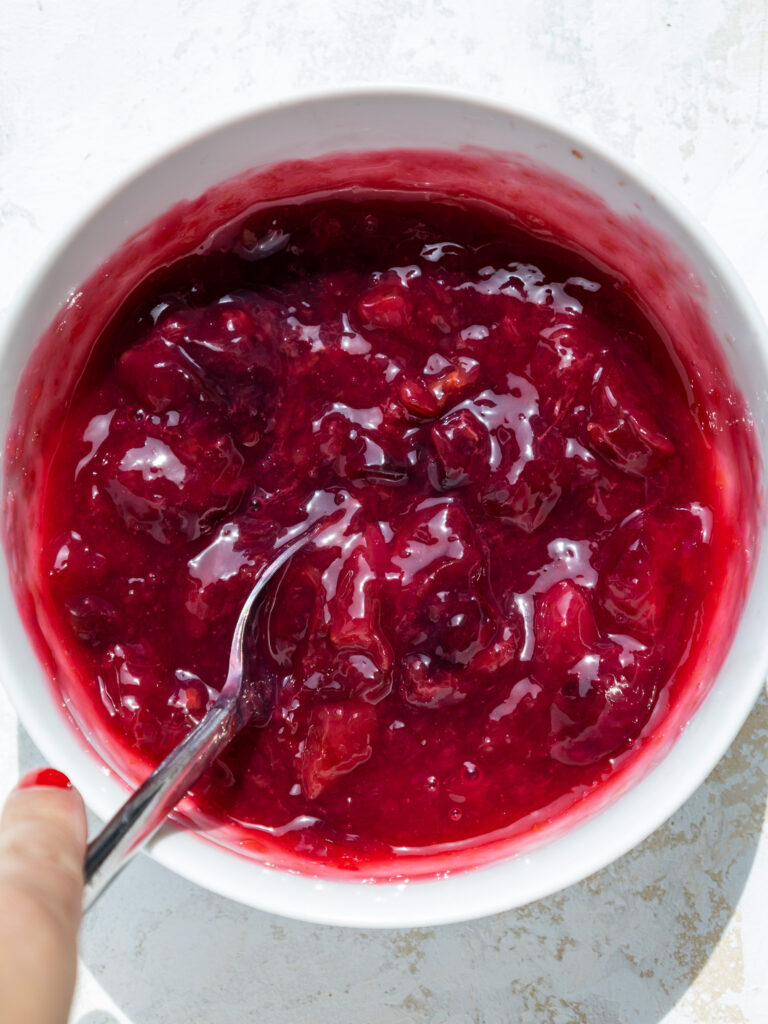
While the mixture cooks, use a berry masher or large fork to mash up the cherries a bit.
At this point, the sauce should be thick enough that you can drag your finger through the sauce on the back of the spoon and it will keep its shape.
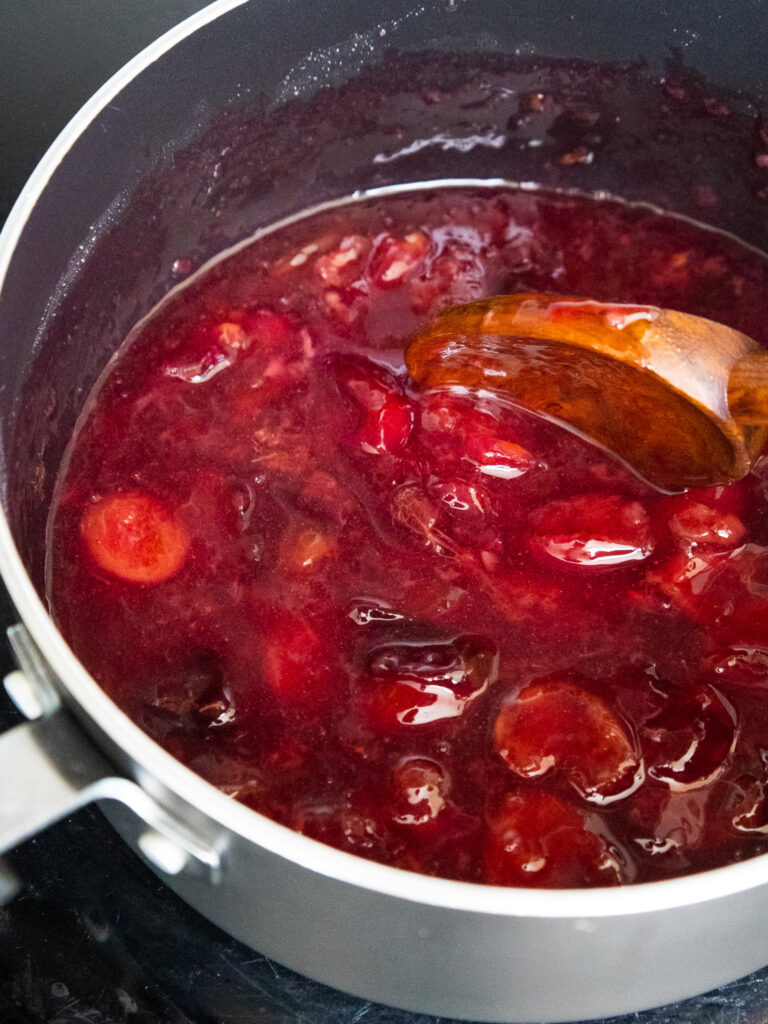
Remove the pan from heat and pour it into a separate bowl. Place the bowl in the fridge to help it cool more quickly.
If you make the cherry sauce in advance, it can be stored in the fridge in an airtight container for up to a week.
Step 2: Preheat the Oven & Prep the Pan
Next, preheat the oven to 350°F / 175°C and line and grease an 8 x 8-inch square pan with parchment paper. Set aside.
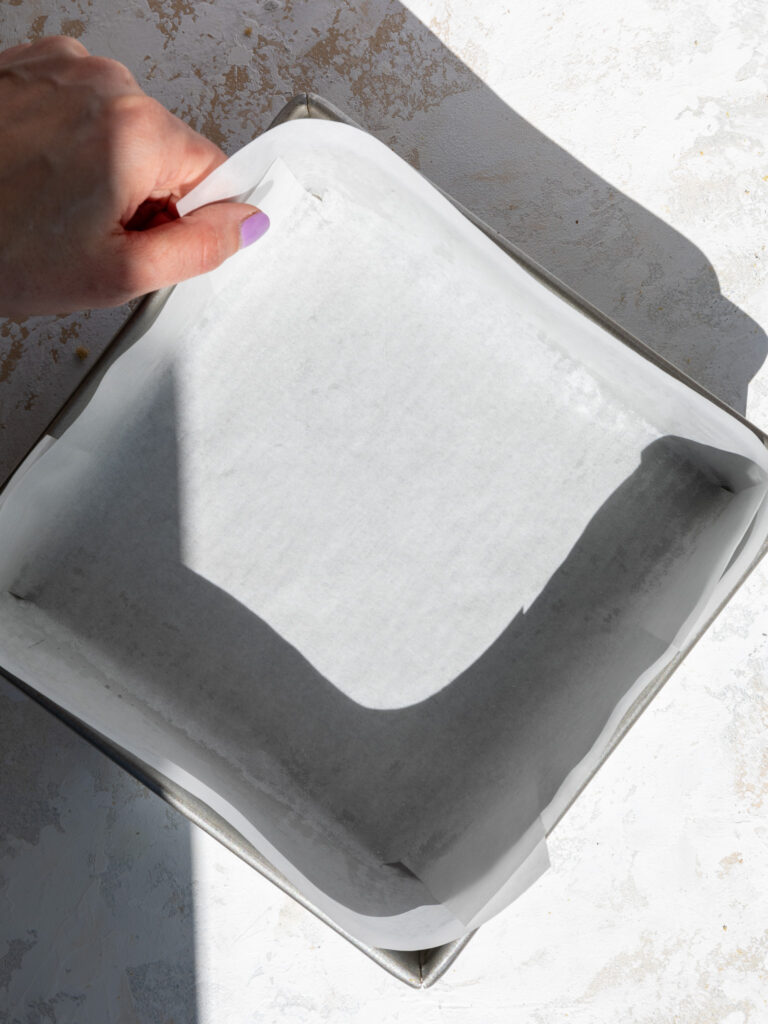
You can also use a 9×9-inch pan, but the brownies will be a bit thinner, and the bake time will be a bit shorter.
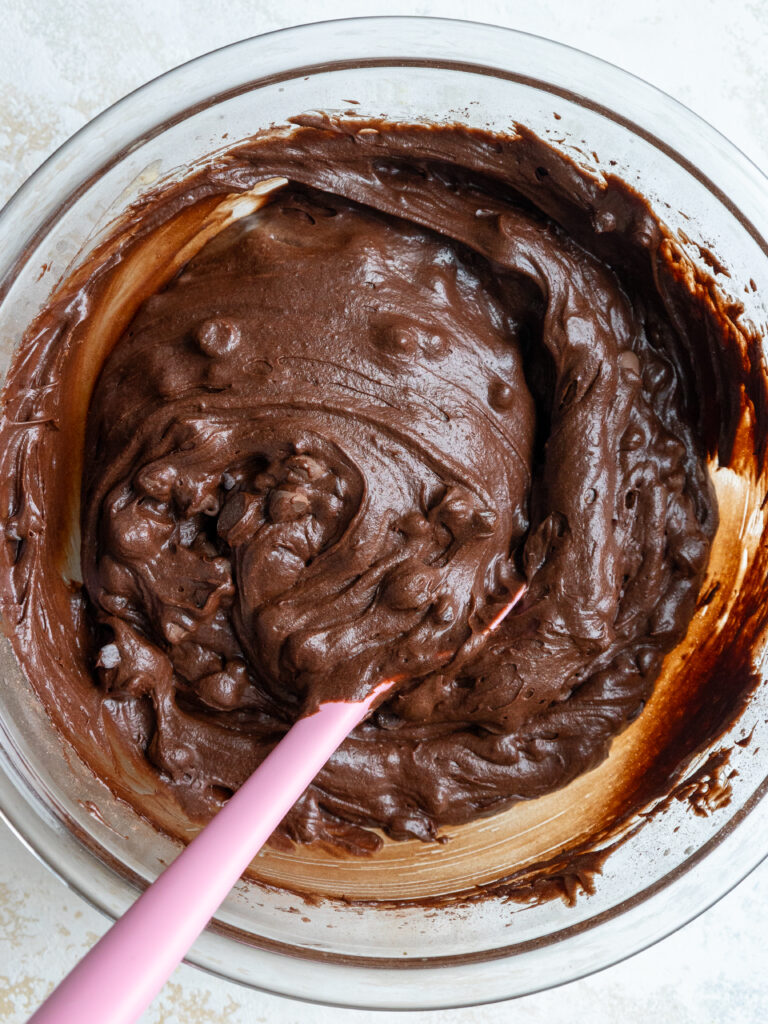
Step 3: Make the Brownie Batter
Then it’s time to make the brownie batter! Place the eggs, granulated sugar, and brown sugar in a large bowl and mix on high for 1 minute with a hand mixer or stand mixer.
The mixture should get lighter in color and look creamy. Whipping up the sugar and eggs will help give these brownies a crinkly, shiny top.
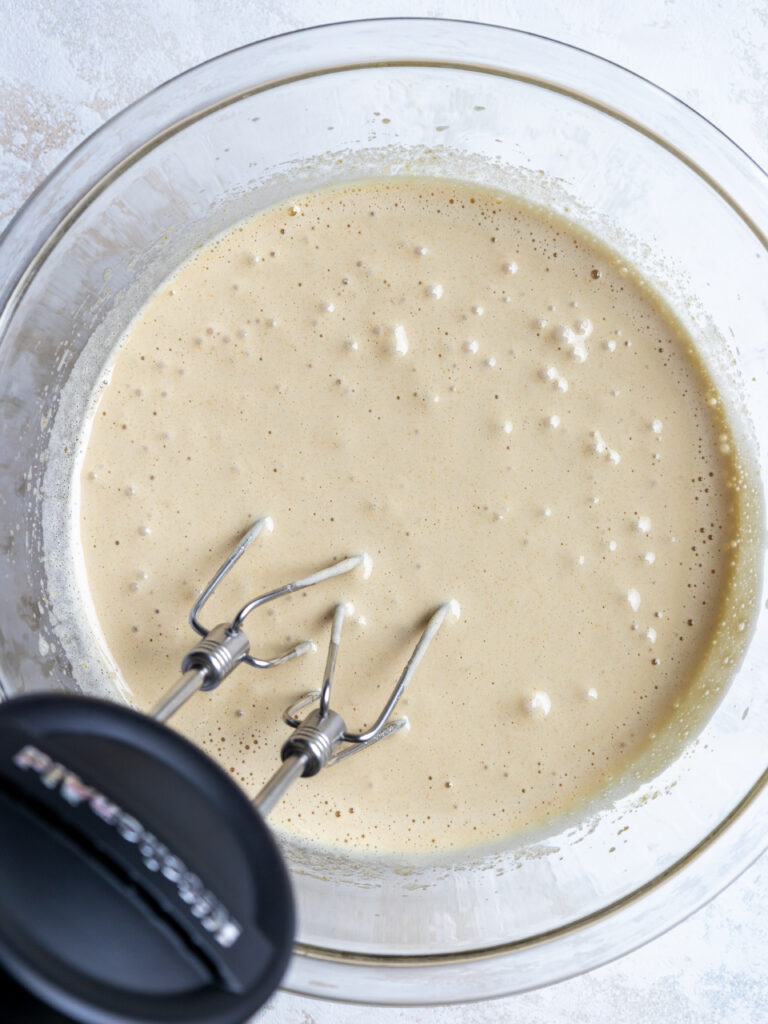
Add the melted butter and vanilla extract to the egg mixture. Mix on a medium speed until the ingredients are combined.
Then add the all-purpose flour, cocoa powder, fine salt, and baking powder and mix on a low speed until just combined.
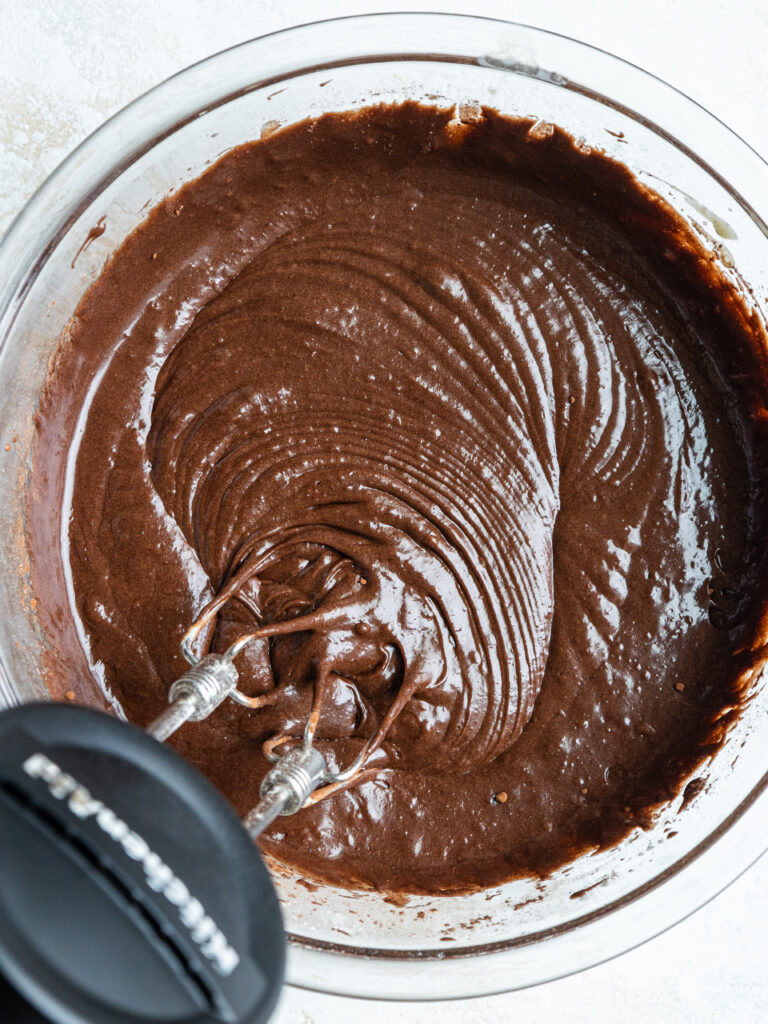
Scrape the sides and bottom of the bowl with a rubber spatula to make sure all the ingredients are properly mixed together.
If desired, fold in the chocolate chips with a rubber spatula until they’re evenly distributed.
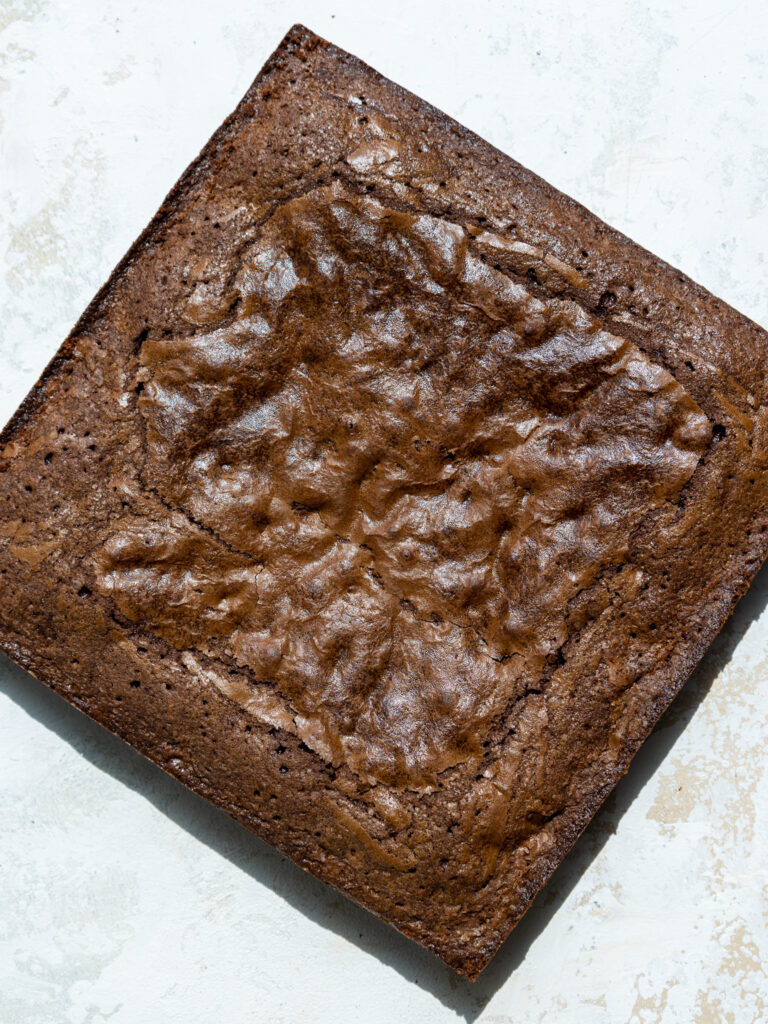
Step 4: Bake and Cool the Brownies
Pour the batter into the prepared pan. Bake for 35-40 minutes or until a toothpick inserted in the middle of the brownies comes out with a few moist crumbs.
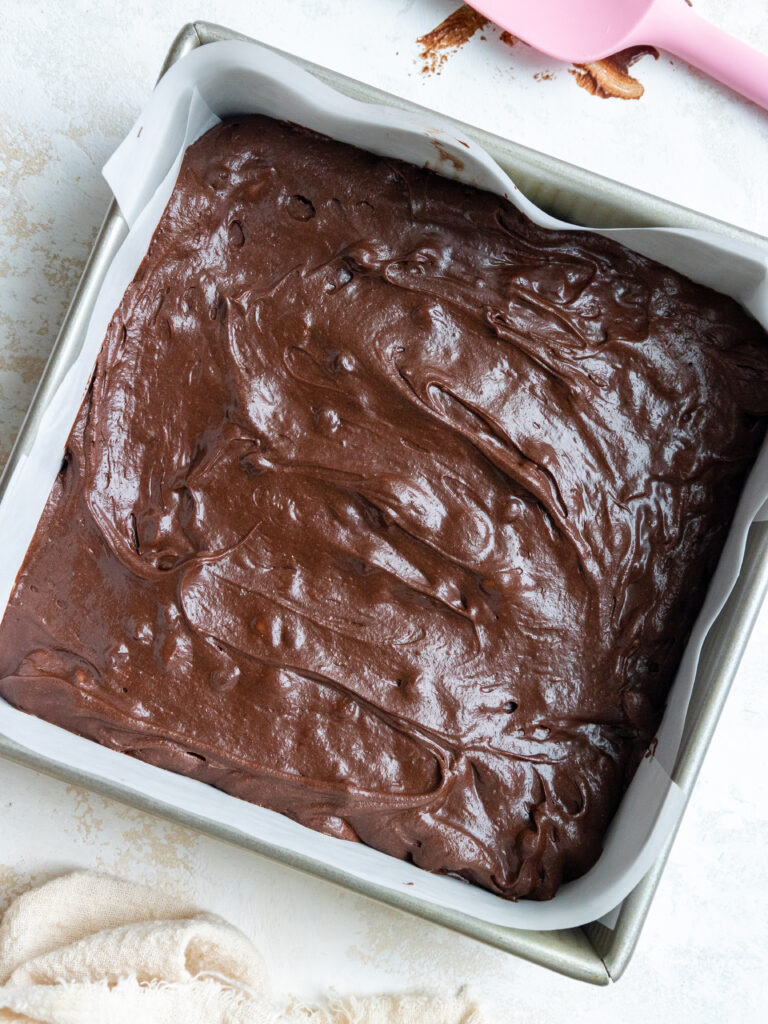
In my oven, the sweet spot is 37 minutes, but every oven bakes a bit differently!
Step 5: Make the Whipped Cream
While the brownies are cooling, make the stabilized whipped cream. If possible, chill the mixing bowl and whisk attachment in the freezer for 30 minutes to help this whipped cream frosting whip up better.
Place the cold cream cheese into the chilled mixing bowl and mix on a medium-low speed until smooth.
Pour in the powdered sugar and mix on low at first to avoid powdered sugar clouds/explosions.
Increase the speed to medium-high once the powdered sugar is incorporated and mix for about 1 minute. Scrape the bowl with a rubber spatula as needed throughout this process.
Add in the vanilla extract, then turn the mixer to a medium-high speed and gradually pour in the cold heavy cream.
I like to do this in 4 additions and focus on pouring the heavy cream down the side of the bowl to prevent it from splattering.
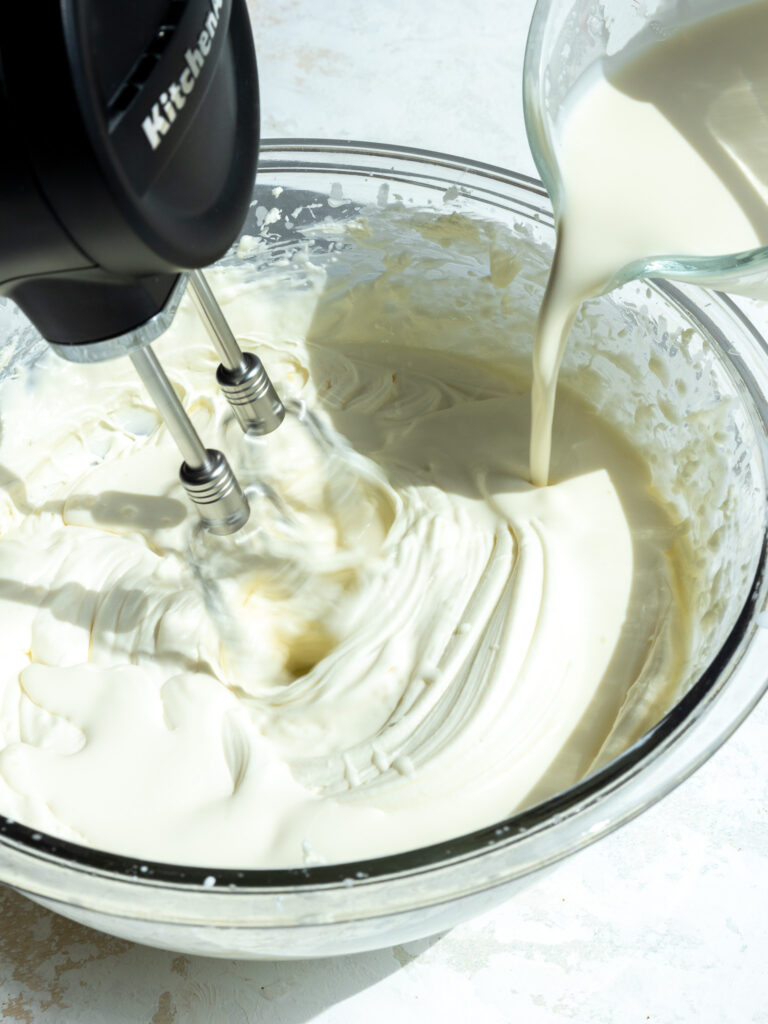
Watch the mixture closely once the heavy cream is fully mixed in.
It should thicken and take shape shortly after this (mine usually does within about 30 seconds once all the heavy cream is mixed in).
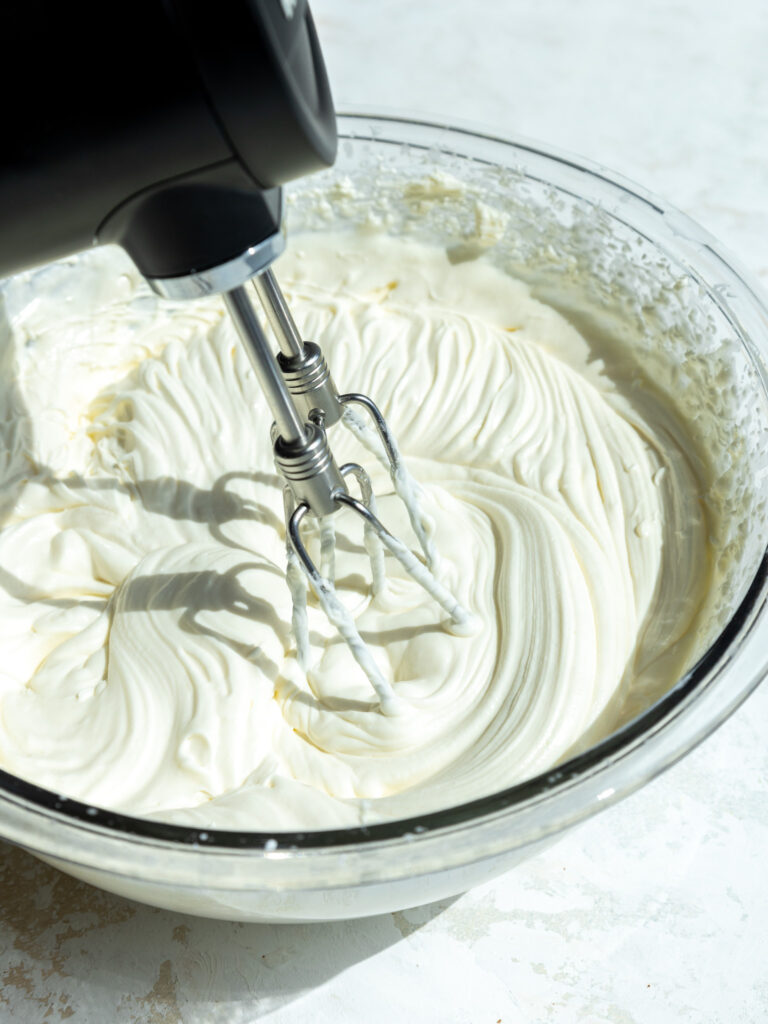
Once you see the whipped cream start to take shape, turn off your mixer and do a quick whisk test. Dunk your whisk attachment into the frosting, then put it out and flip it upside down.
The whipped cream should keep its shape and form a nice peak. If it doesn’t, continue to mix the frosting on a medium-high speed for 30-second intervals until it does.
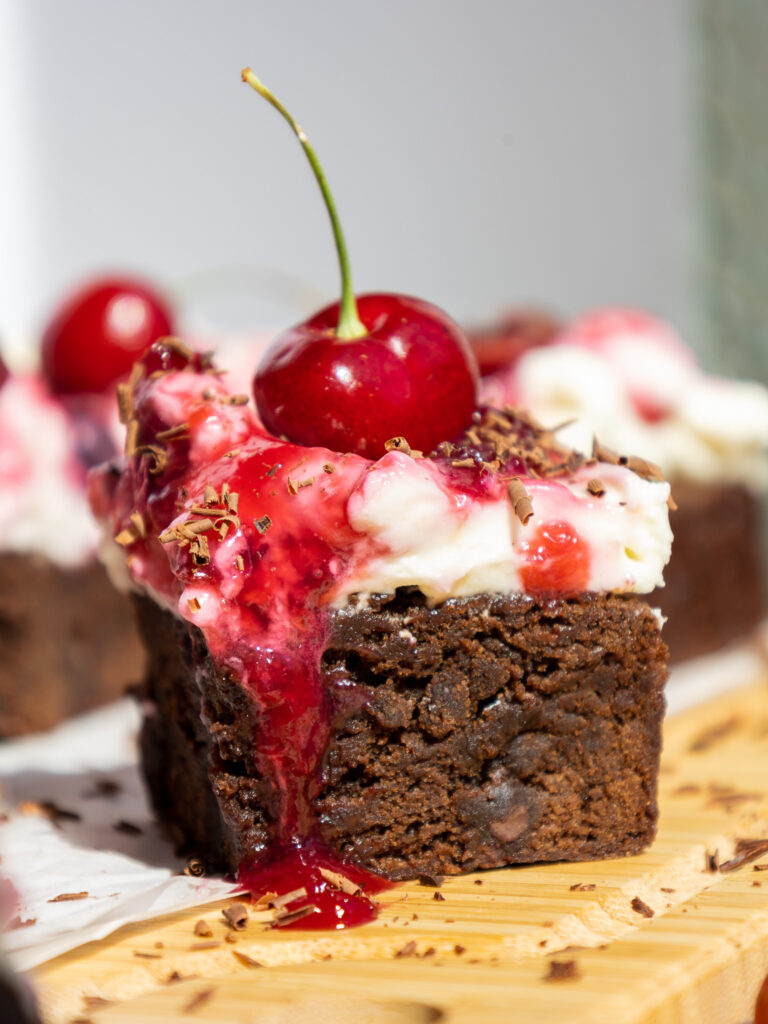
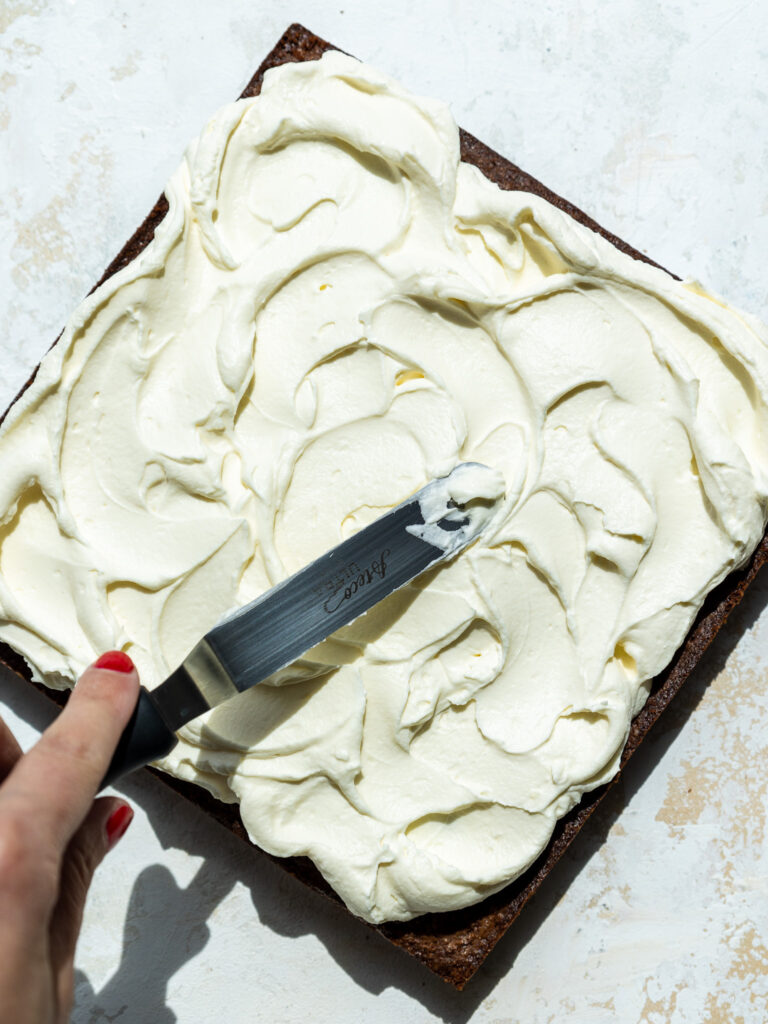
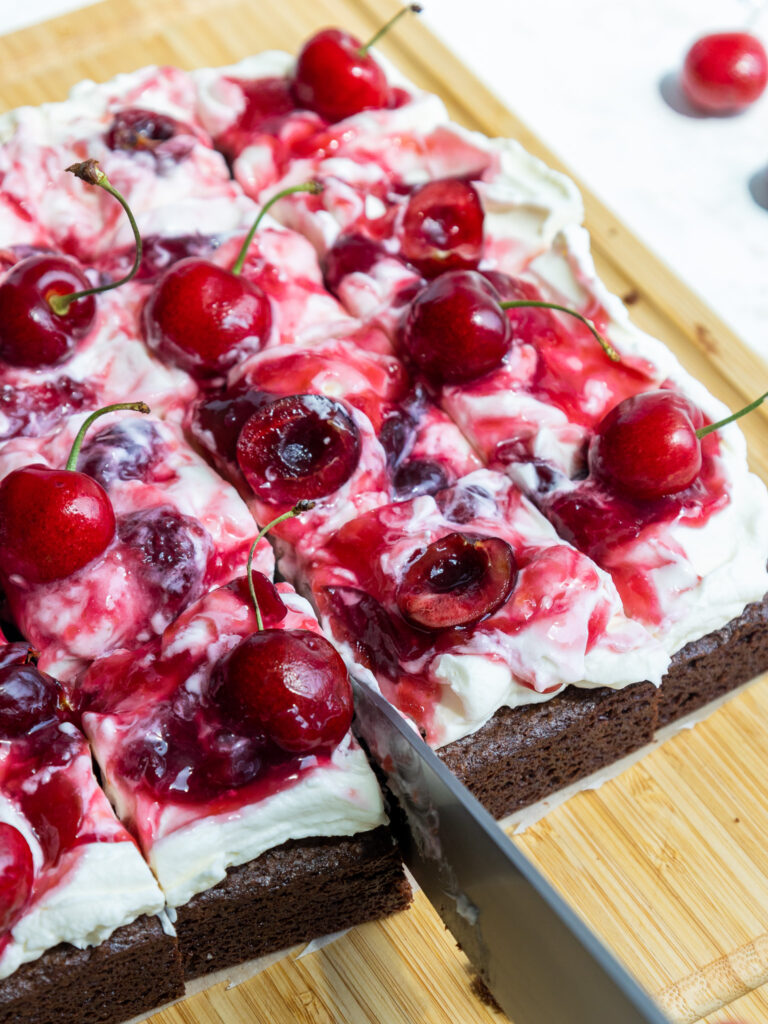
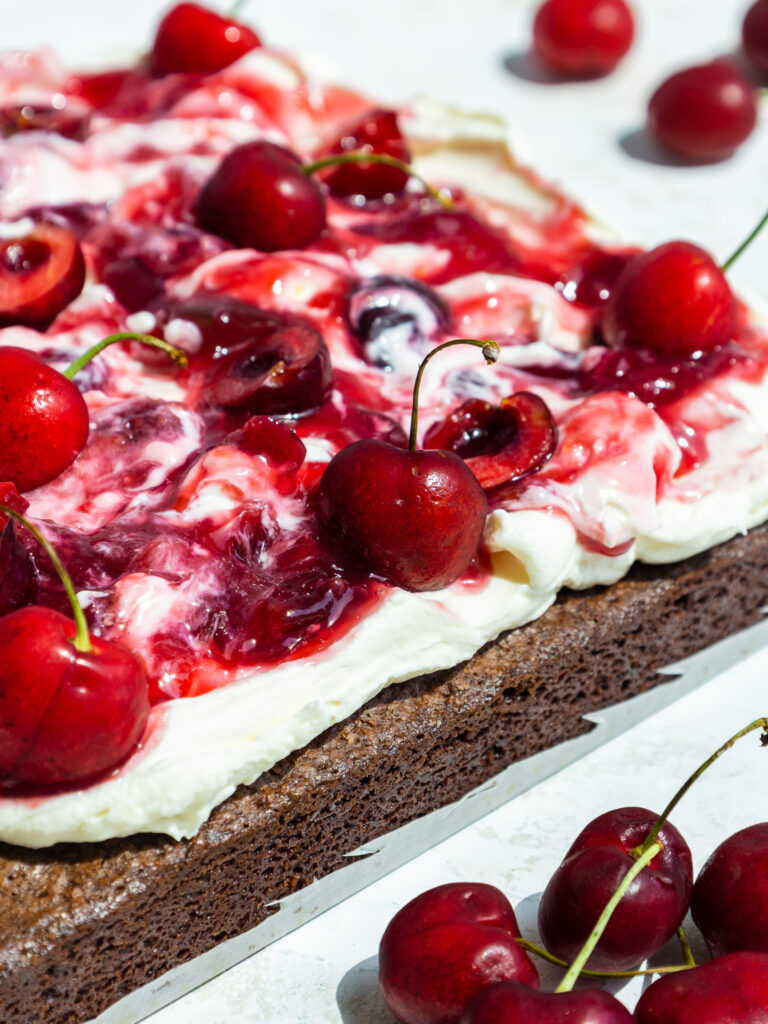
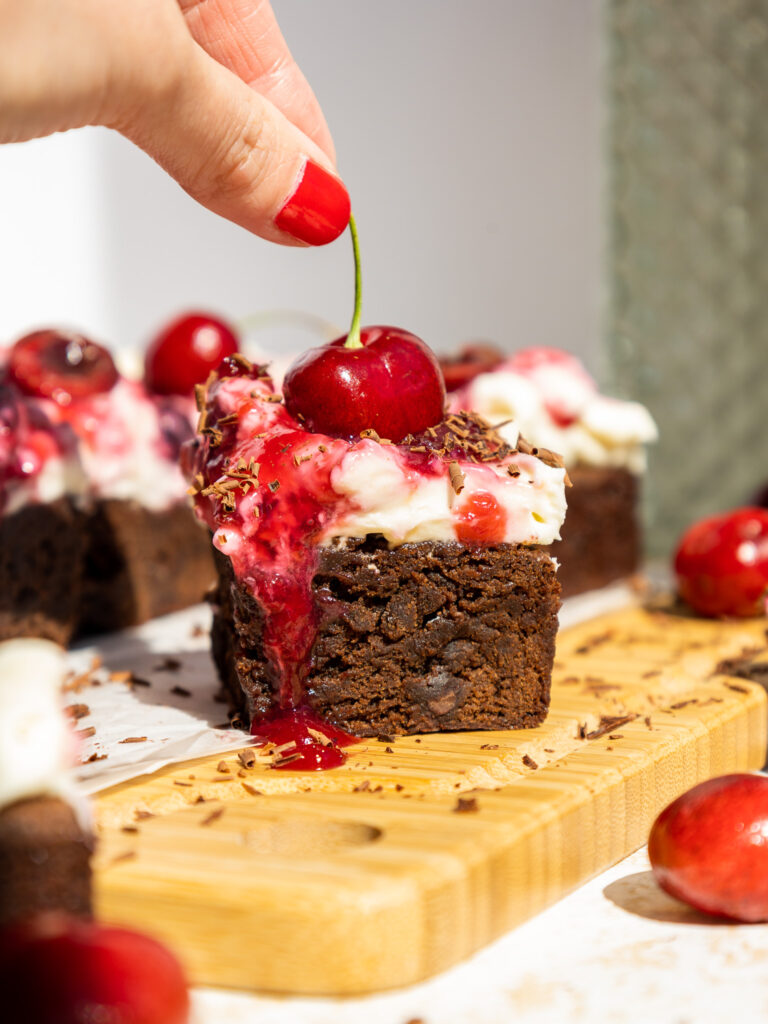
Step 6: Top and Cut These Black Forest Brownies
Once the brownies are completely cooled, remove them from the pan. Top them with an even layer of whipped cream.
Next, taste the cherry filling before you spoon it on top of the whipped cream. If you want a stronger Kirsch flavor, mix an additional 1-2 tablespoons of Kirsch liquor into the filling.
Then add spoonfuls of the cherry topping over the whipped cream.
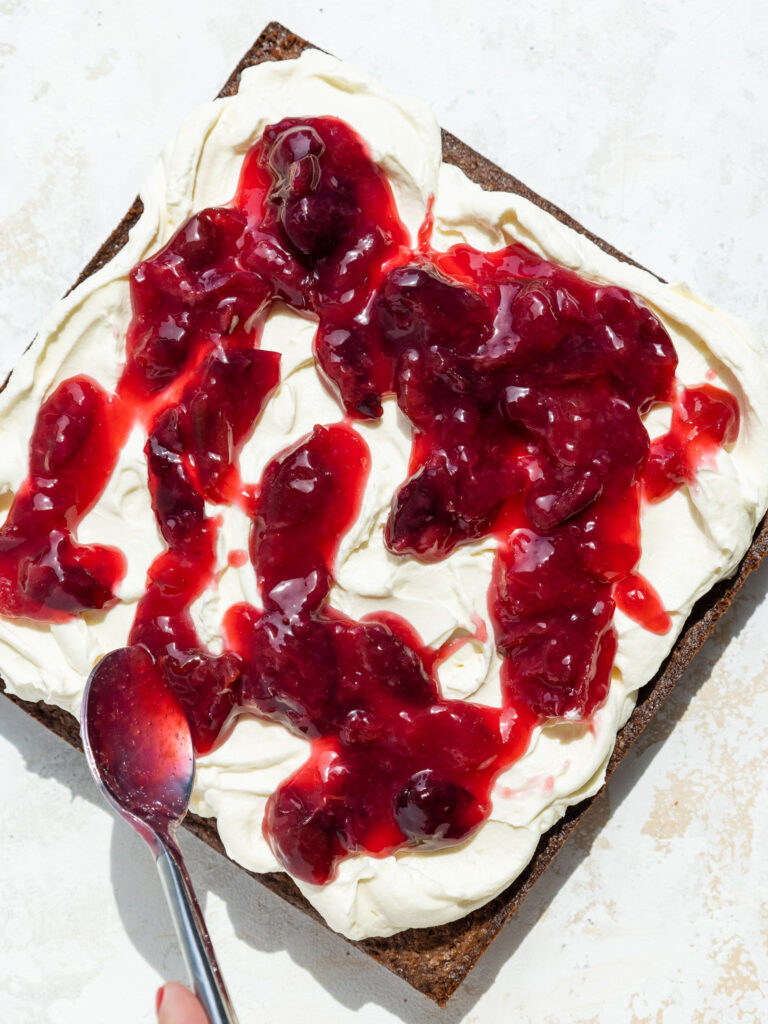
Swirl the cherry topping into the whipped cream to give it a marbled look.
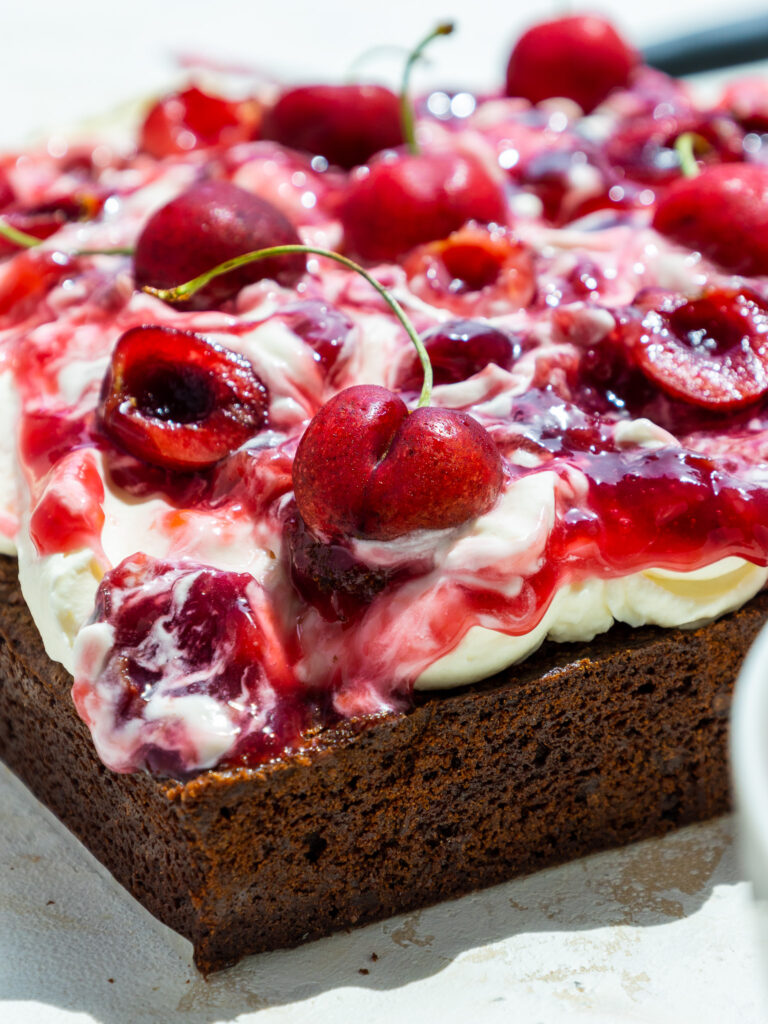
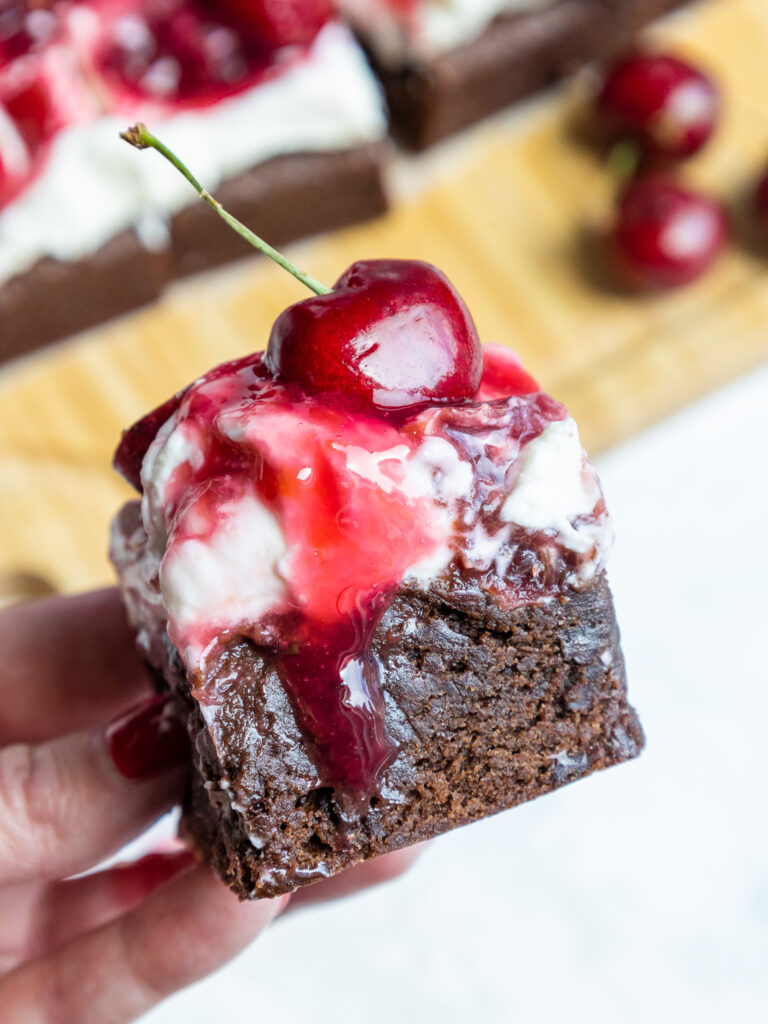
Garnish the brownies with some fresh cherries and dark chocolate shavings. Then use a sharp knife to cut the brownies into 16 squares and enjoy!
Substitutions & Swaps in These Black Forest Cherry Brownies
This recipe uses quite a few ingredients and I know you might not have all of them on hand.
Or if you have food allergies or restrictions, I’ve got you covered. Below are some swaps and substitutions that can be made in this recipe.
- Brown Sugar – The mix of granulated and light brown sugar gives these brownies a crispy top and a wonderful flavor. You can use light or dark brown sugar.
- Unsalted Butter – You can use salted butter if you don’t have unsalted butter on hand, just be sure to omit the salt in this recipe.
- Vanilla Extract – The vanilla extract adds an extra little oomph of flavor and helps enhance the chocolate in these brownies, but it can be omitted if needed.
- All-Purpose Flour – You can use a gluten-free flour blend in place of the all-purpose flour in this recipe. Just be sure to use a good baking blend like King Arthur’s GF flour.
- Dark Cocoa Powder – I like to use Dutch-processed or dark-baking cocoa in this recipe. However, natural, unsweetened baking cocoa can also be used.
- Pitted Cherries – This recipe can be made with fresh or frozen cherries! I recommend using fresh if they’re in season, and frozen if they’re not.
- Heavy Cream – Heavy whipping cream or light whipping cream will both work to make the whipped cream in this recipe. I find heavy whipping cream works best, so I recommend using that if possible!
Doubling This Brownie Recipe
If you want to double this recipe, go for it! Simply double the ingredients and make as instructed.
I recommend baking a double batch in a 9 x 13-inch pan to help them bake through properly. Bake the brownies at 350 F / 175 C for 40-50 minutes.
Making These Black Forest Brownies in Advance
These black forest brownies keep at room temperature for up to 6 hours or can be stored in an airtight container overnight. Store them in an airtight container to keep them fresh.
The cherry filling can be made up to a week in advance and stored in an airtight container in the fridge.
You can also freeze these brownies for up to two months! Freeze them uncut on a sheet pan until they’re firm to the touch, then wrap them in a layer of plastic wrap and then foil.
When you’re ready to eat the brownies place them in the fridge overnight, then unwrap and enjoy the following day. Wait to add the whipped cream and cherry topping until you’re ready to serve them.
How to Make the Best Black Forest Brownies
- Taste the cherry filling before you spoon it onto the brownies. If you want a stronger Kirsch flavor, mix an additional 1-2 tablespoons of Kirsch liquor into the filling.
- Make sure you properly measure your flour! I like to use a scale, but the fluff and level method works great too.
- Bake these brownies in a metal pan, not a glass pan, if possible. Glass gets hotter than metal pans. If you must bake these in a glass pan, bake them at 325 F.
- Chill these brownies before cutting into them. It makes them so much easier to cut.
- Use a warm, sharp knife to get clean slices. Fill a tall cup with hot water and dip a sharp knife into it. Dry the knife fully, then make a slice. Repeat with each cut and wipe the blade clean after each cut.
- If you want to make this recipe in a 9 x 13-inch pan, double the recipe and bake at 350 F for 40-50 minutes.
Let Me Know What You Think!
If you try this recipe for black forest brownies, I’d love to hear what you think of it! Please leave a rating and let me know your thoughts by sharing a comment below.
And don’t forget to tag me @chelsweets if you share on social media so that I can see your delicious creations!
Other Recipes You Might Enjoy:
Black Forest Brownies
Ingredients
Cherry Topping
- 1 1/2 cups pitted, fresh or frozen cherries – if you use frozen, no need to thaw 250g
- 1/2 cup granulated sugar 100g
- 2 Tbsp Kirsch Liquor – optional 30g
- 2 Tbsp water, room temperature 30g
- 1 Tbsp cornstarch 8g
Chocolate Brownies
- 3 large eggs, room temperature 170g
- 3/4 cup granulated sugar 150g
- 3/4 cup packed light brown sugar 150g
- 3/4 cup unsalted butter, melted and cooled 170g
- 2 tsp vanilla extract or vanilla bean paste 8g
- 3/4 cup all-purpose flour 94g
- 1/2 cup dark or Dutch-processed cocoa powder 50g
- 1 tsp fine salt 6g
- 1/4 tsp baking powder
- 1 cup dark chocolate chips – optional 180g
Stabilized Whipped Cream
- 1/2 cup (4 oz) full-fat cream cheese, cold 113g
- 1/2 cup powdered sugar 65g
- 1 tsp vanilla extract or vanilla bean paste 4g
- 1 1/4 cups heavy whipping cream, cold 300g
Equipment Needed
- 8 x8-inch Metal Pan
- Saucepan
- Stove top
- Large mixing bowl, chilled
- Stand mixer or electric stand mixer
- Whisk attachment
Instructions
Cherry Topping
- Make the cherry topping first so that it has time to cool and thicken before we top the brownies with it.
- Add 1 1/2 cups of pitted, fresh or frozen cherries, 1/2 cup of sugar, and 2 Tbsp Kirsch Liquor into a medium saucepan. Heat the mixture over medium-high heat until it begins to simmer, stirring constantly. This usually takes me about 3 minutes (will take a bit longer with frozen cherries).
- Once it reaches a gentle simmer, reduce the heat to medium-low. Stir together 2 Tbsp of water and 1 Tbsp cornstarch in a small bowl until the cornstarch is fully dissolved. Pour this into the cherry mixture and cook for 3 more minutes until it thickens, stirring frequently. while the mixture cooks, use a potato masher or large fork to mash up the cherries a bit.
- At this point, the sauce should be thick enough that you can drag your finger through the sauce on the back of the spoon and it will keep its shape. Remove the pan from heat and pour it into a separate bowl. Place the bowl in the fridge to help it cool more quickly. If you make the cherry sauce in advance, it can be stored in the fridge in an airtight container for up to a week.
Fudgey Brownies
- Next, make the brownies! Preheat oven to 350°F/175°C and line an 8 x 8-inch baking pan with a parchment paper sling (a long strip of parchment paper that is long enough to go all the way up 2 sides of the pan). Set aside.
- Place 3 large eggs, 3/4 cup of granulated sugar, and 3/4 cup of brown sugar in a large bowl and mix on high for 1 minute with a hand or stand mixer. The mixture should get lighter in color and look creamy.
- Mix in 3/4 cup of melted and cooled butter and 2 tsp of vanilla on a medium speed until combined.
- Add 3/4 cup all-purpose flour, 1/2 cup dark cocoa powder, 1 tsp salt, and 1/4 tsp baking powder into the egg mixture. Fold the dry ingredients into the wet ingredients with a rubber spatula. If desired, mix in 1 cup of dark chocolate chips.
- Pour batter into the prepared pan and carefully spread it into an even layer. Bake for 35-40 minutes or until a toothpick comes out mostly clean. In my oven, the sweet spot is 37 minutes, but every oven bakes a bit differently!
- Remove from the oven and cool fully before topping. Pop the pan into the freezer for 30 minutes to accelerate the process. Let the brownies cool fully in the pan before removing them.
Stabilized Whipped Cream
- While the brownies are cooling, make the stabilized whipped cream. If possible, chill the mixing bowl and whisk attachment in the freezer for 30 minutes to help this whipped cream frosting whip up better.
- Place 1/2 cup (4 oz.) of cold cream cheese into the chilled mixing bowl and mix on a medium-low speed until smooth.
- Pour in 1/2 cup of powdered sugar and mix on low at first to avoid powdered sugar clouds/explosions. Increase the speed to medium-high once the powdered sugar is incorporated and mix for about 1 minute. Scrape the bowl with a rubber spatula as needed throughout this process.
- Add in 1 tsp of vanilla extract, then turn the mixer to a medium-high speed and gradually pour in 1 1/4 cups of cold heavy cream. I like to do this in 4 additions and focus on pouring the heavy cream down the side of the bowl to prevent it from splattering.
- Watch the mixture closely once the heavy cream is fully mixed in. It should thicken and take shape shortly after this (mine usually does within about 30 seconds of mixing in the heavy cream). Once you see the whipped cream start to take shape, turn off your mixer and do a quick whisk test. Dunk your whisk attachment into the frosting, then put it out and flip it upside down. The whipped cream should keep its shape and form a nice peak. If it doesn't, continue to mix the frosting on a medium-high speed for 30-second intervals until it does.
Topping These Black Forest Brownies
- Once the brownies are completely cooled, remove them from the pan. Top with an even layer of whipped cream, then add spoonfuls of the cherry topping over the whipped cream.
- Swirl the cherry topping into the whipped cream to give it a marbled look. Then garnish with some fresh cherries and dark chocolate shavings. Use a sharp knife to cut the brownies into 16 squares and enjoy!
Video
Notes
Making These Black Forest Brownies in Advance
These black forest brownies keep at room temperature for up to 6 hours or can be stored in an airtight container overnight. Store them in an airtight container to keep them fresh. The cherry filling can be made up to a week in advance and stored in an airtight container in the fridge. You can also freeze these brownies for up to two months! Freeze them uncut on a sheet pan until they’re firm to the touch, then wrap them in a layer of plastic wrap and then foil. When you’re ready to eat the brownies, place them in the fridge overnight, then unwrap and enjoy the following day. Wait to add the whipped cream and cherry topping until you’re ready to serve them.Doubling this Recipe
If you want to double this recipe, go for it! Simply double the ingredients and make as instructed. Bake a double batch in a 9×13-inch pan at 350 F for 40-50 minutes. They will be slightly thicker but just as delicious!How to Make the Best Black Forest Brownies
- Taste the cherry filling before you spoon it onto the brownies. If you want a stronger Kirsch flavor, mix an additional 1-2 tablespoons of Kirsch liquor into the filling.
- Be sure your ingredients are at room temperature. It helps them mix together better.
- Bake these brownies in a metal pan, not a glass pan! Glass gets hotter than metal pans. If you have to bake these in a glass pan, bake them at 325 F.
- Really whip up your eggs and sugar before adding the other ingredients to get crispy tops on your brownies.
- Chill your brownies before cutting into them! It will make them much easier to cut.
- Use a warm, sharp knife to get clean slices. Fill a tall cup with hot water and drip a sharp knife into it. Dry the knife fully, then make a slice. Repeat with each cut and wipe the blade clean after each cut.
Hi chels dont think you have a recipe up yet for black forest cake or cupcakes. You could try to get those up while cherry season is in. Cheers!
Hi Ren,
I really do need to!!! I was actually just thinking about making black forest cupcakes the other day! 🙂
Thanks very much, i love your recipes , i write from Argentina,someday i will make all your recipes
Hi Igor,
So happy to hear that, thank you for sharing!! 🙂
Made these for a gathering…everyone loved them!! Just have to say that I needed to cook them a bit longer than stated. .used stoneware pan…
So happy to hear that Niki!! Sounds like they may have turned out super fudgy if they were a little underbaked, but I kind of like them that way! A stoneware pan would definitely affect how long they bake, but at least now you know for next time 🙂 Thank you for sharing, and happy baking!
If you accidentally end up with way too much cherry filling, how does it freeze? If you can freeze it, how long can you get away with it?
Hi Kaitlynn,
The cherry filling can be stored in the fridge in an airtight container for up to a week. I haven’t tested out freezing it, so sadly I’m not sure :/ You can freeze cherry pie filling for up to 3 months, so I would think you should be able to freeze this as well, but I just haven’t tested the limits of it myself. So sorry I can’t be of more help!
Could one layer the cherry filling in the middle of the brownie? Half batter , some filling, rest of batter, balance of cherries on top?
Hi Lisa,
Great question! I haven’t tested that out, but you definitely could! It might make the brownie in the center a bit gooey / softer than it would be otherwise, but as long as you like a fudgier texture in your brownies, I bet it would be delicious! If you try it, I’d love to hear how it goes! Please let me know 🙂
Can you add cherries in the batter too? If so, how much (e.g., 1/2 cup), and how long should I bake the brownie batter in an 8”x8” metal pan? Thanks!
Hi Stephanie,
You totally can! I’d recommend folding 1/2 cup of chopped cherries into the batter once it’s made, and baking the batter for an additional 2-4 minutes. Hope that helps, happy baking!