Baby Shower Cake
This baby shower cake is the perfect way to celebrate! It's made with tender vanilla cake layers and is just as cute as it is delicious.
Servings: 24
Calories: 579kcal
Ingredients
Gelatin Bubbles:
- 6 Tbsp unflavored powdered gelatin 56g
- 3/4 cup cold water 180g
- gel food coloring
- 3 Tbsp shortening
- paper towels to wipe the shortening
- luster dust optional
Vanilla Cake Recipe
- 3 cups all-purpose flour 375g
- 3 cups granulated sugar 600g
- 2 1/2 tsp baking powder 10g
- 1 tsp fine salt 6g
- 1 cup unsalted butter, room temperature 226g
- 1 cup carton egg whites or 7 large egg whites, room temperature 235g
- 1 1/2 cups buttermilk, room temperature 360g
- 2 Tbsp vegetable or canola oil 30g
- 2 tsp vanilla extract or vanilla bean paste 8g
- gel food coloring - if desired
Vanilla Buttercream Frosting
- 2 cups unsalted butter, room temperature 452g
- 1 Tbsp vanilla extract or vanilla bean paste 12g
- 1/2 tsp fine salt 3g
- 7 cups powdered sugar 875g
- 1/4 cup heavy whipping cream, room temperature 60g
Additional Tools for the Gelatin Balloons:
- heatproof bowl
- small balloons
- cooling rack to dry bubbles
- sharp scissors
Recommend Tools & Equipment for the Cake
- 3, 8- inch Cake Pans
- Spinning Cake Stand
- 10- inch Cake Board
- Offset Spatula
- Acetate Sheet
- 3 Small Piping Bags
- 3 Small Round Piping Tips like a Wilton 2
Instructions
Gelatin Bubbles:
- The gelatin bubbles need several hours to dry, so I recommend making them first! They can also be made up to a month in advance. If you don't want to make these gelatin bubbles or are short on time, you can decorate this cake with these faux balloons from Amazon.
- Partially inflate 30 small balloons, tying a knot high up at the neck of the balloon to make it into a (somewhat) spherical shape. If desired, tie the balloon to the end of paper straw to make it easier to handle.
- Cover each balloon with a thin coat of shortening. You shouldn't be able to see any white streaks of shortening. The bubbles should just look shiny and lightly greased. This will make it easier to remove the balloons later in the process.
- Then 3/4 cup of cold water to a small, heat-proof bowl. Pour in 6 Tbsp of unflavored gelatin (ratio should always be 2 parts water, 1 part gelatin). Gently swirl the water in the bowl to fully hydrate the gelatin in the water. Let the mixture sit for a couple minutes to let the gelatin bloom (absorb water).
- Once the mixture firms up, pop the bowl into the microwave for about 20 seconds (time can vary based on your microwave). The gelatin should be warm and very fluid, but not hot to the touch.
- Stir in a few drops of gel food coloring (and/or luster dust). Make sure the gelatin is fully dissolved at this stage. If it's not, heat it in additional 10 second intervals and stir in between until it's fully melted. If you notice small bubbles or foam on top of the gelatin, carefully spoon it out of the container. This will cause your gelatin bubbles to have a cloudy, bubbly, surface.
- Gently dip each balloon into the gelatin, rolling it to cover a majority of the balloon. Make sure each balloon is covered in a thin, even coat of gelatin. Gently shake off any excess gelatin. If you tied the balloons to straws, place them in a heavy glass to dry like in the photos above. If you skipped the straws, rest the balloons with the tie side down on a cooling rack.
- If the gelatin cools off and thickens while you're dipping the balloons, pop the gelatin into the microwave and heat for 10 seconds to get it back to the right consistency.
- Once all the balloons are dipped, dip them one more time. Two coats of gelatin help them be stronger and more brightly colored.
- Let the balloons sit for about 12 hours, or overnight to let them fully harden. If you're in a time crunch, you can use a fan to speed up the drying process (it takes about 4 hours with a fan). If using a fan, let the balloons rest for about 30 minutes (I found they had started to harden by this point), then use a small fan (on a LOW SPEED) to speed up the rest of the drying process. Be VERY careful when you do this. If your fan is too strong, it will blow your bubbles right off your counter!!
- Once the bubbles have hardened, use scissors to gently puncture the exposed balloon. Once it shrinks, gently loosen the balloon from the bubble and remove it.
- If the bubbles collapse a bit during this process, don't worry! They are rather sturdy, and any indents can be popped back into place.
- Use sharp scissors to trim away any jagged edges around the base of each bubble. Then set aside. If you make these in advance, store them in an airtight container at room temperature.
Vanilla Cake Layers:
- Next, make the vanilla cake layers. Preheat oven to 350°F / 175°C. Line four 7" or three 8" cake pans with parchment rounds and grease with non-stick baking spray or homemade cake pan release.
- Mix 3 cups all purpose flour, 3 cups sugar, 2 1/2 tsp baking powder and 1 tsp salt together in a stand mixer with a paddle attachment or hand mixer until fully combined.
- Mix in 1 cup of room temperature, unsalted butter slowly into the dry ingredients on a low speed. Continue to mix until no large chunks of butter remain, and the mixture looks like moist sand.
- Pour in 1 cup of egg whites and mix on low until just incorporated. Mix in 1 1/2 cups buttermilk in two installments, on a low speed.
- Add in 2 Tbsp of vegetable oil and 2 tsp of vanilla extract and mix at a low speed until fully incorporated. If you plan to color your cake layers, add in the gel food coloring with the oil and vanilla.
- Scrape down the sides of the bowl with a rubber spatula, then beat on a medium speed for about a minute to make sure everything is properly mixed together. This also helps lighten the texture of the cake layers a bit.
- Divide the batter evenly between your prepared pans. I like to use a scale to make sure each pan has the same amount of batter and will bake up to be the same height.
- Bake for 33-35 minutes or until a toothpick comes out with a few moist crumbs.
- Let the pans cool for 10 minutes, then run a small offset spatula around the perimeter of the pan to separate the cake from the pan.
- Place the cake layers into the freezer for 30 minutes to accelerate the cooling process. Once the layers are fully cooled, carefully flip the pans and remove the layers.
- Use a serrated knife to level the tops of the layers right before you plan to assemble your cake, or you can wrap and freeze them if you're making them in advance.
- If you make these cake layers in advance and freeze them, let them thaw for about 20 minutes before making your cake. The cake layers should still be slightly cold to the touch, which will make it easier to assemble your cake.
Vanilla Buttercream Frosting:
- While the cake layers bake and cool, make the vanilla buttercream frosting.
- Beat 2 cups of unsalted butter on a medium speed for 30 seconds with a paddle attachment until smooth.
- Mix in 1 Tbsp of vanilla extract and 1/2 tsp salt on a low speed.
- Gradually mix in 7 cups of powdered sugar and 1/4 cup of heavy cream on a low speed.
- Continue to mix on a low speed for a few minutes until the desired consistency is reached. If the frosting is too thick, add in additional cream (1 Tbsp at a time). If the frosting is too thin, add in more powdered sugar (quarter of a cup at a time).
- Scoop 2 tablespoons of buttercream into a separate bowl and color a light pink color with pink gel food coloring. Place in a small piping bag fit with a small round tip and seal the top of the bag with a rubber band or clip.
- Scoop 1/4 cup of buttercream into the same bowl and color a light gray color with a tiny drop of black gel food coloring. Place in a small piping bag fit with a small round tip and seal the top of the bag with a rubber band or clip.
- Scoop 1/4 cup of buttercream into the same bowl and color it black with a generous squirt of black gel food coloring. Place in a small piping bag fit with a tiny round tip (like a Wilton 2) and seal the top of the bag with a rubber band or clip.
- Cover the remaining buttercream flush with plastic wrap to prevent the buttercream from crusting.
Assembling This Baby Shower Cake:
- Stack and frost cake layers on a greaseproof cake board using a dab of frosting to help stick the first cake layer to the board.
- Add an even layer of buttercream between each cake layer with a large offset spatula.
- Add a thin coat of frosting around the cake to fully cover the cake layers.
- Smooth using a bench scraper, then chill the cake in the fridge (30 minutes) or freezer (10 minutes) until the frosting is firm to the touch.
- Add a second, thicker layer of frosting to the cake, and smooth using a bench scraper. Chill the cake one more time until the frosting is firm to the touch. This will make it easier to trace and pipe the elephant onto this cake.
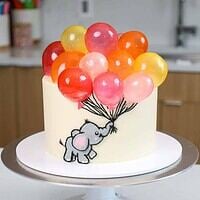
- Trace the outline of a baby elephant at the base of the cake using a scribe or toothpick.
- Fill in the outline with grey buttercream and smooth with either a small offset spatula or an acetate sheet.
- Pipe an outline around the baby elephant with black buttercream and use pink buttercream to color the elephant's ears and cheek like in the photo above.
- Add a little extra vanilla frosting to the top of the cake, then press the gelatin balloons into place on top of the cake, adding a few on the side of the cake above the elephant. Pipe thin black lines from the elephant's trunk up to the gelatin balloons.
- When it comes time to actually cut into the cake, I usually remove the gelatin balloons before cutting the cake. While they are edible, they're almost impossible to cut through with a knife.
- If you make this cake in advance, it can be refrigerated (gelatin balloons and all) for up to a week. Let the cake sit at room temperature for an hour or two to let it thaw before enjoying.
Notes
Recipe Variations
This recipe can also be used to make a sheet cake! One batch will make 2, 9 x 13-inch cake layers that are about 1-inch tall. One batch of cake batter makes about 1800 grams. If you plan to use four circular cake pans, add 450 grams of batter into each pan.Tips for Making the Best Baby Shower Cake
- Ingredients at room temp mix together better! Set out any cold ingredients ahead of time.
- Properly measure your flour (spoon into the cup measure, then level). Or better yet, use a kitchen scale to measure your dry ingredients.
- Use a scale to weigh your cake pans as you fill them. It will make your cake layers bake to the same height and bake more evenly.
- Level your room temperature or thawed cake layers with a serrated knife to make them easier to stack.
- Chill your cake layers in the freezer for about 20 minutes before assembling the cake. It makes it so much easier to stack and frost them!
Making This Baby Shower Cake in Advance & Storage Tips
I recommend making the cake layers in advance and freezing them. It breaks the process up and makes it more approachable. You can also your frosting ahead of time too or save any leftover frosting! It can be stored in an airtight container in the fridge for up to a month, or in the freezer for up to 3 months. Be sure to give it a good stir once it thaws to get the consistency nice and smooth again. If you decorate this cake in advance, it can be refrigerated (gelatin balloons and all) for up to a week. Let the cake sit at room temperature for an hour or two to let it thaw before enjoying. If you cut into the cake and have leftovers, use any remaining frosting to cover the cut section to keep it moist and store in the fridge for up to a week.Nutrition
Serving: 1 | Calories: 579kcal | Carbohydrates: 75g | Protein: 5g | Fat: 30g | Saturated Fat: 17g | Polyunsaturated Fat: 11g | Cholesterol: 80mg | Sodium: 262mg | Sugar: 61g