
Rolo Cake
First came the Butterfinger cake, then the gummy bear cake. Today we’re continuing our candy cake series with this Rolo Cake!
In case you don’t know- Rolos are cone-shaped chocolate candy with a gooey caramel center.
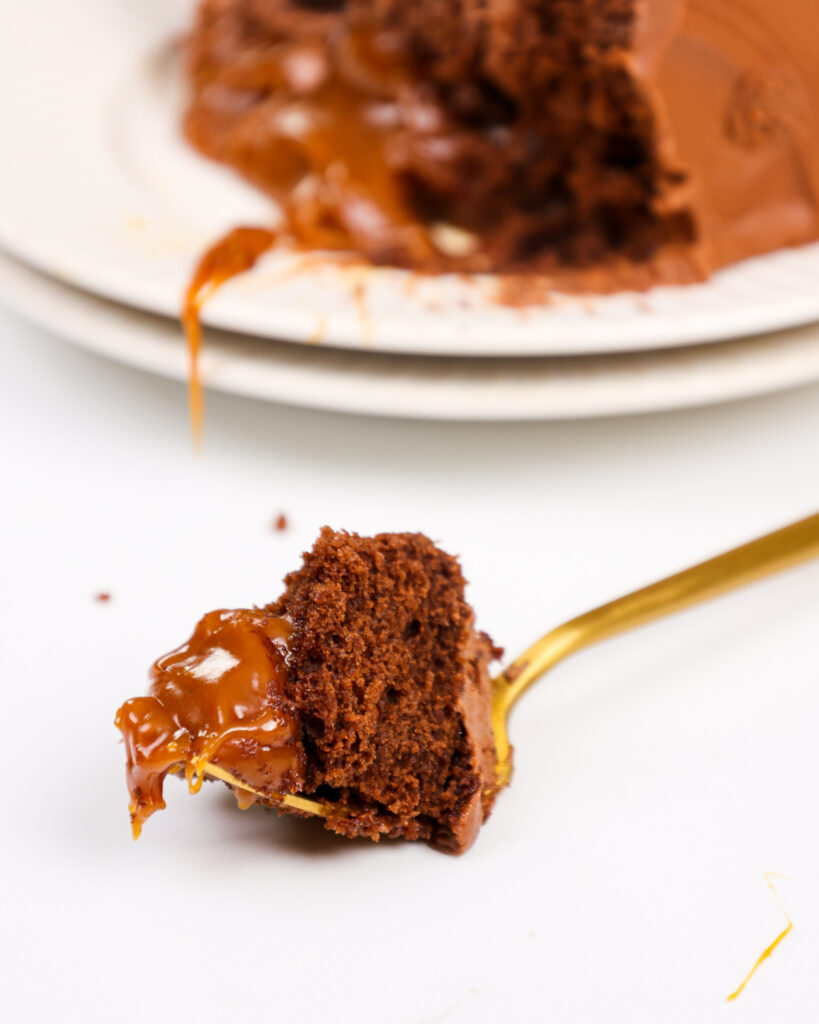
My Rolo cake is made with moist chocolate cake layers, filled with decadent homemade caramel, and frosted with milk chocolate buttercream! It seriously looks and tastes JUST like a Rolo!!

How to Make This Rolo Cake
To make sure your Rolo cake is baked to perfection, let’s walk through each step of the process! You can also check out my video tutorial here.
Step 1: Make the Chocolate Cake Layers
Combine all the dry ingredients together in a large bowl. Pour in the wet ingredients and then whisk to combine.
Divide the batter evenly between the four, seven-inch, or 3, eight-inch pans and bake!
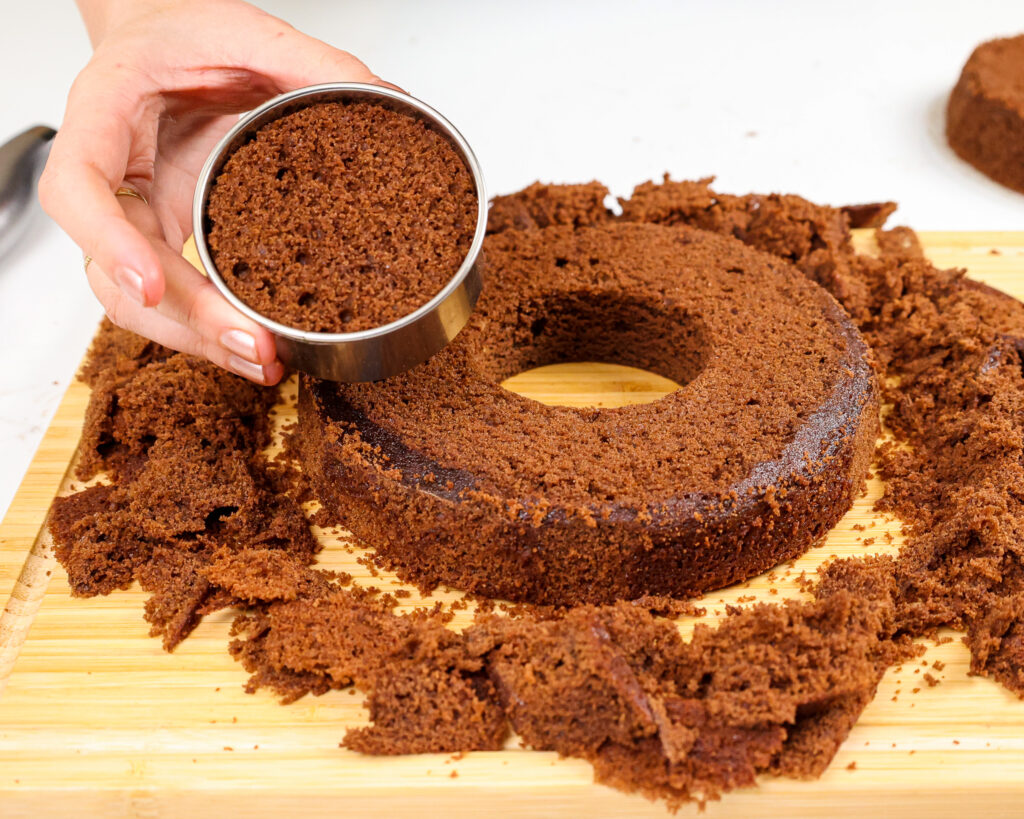
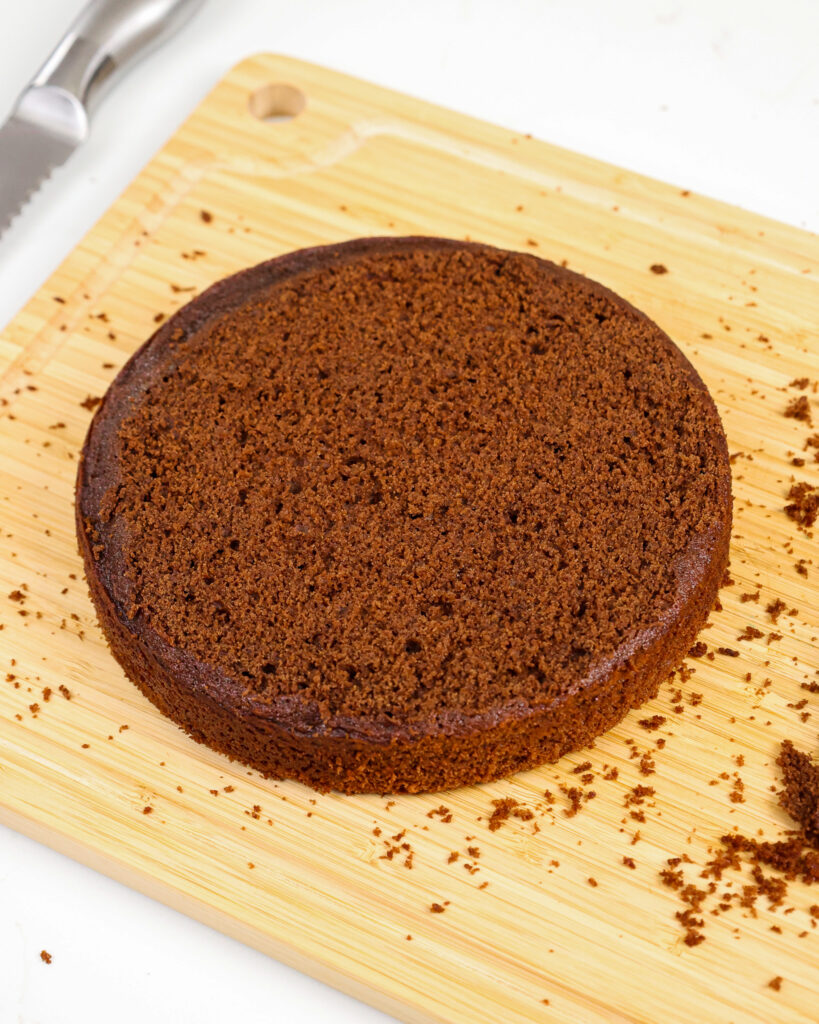
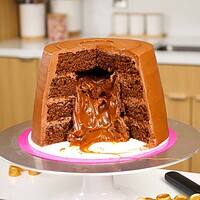
Once the cake layers are baked and cooled, use a serrated knife to level the top of each cake layer. Stack the cake layers on top of each other and trim in a slightly tapered shape to look like a Rolo candy.
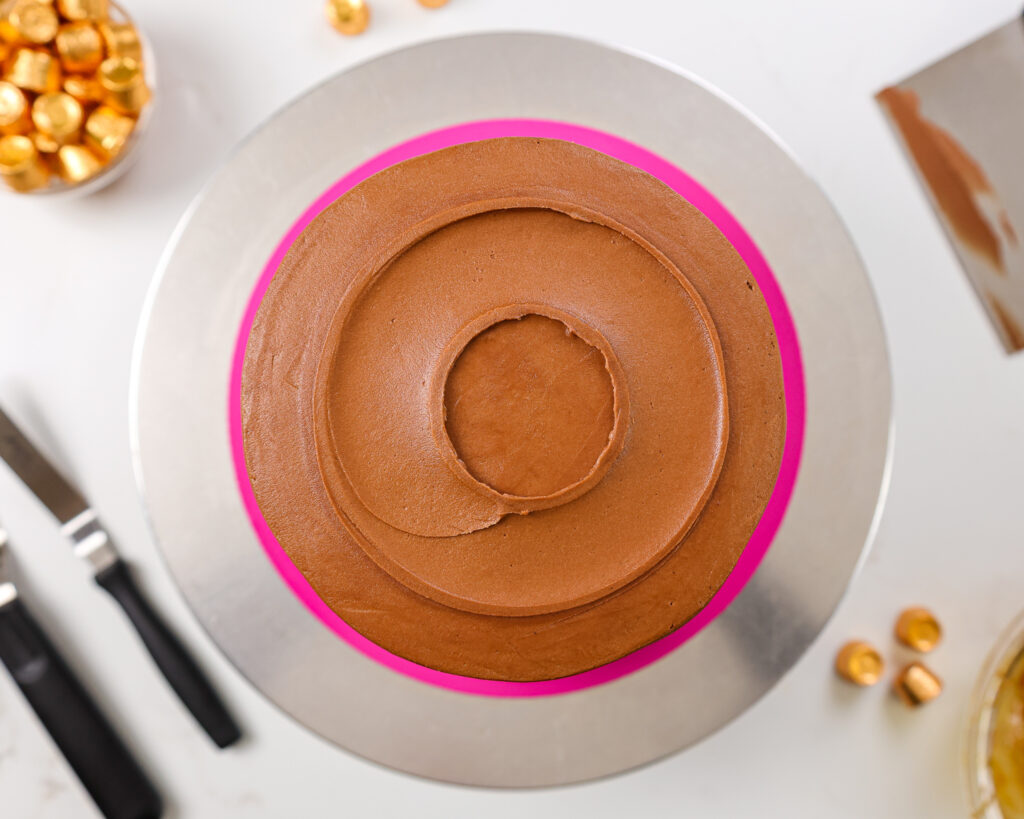
Unstack the cake layers and cut a 2 1/2-inch circle from the center of the 2 middle cake layers with either a circle cutter or small knife. This will create a cavity in the middle of the cake for the caramel filling.
Step 2: Make Caramel Filling and Milk Chocolate Buttercream
In a saucepan over medium to medium-high heat gradually add in the sugar. When it reaches an amber color remove it from the heat.
Gradually mix in the butter, then stir in the heavy cream and salt. The mixture will thicken as it cools so don’t worry if it’s a bit thin at this stage. Transfer it into a clean container to cool completely.
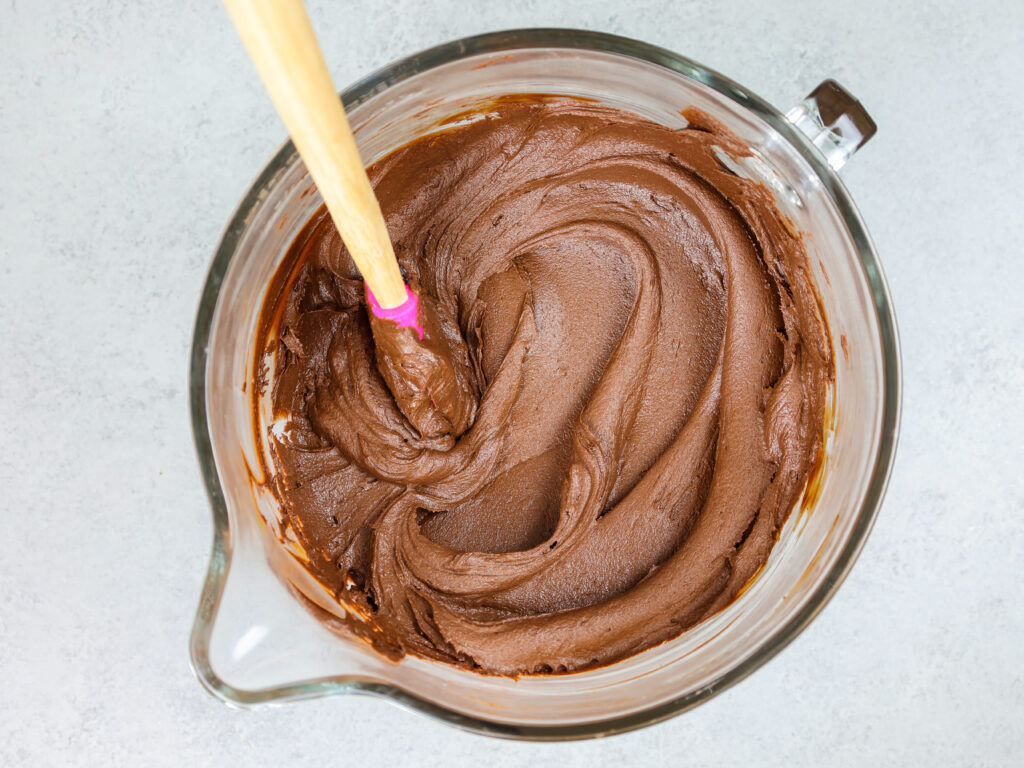
Next, make the chocolate buttercream. This frosting can also be made in advance if needed and kept in the fridge for up to a month!
Mix the butter on a low speed until smooth, then mix in the cocoa powder, vanilla, and salt. Slowly mix in the powdered sugar and heavy cream. Scrape the sides of the bowl as needed.
Add in the melted milk chocolate and mix until the ingredients are incorporated, then set aside.
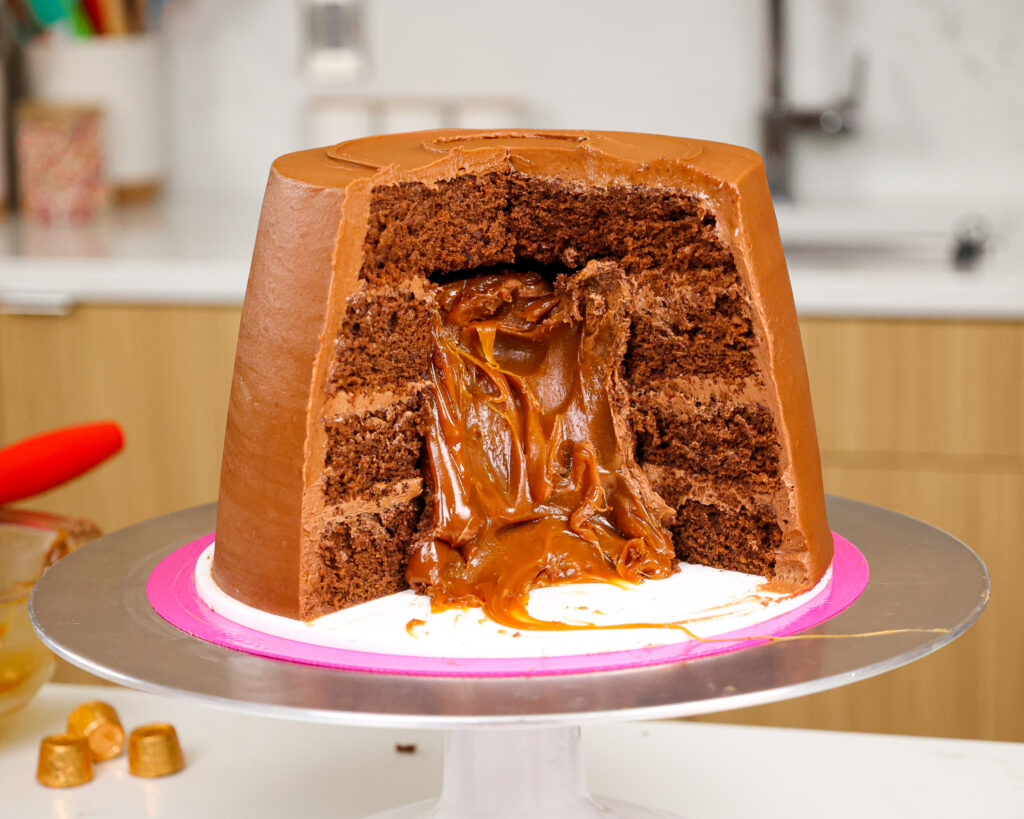
Step 3: Assembling this Rolo Cake
Stack and frost cake layers on a greaseproof cake board. Use a dab of chocolate buttercream to help stick the first cake layer to the board.
Spread an even layer of chocolate buttercream on each cake layer and stack the cake layers from largest to smallest.
The layers with cut out sections should be the 2nd and 3rd cake layers.
Once you’ve stacked and frosted the first three cake layers, fill the opening with all of the caramel filling.
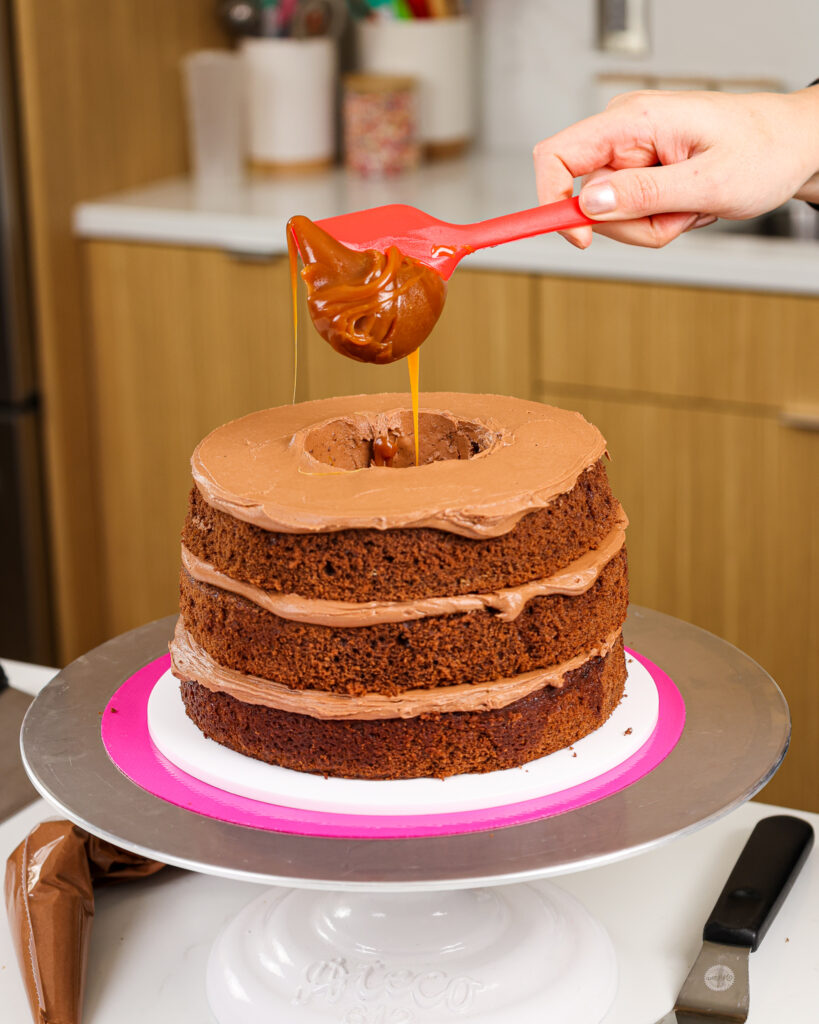
Place the last cake layer on top and smooth a thin coat of buttercream around the whole cake.
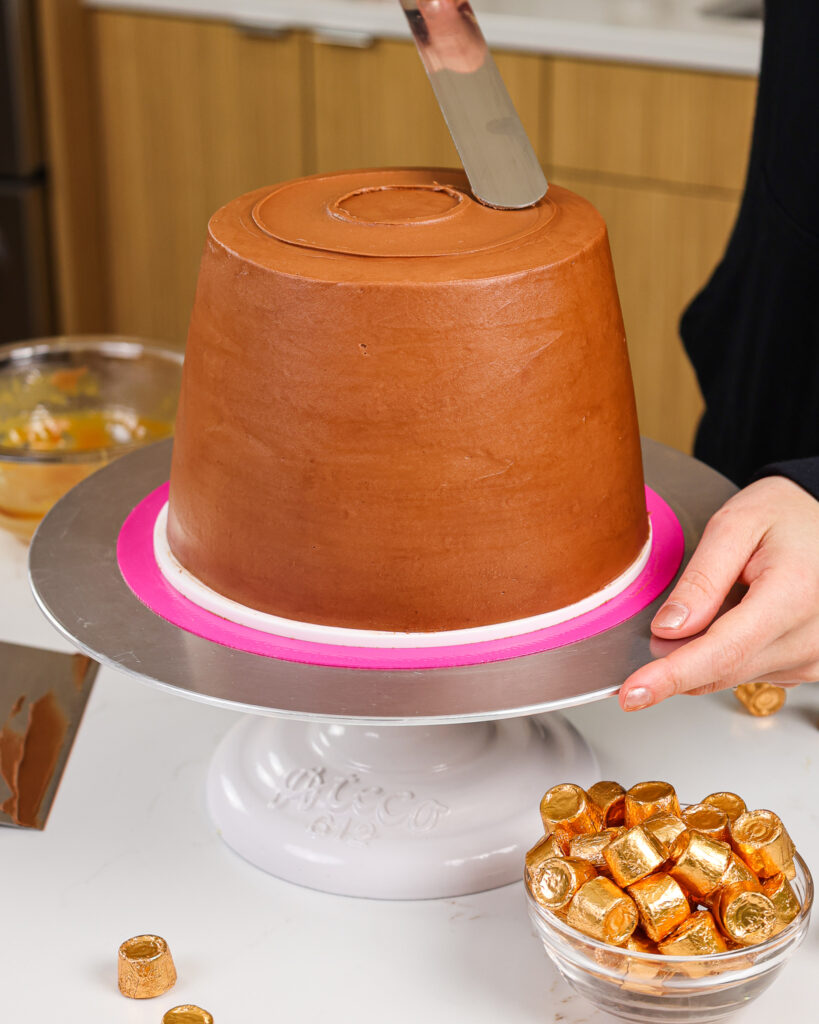
Freeze the cake until the frosting is firm to the touch, then cover the cake with a second layer of chocolate buttercream. Smooth using a bench scraper and offset spatula.
Make a ring on top of the cake with a large offset spatula to look like the top of a Rolo, then enjoy!
Swaps & Substitutions: Chocolate Cake
- Granulated Sugar – I don’t recommend reducing the amount of sugar or changing the type of sugar, as it will change the texture of the cake layers.
- Unsalted Butter – If you only have salted butter on hand, you can use it in place of the unsalted butter. You can also use vegan butter in its place!
- Eggs – This recipe uses large eggs. If you have an egg allergy you can try using a vegan egg replacer.
- Buttermilk – You can also use full fat yogurt, sour cream, whole milk, or an alternative yogurt or milk (almond, soy, oat).
- All-Purpose Flour – This recipe turns out best with all-purpose flour. However, you can swap in a good gluten free flour blend (like this) if needed. Just be sure to stir the batter longer than normal to help give the cake proper structure, and let the batter sit for about 20 minutes before baking it if you opt to make a gluten free version.
- Unsweetened Cocoa Powder – I prefer using regular baking cocoa in this recipe, but you can also use Dutch-processed or black cocoa powder.
Substitutions & Swaps: Milk Chocolate Buttercream
- Unsalted Butter – If you only have salted butter on hand, you can use it in place of the unsalted butter. Just be sure to omit the salt that this frosting recipe calls for. You can also use vegan butter in its place!
- Heavy Cream – Whole milk or alternative milk (soy, almond, oat) can also be used to make the frosting. However, I recommend using about half the amount the recipe calls for.
- Milk Chocolate Chips – I used milk chocolate chips but you can use baking chocolate, or good-quality chocolate bars to melt and add into the frosting. Alternatively, you can also use semi-sweet or dark chocolate if you have a strong preference.
Tips for Making the Best Rolo Cake
- Ingredients at room temp mix together better! Set out any cold ingredients ahead of time.
- Properly measure your flour. Spoon into the cup measure, then level or use a kitchen scale to measure your dry ingredients.
- Properly cream together the butter and sugar. Mix for at least 2 minutes, or until the mixture becomes lighter in color. This will ensure your cake layers are tender and fluffy.
- Use a scale to weigh your cake pans as you fill them. This helps your cake layers bake to the same height and bake more evenly.
- Bang your cake pans on the counter before putting them in the oven. It brings any air bubbles that are trapped in the batter to the surface.
- Level your room temperature or thawed cake layers with a serrated knife to make them easier to stack.
- Let the melted chocolate sit at room temperature for about 10 minutes before adding it into the frosting. If you add it in straight out of the microwave, it can melt your frosting and make it hard to use.
- Chill your cake layers in the freezer for about 20 minutes before assembling this cake. It makes it so much easier to stack and frost them!
Making this Rolo Cake in Advance & Storage Tips
Make your cake layers in advance and freeze them. It breaks the process up and makes it more approachable.
Make your chocolate frosting ahead of time or save any leftover frosting! It can be stored in an airtight container in the fridge for up to a month.
This frosting can also be stored in the freezer for up to 3 months! Just be sure to give it a good stir once it thaws to make it nice and smooth again.
A frosted cake can last in the fridge for a week, or in the freezer for a month. The buttercream locks in the moisture and keeps the cake fresh and delicious!
Let Me Know What You Think
If you try this Rolo cake recipe, I’d love to hear what you think! Please leave a rating below and a comment with your thoughts.
Other Recipes You Might Like:
Rolo Cake
Ingredients
Chocolate Cake Ingredients
- 1 cup (2 sticks) unsalted butter, room temperature 226g
- 2 1/2 cups granulated sugar 500g
- 4 large eggs, room temperature 224g
- 1 cup hot water 240ml
- 1 cup buttermilk, room temperature 240ml
- 1 cup unsweetened cocoa powder, sifted 80g
- 3 cups all-purpose flour 375g
- 1 1/2 tsp baking powder 6g
- 1 tsp baking soda 6g
- 1 tsp fine salt 6g
Caramel Filling
- 1 cup granulated sugar 200g
- 6 Tbsp unsalted butter, room temperature 85g
- 1/4 cup heavy whipping cream, room temperature 60g
- 1/4 tsp fine salt 2g
Chocolate Buttercream Frosting
- 2 cups (4 sticks) unsalted butter, room temperature 454g
- 1/2 cup unsweetened baking cocoa 40g
- 1 tsp vanilla extract or vanilla bean paste 4ml
- 1/2 tsp fine salt 3g
- 6 cups powdered sugar 750g
- 2/3 cup heavy whipping cream, room temperature 180ml
- 1 cup milk chocolate chips, melted and cooled 180g
Recommended Tools
- 2-1/2 inch circle cutter
- 7- inch cake pans
- Spinning cake stand
- 8- inch greaseproof cake board
- Large offset spatula
- Electric hand mixer or stand mixer
Instructions
- Chocolate Cake Layers
- Begin by preheating the oven to 350 F / 175 C.
- Add 1 cup of unsalted butter into the bowl of a stand mixer or a large bowl and beat on a medium speed until smooth and creamy. Add 2 1/2 cups sugar and cream together on a high speed for 1-2 minutes with a whisk attachment or hand mixer. Scrape the sides of the bowl as needed. The mixture should become light in color.
- Mix in 4 large eggs on a medium speed, two at a time.
- In a separate bowl combine 1 cup of hot water, 1 cup of buttermilk, and 1 cup of cocoa powder. Whisk until the mixture is smooth and no clumps remain.
- Sift 3 cups of flour, 1 1/2 tsp baking powder, 1 tsp baking soda, and 1 tsp salt into a large bowl.
- Next, add 1/2 the dry ingredients into the butter/egg mixture. Scrape the sides of the bowl with a spatula to ensure the flour gets fully incorporated.
- Pour in the buttermilk/cocoa mixture and gently pulse the mixture to incorporate the liquid. If you don't, you'll end up splattering the cocoa mixture all over your kitchen!
- Add in the last half of the dry ingredients and mix on low until fully incorporated.
- Divide the batter evenly between the prepared pans. I like to use a kitchen scale to make sure each pan has the same amount of batter.
- Bake for 29-32 minutes or until a toothpick comes out with a few moist crumbs.
- Let the layers cool in the pans for about 10 minutes, then run an offset spatula around the edge of the pans to help separate the layers from the pans.
- Place the pans in the freezer for about 45 minutes, to accelerate the cooling process. Once the layers are fully cooled, carefully flip the pans and remove the layers from the pans.
- Use a serrated knife to level the top of each cake layers. Stack the cake layers on top of each other and trim in a slightly tapered shape to look like a Rolo candy (see photos above).
- Unstack the cake layers and cut a 2 1/2-inch circle from the center of the 2 middle cake layers with either a circle cutter or small knife. This will create a cavity in the middle of the cake for the caramel filling. Set the cake layers aside, or wrap them and freeze them at this point if you're making them in advance.
Caramel Filling
- Make the caramel filling while the cake layers bake and cool. This can be made up to a month in advance.
- Place a medium saucepan over medium to medium-high heat.
- Once the pan has warmed up, pour in 1 cup sugar gradually, adding 1/4 cup at a time. Wait until the sugar is mostly dissolved, then add in the next bit of sugar.
- As the sugar melts it will gradually deepen in color.
- Stir occasionally until the sugar is fully dissolved and has become an amber color, then turn off the heat.
- Gradually mix in 6 Tbsp of butter (2 Tbsp at a time), then stir in 1/4 cup of heavy cream and 1/4 tsp salt. The mixture will be thin but will thicken as it cools.
- Pour into a separate container, then place in the fridge to cool to room temperature.
Chocolate Buttercream Frosting
- Then make the chocolate buttercream frosting. Beat the butter on a medium speed for 30 seconds with a paddle attachment until smooth.
- Add in the sifted cocoa powder, vanilla extract, and salt. Mix on low until the ingredients are fully incorporated.
- Slowly mix in the powdered sugar. Halfway through, add in the heavy cream to make the frosting easier to mix.
- Mix in the cooled, melted milk chocolate on a low speed until the ingredients are fully incorporated and the desired consistency is reached. Cover with plastic wrap to prevent crusting and set aside.
Assembling This Rolo Cake
- Stack and frost the cake layers on a greaseproof cake board or flat plate, using a dab of chocolate buttercream to help stick the first cake layer to the board.
- As you assemble the cake, spread an even layer of chocolate buttercream on each cake layer and stack the cake layers from largest to smallest. The layers with cut out sections should be the 2nd and 3rd cake layers.
- Once you've stacked and frosted the first three cake layers, fill the opening the all of the caramel filling.
- Top with the last cake layer and smooth a thin coat of buttercream around the cake with a large offset spatula and bench scraper. Freeze the cake for about 10 minutes in the freezer or 30 minutes in the fridge. This will help the buttercream between the cake layers firm up and make the cake easier to frost.
- Carefully cover the cake with a second, thick layer of chocolate buttercream and smooth using a bench scraper. Make some rings on top of the cake with the large offset spatula to look like the top of a Rolo, then enjoy!
Video
Notes
My Tips for Making the Best Rolo Cake
- Ingredients at room temp mix together better! Set out any cold ingredients ahead of time.
- Be sure to properly measure your flour (spoon into the cup measure, then level). Or better yet, use a kitchen scale to measure your dry ingredients.
- Once you add in the flour, mix your cake batter just until the ingredients are incorporated. This will ensure your cake layers are tender and fluffy.
- Use a scale to weigh your cake pans as you fill them. It helps the cake layers bake to the same heigh and bake more evenly.
- Bang your cake pans on the counter before putting it in the oven. This brings any air bubbles that are trapped in the batter to the surface.
- Level your room temperature or thawed cake layers with a serrated knife to make them easier to stack.
- Chill your cake layers in the freezer for about 20 minutes before assembling the cake. It makes it so much easier to frost them!
Making This Rolo Cake in Advance & Storage Tips
- Make your cake layers in advance and freeze them. It breaks the process up and makes it more approachable.
- Make your chocolate frosting ahead of time or save any leftover frosting! It can be stored in an airtight container in the fridge for up to a month. This frosting can also be stored in the freezer for up to 3 months. Just be sure to give it a good stir once it thaws to make it nice and smooth again.
- The caramel can be made up to a month is advance if stored in an airtight container in the fridge.
- A frosted cake can last in the fridge for up to a week, or in the freezer up to a month. If you freeze the cake, transfer it to the fridge the night before you plan to eat it. This will help it gradually thaw and minimize any temperature shock. Remove the cake from the fridge about 30 minutes before you plan to cut into it.
Amazing recipe probably the best chocolste cake ive ever baked , tastes amazing but had trouble shaping cake into rolo as it was so moist and just crumbled not sure what I could do to prevent this happening again.
Hi Jo,
So happy to hear you love this recipe!! Trimming the cake layers can be a bit challenging. I’d suggest chilling the layers in the freezer until they’re cold to the touch and firmer, which will help minimize the crumbing. Hope that helps for the future, happy baking!
How do I get four layers if I’m using 8 inch round pans that I’m only using three of them
Hi Sharon,
You can make 4, 8-inch layers using this cake recipe if you really want, but the cake layers will be a lot thinner. Do you want to make 4 cake layers so the dimension look better? Or so you can feed more people with the cake? If I know that, I’ll be able to help better!
You could also make 4, 6-inch cake layers if you have that size of pan. Hope that helps, happy baking!