
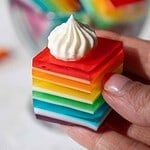
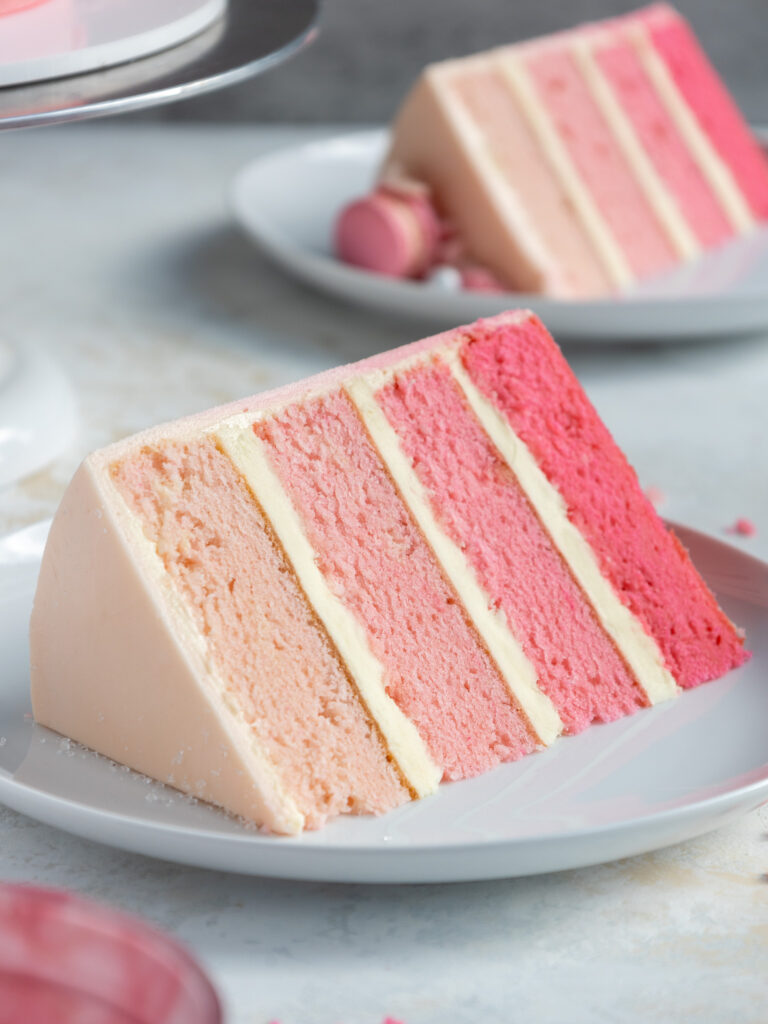
Rainbow Jello Cake
This rainbow jello cake is a total showstopper! It’s perfect for birthdays, holidays, or whenever you’re craving something joyful and nostalgic.

How to Make This Rainbow Jello Cake
Let’s walk through each step of this recipe to make sure it turns out as amazing as possible.
I figured it might be helpful to know what tools I use, too, so I’ve shared a list below.
Not all of these are mandatory, but they make the process a lot easier. If you don’t have all these things on hand, feel free to improvise and work with what you have.
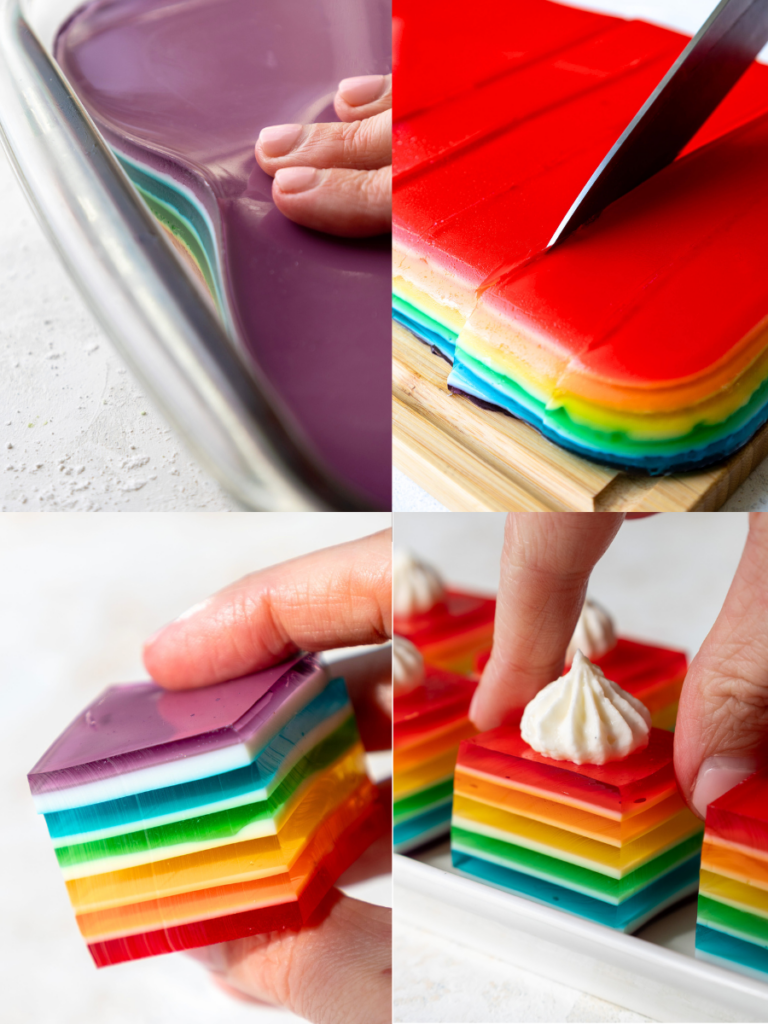
Step 1: Prepare the Pan
Spray either a 9×13-inch pan or a 10-cup Bundt pan generously with non-stick spray. This ensures your Jello cake will pop out beautifully! Set aside.
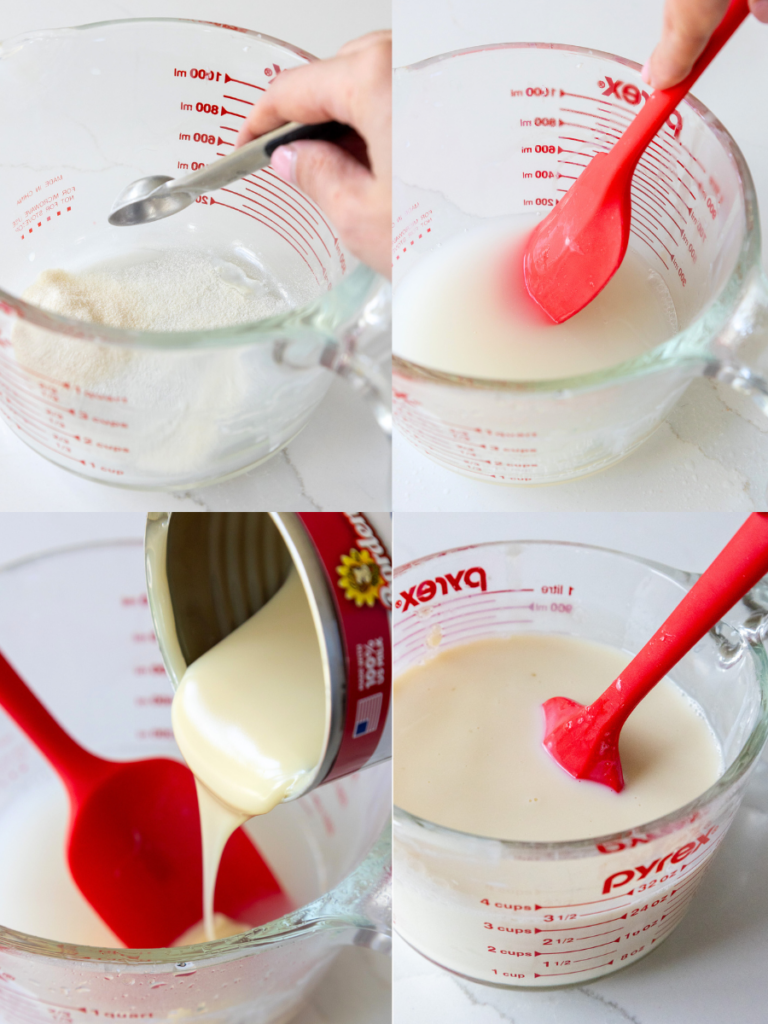
Step 1: Make the White Layer
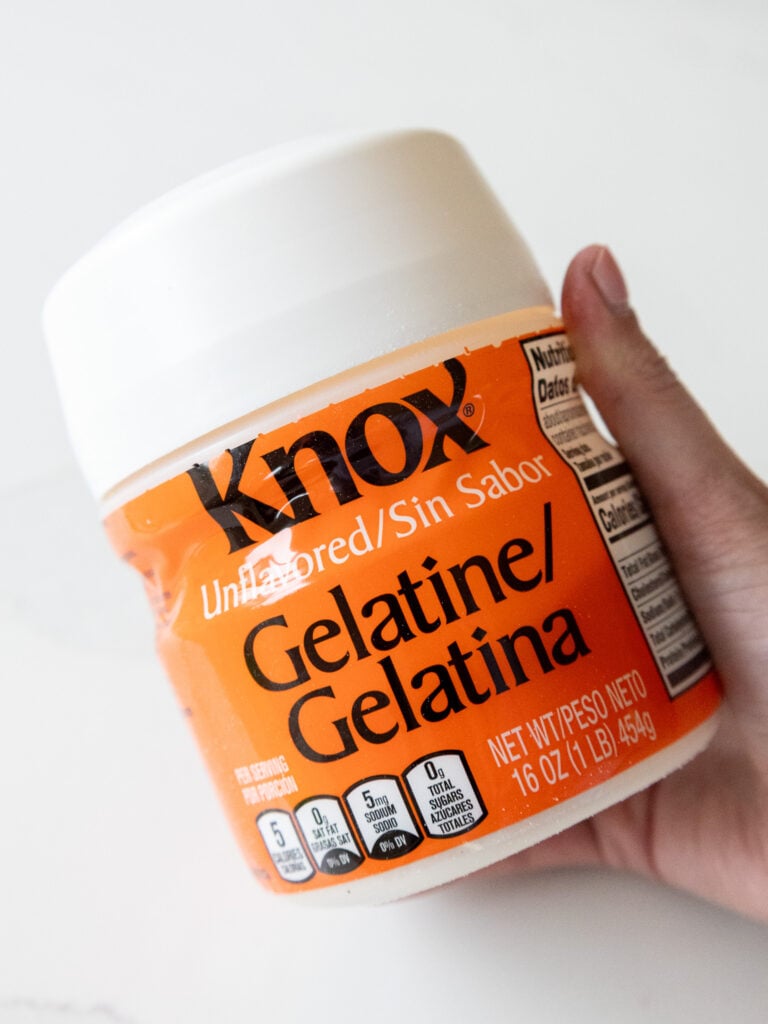
First, we tackle the white layer! In a large bowl, mix 4 1/2 tsp or 2 envelopes Knox gelatin with 2 cups of hot water until dissolved.
Then add a 14-oz can of sweetened condensed milk and mix until combined, then set aside until the mixture cools to room temperature.
Pour slightly over 1/2 cup of the white mixture (120ml) over the set red Jello. Refrigerate for 20 minutes until firm.
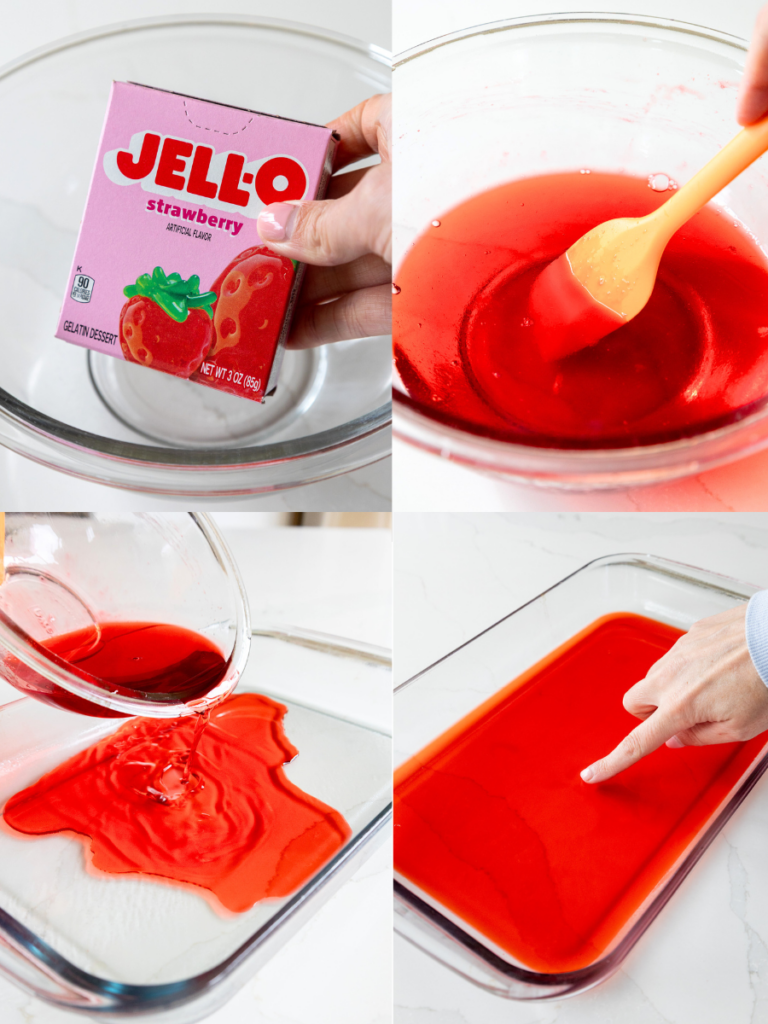
Step 2: Create the Red Layer
In a large bowl or large liquid measuring cup, combine 1 3 oz. package of strawberry or cherry Jello and 1 teaspoon of Knox gelatin with 1 cup boiling water. Stir until fully dissolved.
Allow the mixture to cool slightly (about 10 mins), then pour gently into your prepared pan. Refrigerate for about 20 minutes or until set. I like to gently poke the layer to test if it’s firm!
While the red layer sets in the refrigerator, prepare the mixture for the next layer and let it cool on the countertop. This helps prevent the layers from bleeding together.
Step 4: Create the Orange Layer
Repeat this process and mix 1 package of orange Jello with 1 teaspoon Knox gelatin and 1 cup boiling water. Cool and pour over the milk layer. Refrigerate for 20 minutes until set.
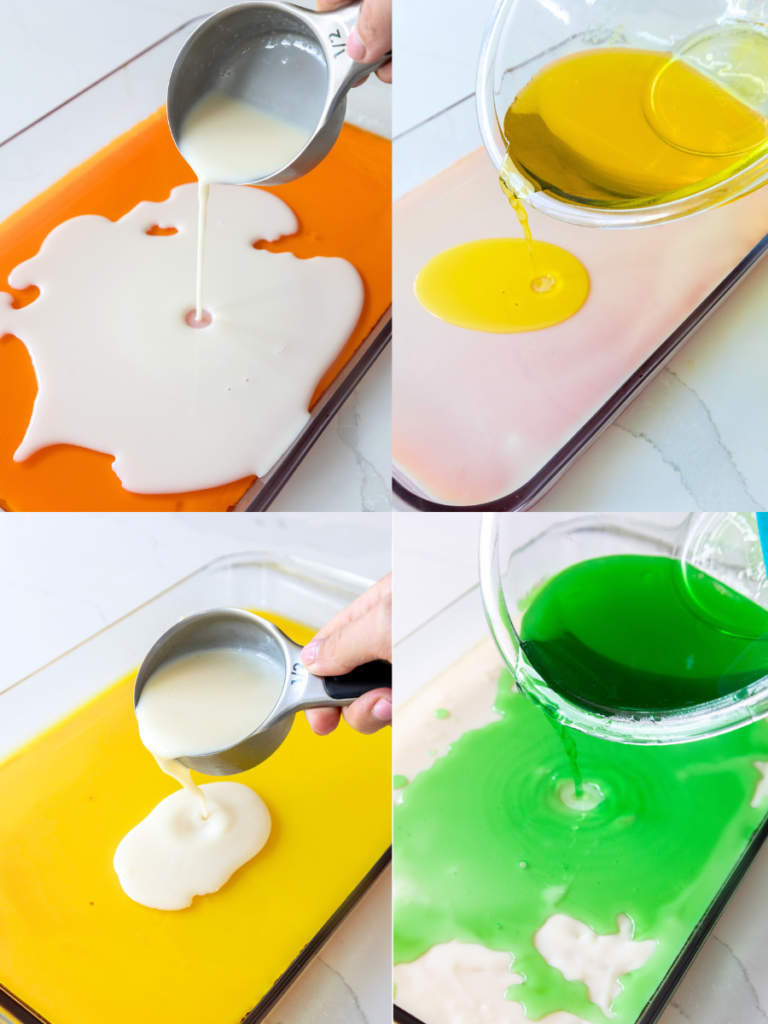
Step 5: Repeat with Remaining Layers
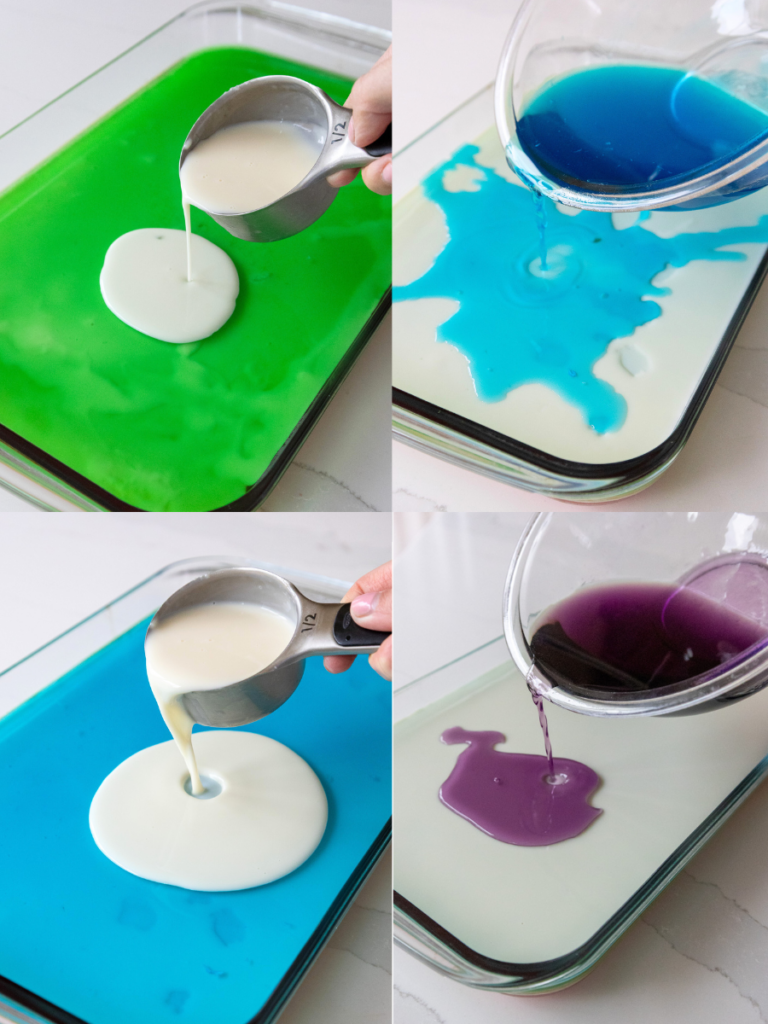
Continue with the remaining Jello flavors (yellow/lemon, green/lime, and blue/berry blue, purple/grape), alternating each with a white condensed milk layer.
Make sure each layer has had a chance to cool down a bit before pouring over the previous layer, and that each layer sets properly in the refrigerator before adding the next.
Step 6: Final Chill
After the last layer is added, refrigerate the entire dish for at least 2 hours, if not overnight, to ensure all layers are firmly set.
Step 7: Serve
Cut the layered Jello into slices with a sharp knife and serve with a dollop of whipped cream on top and enjoy!
Substitutions & Swaps
- Jello Flavors – Feel free to swap for different flavors that match your color scheme. Just make sure to keep the same size boxes (3 oz).
- Knox Unflavored Gelatin – This is essential for the recipe, but you can use any unflavored gelatin brand.
- Sweetened Condensed Milk – In a pinch, you could use evaporated milk sweetened with 1/4 cup sugar, but the layers won’t be as opaque.
- Whipped Cream – Store-bought works fine, but my homemade whipped cream holds up better for serving.
- Pan Size – If you don’t have the recommended pan sizes, any similar-sized pan will work. The layers may just end up being a bit thinner or thicker, and the chill time may vary a bit.
Making This Rainbow Jello Cake in Advance
This Rainbow Jello Cake can be stored covered in the refrigerator for up to 3 days. In fact, making it a day ahead is ideal to ensure it’s fully set.
I don’t recommend freezing this dessert as the texture of gelatin changes when it is frozen and then thawed.
How to Make the Best Rainbow Jello Cake
- Be patient with each layer. Rushing the cooling or setting process will result in layers that bleed together.
- Let each flavor of Jello cool until it’s room temperature before pouring over the set layers.
- Test each layer by gently touching it before adding the next one. It should be firm and not sticky.
- Use the same bowl for mixing all your Jello flavors. Just rinse between colors to keep them vibrant.
- Time it right – Start this recipe when you have time to come back to it every 30 minutes or so. Or prepare the next layer as the previous one sets.
- Get creative with colors to match any holiday or occasion. Red and green for Christmas, pastels for Easter, or school colors for graduation!
Let Me Know What You Think!
If you make this rainbow jello cake, I’d love to hear what you think of it! Please leave a rating and comment below.
Don’t forget to tag me @chelsweets and #chelsweets if you share on social media! I love seeing your delicious creations.
Other Recipes You Might Like:
Rainbow Jello Cake
Ingredients
Rainbow Jello Cake
- 14 oz. sweetened condensed milk 396g
- 9 1/2 tsp or 5 envelopes Knox unflavored gelatin divided
- Boiling water 6-7 cups total; divided as needed
- 1 3 oz. box strawberry or cherry Jello (85g)
- 1 3 oz. box orange Jello (85g)
- 1 3 oz. box lemon Jello (85g)
- 1 3 oz. box lime Jello (85g)
- 1 3 oz. box berry blue Jello (85g)
- 1 3 oz. box grape Jello (85g)
- Non-stick cooking spray as needed
Recommended Tools and Equipment
Optional Garnish
- Stabilized Whipped Cream
- Sprinkles or fresh fruit
Instructions
Rainbow Jello Cake
- Note: This cake will end up having 11 layers: 5 colored layers (red, orange, yellow, green, blue, purple) and 5 white layers between each color. This recipe isn't hard, but there are lots of steps. Give yourself some grace, read through the entire recipe and tips first, and you'll nail it!
- Prepare the Pan: Spray either a 9×13-inch pan or a 10-cup Bundt pan generously with non-stick spray. This ensures your Jello cake pops out beautifully! Set aside.
- White Layer: The mixture we make in this step will be sandwiched between each color of Jello. In a large bowl, mix 5 tsp or 2 envelopes Knox gelatin (14g) with 2 cups of hot water (480g) until dissolved. Then add 14 oz (1 can, or 396g) of sweetened condensed milk and stir until combined. Set aside until the mixture cools to room temperature, then pour slightly over 1/2 cup of the white mixture (120ml) or 1/5 of the total mixture over the set red Jello. It helps to pour the mixture over a spoon to let it fall lightly on top of the previous layer. Refrigerate for 20 minutes until firm. Let the remaining white mixture sit out at room temperature as you add each colorful jello layer.
- Red Layer: In a large bowl or liquid measuring cup, combine 1 package of strawberry or cherry Jello (85g) and 1 teaspoon Knox gelatin (about 3g) with 1 cup (240ml) boiling water. I like to use the same large bowl to make each flavor of Jello! Just give it a quick rinse between flavors so that the colors stay bright and don't mix. Stir until fully dissolved. Gently pour into the prepared pan. Refrigerate for about 20 minutes or until set (I like to gently poke the layer to test if it's firm!) Tip: While each layer sets in the refrigerator, prepare the mixture for the next layer and let it cool on the countertop. This helps prevent the layers from bleeding together.
- Orange Layer: Mix 1 package of orange Jello with 1 teaspoon Knox gelatin and 1 cup boiling water. Cool and pour over the milk layer. Refrigerate for 20 minutes until set.
- Repeat Layers: Continue this process with the remaining Jello flavors (yellow/lemon, green/lime, blue/berry, and purple/grape), alternating each with a white condensed milk layer. Make sure each layer is cooled before pouring over the previous one and that each sets properly in the refrigerator before adding the next. Note: The white mixture will likely start to set as it sits between layers. When this happens, heat it up in the microwave in 10-second intervals until it's fluid again and easy to pour.
- Final Chill: After the last layer is added, chill for at least 2 hours, if not overnight, to ensure all layers are firmly set.
- Serve: You can either cut the jello cake directly in the pan or flip it onto a cutting board. I prefer flipping it out of the pan. Do NOT dip the pan in hot water to try to help release the jello. The heat will melt the Jello and create a goopy mess (I learned this the hard way!!). Instead, use your fingers to gently pull the sides of the jello from the edge of the pan, then flip it, and it should easily separate from the pan. Cut the layered Jello into squares or slices (depending on which pan you used) with a sharp knife and serve with a dollop of whipped cream, sprinkles, and/or fresh fruit on top, and enjoy!
Video
Notes
Tips for Making the Best Rainbow Jello Cake
- Prepare Ahead: Gather and measure all your ingredients before starting—it’ll save you from scrambling later!
- Reduce the Number of Dishes: Use the same large bowl to make each flavor or Jello! Just give it a quick rinse between flavors so that the colors stay bright.
- Pour Each Layer Gently: Carefully pour each new Jello layer over a spoon or spatula to prevent mixing into the layer below.
- Cool the Layers Properly: Allow gelatin mixtures to cool slightly before adding them to previous layers to avoid melting the set Jello beneath.
- Temperature Check: Let the Jello mixtures cool a bit before pouring them so they won’t melt the previous layer.
- Chill Completely: Be patient and fully chill each layer until firm—it’s a must for getting clean, distinct layers!
- Get Creative: Feel free to customize colors and flavors to match your party’s theme or the season! Red and pink would be so cute for Valentine's Day, or green and red for Christmas!
- If you're short on time or can't find all the right flavors, you always omit some of them!
How to Store This Rainbow Jello Cake
Keep any leftovers covered in the fridge—they'll stay jiggly and fresh for up to 3 days (if you even have leftovers!).Nutrition

What is the purpose of the extra gélatine? Is it to create a firmer texture?
Hi Ann,
Great question! The extra gelatin helps make the layers firmer and sturdier. Boxed Jello already contains gelatin, but adding a bit more helps the colored layers hold their shape better, especially when you’re stacking so many layers and pouring new ones on top. It also helps the layers set a little more firmly so they slice more cleanly and don’t blend together as easily. Hope that helps, happy baking!!
I made this for my son’s birthday party and it was a hit for him and all of his friends! He’s requested it again this year
Hi Taku,
So happy to hear that!! That’s wonderful 🙂 Thanks for sharing!!
This jello cake was a big hit at my granddaughter’s birthday party! I used a round glass pyrex bowl and the layers were very pretty even before cutting.
Hi Jan,
That is so wonderful to hear!! And thank you for sharing, I haven’t tried that type of bowl yet so it’s good to know it works too 🙂
I’m dying to try this! Just want to double check the instructions regarding the white layer amount. Your instructions indicate slightly over a half cup between jello layers, but watching the video, it looks like it’s slightly under a half cup. Thanks so much!
I ended up having a bit of the white liquid leftover, so doing slightly over a half cup is the best way to use all the white part up! Hope that helps, happy baking!
Thank you so much! I’m planning to make it tomorrow! I’ll keep you posted!
Chelsea, they were absolutely amazing! I ended up weighing each portion of the sweetened condensed milk mixture out, which made it easier for me (I’m a sourdough baker, so weighing everything is a happy place for me).
The only procedure I would change in this recipe, is to make the sweetened condensed milk mixture first, so it has time to cool. I made the red layer mixture first, and then had to cool my jets waiting for the sweetened condensed milk mixture to cool to move on. Everything else was absolutely perfect! Thank you!
So happy to hear that Michelle!! YAY 🙂 That is so smart, and def the best way to get perfectly even layers!!
And I appreciate that feedback, things are always a little slower for me because I’m usually filming while I make everything, and that makes the process take a lot longer! Very good to know, and I will update the recipe card to reflect this!
What do you do with the white layer mixture while you wait for layers to set? Refrigerate? Or just leave on counter?
Hi Jas,
Great question! Let it sit out at room temperature so that it stays fluid and so that you will be able to pour it on top of each colorful jello layer. I’ve updated the recipe card to make this more clear 🙂 Happy baking!