
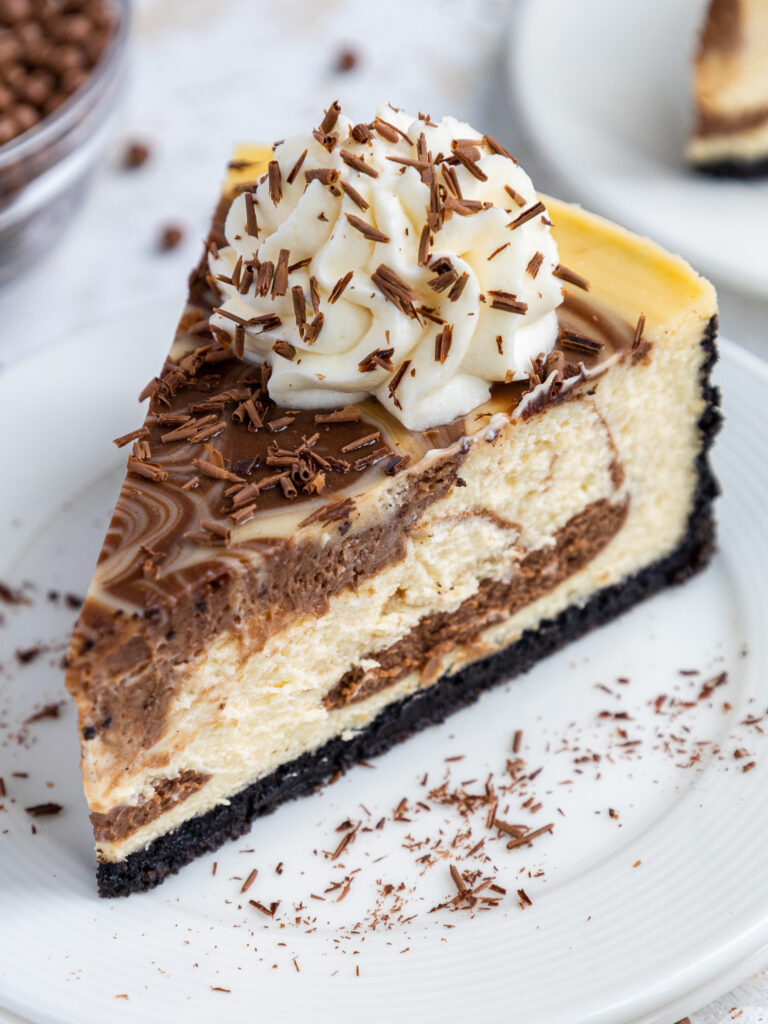
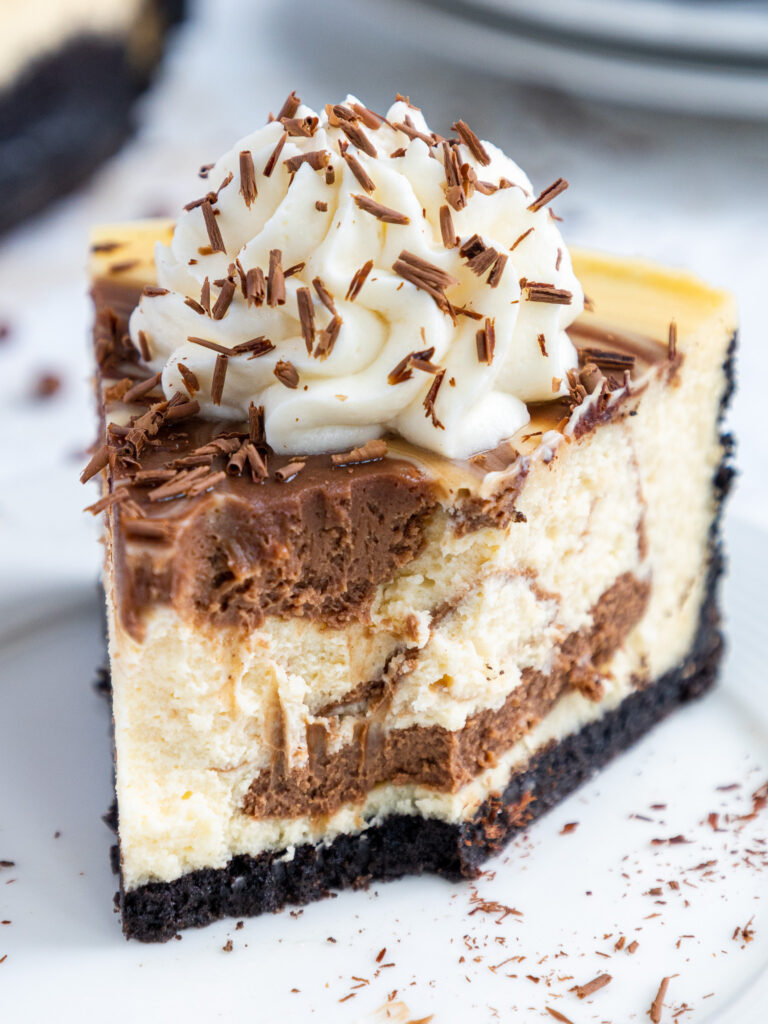
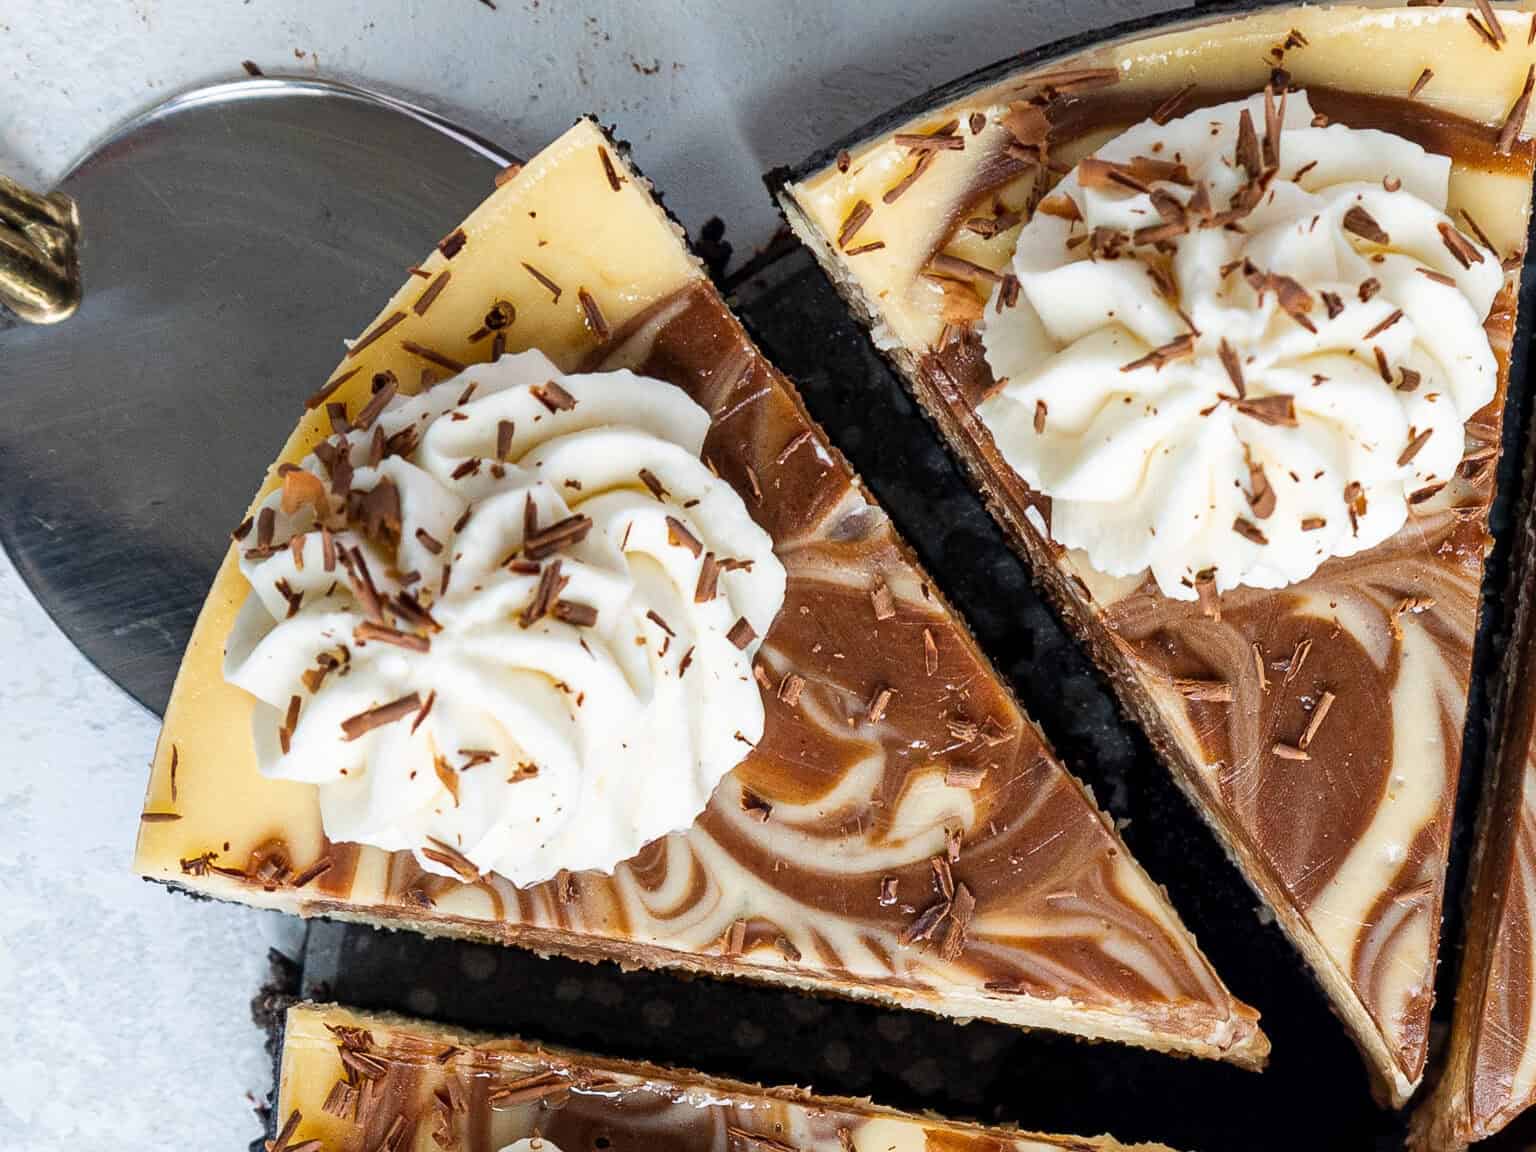
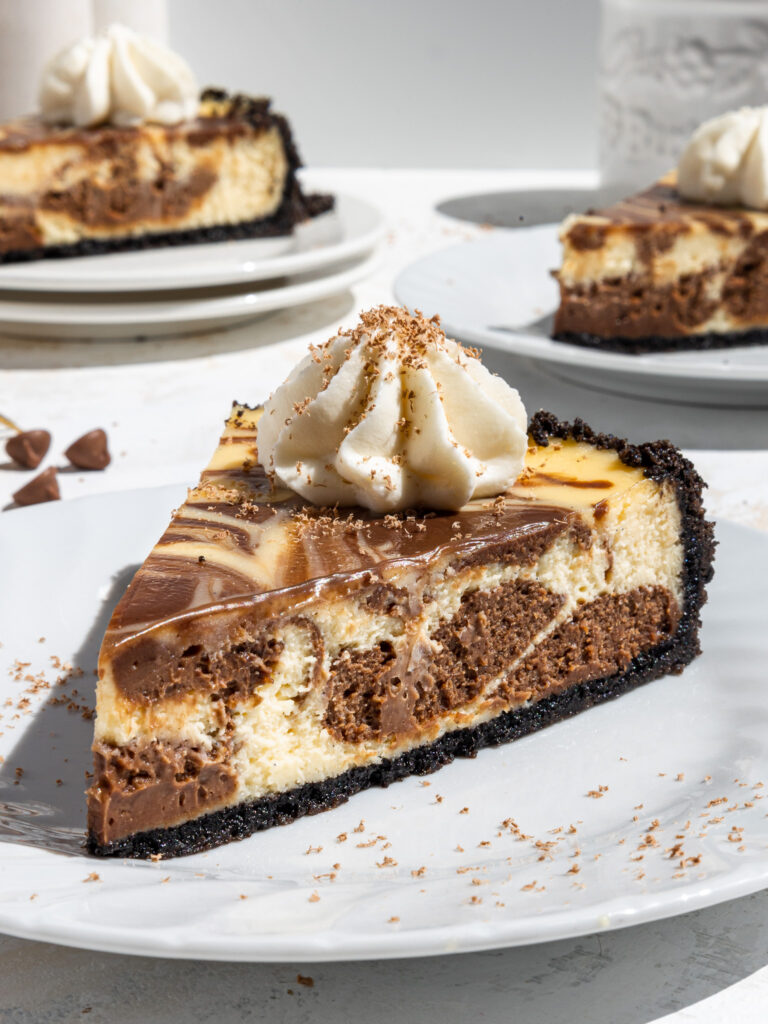
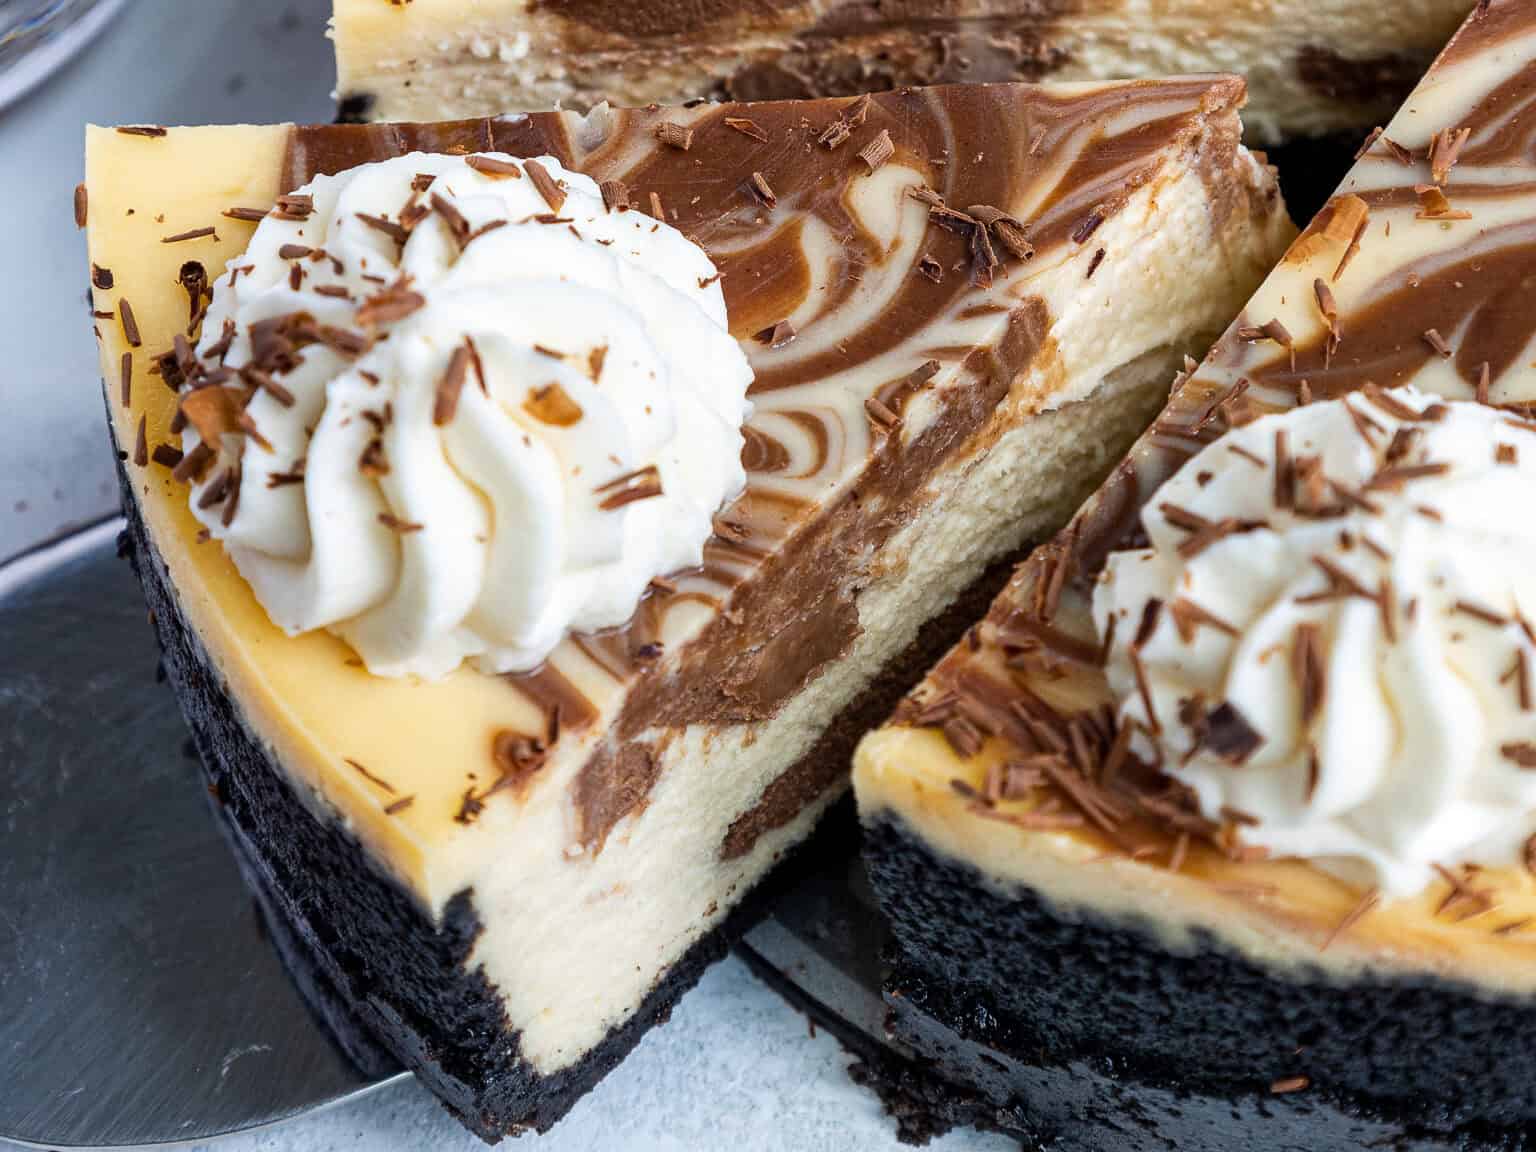
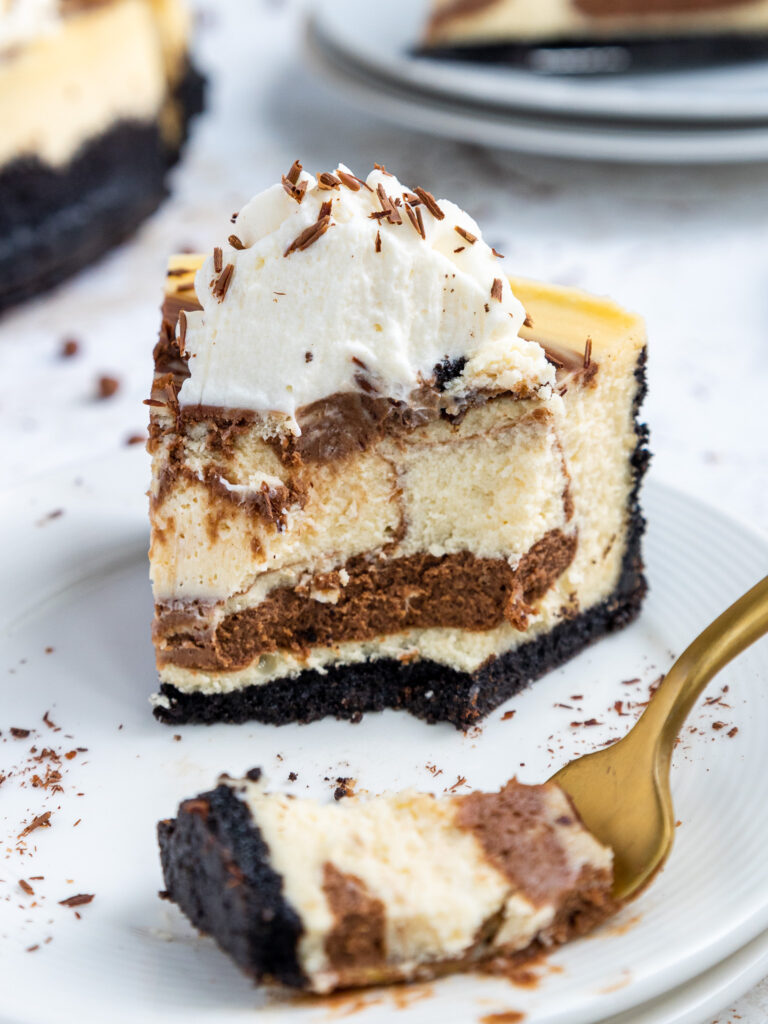
Marbled Cheesecake
This marbled cheesecake is the best of both worlds with its creamy, swirled layers vanilla and chocolate cheesecake! It’s rich yet fluffy and absolutely delicious!!
How to Make This Marbled Cheesecake
Let’s walk through each step of this cheesecake recipe to make sure it turns out as amazing as possible.
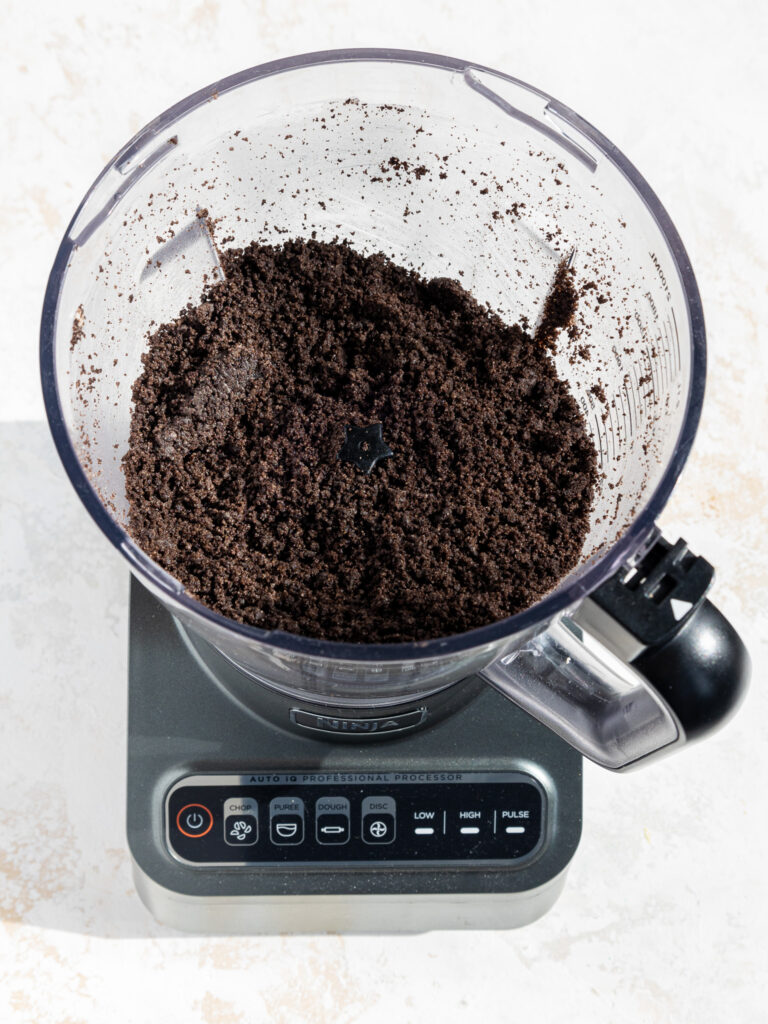
Step #1: Make the Oreo Cookie Crust
Make the Oreo cookie crust first so that it can bake and cool before you fill it.
Use a food processor to crush the Oreo cookies until they have a fine crumb. If you don’t have a food processor, you can crush them in a Ziplock bag with a rolling pin or wine bottle.
Then pour in the melted butter and granulated sugar and pulse until combined.
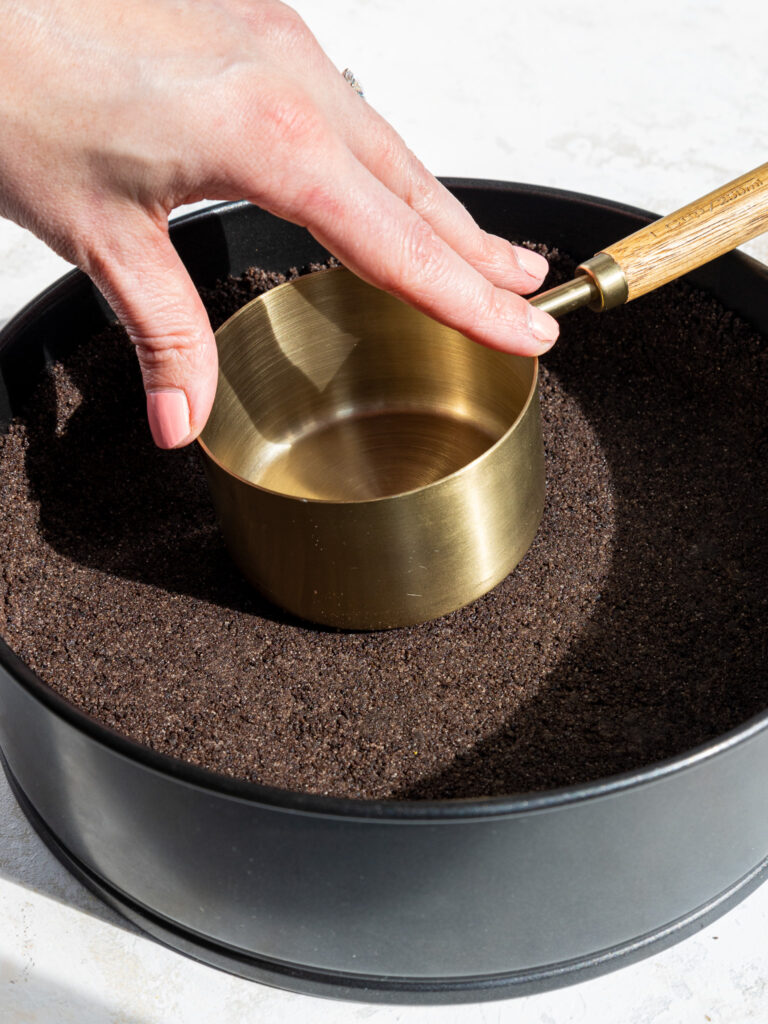
Pour the cookie mixture into a lined and greased 8-inch springform pan. Use the bottom of a measuring cup or a flat-bottomed glass to press down firmly and create a compact, even crust.
The crust should cover the bottom of the pan and reach about halfway up the sides of the pan.
Bake for 12-14 minutes, then remove from the oven. Place the pan on a wire rack to cool.
Keep the oven on but lower the temperature to 300°F/150°C and place a baking tray filled with about 1 inch of water on the bottom rack.
Step #2: Make the Marbled Cheesecake Filling
While the cookie crust bakes and cools, make the cheesecake filling.
Start by melting the semi-sweet or dark chocolate chips. Heat them in the microwave in 15-second intervals, stirring between each, or use a double boiler. Set aside to cool.
In a separate, small bowl, whisk together the sugar and cornstarch. This helps prevent the cornstarch from clumping.
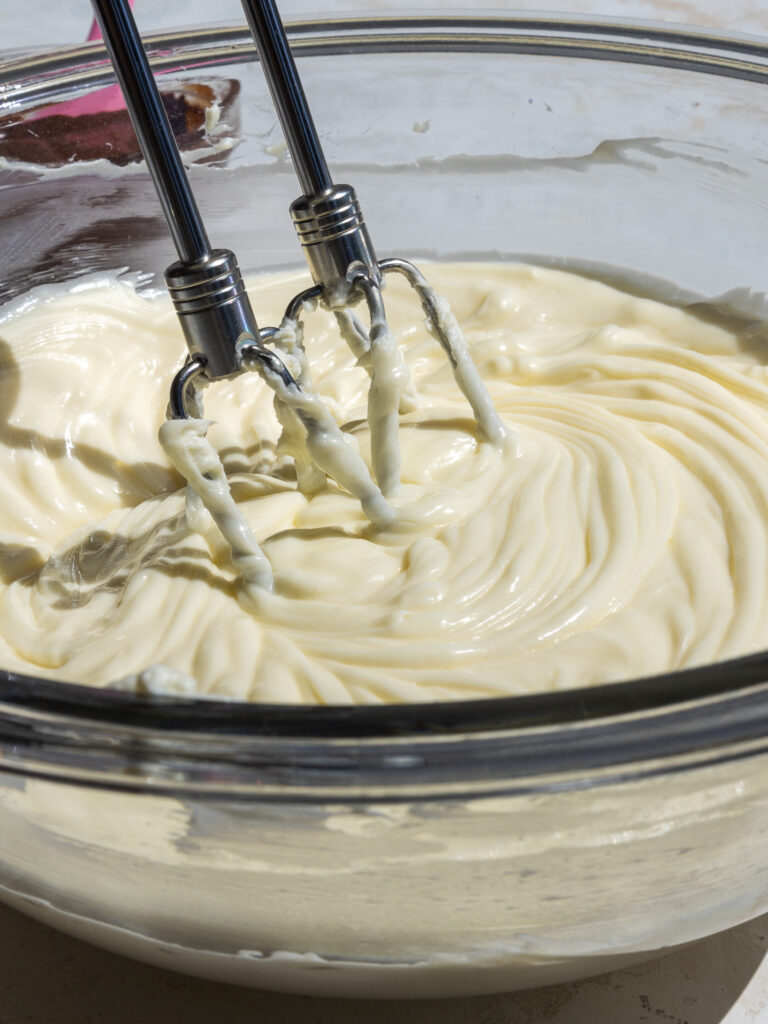
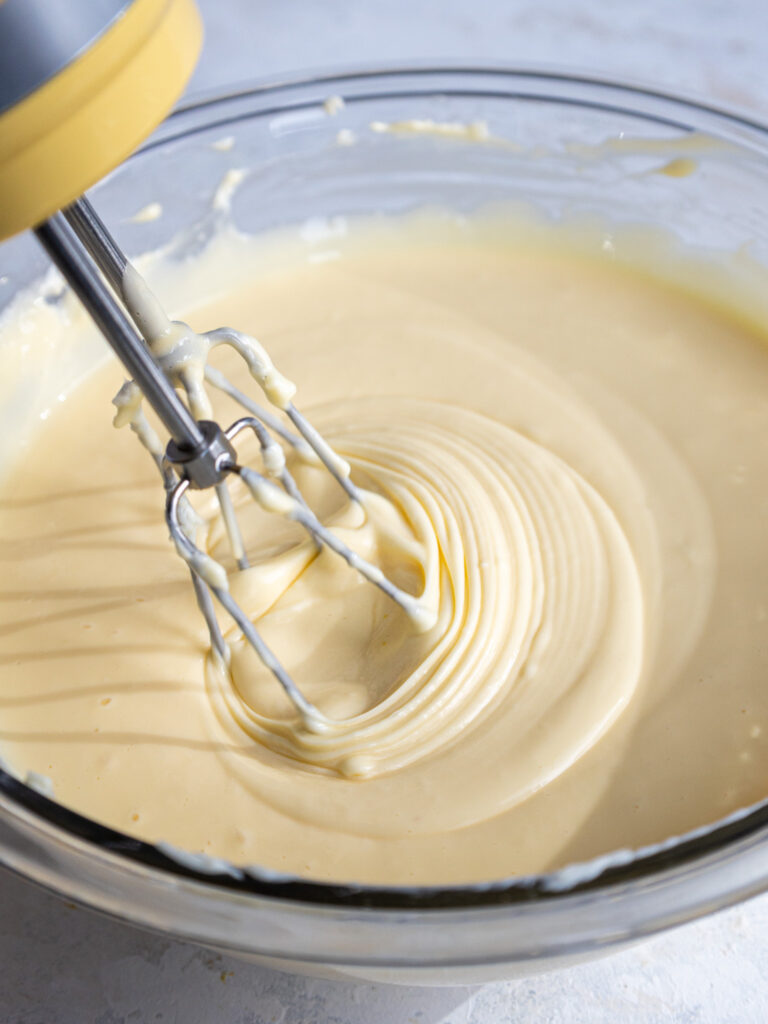
In a large mixing bowl or the bowl of a stand mixer fitted with a paddle attachment, beat the room temperature cream cheese and the sugar/cornstarch mixture on a low speed until the mixture is completely smooth.
Crack the eggs in a bowl and whisk them together.
Gradually pour the eggs into the cheesecake batter in a few installments while mixing on a low speed.
Scrape the sides and bottom of the bowl with a rubber spatula as needed.
Then, mix in the sour cream and vanilla extract until combined.
Scoop 2 cups of batter into a separate bowl and add in the melted and cooled chocolate to transform some of the vanilla cheesecake batter into chocolate cheesecake batter.
The chocolate should still be in a liquid form, but not hot to the touch. Fold it into the batter with a rubber spatula until combined.
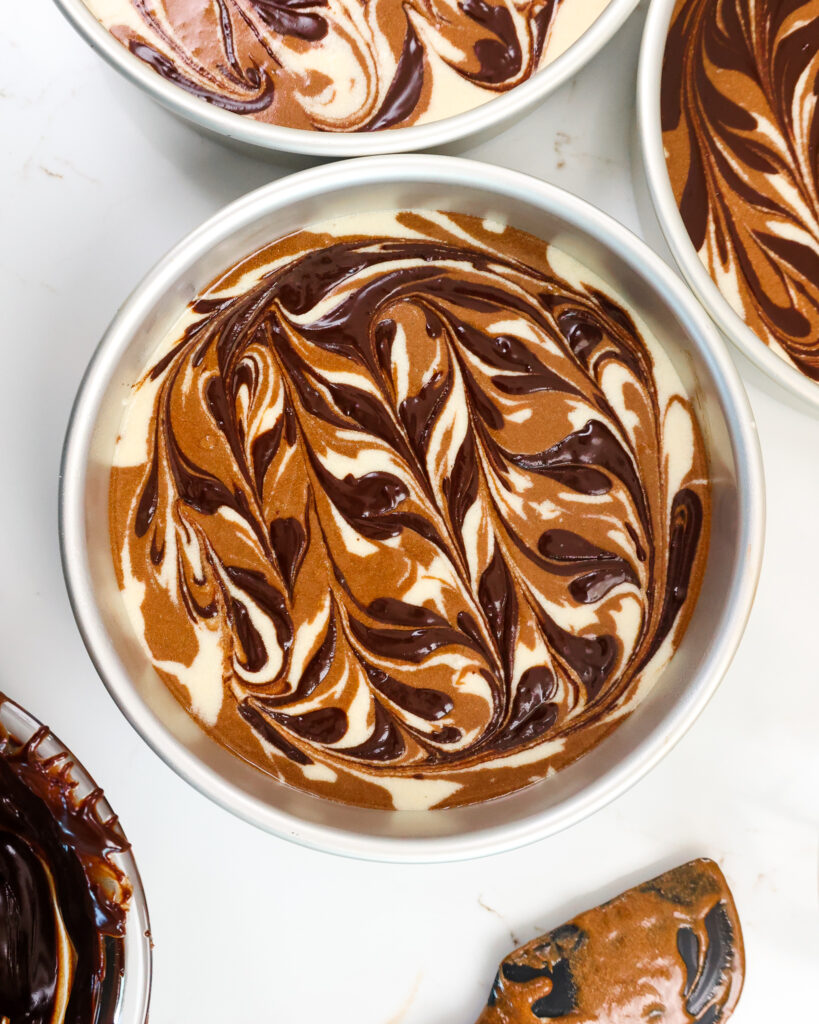
Alternate scoops of chocolate and vanilla cheesecake batter into the prepared pan.
You will have more vanilla batter than chocolate batter, so add one scoop of chocolate batter for every 2 scoops of vanilla batter.
Use a butter knife or offset spatula to swirl the batter together and create a marbled pattern.
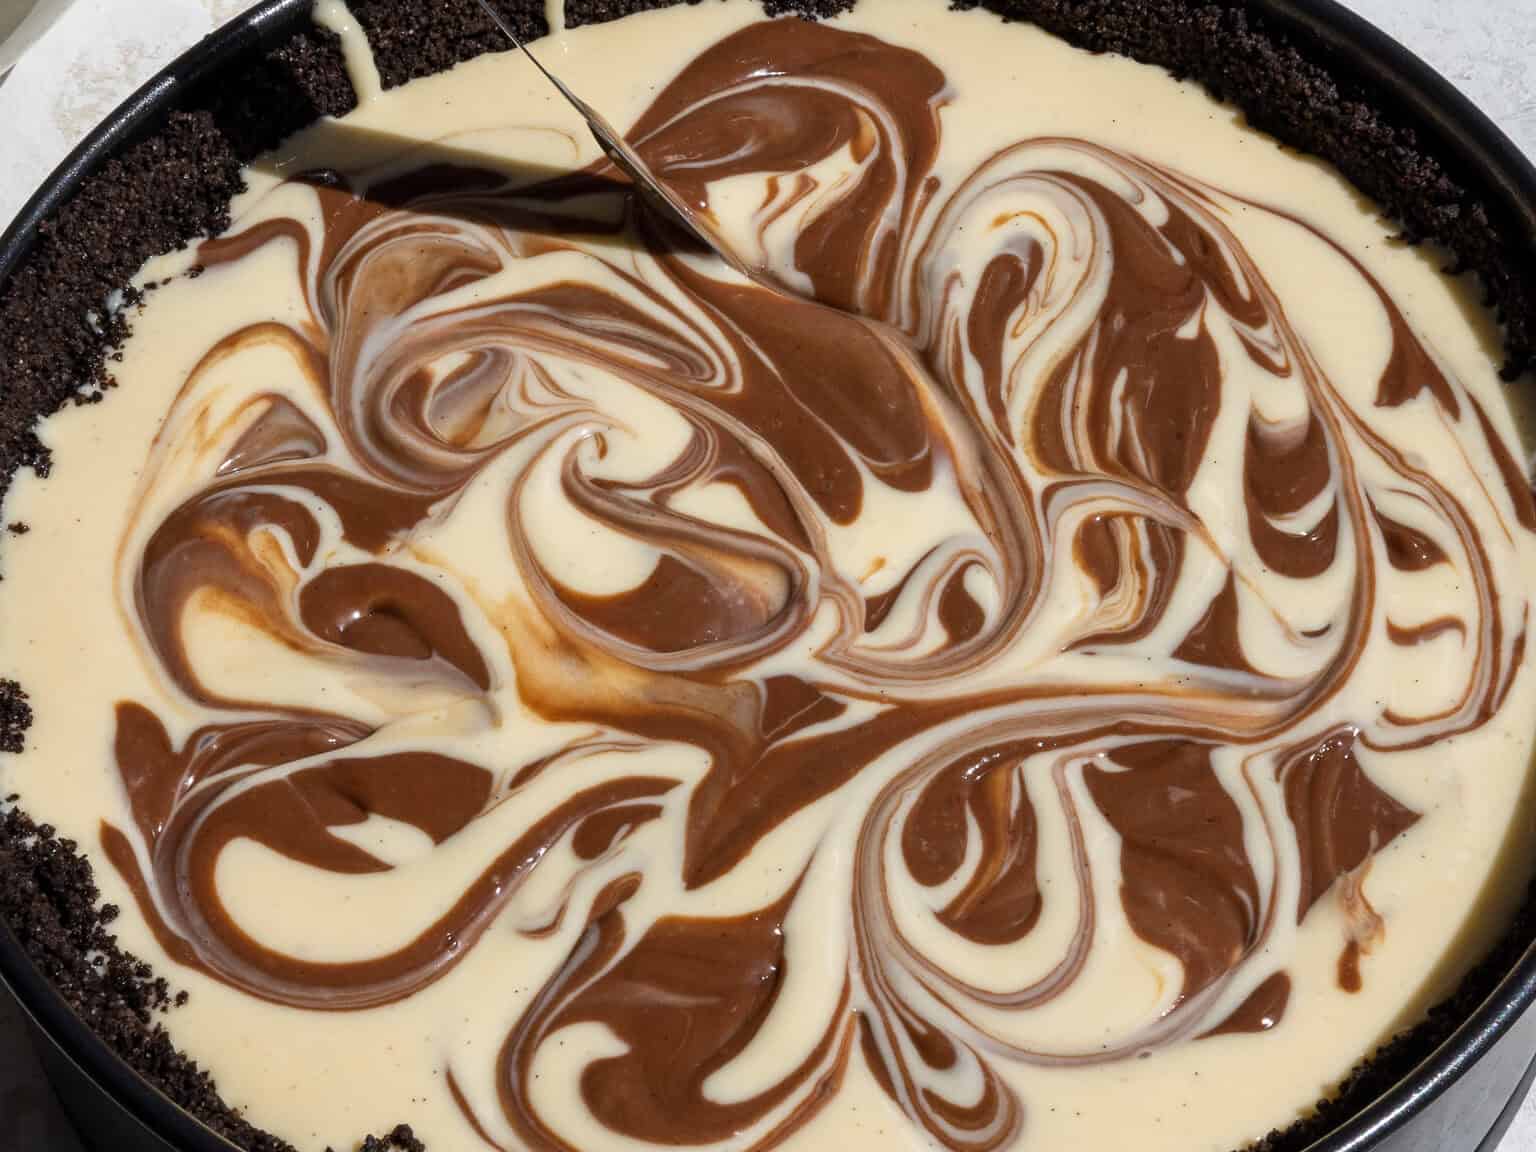
NOTE: If you use an 8-inch pan, it will be filled close to the top of the pan! But don’t worry, cheesecakes don’t really rise as they bake, so it shouldn’t overflow in the oven.
Step #3: Bake the Cheesecake
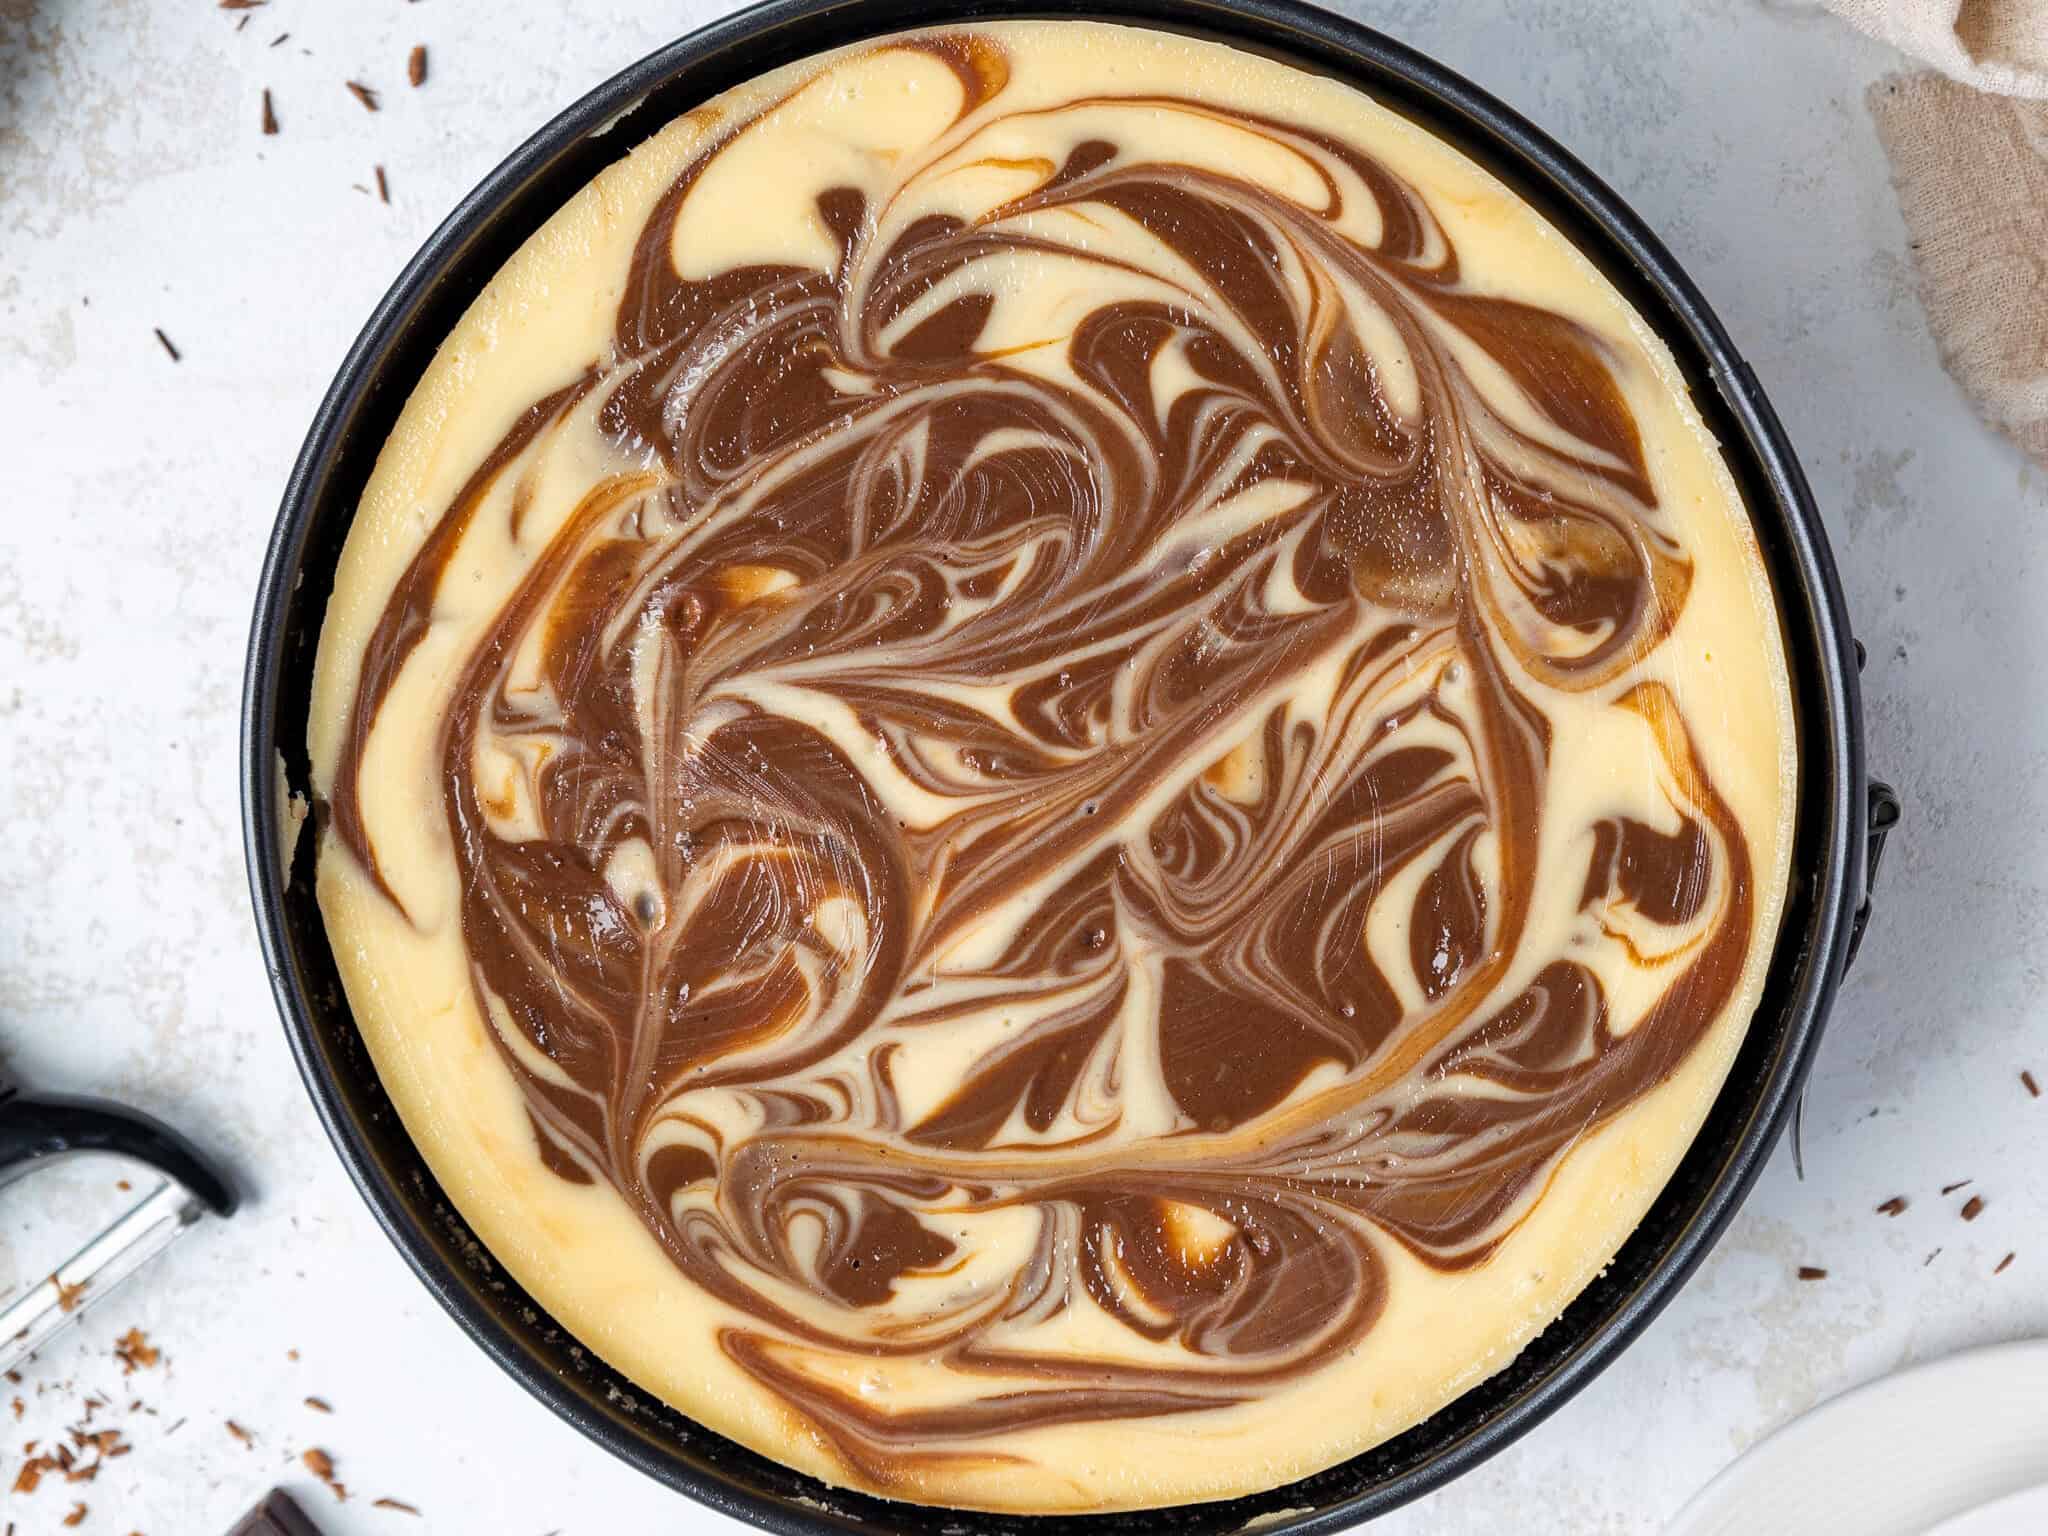
Double-check that the oven temperature has been lowered to 300°F/150°C, then place the cheesecake pan on a large cookie sheet and bake the cheesecake for 15 minutes.
Without opening the oven door, reduce the oven temperature to 225°F/110°C and bake for an additional 2 hours.
It sounds crazy, but low and slow is the best way to bake up a perfect, crack-free cheesecake that doesn’t sink.
Step #4: Cool the Marbled Cheesecake Gradually
Once the cheesecake is fully baked, turn the oven off and let the cheesecake sit in the oven for 1 hour without opening the door.
After 1 hour of cooling in the oven, crack the oven door open with a wooden spoon and let the cheesecake cool in the oven for another hour.
Next, remove the cheesecake from the oven and let it continue to cool at room temperature for 2 hours.
Once it’s reached room temperature, cover the top of the cheesecake with plastic wrap and refrigerate the cheesecake for an additional 3-4 hours or overnight (preferred).
Store the cheesecake in the fridge until you’re ready to serve it.
Step #5: Decorate the Cheesecake
When you’re ready to enjoy this marble cheesecake, remove it from the fridge and carefully release it from the pan.
Top the cheesecake with whipped cream swirls and chocolate shavings, then use a sharp, warm knife to cut into the chilled cheesecake. Clean the knife after each cut to get perfect slices.
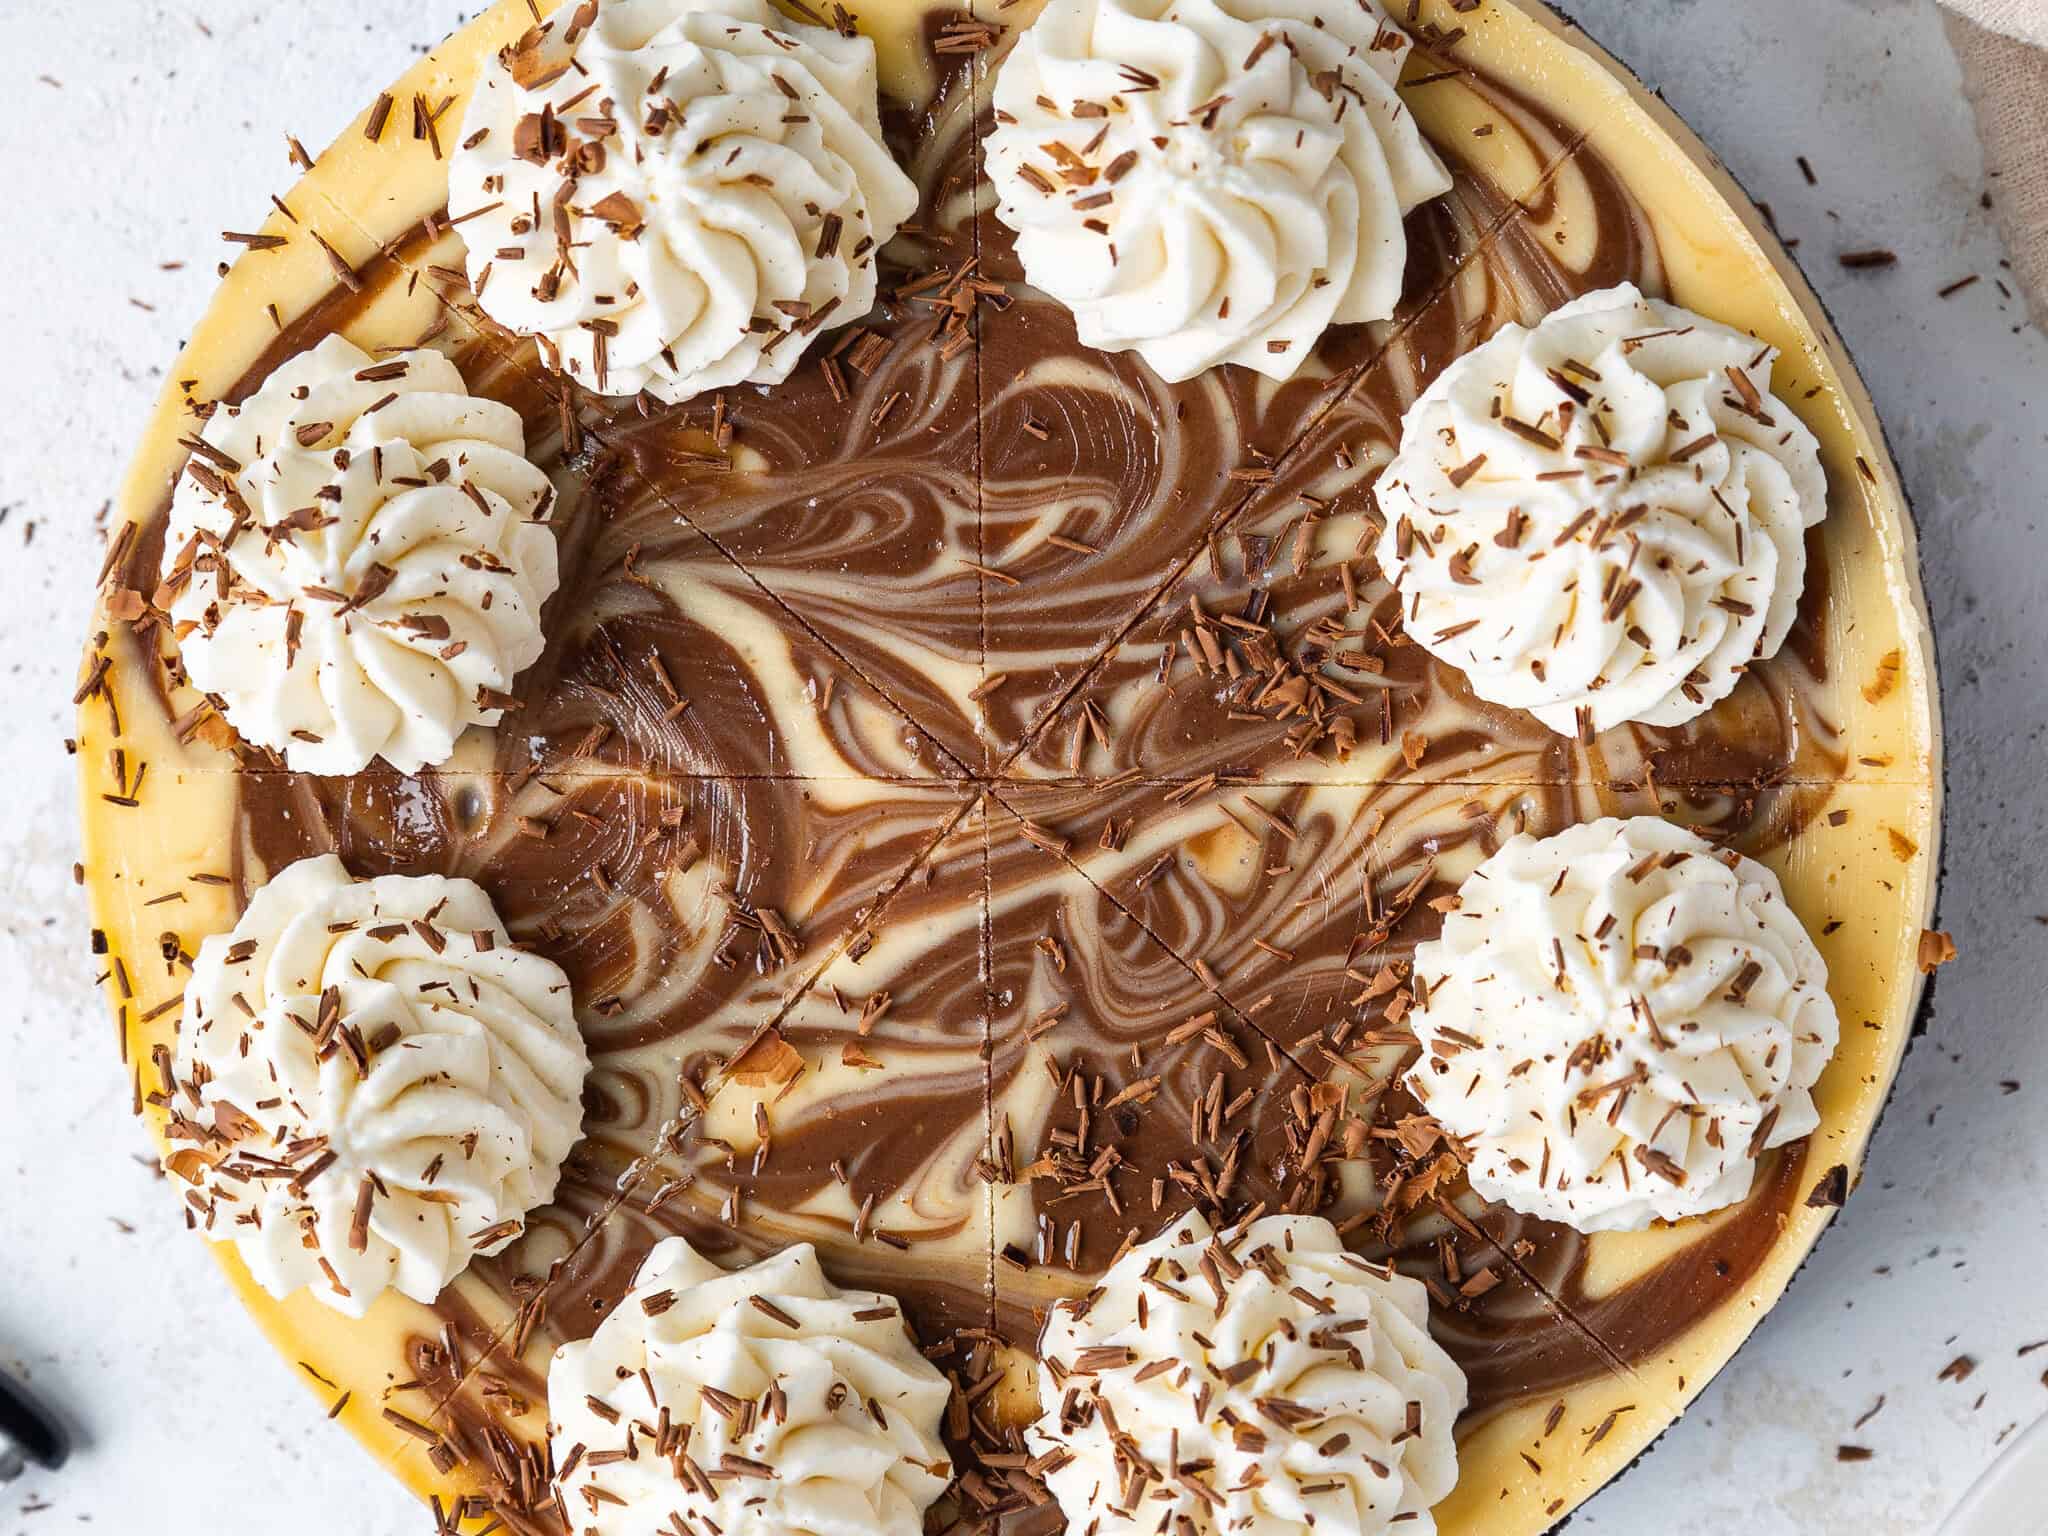
Leftover cheesecake can be kept in the fridge for up to 5 days in an airtight container.
Substitutions & Swaps – Oreo Cheesecake Crust
This recipe uses quite a few ingredients, and I know you might not have all of them on hand.
Below are some swaps and substitutions that can be made in this recipe.
- Oreo Cookie Crumbs – I like to use crushed Oreo cookies to make the crust. This can easily be done in a food processor, or crush the cookies in a Ziplock bag with a rolling pin. You can also use crushed graham crackers in a pinch, but I’d recommend using 2 cups of graham cracker crusts, 7 Tbsp of melted butter, and 5 Tbsp of granulated sugar if you want to make a graham cracker crust.
- Salted Butter – To keep things simple, I use salted butter to make the crust. If you only have unsalted butter, add about 1/4 tsp of fine salt to the crust mixture.
- Granulated Sugar – Adding granulated sugar to the crust helps solidify the crust once it’s baked and makes the crust more stable. However, it can be omitted if needed.
Substitutions & Swaps – Marbled Cheesecake
- Cream Cheese – This recipe tastes best with full-fat cream cheese. I find using cream cheese that comes in brick form works best and highly recommend using the Philadelphia brand (not sponsored – it just works best!). Avoid organic cream cheese if possible; it’s creamier and will make the cheesecake denser and less fluffy.
- Granulated Sugar – I think this cheesecake has just the right amount of sweetness, but you can increase or decrease the amount of sugar by a few Tablespoons based on your preferences.
- Cornstarch – Cornstarch helps prevent cracking and makes the cake easier to cut into clean slices. You can use all-purpose flour in its place if needed.
- Eggs – Sadly, this recipe does not turn out with egg alternatives like applesauce or flaxseed eggs. I highly recommend using regular large eggs.
- Dark Chocolate – I love using dark or semi-sweet chocolate, but you can also use milk chocolate if you prefer.
Marbled Cheesecake Troubleshooting and FAQs
While I’d love to think everyone’s cheesecake will turn out perfectly every time, I know that sometimes things don’t go that smoothly. Below are some tips and advice to help!
Do I Have to Use a Water Bath?
This recipe uses a kind of pseudo water bath. Rather than baking the cheesecake directly in a giant pan filled with water, I like to place a tray filled with water on the bottom rack of the oven as the cheesecake bakes.
This helps the cheesecake bake up tall and fluffy. It also prevents the center from sinking. I highly recommend baking the cheesecake this way, but it can be baked without the water tray.
However, the texture will be slightly denser, and the cheesecake will sink in the middle as it cools if you don’t use one.
Why Did My Cheesecake Crack?
There can be a few different culprits for cracked cheesecake. The most common are the cheesecake was over-baked, it was cooled too quickly, or the batter was over-mixed.
When a cheesecake is over-baked, the edges stick to the side of the pan. This can be a problem because cheesecake contracts as it cools, and this can lead to cracking.
The center of the cheesecake should still be a little bit jiggly when you turn off the oven.
On a similar note, if a cheesecake is cooled too quickly, the temperature shock can also cause it to crack. Gradually cooling a cheesecake is key!
It’s a slow process, letting it sit in the oven for two hours after baking, then letting it cool at room temperature for a few hours, then chilling it in the fridge overnight. But it’s totally worth it and should prevent any big cracks from forming.
If your cheesecake cracks, there’s also a chance that the batter was over-mixed. If you incorporate too much air into the cheesecake batter as you make it, air bubbles can get trapped as the cheesecake bakes and cause cracks.
And while we’d all love our cheesecake to turn out with a perfect, smooth top, it’s also ok if it doesn’t! You can always decorate the top of the cheesecake to cover any cracks.
How Can I Tell If My Cheesecake Is Done?
If you don’t make cheesecake very often, it can be hard to know when the cheesecake is done!
While we know the center is supposed to still be jiggly when we turn off the oven, I always think to myself, HOW JIGGLY?? I’ve gotten better at trusting the process over time and baking this cheesecake with the low and slow method really helps it cook through properly.
However, if you’re still nervous, there is an easy test you can do to make sure your cheesecake is properly baked.
I like to call it the toothpick test. Once you remove the cheesecake from the oven (after the 2-hour cooling process in the oven), insert a toothpick into the cheesecake 1 inch from the edge of the pan.
If it comes out clean, your cheesecake is properly baked.
Can I Bake This Cheesecake Without a Springform Pan?
This recipe bakes up best in an 8-inch springform pan or cheesecake pan.
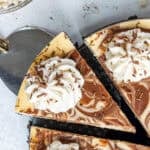
It can also be baked in a 9-inch springform pan if needed, but it will be a bit shorter (see the picture below)!
You can also turn this recipe into marbled cheesecake bars by baking it in a 9 x 13-inch pan for 40-45 minutes at 350°F or 175°C with a water tray on the bottom rack.
Be sure to line the pan with parchment paper and spray it with non-stick spray to make it easier to cut the bars and remove slices.
Making This Marbled Cheesecake in Advance & Storage Tips
This cheesecake can be stored in the fridge for up to a week. Store slices in an airtight container or cover the springform pan tightly with plastic wrap to keep it fresh.
You can also freeze this cheesecake for up to 3 months! After it’s baked and cooled, release it from the pan, then freeze the entire cheesecake until it’s firm to the touch (about 3 hours).
Carefully lift the cheesecake off the bottom of the springform pan and slide it onto a cardboard cake round or plate.
Wrap the entire cheesecake in a couple of layers of plastic wrap and then foil.
When you’re ready to enjoy the frozen cheesecake, place it in the fridge overnight, then unwrap and enjoy it the following day.
Whether you’re freezing or refrigerating this cheesecake, wait to add the whipped cream until you’re ready to serve it.
How To Make the Best Marbled Cheesecake
- Make sure the ingredients are at room temperature. It helps them mix together better and will give the cheesecake a smoother texture.
- Use full-fat cream cheese that comes in brick form. I highly recommend using the Philadelphia brand (not sponsored – it just works best!). Avoid organic cream cheese if possible; it’s creamier and will make the cheesecake denser and less fluffy.
- Mix the batter on a low speed as you make it. You want to incorporate as little air as possible into the batter. Excess air in your batter can cause your cheesecake to crack.
- Make this cheesecake early in the day. The baking and cooling process takes about 6 hours before you can place the cheesecake in the fridge.
- Follow the cooling instructions to a T! I know it’s a slow process, but it’s worth it. It helps ensure the cheesecake has the perfect consistency once it’s cooled.
- Use a warm, sharp knife to get clean slices. Fill a tall cup with hot water and dip a sharp knife into it. Dry the knife fully, then cut into the cheesecake. Repeat with each cut, being sure to wipe the blade completely clean after each cut.
- If your cheesecake cracks while baking or cooling, don’t fret! You can easily cover it with a bit of chocolate ganache while decorating this cheesecake, and no one will know.
- Make room in your fridge ahead of time so you can easily chill the cheesecake once it reaches room temperature.
Let Me Know What You Think!
If you try this marbled cheesecake recipe, I’d love to hear what you think of it! Please leave a rating and comment below.
Don’t forget to tag me @chelsweets and #chelsweets if you share on social media! I love seeing your delicious creations.
Marbled Cheesecake
Equipment
- Rimmed Baking Tray for pseudo water bath
Ingredients
Oreo Cookie Crust
- 1 2/3 cups Oreo cookie crumbs – 20 cookies with centers 220g
- 2 Tbsp salted butter, melted 28g
- 2 Tbsp granulated sugar 25g
Marbled Cheesecake
- 3/4 cup semi-sweet or dark chocolate chips 130g
- 1 1/3 cup granulated sugar 266g
- 2 Tbsp cornstarch 18g
- 4, 8 oz. packages full fat cream cheese, room temperature 904g
- 4 large eggs, room temperature 224g
- 2/3 cup full-fat sour cream, room temperature 170g
- 1 tsp vanilla extract or vanilla bean paste 4g
Garnish – Optional
- Whipped cream
- Chocolate Shavings
Instructions
Oreo Cookie Crust
- Preheat the oven to 350°F/175°C. Spray an 8-inch or 9-inch springform pan or cheesecake pan with non-stick baking spray, then place a parchment round on the bottom of the pan.
- Using a food processor, crush 20 Oreo cookies until they have a fine crumb. If you don't have a food processor, crush them in a Ziplock bag with a rolling pin or wine bottle. Mix in 2 Tbsp melted butter and 2 Tbsp granulated sugar. Pulse or stir until combined.
- Pour the cookie mixture into the prepared pan. Use the bottom of a measuring cup or a flat-bottomed glass to press down firmly and create a compact, even crust. The crust should cover the bottom of the pan and reach about halfway up the sides of the pan.
- Bake for 12-14 minutes, then remove from the oven. Place the pan on a wire rack to cool. Keep the oven on but lower the temperature to 300°F/150°C and place a rimmed baking tray filled with about 1 inch of water on the bottom rack.
Marbled Cheesecake
- While the cookie crust bakes and cools, make the cheesecake filling.
- Start by melting 3/4 cup of semi-sweet or dark chocolate chips in the microwave in 15 second intervals, stirring between each, or using a double boiler. Set aside to cool.
- In a separate, small bowl, whisk together 1 1/3 cup of sugar and 2 Tbsp of cornstarch. This helps prevent the cornstarch from clumping.
- In a large mixing bowl or the bowl of a stand mixer fit with a paddle attachment, beat 4, 8-oz. packages of room temperature cream cheese and the sugar/cornstarch mixture on a low speed until the mixture is completely smooth. Scrape the sides and bottom of the bowl with a rubber spatula to make sure everything is properly combined.
- Crack 4 eggs in a bowl and whisk them together. Gradually mix the eggs into the cheesecake batter in a few installments while mixing on a low speed. Then mix in 2/3 cup sour cream and 1 tsp vanilla extract until just combined.
- Scoop 2 cups (420g) of batter into a separate bowl and add in the melted and cooled chocolate to transform some of the vanilla cheesecake batter into chocolate cheesecake batter. The chocolate should still be in a liquid form, but not hot to the touch. Fold it into the batter with a rubber spatula until combined.
- Alternate scoops of chocolate and vanilla cheesecake batter into the prepared pan. You will have more vanilla batter than chocolate batter, so add one scoop of chocolate batter for every 2 scoops of vanilla batter. Use a butter knife or offset spatula to swirl the batter together and create a marbled pattern. NOTE: If you use an 8-inch pan, it will be filled close to the top of the pan! But don't worry, cheesecakes don't really rise as they bake, so it shouldn't overflow in the oven.
- Double check that the oven temperature has been lowered to 300°F/150°C, then place the cheesecake pan on a large cookie sheet and bake the cheesecake for 15 minutes.
- Without opening the oven door, reduce the oven temperature to 225°F/110°C and bake for an additional 2 hours. It sounds crazy, but low and slow is the best way to bake up a perfect, crack-free cheesecake that doesn't sink.
- Once the cheesecake is done baking, turn the oven off and let the cheesecake sit in the oven for 1 hour without opening the door.
- After 1 hour of cooling in the oven, crack the oven door open with a wooden spoon and let the cheesecake cool in the oven for another hour.
- Next, remove the cheesecake from the oven and let it continue to cool at room temperature for 2 hours. Once it reaches room temperature, cover the top of the cheesecake with plastic wrap and refrigerate the cheesecake for an additional 3-4 hours or overnight (preferred). Store the cheesecake in the fridge until you're ready to serve it.
- When you're ready to enjoy this marbled cheesecake, remove it from the fridge and carefully release it from the pan.
- Top the cheesecake with whipped cream swirls and chocolate shavings, then use a sharp, warm knife to cut into the chilled cheesecake. Clean the knife after each cut to get perfect slices. Leftover cheesecake can be kept in the fridge for up to a week in an airtight container.
Video
Notes
Making This Marbled Cheesecake in Advance
This cheesecake can be stored in the fridge for up to a week. Store slices in an airtight container or cover the springform pan tightly with plastic wrap and foil to keep it fresh. If you’re making this cheesecake in advance, wait to garnish it with whipped cream until you plan to serve it. You can also freeze this cheesecake for up to 3 months! After it’s baked and cooled, release it from your pan, then freeze the entire cheesecake until it’s firm to the touch (about 3 hours). Carefully lift the cheesecake off the bottom of the springform pan and slide it onto a cardboard cake round or plate. Wrap the entire cheesecake in a couple of layers of plastic wrap and then foil. When you’re ready to enjoy the frozen cheesecake, place it in the fridge overnight, then unwrap and enjoy it the following day. Wait to add the whipped cream and other toppings until you’re ready to cut into it.How To Make the Best Marbled Cheesecake
- Make sure the ingredients are at room temperature. It helps them mix together better and will give the cheesecake a smoother texture.
- Use full-fat cream cheese that comes in brick form. I highly recommend using the Philadelphia brand (not sponsored – it just works best!). Avoid organic cream cheese if possible; it’s creamier and will make the cheesecake denser and less fluffy.
- Mix the batter on a low speed once you start mixing ingredients into the cream cheese/sugar mixture. You want to incorporate as little air as possible into the batter. Excess air in your batter can cause your cheesecake to crack.
- Make this cheesecake early in the day. The baking and cooling process takes about 6 hours before you can place the cheesecake in the fridge.
- Follow the cooling instructions to a T! I know it’s a slow process, but it’s worth it. It helps ensure the cheesecake has the perfect consistency once it’s cooled.
- Use a warm, sharp knife to get clean slices. Fill a tall cup with hot water and dip a sharp knife into it. Dry the knife fully, then cut into the cheesecake. Repeat with each cut, being sure to wipe the blade completely clean after each cut.
- If your cheesecake cracks while baking or cooling, don’t fret! You can easily cover it with a bit of Nutella while decorating this cheesecake, and no one will know.
- Make room in your fridge ahead of time so you can easily chill the cheesecake once it reaches room temperature.
Nutrition
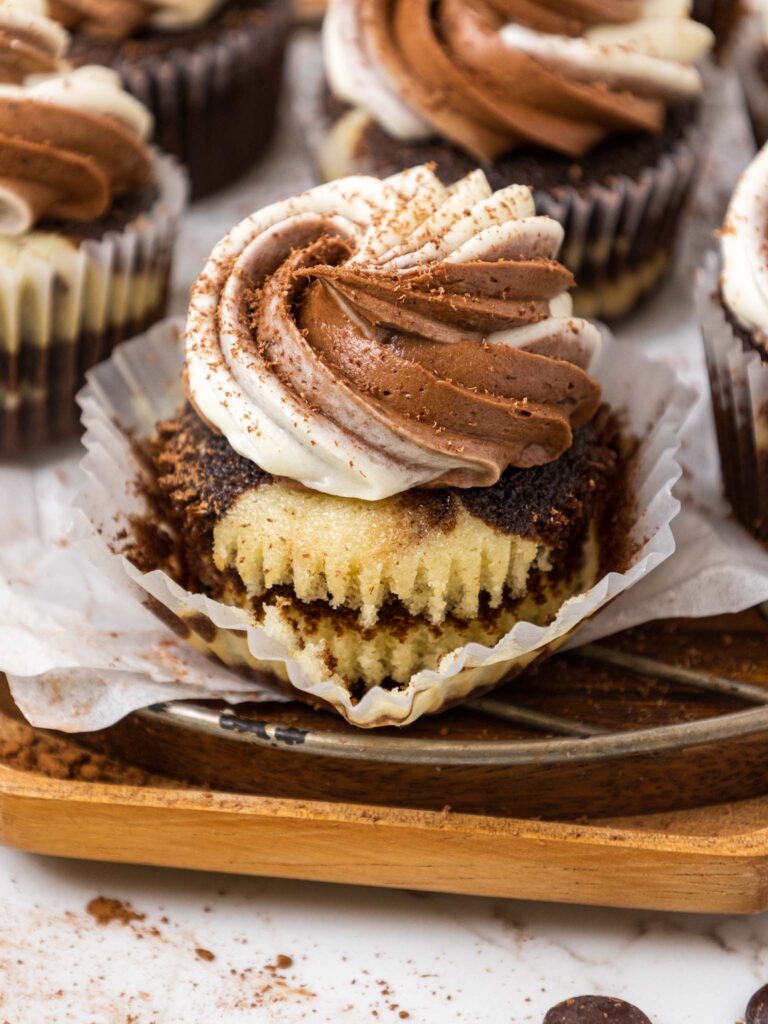
Other Posts You Might Like:

@Rianna, It is on her you tube channel. Check it out there.
Hi, my chocolate mixture started solidifying once I poured it into the batter I ended up having a very pale chocolate mixture with solid chunks of chocolate mixed in. It might still be good though, but I wonder why I couldn’t get it right?
Hi Irene,
I’m so sorry to hear that! My best guess as to why that happened is that your cheesecake batter was on the cold side, and it solidified the chocolate as it was combined. It should still taste great, it might just a look a little different than mine.
I’d recommend either setting out your cream cheese further in advance next time, or removing it from it’s foil lining then heating it up in small intervals on a medium heat to make sure it’s fully at room temperature before making the cheesecake batter. Hopefully that helps for next time!
Absolutely no cracks or sinkage! I ended up starting too late and instead of leaving it on the counter to reach room temp for 2 hrs I ended up doing that overnight with a cake carrier lid over it, and then put it in the fridge in the morning for a full day. It’s a gift so I can’t say taste-wise but the process all seemed great!
So happy to hear that Lorelai! I hope they love it!!
How does the pan of water fit into this recipe?????
The recipe does not talk about it again after filling and placing in oven???
Hi Elizabeth,
It’s a psuedo water bath, so it just sits on the bottom rack of the oven underneath the rack that the cheesecake is on. It adds moisture to the oven, which helps prevent the cheesecake from cracking. But that’s it! It really does just sit there until the cheesecake is done baking, then you can remove it and dump it out. Hope that helps, happy baking!
@Chelsweets, You didn’t put the water bath instructions in the actual recipe though. So it’s a little confusing.
Hello!
Can this recipe work for making mini cheesecakes? How should I modify the recipe for that??
Hi Jenny,
I haven’t tested it to make mini cheesecakes, but I’d think it should work just fine! You could probably 1/2 or 1/4 the recipe because you probably don’t want to make a zillion mini cheesecakes. Bake time will vary a lot depending on the size of pan you use and how full you fill them.
I’d recommend baking them in a 350F oven for 15-20 minutes or until the mini cheesecakes’ tops appear puffed up and look set. Look closely at the edges and make sure they’re completely set. The center may still be a little jiggly when lightly shaken. When they look like this, they should be done baking. Hope that helps, happy baking!
Hi, where can find the tutorial video?
Thanks
Hi Clifford,
Here’s the link to the video tutorial: https://youtu.be/7BT3TLv3fAg
Hope that helps, happy baking!
Will doing a real water bath effect baking times vs your pseudo water bath?
Is there a different result that happens from the two baths?
Hi Joe,
I prefer using a pseudo water bath just because it’s easier, but the outcome should be the same. You shouldn’t need to adjust the bake time. Hope that helps, happy baking!
Do you bake it for the same amount of time if you use a 9 inch springform pan?
Hi Elaine,
Great question! The bake time will be the same for a 9-inch springform pan. It seems like it would be less, but because the bake method is low and slow, it ends up being the same. Hope that helps, happy baking!
Can you use liquid sweetener, like maple syrup, instead of granulated? Thank you!
Hi Lyra,
I haven’t tested it out, but I think that should work! If you try it, please let me know how it turns out!
Hi Chelsea,
If I half this recipe and bake it in a 6 inch pan, how long should it be baked for?
Hi Chelsey,
If I half this recipe and bake it in a 6 inch pan, how long should it be baked for?
Thank you for this great recipe! I used it as a jumping off point to do a pumpkin marble cheesecake with a ginger snap crust.
I used a nine inch pan, and I found the amount of crumb mixture was not enough to make a decent crust on the bottom. I used about 2 and 1/3 cups of crumbs, and I added an extra tablespoon of butter since Ginger snaps have no cream center. Even then, when it was finished, the crust on the bottom was super duper thin. So perhaps for a nine inch pan, three full inches of crumbs and three to four tablespoons of butter.
For the pumpkin part, I used half a can of pumpkin puree added to the two cups of reserved cheesecake batter. And I added a couple of drops of red food coloring to get a good orange color contrast.
It came out great! The texture using this method was like none other that I have achieved in all my years of making cheesecakes many different ways. It was a big hit at the Thanksgiving feast.
In hindsight, one additional change I would make to do this as a pumpkin marble cheesecake would be to add some pumpkin pie spices to the straight pumpkin puree that I mixed in with the cheesecake batter (or I could use canned pumpkin pie filling, I suppose). I don’t mind the straight sweet pumpkin flavor at all, but I think more of a pumpkin pie flavor profile would be an improvement.
Err three full cups of crumbs, not inches!
I made this for my daughter’s birthday and it was delicious! Now every time I open the fridge I think, maybe now is a good time for cheesecake.
Hi Jess,
So happy to hear that!!!! This is such a yummy recipe 🙂 Thank you for sharing!
I made this for my Father in law’s 85th birthday. This was my 1st time making cheesecake. I followed the recipe exactly, and it was fabulous. No cracking, no sagging, and tasted amazing. I will be making this again, and again, and again.
Hi Erin,
YAY!! That is so wonderful to hear 🙂 Thank you for sharing, and happy belated bday to your father-in-law!!!