
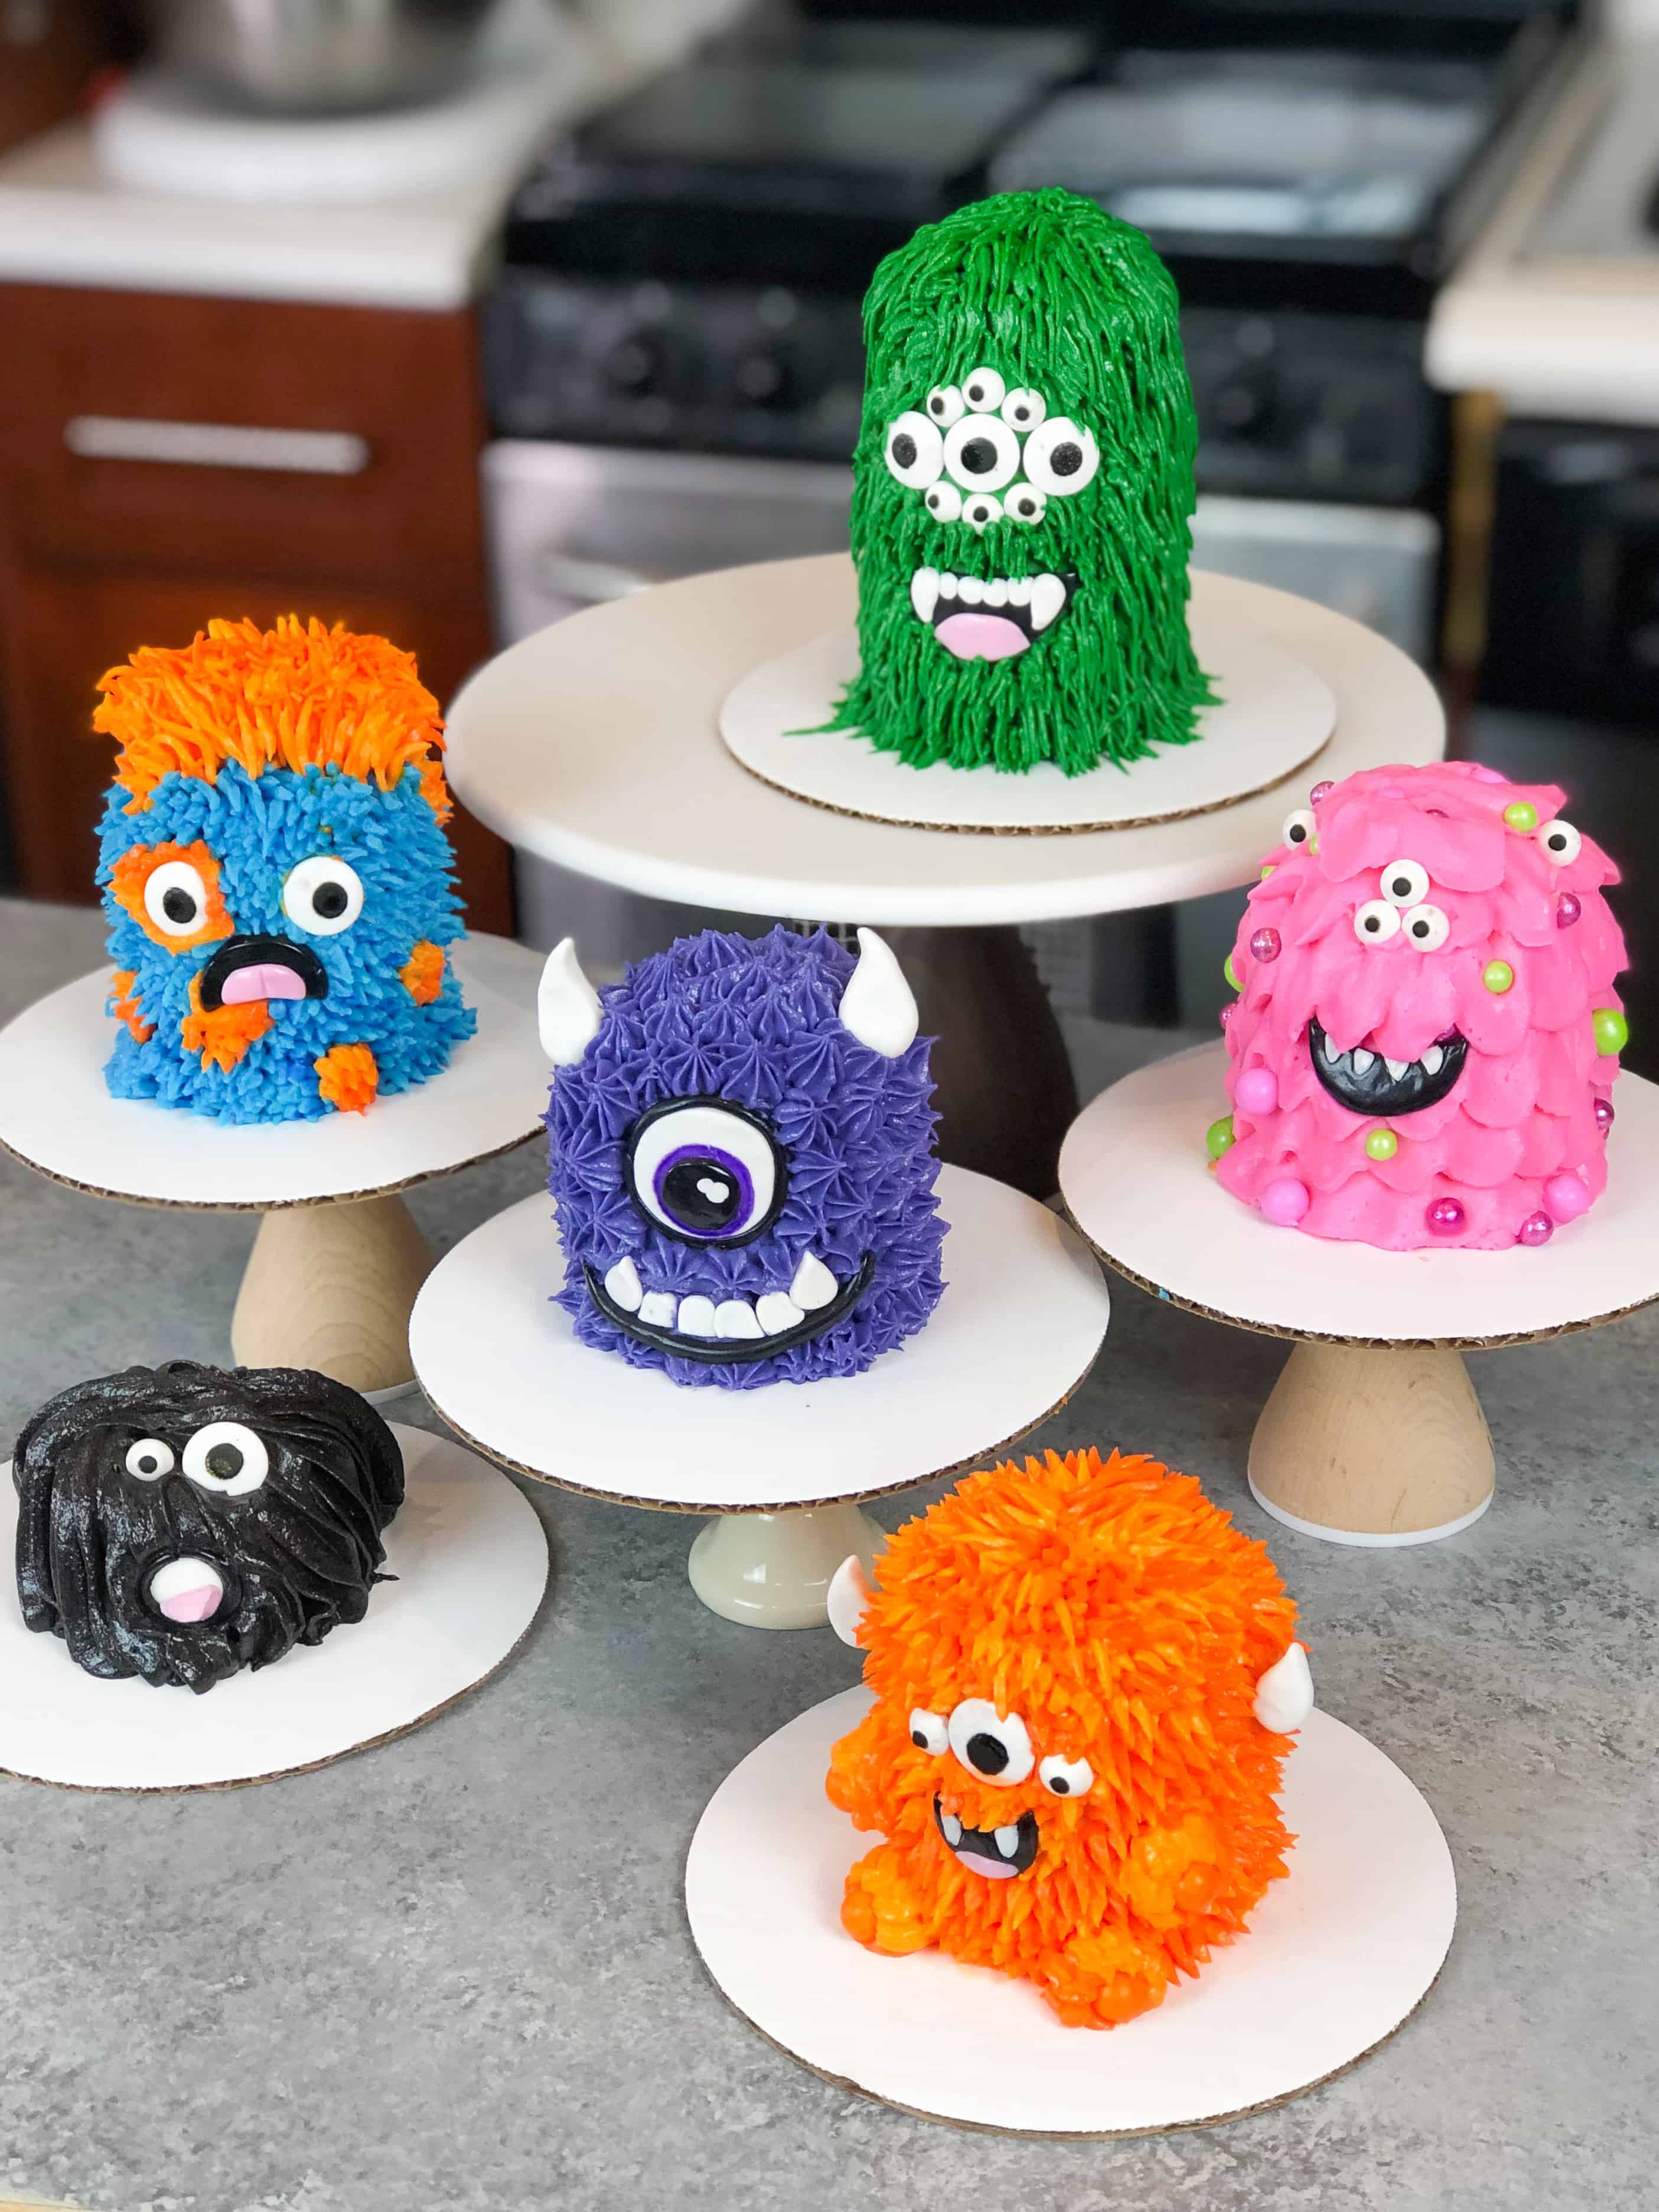
Monster Cakes
I really struggled with what to call these little guys. They’re made with stacked cupcakes and coated in buttercream frosting, so they really could be called monster cupcakes or mini-monster cakes!
To be totally honest, they’re more work than simply piping frosting onto a cupcake. In fact, they even have a crumb coat! That makes them seem like cakes to me. Little gremlin cakes 🙂
These are an absolute blast to make and would be a great activity to do with kids or friends to celebrate Halloween!
How to Make These Mini Monster Cakes
To make sure these mini monster cakes turn out as amazing as possible, let’s go through each step together! Or if you’re more of a visual learner, I’ve also included a video tutorial below.
Step 1: Make the Vanilla Cupcakes
The first step is to make the vanilla cupcake batter (sprinkles are optional!). This recipe uses my one-bowl vanilla cupcake recipe to make one dozen cupcakes.

This is enough cupcakes to make 6 mini cakes if you use two cupcakes per monster. However, you can get creative with this part too.
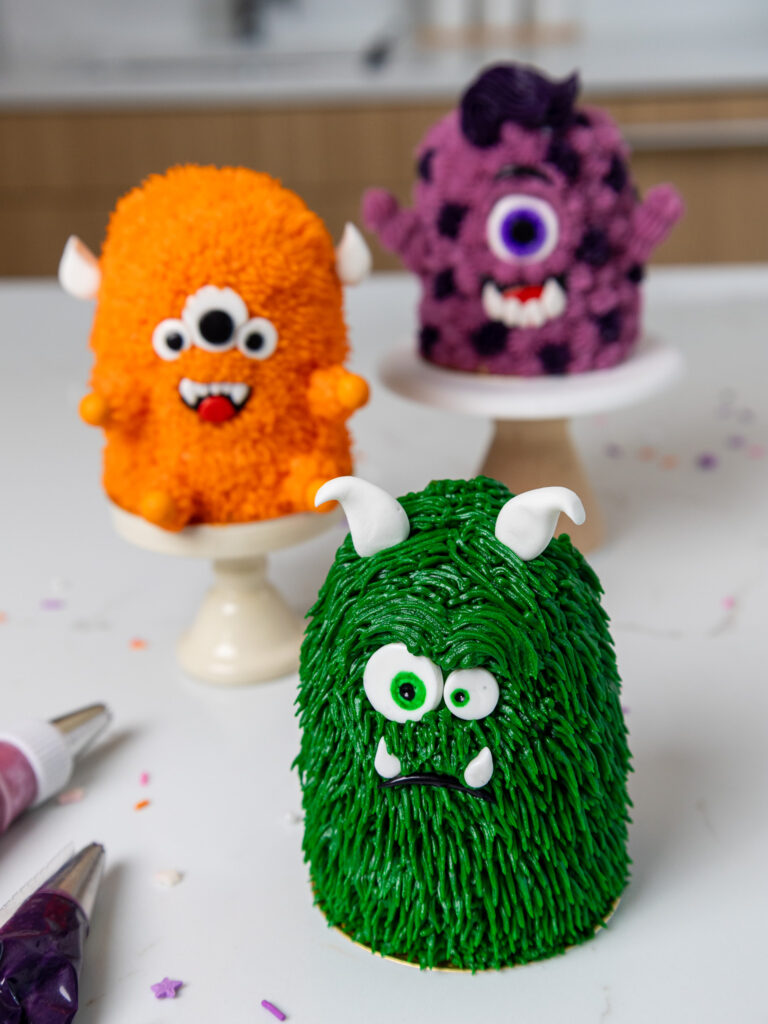
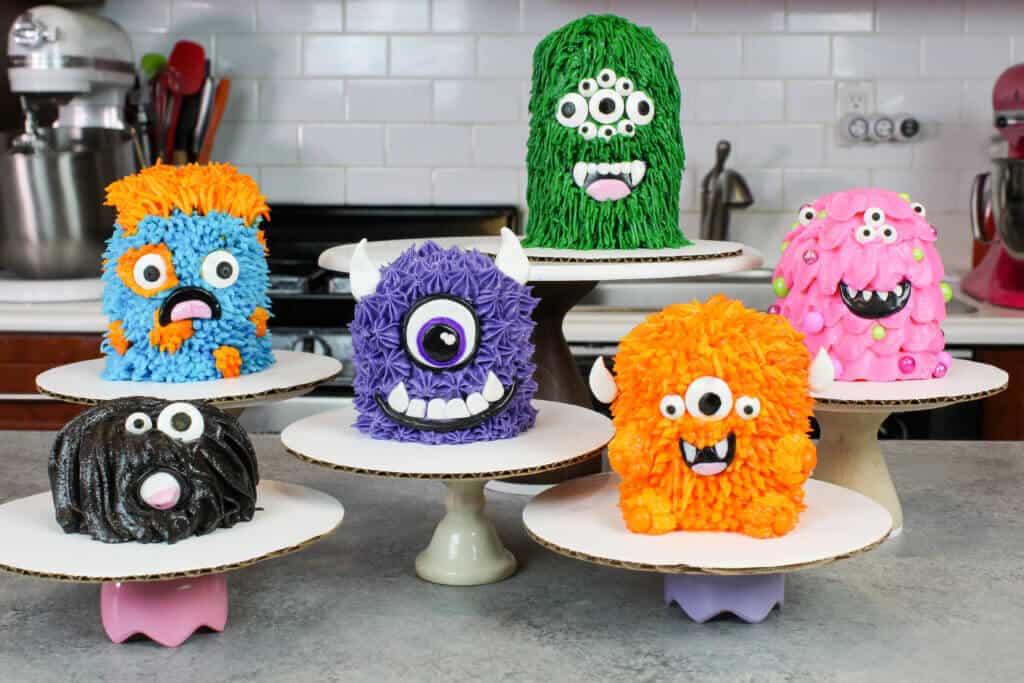
If you look closely, my green monster is made with three cupcakes, and the little black monster is made with just one!
I liked the way they looked with different heights, but you can stack them as high or as low as you want.
Step 2: Make the Buttercream
While the cupcakes bake and cool, make the buttercream frosting.
I like to frost these with my American buttercream because it’s my favorite frosting to pipe with, but any light-colored frosting would work.
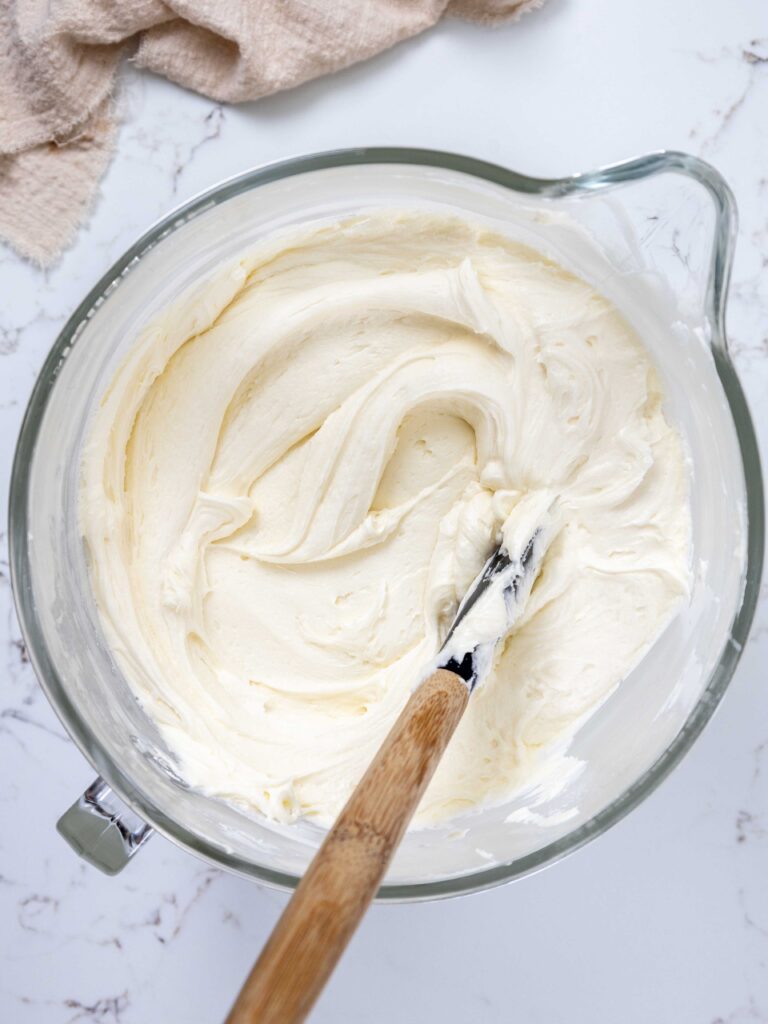
If you want to use a less sweet frosting, I’d recommend making a batch of my Swiss meringue buttercream or my hybrid buttercream.
Just be sure whatever frosting you use has a white base so that you can easily color it, and that it’s stiff enough to pipe with.
Once the frosting is made, divide it evenly between six bowls and color it with gel food coloring.
Leave one bowl of frosting uncolored to fill and crumb coat the little monster cakes. I colored the remaining bowls purple, orange, blue, green, and pink.
Place the colorful frosting into piping bags fitted with your favorite frosting tips. To make the fur on these little guys, I used the following frosting tips:
- Blue and orange monster: Wilton 234 frosting tip (large grass/fur tip)
- Black monster: Wilton 1M frosting tip (open star tip)
- Purple monster: Ateco 824 frosting tip (small French tip)
- Green monster: Wilton 231 frosting tip (smaller grass/fur tip)
- Pink monster: Wilton 104 frosting tip (petal tip)
- Orange monster: Wilton 234 frosting tip (large grass/fur tip)
Step 3: Stack and Crumb Coat the Cupcakes
Unwrap two cupcakes. Spread a dab of frosting onto a small, greaseproof cake board. This will help keep the cupcake stack in place on the board.
Place one cupcake in the center of the board. Spread an even layer of frosting on top of the cupcake, then top it with the second cupcake.
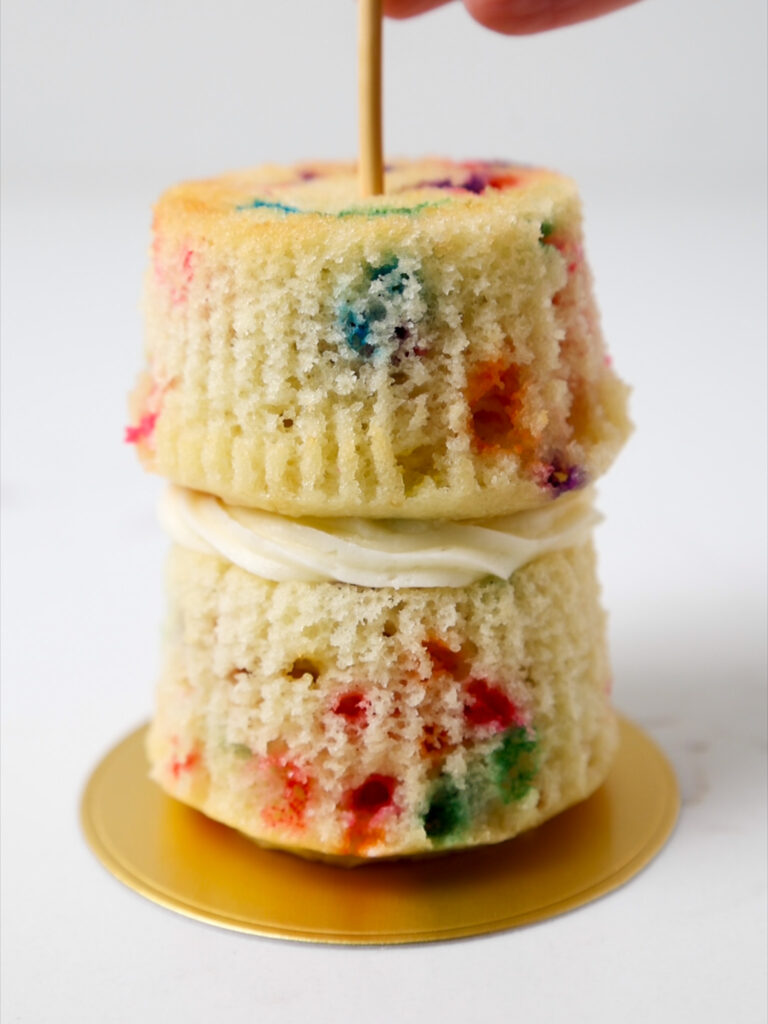
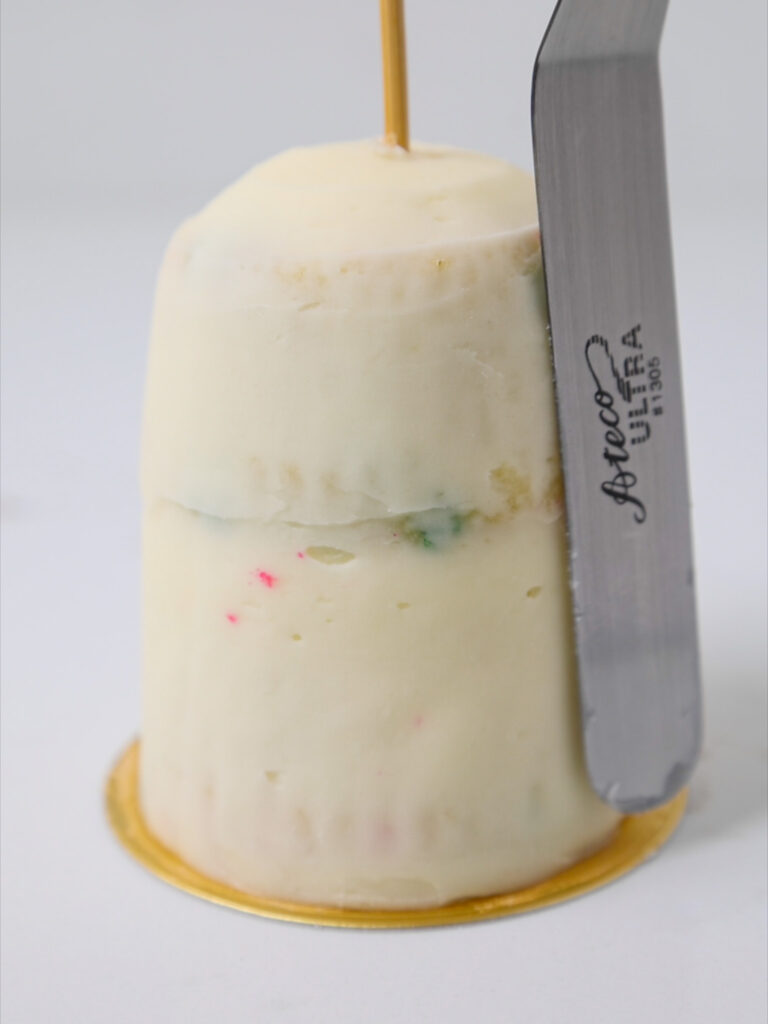
Insert a wooden skewer through the center of the cupcakes, then carefully cover the cupcake stack in a thin layer of frosting.
Freeze the stacked cupcakes for 5-10 minutes, until the frosting is firm to the touch.
Step 4: Frost and Decorate the Mini Monster Cakes
Remove the cupcake stack from the freezer and pipe on a second layer of frosting with colorful frosting.
After you’ve frosted your monsters, it’s time to add their faces. This is where your imagination can really run wild.
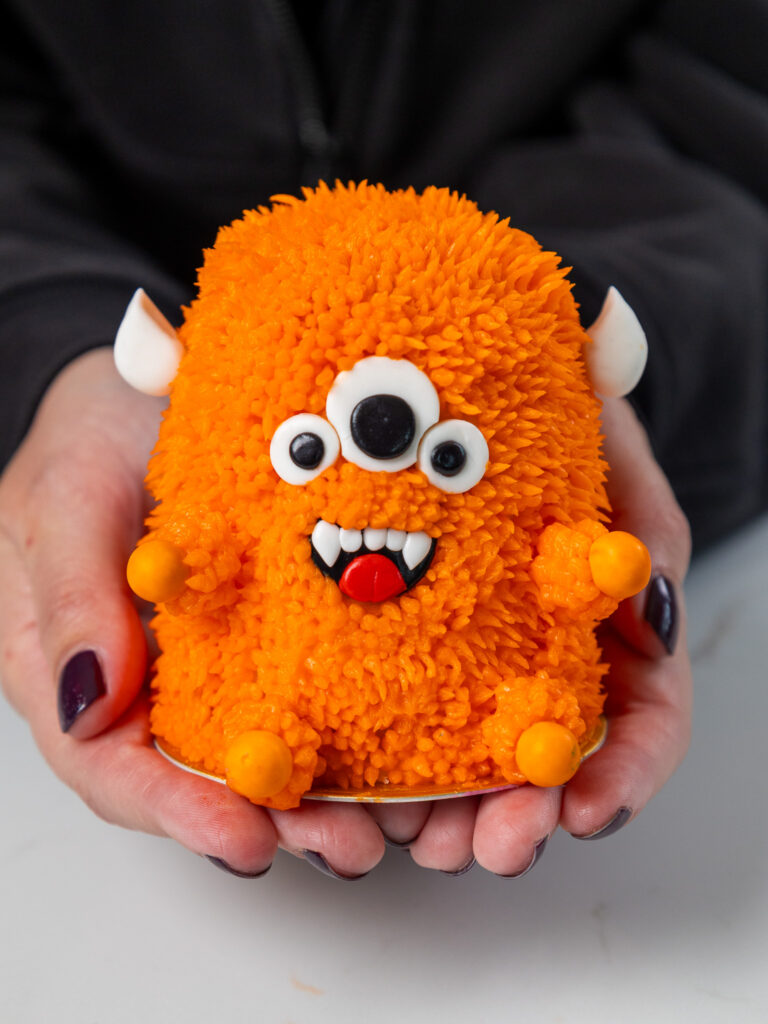
Add on sprinkle or fondant eyes and fondant facial features of your choice. Repeat with the remaining cupcakes, creating different colored monsters with a variety of expressions.
I used eyeball sprinkles (both large and small) and made one giant eyeball myself with black and white fondant.
The mouth of each monster is what really defines it. Is it scared? Maybe it’s happy?
Mine were mostly happy, but a couple were scared! I made the mouths by rolling out some black, white, and pink fondant and cutting them out with small circle cutters.
Tips for Making These Cutest Monster Cakes
- Insert a skewer or chopstick into the stacked cupcakes to make them easier to frost. Chill the stack with the skewer, then remove it as you pipe on the second layer of frosting.
- Thoroughly chill the crumb coat of each monster to help them keep their shape when it’s time to decorate.
- You can make the cupcakes for these monster cakes in advance! Unfrosted cupcakes can be frozen for up to 2 weeks if stored in an airtight container.
- You can also decorate the monsters ahead of time. Once the cupcakes/mini cakes are fully frosted, the buttercream will lock in all the moisture. They keep in the fridge for several days.
Let Me Know What You Think!
If you try making these monster cakes, I’d love to hear what you think! Please leave a rating, and let me know your thoughts by sharing a comment.
Or if you share your creations on social media, be sure to tag me @chelsweets!

Mini Monster Cakes
Ingredients
Vanilla Cupcakes
- 1 1/4 cup all-purpose flour 160g
- 1 cup granulated sugar 200g
- 1 1/2 tsp baking powder 6g
- 1/2 tsp fine salt 3g
- 1/2 cup buttermilk, room temperature 120ml
- 1/2 cup water, room temperature 120ml
- 1/4 cup vegetable or canola oil 60ml
- 1 large egg, room temperature 56g
- 1 Tbsp vanilla extract or vanilla bean paste 12ml
- 1/4 cup rainbow jimmies optional
Vanilla Buttercream Frosting
- 2 cups unsalted butter, room temperature 452g; 1 lb. box
- 1 Tbsp vanilla extract or vanilla bean paste 12g
- 1/2 tsp fine salt 3g
- 7 cups powdered sugar 907g; 2 lb. bag
- 3 Tbsp heavy whipping cream, room temperature 45g
Additional Decorations
- Eyeball sprinkles – optional
- White, black, and pink fondant
- Various frosting tips I used Wilton 233, Wilton 104, and Wilton 1M
- Gel food coloring I used sky blue, royal purple, orange, deep pink, and leaf green
- Small circle cutters for the mouths/teeth
- Wooden skewer or chopstick
Instructions
Vanilla Cupcakes
- Begin by preheating the oven to 350°F / 175°C and line a muffin pan.
- Whisk 1 1/4 cups all-purpose flour, 1 cup sugar, 1 1/2 tsp baking powder, and 1/2 tsp salt together in a large bowl.
- Make a well in the middle of the dry ingredients and add 1/2 cup of buttermilk, 1/2 cup water, 1/4 cup vegetable oil, 1 large egg, and 1 Tbsp vanilla extract into the opening. Whisk the wet ingredients together, then whisk them into the dry ingredients. Mix until the batter is smooth. If you want to add sprinkles, fold 1/4 cup of rainbow sprinkles into the batter.
- Divide the batter evenly between the cupcake liners, filling them about 3/4 of the way full. Bake for 18-20 minutes or until a toothpick comes out clean.
- Let the cupcakes cool for 10 minutes before moving them to a cooling rack to finish cooling. If you want to accelerate the cooling process, pop the pan into the freezer for about 30 minutes.
Vanilla Buttercream
- Beat 2 cups of unsalted butter on a medium speed for 30 seconds until smooth with a paddle attachment / stand mixer or a hand mixer.
- Mix in 1 Tbsp vanilla extract or vanilla bean paste and 1/2 tsp salt on a low speed.
- Slowly add in 7 cups of powdered sugar while mixing slowly on the lowest setting. Halfway through add in 3 Tbsp of heavy cream or milk to make it easier to mix. I like to place a kitchen towel over my mixer to contain any powdered sugar clouds.
- Mix on low until the ingredients are fully incorporated and the desired consistency is reached. Scrape the sides and bottom of the bowl as needed with a rubber spatula.
- If the frosting seems too thick, add additional cream (1 Tbsp at a time). If the frosting is too thin, add more powdered sugar (a quarter of a cup at a time).
- Divide frosting evenly between six bowls and color with gel food coloring. Leave one bowl of frosting uncolored to fill and crumb coat the little monster cakes. I colored the remaining bowls purple, orange, blue, green, and pink.
- Place the colorful frosting into piping bags fitted with your favorite frosting tips. I used a small grass tip and a small French piping tip to make the monsters look furry.
Monster Cake Assembly
- Unwrap two cupcakes. Spread a dab of frosting onto a small, greaseproof cake board. This will help keep the cupcake stack in place on the board.
- Place one cupcake in the center of the board. Spread an even layer of frosting on top of the cupcake, then top it with the second cupcake.
- Insert a wooden skewer through the center of the cupcakes, then carefully cover the cupcake stack in a thin layer of frosting.
- Freeze the stacked cupcakes for 5-10 minutes, until the frosting is firm to the touch.
- Remove the cupcake stack from the freezer and pipe on a second layer of frosting with colorful frosting.
- Add on sprinkle or fondant eyes and fondant facial features of your choice. Repeat with the remaining cupcakes, creating different colored monsters with a variety of expressions. You can also stack up to 3 cupcakes to make a taller monster, or avoid stacking all together and make shorter monsters using 1 cupcake.
Video
Notes
Nutrition
Other Recipes You Might Like:

Thank you for posting these cute little monsters. I saw them on your last post and thought what a great idea to do with the grand children. Very creative and so cute. Thanks again.
Aw thank you Deborah!! These definitely would be a blast to make with grandkids 🙂
Does the buttercream recipe make enough to decorate all the monsters or should we double! This is so cute. I can’t wait to surprise my girls with this for Halloween !
It was enough for me, since there isn’t much on the sides around the cupcakes!! But you can always make a little more if you want, and save any leftovers in the fridge for another project <3 Happy baking Jodi!
I will be making these little monsters for a fall festival atmy church next week, they are wonderful. I am a Junior in highschool preparing to be a baker at a highschool, trade school near me.
That’s so fun Mackenzie! I’m sure your church will love them, and that you have a bright future as a baker <3
I made a couple of the monster cakes for my daughter’s birthday. I love the way they turned out. I got many complements. Thanks for the great ideas. I’ll be posting them on Instagram and I’ll tag you in them. Would mean the world to get your opinion.
Hi Alysia! I’m so happy to hear that 🙂 Yes please do, I’d love to see them!!!
Hi.. I did one tonight, almost nailed it.. just gotta watch it again before putting together heheh
Hi Jennifer!! haha stacking the cupcakes can def be a little tricky! But don’t worry, they get easier as you make more of them, I promise 🙂
Hi I wanted to see if you ever had a chance to check out the cakes i made of the little monsters? I tagged you on Instagram. Would love your feedback. Trying to build my confidence to bake for others outside my family. Lol. Your opinion will mean the world to me. ?
Hi Chelsea. Can you tell me if you were able to take a peek at my monster cakes?
This is such an amazing idea !! Must practice my frosting . Btw how much frosting you used for all this monsters?
Thanks Angelique! I used about a half batch of my American buttercream frosting, which is included in the recipe for these little guys 🙂
Hi! Can I use whipped cream frosting?
These are so cute! I would like to do this with kids – is there one decorating tip to use that you think would be the easiest for young kids?
What do you think about substituting coconut cream for the heavy whipping cream in your frosting recipe?
Your recipes/instructions were awesome (especially for this non baker). With the help of my Daughter in Law we made 16 of these monster cakes for my grandson’s monster themed bday. They were a hit. I learned about and made fondant. We had fun cutting out shapes/designs (eyes, mouths, spits, ears, etc). They turned out great! Thanks!!
Do you have any tips for transporting these little cakes?