
Chocolate Ganache Drip Recipe
This 2-ingredient chocolate ganache drip is the easiest way to get clean, bakery-style drips on a cake.
It’s made with chocolate and heavy cream, and comes together in about 5 minutes.

This Recipe at a Glance
- Ingredients: Chocolate + heavy cream
- Time: ~5 minutes + cooling time
- Best on: Chilled buttercream cakes
- Tools: Bottle, spoon, or offset spatula
- Yield: ~3/4 cup (enough for two 8-inch cakes)
The Easiest Recipe: Milk Chocolate and Heavy Cream
Just because chocolate drip cakes are beautiful doesn’t mean they have to be complicated. Let’s start by discussing the most basic part of a chocolate drip, the ingredients it’s made with!
The best part of my chocolate ganache drip recipe is that it’s made with only two ingredients.
All you need is half a cup of milk chocolate chips and some heavy cream. If you can’t find heavy cream in your grocery store, you can also use heavy whipping cream.
Don’t worry if you’re not in the US! I’ve also included the metric measurements below. So no matter where you’re making this drip, you can use this recipe.
For reliable drips, use heavy cream. Lower-fat dairy can work in a pinch, but it often makes a thinner ganache that won’t set as well.
The ratio of milk chocolate to heavy cream is super important in this recipe. Because of the chocolate in the mixture, it will thicken as it cools.
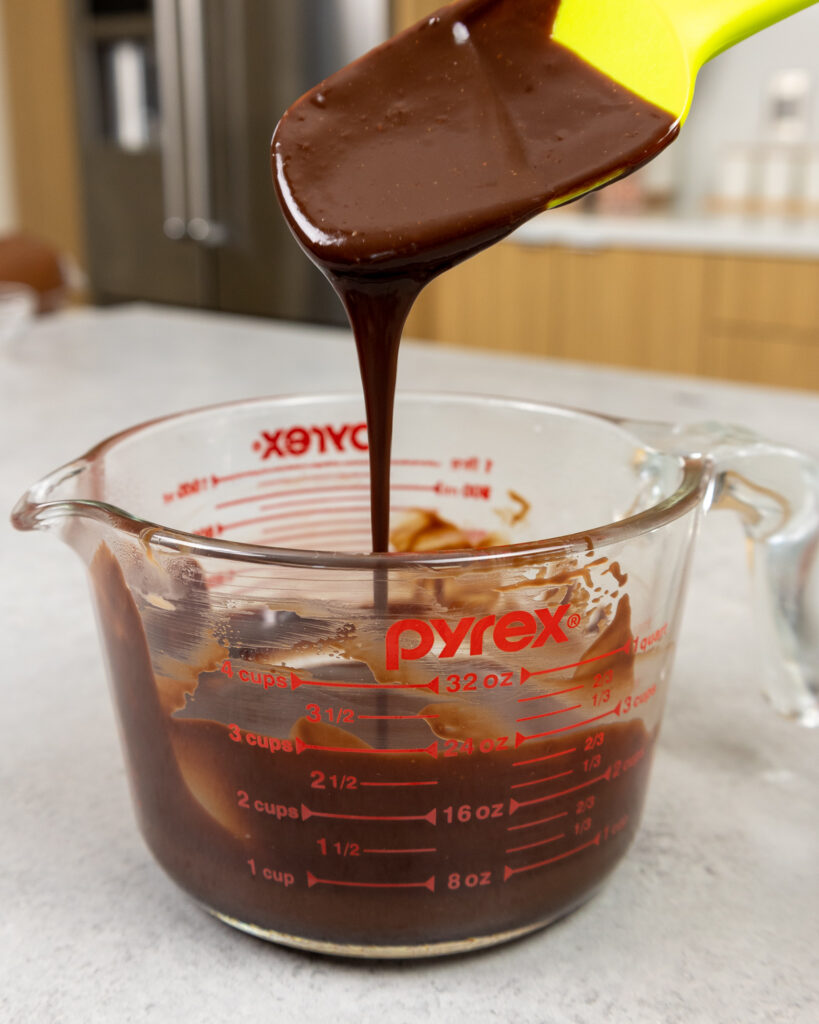
Having the ganache at the right temperature allows you to create those beautiful, perfect drips.
How To Make Perfect Chocolate Drips
Drip cakes don’t have to be scary, but there are a few things to keep in mind to make sure you get that perfect drip look! The most common issues include:
- Runaway drips that run straight to the bottom of the cake
- Thin, watery drips that look more like streaks than drips
- Ganache that seems to melt the buttercream, and does not keep its shape
- Short, stubby drips that (sadly) look like candle wax
Most of these problems are caused by adding the chocolate ganache to a cake when it isn’t at the right temperature.
You can also have issues if the cake isn’t properly chilled. If you follow my drip tutorial below, I promise you can avoid all of these issues!!
Step #1: Chill Your Cake!!
My first tip is to make sure your cake is properly chilled.
Once frosted, you should allow the cake to sit in the fridge for at least 20 minutes, or in your freezer for 10 minutes. This makes the frosting cold and firm to the touch.
Chilling the cake helps the buttercream keep its shape, and not “melt” when the slightly warmed ganache is added to it.
It will also slow down the speed at which the drips run down the cake.
Step #2: Getting the Ganache to Just the Right Temperature
My second tip is to make sure your chocolate ganache is the right temperature!! It should be just slightly warmer than room temperature.
If your ganache is too warm, it will be thinner than you want and will run straight down the cake.
On the other hand, if it’s not warm enough, you will end up with short, stubby little drips.
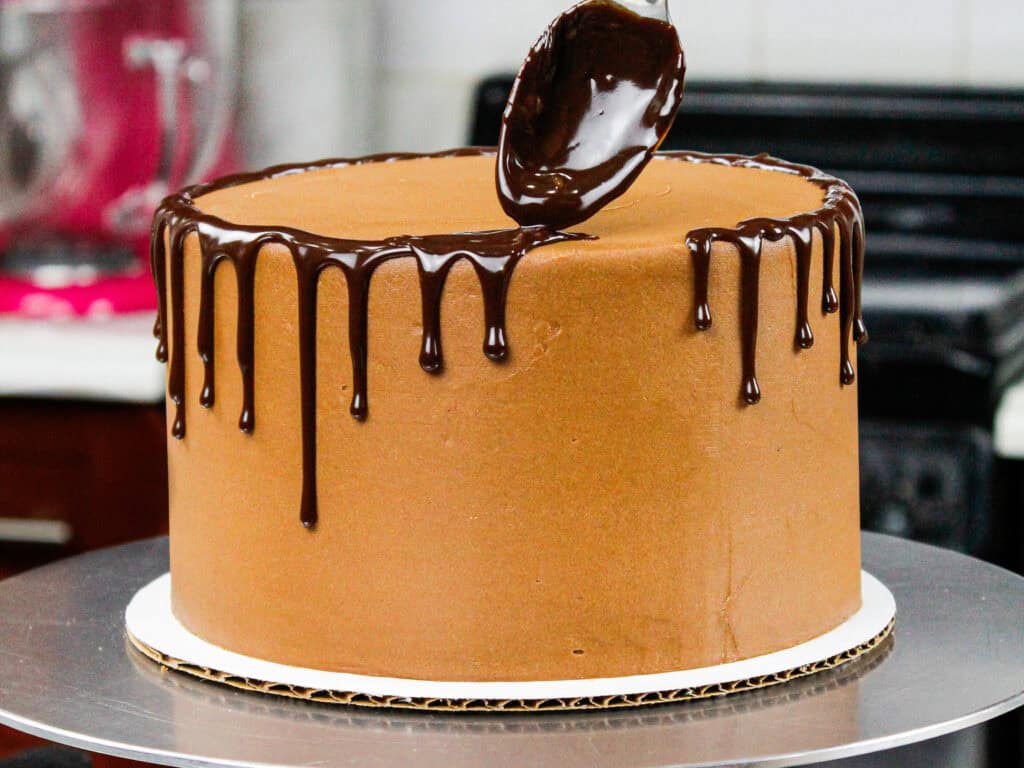
Step #3: The Test Drip
The best way to ensure your ganache is the right temperature is to do a test drip.
Make a single drip on the side of your cake, and let it flow. Allow it to slowly run down the side of the cake, and see where it stops.
If it’s the length and look you’re after, then go ahead and add drips to the rest of the cake.
If you’re more of a visual learner, here is a video tutorial showing exactly how I add drips to my cakes. Note: Older videos mention equal parts. The ratio in the recipe card below is the most current and gives the most reliable drips.
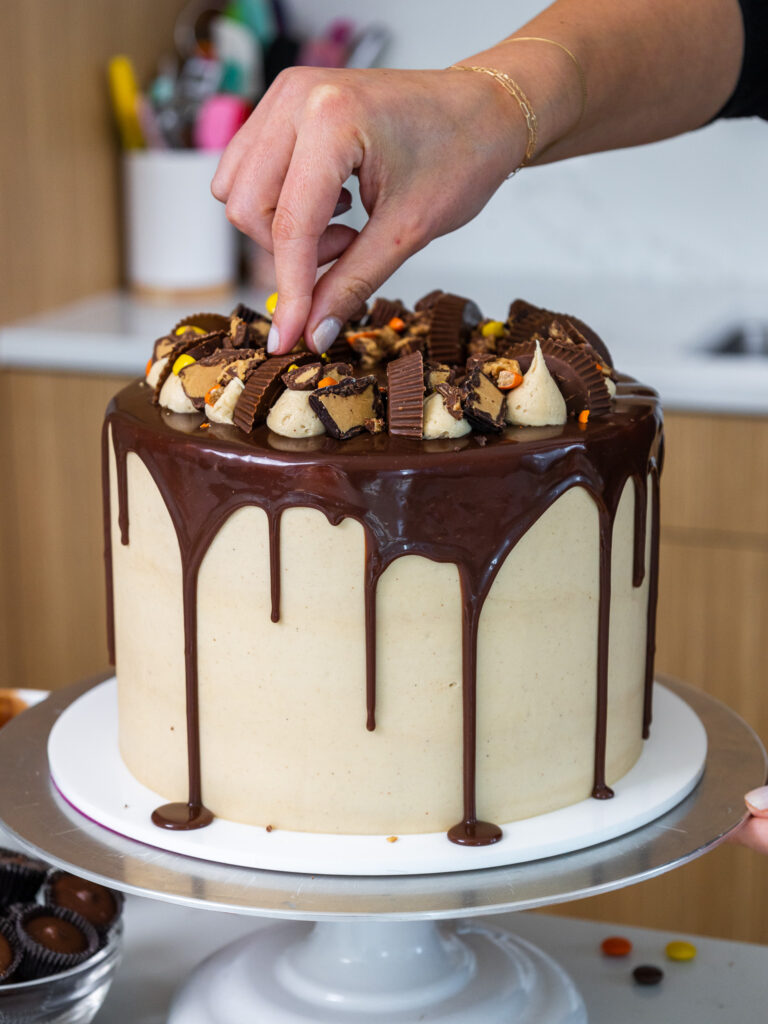
Techniques For Adding Chocolate Drips To The Cake
There are two ways to easily add colored drips to a cake. One way is to use plastic bottles.
I prefer this method since it makes the process so much easier. The ganache is contained in the bottle and can also easily be heated or chilled.
If you don’t have any plastic bottles on hand, you can also use a spoon or a small offset spatula.
With either tool, you can carefully push the ganache over the edge of your cakes, creating each drip.
Tips for Making the Best Chocolate Drip
- Use this drip recipe on any type of buttercream cake as long as it’s chilled.
- I prefer using Ghirardelli milk chocolate chips, but any milk chocolate chip (or finely chopped milk chocolate bar) will work.
- If you want to use dark chocolate, add a Tablespoon of heavy cream to give the ganache the right consistency.
- Candy melts cannot be swapped for the chocolate in this recipe! They are not interchangeable.
- Be sure you use heavy cream or heavy whipping cream! You need the high-fat content to create the right consistency in this recipe.
- To make colorful drips on a cake, use my white chocolate ganache drip recipe.
Making This Chocolate Drip Recipe in Advance & Storage Tips
Make this chocolate drip recipe ahead of time or save leftovers! Once it’s made, wrap the bowl with plastic wrap or cover the top of the plastic bottle and store it in the fridge for up to 3 weeks.
To use chilled ganache, heat the bottle or bowl in the microwave for 10-second intervals until it reaches the right consistency.
Use leftover ganache to top cupcakes, cookies, or even ice cream!
Troubleshooting
Why did my drips run all the way down the cake?
- Cake wasn’t chilled long enough (buttercream should feel firm).
- Ganache was too warm. Cool it slightly and do a test drip.
Why are my drips short and stubby?
- Ganache is too cool/thick. Warm for 5 seconds and test again.
Can I use this as a cake filling?
This drip ganache is a bit thin for filling at room temperature. If you want a ganache that holds up between layers, use a thicker ganache ratio instead.
Why did my ganache look thin or not set?
- Lower-fat dairy (milk/half-and-half) can make ganache too thin. Use heavy cream for reliable results.
Why did my drips crack after refrigerating overnight?
Most likely, the ganache went on slightly too warm or too thick, then set unevenly. Let it cool a bit more before dripping, and keep the drip layer thinner.
Frequently Asked Questions
Can I make this without a microwave?
Yes! Heat the cream on the stovetop until it just starts to simmer, then pour it over the chocolate.
Can I use semi-sweet or dark chocolate?
Yes. Dark/semi-sweet can set thicker, so you may need a tiny bit more cream or a slightly warmer drip.
Does it set hard?
It firms up in the fridge but won’t be rock-hard. For best slicing, use a warm knife.
Do I need to refrigerate the cake after dripping?
I recommend it! Chilling helps the drips set and keeps them neat.
Let Me Know What You Think!
If you try this chocolate drip recipe, I’d love to hear what you think of it! Leave a rating and comment below.
Don’t forget to tag me @chelsweets and use #chelsweets so I can see your beautiful creations on social media!
Chocolate Drip Recipe
Ingredients
Chocolate Drip Recipe
- 1/2 cup milk chocolate chips 85g
- 1/3 cup heavy whipping cream, room temperature 80ml
Instructions
- Place 1/2 cup milk chocolate chips in a heatproof bowl and set aside.
- Heat 1/3 cup of heavy cream in a heatproof bowl in the microwave until it's steaming and just starting to bubble (takes about 45 seconds in my microwave).
- If you don’t have a microwave or prefer to use the stove top, you can heat the cream over medium heat in a pan until it begins to simmer. Remove from heat.
- Gently pour the heavy cream over the chocolate chips, making sure they are covered with cream. Allow the mixture to sit for 1-2 minutes.
- Stir slowly until the cream and chocolate are fully combined and the ganache is silky smooth. Pour into a plastic squirt bottle to easily add drips to a cake. If you don’t have any plastic bottles on hand, you can also use a spoon to drizzle it over cakes.
- Let the mixture cool for about 10 minutes, or until it's just slightly warm to the touch.
- Make a test drip on the back of the cake to check the consistency of your ganache. If the test drip seems too thick, try heating up the ganache for 5-10 additional seconds in the microwave. If the mixture seems too thin, allow it to cool a bit longer, then try another test drip.
- Once the test drip looks how you want it to, add the ganache around the sides of the cake and top of the cake if desired. The drips should set on the cold cake, but you can also pop the cake in the freezer to help lock the drips in place.
Video
Notes
Additional Tips for Making the Best Chocolate Drip
- Use this drip recipe on any type of buttercream cake as long as it’s chilled.
- I prefer using Ghirardelli milk chocolate chips, but any milk chocolate chip (or finely chopped milk chocolate bar) will work.
- If you want to use dark chocolate, add an additional Tablespoon of heavy cream to give the ganache the right consistency.
- Chocolate candy melts cannot be swapped for the chocolate in this recipe! They are not interchangeable.
- Be sure you use heavy cream or heavy whipping cream! You need the high-fat content to create the right consistency in this recipe.
- To make colorful drips on a cake, use my white chocolate ganache drip recipe.
Making This Chocolate Drip Recipe in Advance & Storage Tips
Make this chocolate drip recipe ahead of time or save leftovers! Once it’s made, wrap the bowl with plastic wrap or cover the top of the plastic bottle and store it in the fridge for up to 3 weeks. To use chilled ganache, heat the bottle or bowl in the microwave for 10-second intervals until it reaches the right consistency. Use leftover ganache to top cupcakes, cookies, or even ice cream!Nutrition
Other Recipes You Might Like:
Can you give directions that do not require using a microwave oven?
I just updated the post to add stove-top instruction 🙂
Thank you
Sent from Katie Bachand’s cell phone
Me encanta todo lo que haces. Delicia
so happy to hear that 🙂
Can you use this for lines on the cake too? And could you use it to make shapes on the top?
Yup! Sadly it’s not thick enough to make shapes or mold into anything! You can make modeling chocolate for that though!
Does this recipe make enough to cover the whole top of the cake as well as the drips down the sides?
Depends on the size of the cake, but yes definitely for an 8 inch cake!
i used half and half instead of heavy cream. it is not setting up. i don’t know what to do.
If I’ve buttercreamed a cake and then put the ganache on the same day, can I store it in the fridge for 2 nights?
Oh, and if so, how long befroe serving do you take it out of the fridge?
Hi thank you for all your informative posts on drip cakes! Would it work if I use a bar of white melting chocolate instead of chocolate chips? If I chop up the chocolate into small pieces ?
Thank you
And I would follow the recipe for the white choc ganache
here is the recipe for white chocolate ganache, the ratio is different: https://chelsweets.com/2016/08/28/colored-drips-recipe-white-chocolate-ganache/
it would definitely work! Yes, just chop it up into small bits and you’ll be good to go 🙂
what type of frosting do you use on the cake? It is so smooth it almost looks like fondant!
i use american buttercream! the recipe can be found here: https://chelsweets.com/2016/11/01/the-best-american-buttercream-recipe/
Hello! Thank you for all of your cute tutorials; I absolutely love them! I do have one question though, would the ganache still work even if I frosted the cake using a cream cheese buttercream? I assume the cake would still need to be a good temperature no matter the type frosting but would that make much of a difference?
aw you’re too sweet! the ganache will still work on a cream cheese buttercream!! as long as the cake is chilled you’re good to go!
Thank you so much! 🙂
Hi! I love your creations and your tutorials. Thank you for sharing it all!!! Does this drip ganache firm up enough to paint with edible metallic paint? Thank you and wish you continued success!!!!!
It’s not quite firm enough to paint on sadly! I think you’d want to use straight melted chocolate or candy melts if you want to paint it 🙂
Hi I’m from Germany and we don’t have Heavy Cream, but similiar stuff. So I’m just wondering what percentage is the fat in Heavy Cream? I found pretty much everything from 5%-50%.
Thanks so much,
Nina
Hi there! I have a question…will the chocolate ganache drip harden after it’s on the cake? I’m planning on making this for my son’s birthday the day before we actually eat it. Also, should I store it in the refrigerator? I live in Florida and it will be hot and humid later this week. Thank you for your help!! Your tuition video is very helpful!!
It doesn’t get completely solid, but they should keep in place once the cake is placed in the fridge to keep overnight! As long as it’s indoors, they should be fine as you allow the cake to warm back to room temp before eating it. I don’t think it’d hold up well in direct sunlight or really high temps though!
congratulation for your site ……Can i make the chocolate ganache some days earlier(with color or not) ? how can I maintain it and for how long?….th?nk you 🙂
yes, it can be made in advance! It keeps in the fridge for up to 2 weeks!
Love your tutorials!! Thank you for being so informative. Can this recipe be used as a filing in between layers? Would it have to be cooled completely? I’m making a chocolate cake with a cream cheese buttercream frosting.
This one is too thin, but I have a “ganache frosting” recipe which is thicker, and perfect for filling a cake! It’s the same ingredients, just a different ratio 🙂
I made this last night, and it was delicious. Everyone loved it. However, I felt like it was a little thick. I squeezed it from a bottle, and a bunch was stuck to the bottom. It only cooled about ten minutes. Should I increase the ratio of heavy cream? Mine didn’t drop as far as yours in your videos but it didn’t cool as long as yours did in these instructions.
Yah, it vary based on the type of chocolate you use (milk, dark, size of chocolate pieces), and how warm you heat it up to be!! If you find it thick, I’d definitely recommend adding a bit more heavy cream! Or you can let it cool for a shorter period of time, and use it when it’s a bit warmer <3
Hi, I love everything you do. I follow you from Spain!
In the video tutorial that shows the drip you use a dark chocolate for the sides and it seems that for the top part it is lighter. Is it milk chocolate?
Is the same proportion of ingredients used as with dark chocolate?
Thank you!!
Aw thanks, you’re too sweet! I think that’s just the lighting and my camera! I usually just make one batch for a cake! You can use milk or dark chocolate, but you will need slightly more heavy cream with dark chocolate than milk chocolate!
In the video you said you use equal parts chocolate to heavy cream but in your recipe on your site it’s different. It’s 1/3 cupheavy cream to 1/2cup chocolate. Which is better?
I’ve slightly updated the recipe, to use a tiny bit more chocolate! I recommend following my recipe! 🙂
Can you add black americiolor gel to this to make it a true black?
Also can you drop this over fondant?
you can definitely make a black drip with americolor black gel food coloring. I have never added it over fondant, only chilled buttercream. I don’t think it would work well on fondant, because the cake needs to be chilled ?
Hello Chelsea,
Someone asked me for a cake with pink driping for a fondant covered cake. Is there a way to do it right or do I have to tell the cliente that it will have to be a buttercream cover?
I would recommend suggesting to the client that drips should be done on a buttercream cake! <3
Yum. Should I refrigerate the cake after applying the drips?
Hi Maude! I would say yes, it’s a good idea to chill the cake once adding the drips, to help them set!
Hi Chelsea!
Do you think the ganache drip on the cake would be safe sitting out for a while after being refrigerated over night? Taking it for a party and there’s no room in the fridge in my office.
Thanks!
Hi Bailey! A cake decorated with this ganache can definitely sit out for a few hours the day of!! 🙂
Please can the dripping also be done on royal icing ?
Hi Jaan,
I’ve never tried it with royal icing, so sadly I’m not sure! Sorry I can’t be of more help!!
Will semi-sweet chocolate chips work ok? And if so, do I need to add more heavy cream? Thank you!
Hi Susan,
Semisweet chocolate chips should work just fine! But sometimes I find I need to add a bit more heavy cream because it has less cocoa butter in it that milk chocolate. So feel free to adjust the ratio as needed until the consistency of your test drip looks good. Hope that helps, happy baking!
I don’t have heavy cream at my grocery store but I have seen your TIkTok a and you said it was ok to use Harvey whipping cream nah oh is the only thing my store sells so would that be ok to use?
Hi Lukas,
That’s awesome that you saw my TikTok video for this! You can use heavy whipping cream in place of the heavy cream in this recipe. Hope that helps, happy baking!
I came across your website by accident and have spent ages looking at the amazing recipes. I couldn’t believe it was you from Tiktok! I am going to try the ganache. 🙂
That’s awesome!! You’re too sweet emma 🙂 hope your ganache turns out great!!
Hi, I love your cakes & your skills! Thank you for sharing! I usually don’t bake my own cakes except for banana bread which is easy. So now during this pandemic I’ve decided to try it out. I’m in the process of making your Oreo Butter Cream cake for my sons graduation. He loves Oreos! Ive completed the buttercream in advance & would like to make the ganache for the drip. I see you also add it in between layers atop the Oreo crumbs, is this the same recipe as the drip? Thx!
I love your videos and cakes I have a ? If you have a icing recipe that’s calls 300grams of crisco and 600 grams of conf sugar how much would that be for cups thanks sara
I discovered you on TikTok and love your style! I made a gorgeous cookies and cream Father’s Day cake for my husband using your butter cream recipe and your ganache recipe/technique from the YouTube video. Thanks for all the great tips!
Can I use non-dairy (liquid) whipping cream for this instead of the heavy cream?
Can i use whipping cream instead??
Hey Chelsea, I think the ingredients measurement and the directions measurement are mixed up…
It says 1/3 cup cream and 1/2 cup milk choco chips in the ingredients whereas in directions it mentions 1/3 milk choco chips and 1/2 cup heavy cream.
Hi Chels love your work, I noticed the recipe had 1/3 cup of heavy cream and 1/2 of chocolate BUT INSTRUCTIONS has 1/2 cup hvy cream and 1/3 cup of chocolate ( REVERSED) . So what’s correct
Hi, how would you make this drip black?
Love the fact that I can reheat to use this for upto a month!!! Now I always have a bottle stash in my refrigerator! Thanks for sharing:)
Can you swap out for a darker chocolate with the same amount?
Love your recipe!! Do you have any advice or know why after refrigerating all night, I sometimes get cracks in the ganache drip??
Hi Julia,
Thank you! I’ve never run into that before, but my best guess would be that either the ganache is too hot when it’s poured and it’s melting the frosting underneath a bit, or it’s too warm and the top is setting faster than the warm ganache can beneath it. I’d suggest seeing if you can let it cool down a tiny bit more before pouring it and see if that helps! Hopefully it does but let me know either way!! Happy baking!
hi just a quick question, in the video you say equal amounts of heavy cream and chocolate chips but in the recipe above you list 1/2 cup chocolate chips and 1/3 cup of heavy cream. which one do i go by?
Hi Tricia,
Great question and apologies for any confusion! That video is from six years ago and I’ve slightly tweaked the recipe since then as I found the ratios in the recipe card work better.
In general, my recipe cards are always the most up to date, so if there is a discrepancy between an old video and the recipe card, I recommend following the recipe card. Hope that helps for the future, happy baking!!
Hi. Can this be used as a filling for a cake? Thank you
Hi Megan,
This ganache is a little bit thin for filling a cake. It does firm up when it’s cold, but I think it might be too thin when it’s room temperature or slightly warm. I’d recommend using my chocolate ganache frosting, here’s the link: https://chelsweets.com/dark-chocolate-ganache-cake-filling/
I also use it to fill my macarons and it has a great texture at room temperature. It should be firm enough to hold up as a cake filling. Hope that helps, happy baking!
Hello! You mention to use this ganache drip with buttercream… can it be used with your chocolate whipped cream frosting or will it become a mess? THANK YOU!
Does this need to be refrigerated once on the cake (or any extra)?
Hi Allie,
Great question! I would store a cake that has ganache drips on it in the fridge, and I would also store any leftover ganache in the fridge. Hope that helps, happy baking!