
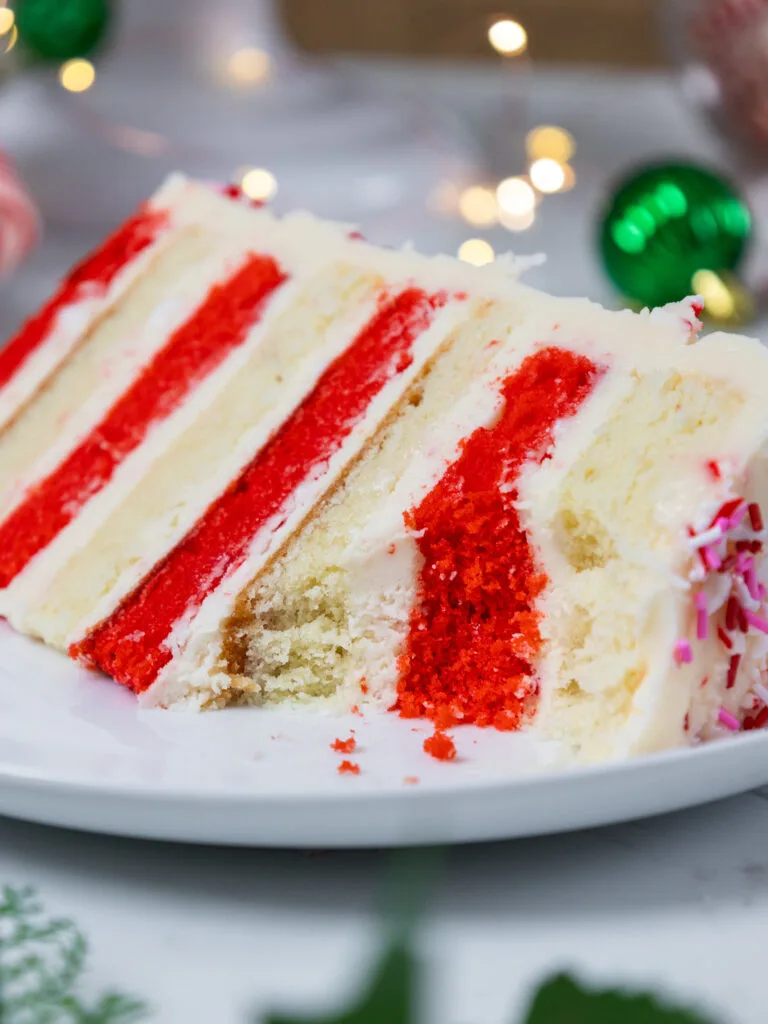
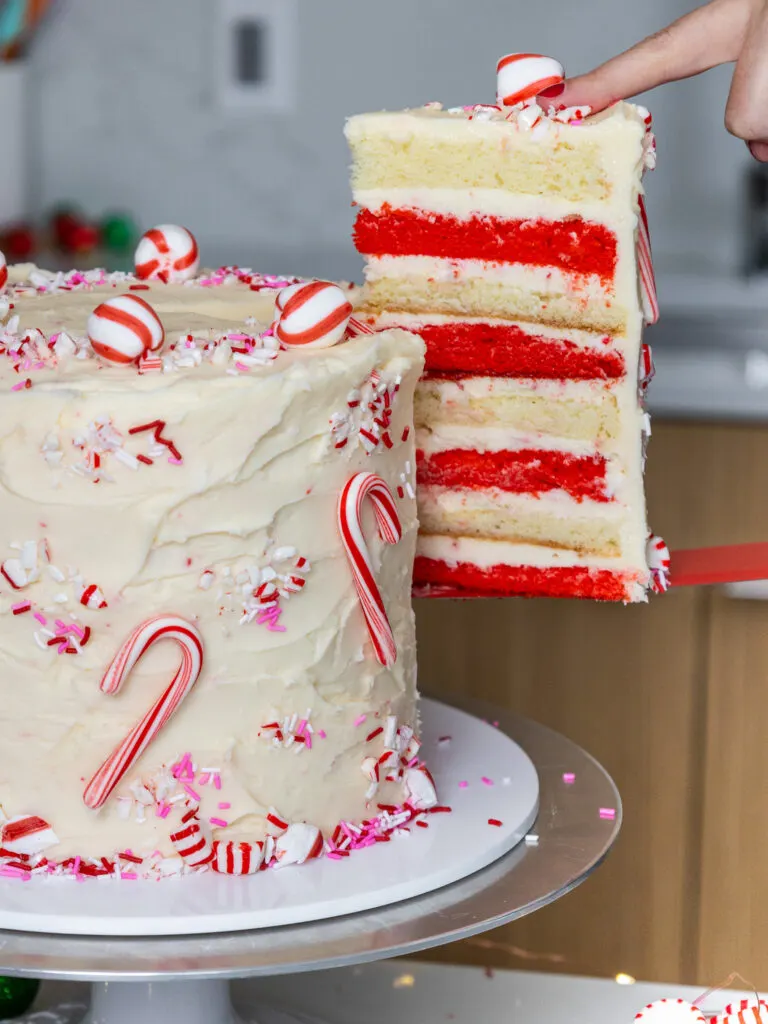
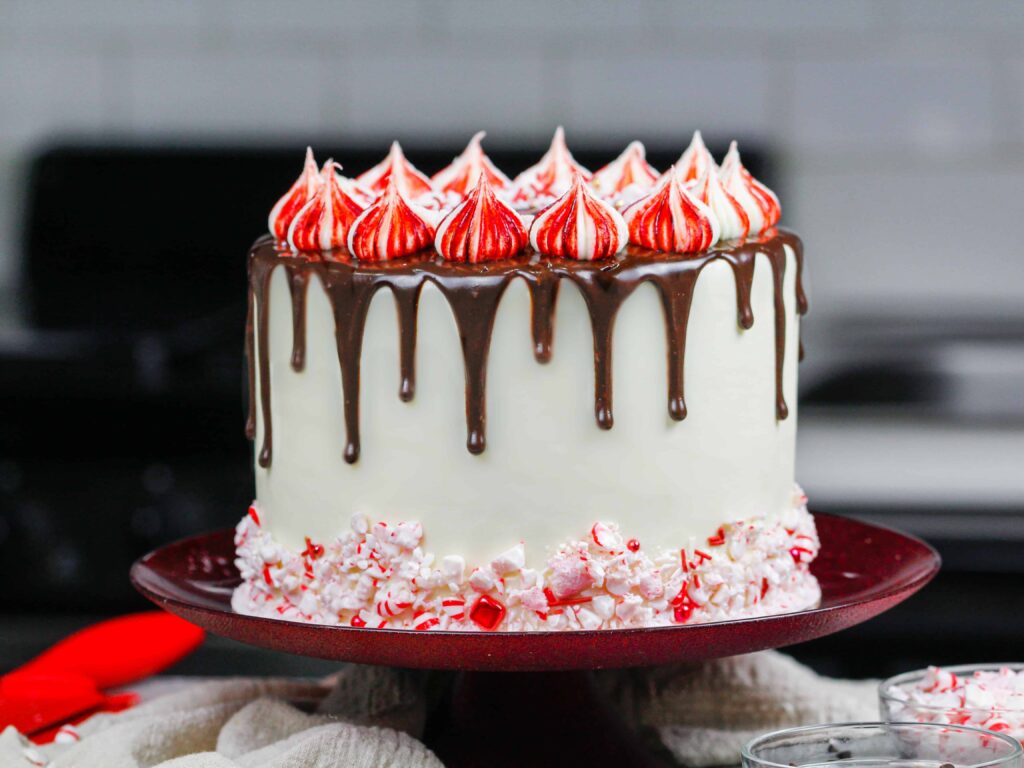
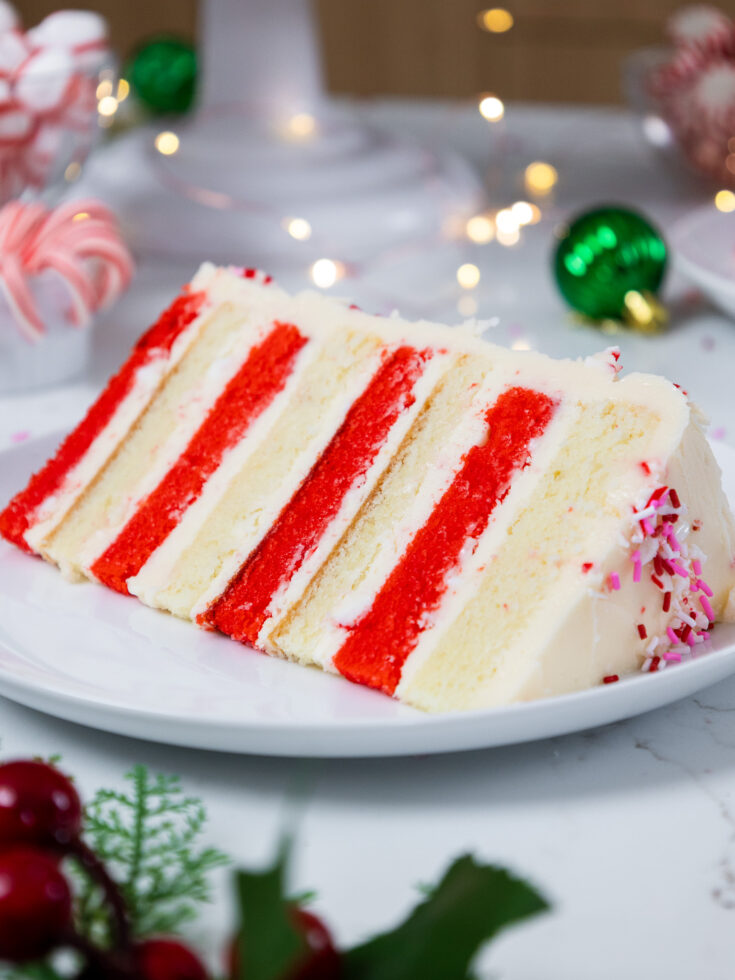
This candy cane cake is made with tender peppermint cake layers and frosted with candy cane buttercream.
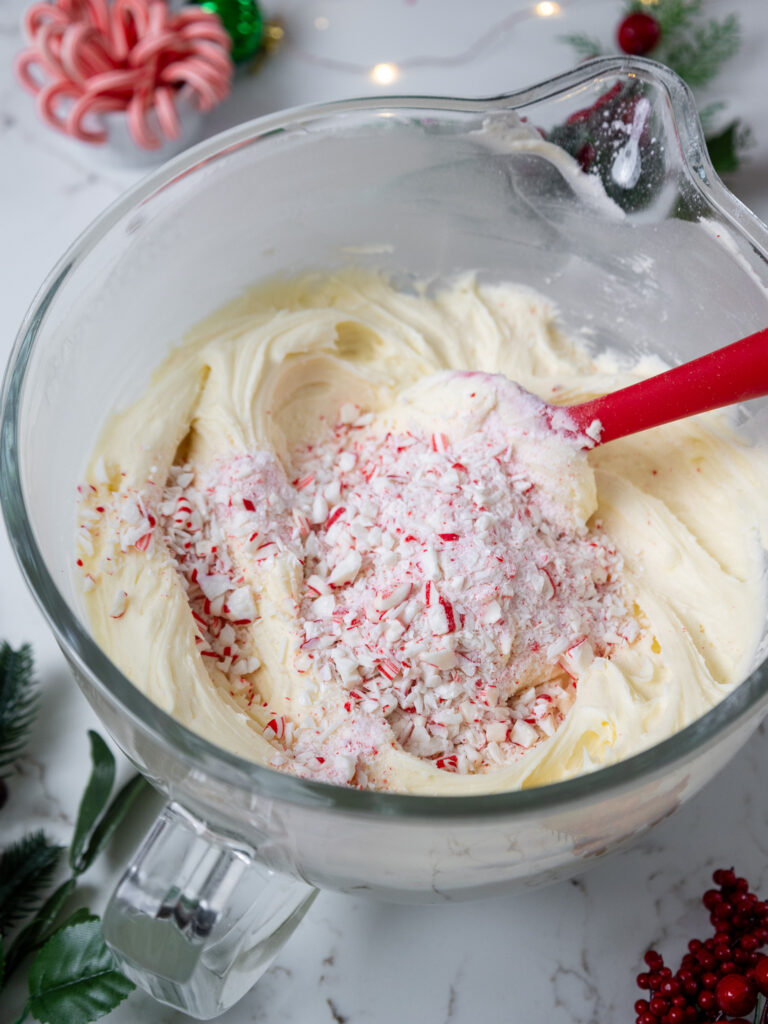
Crushed candy canes are folded right into the buttercream, and this gives each bite a delicious bit of crunch!


How to Make This Candy Cane Cake
Let’s walk through each step together to make sure this cake turns out as amazing as possible! I’ve also included a video tutorial of the process below.
I figured it might be helpful to know what tools I use too, so I’ve shared a list below. Not all of these are mandatory, but they make the process a lot easier.
If you don’t have all these things on hand, feel free to improvise and work with what you have.
- 4, 7-inch Cake Pans or 3, 8-inch Cake Pans
- Spinning Cake Stand
- Electric Hand Mixer or Stand Mixer
- Serrated Knife
- 10-inch Greaseproof Cake Board or Flat Plate
- Large Offset Spatula
- Red Gel Food Coloring
Step 1: Bake the Peppermint Cake Layers
Make the cake layers first following the recipe card at the bottom of this post.
After coloring the batter, divide it evenly between the prepared cake pans and bake for 33-37 minutes or until a toothpick comes out with a few moist crumbs.
Remove the cake layers from the oven and let them cool in the pans for about 30 minutes. Or if you’re in a rush, place the pans directly in the freezer to accelerate the cooling process.
Then gently run an offset spatula around the rim of the cake pans to loosen them and flip them onto wire racks to finish cooling.
These layers bake up pretty flat but I still recommend leveling them with a serrated knife to make them easier to stack and frost.

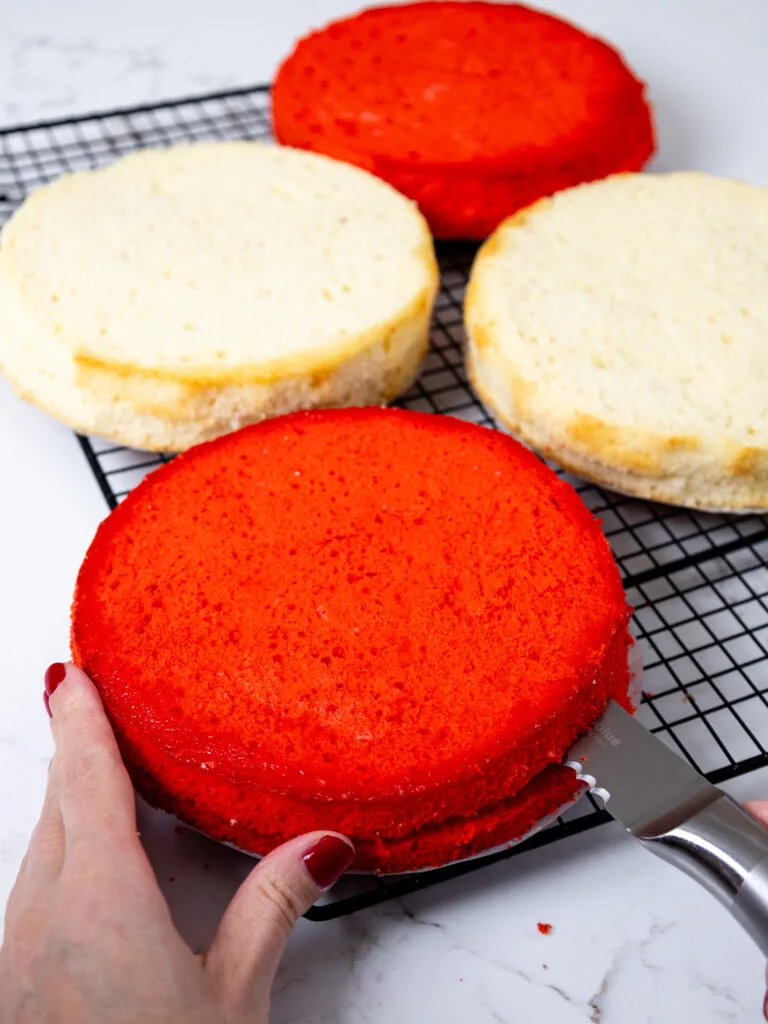
I also like to trim away the caramelization around the sides of the layers and tort each layer to create eight, thinner layers. This is totally optional though!
If you’re making these in advance, you can wrap and freeze them at this point.
Step 2: Make the Candy Cane Buttercream Frosting
While the cake layers bake and cool, make the candy cane buttercream frosting. I love this frosting because it has crunchy bits of candy cane folded right into it!
I like to use an American buttercream base to make this frosting because I think it’s the easiest to make and I love eating it. However, it is quite sweet!

If you want to use a less sweet frosting base, I’d recommend making a batch of my Swiss meringue buttercream or 1.5 batches of my hybrid buttercream.
Or if you want to channel peppermint back vibes, you also can add peppermint extract and crushed peppermint candies to my white chocolate buttercream or my white chocolate SMBC.
If you’re short on time or want to work ahead, this frosting can be made in advance and kept in the fridge for up to a month or in the freezer for 3 months.
Step 3: Stack and Frost the Cake Layers
Then it’s time to assemble this cake! Stack and frost cake layers on a greaseproof cake board or flat plate. Use a dab of buttercream to help stick the first cake layer to the board.
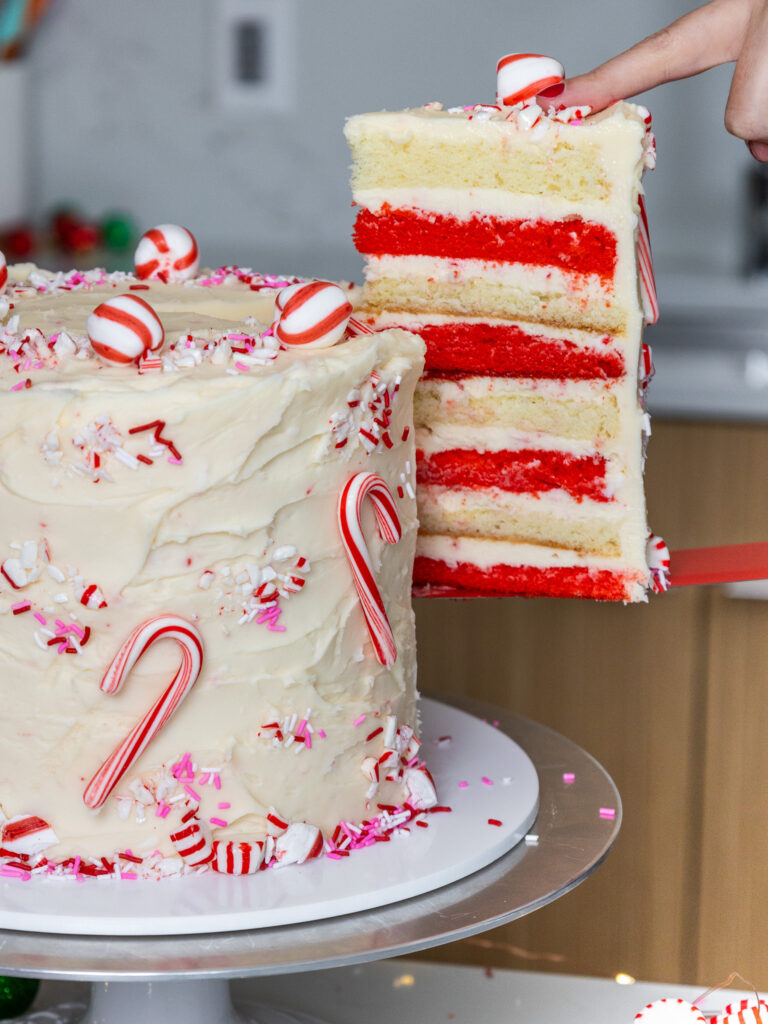
Alternate red and white cake layers, and spread an even layer of buttercream on top of each cake layer with a large offset spatula. Repeat with the remaining cake layers.
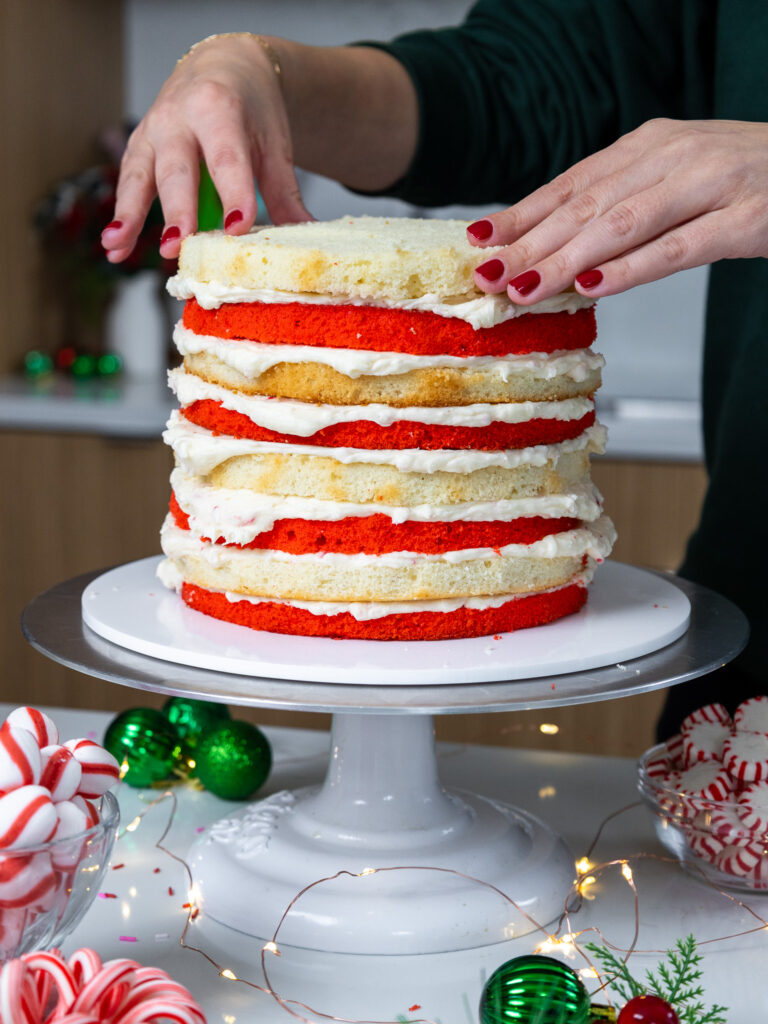

Once the cake layers are stacked, smooth any overhanging frosting and chill the cake in the freezer for 15 minutes.
This will help the frosting between the layers firm up and reduce crumbing as you frost the cake.
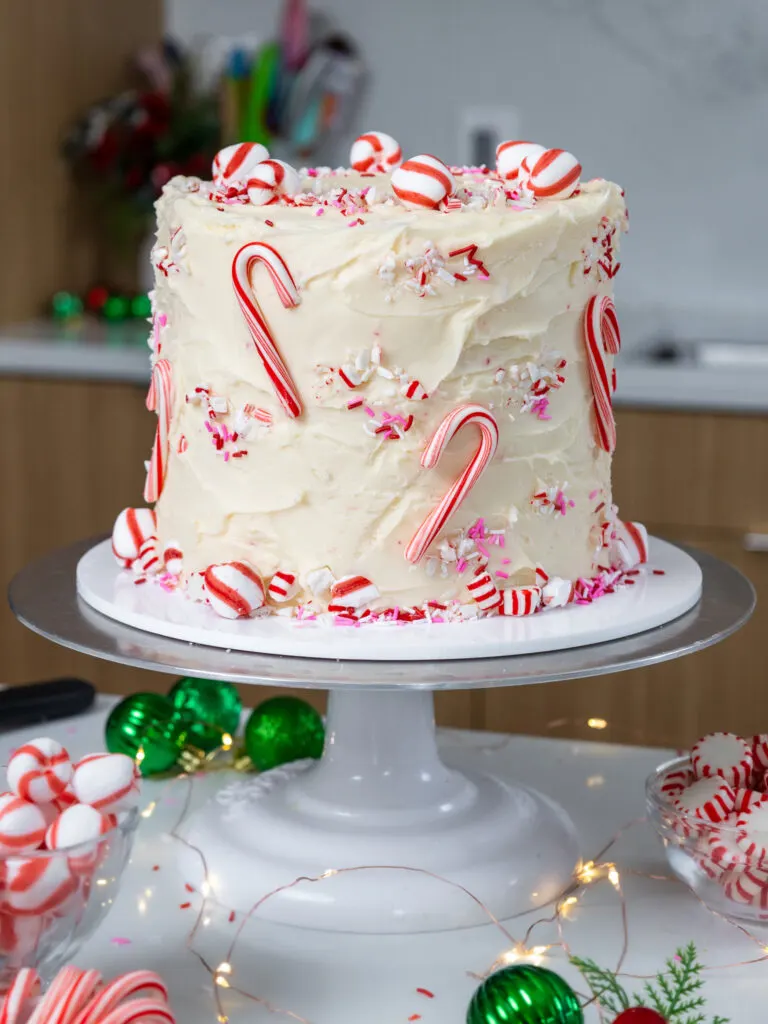
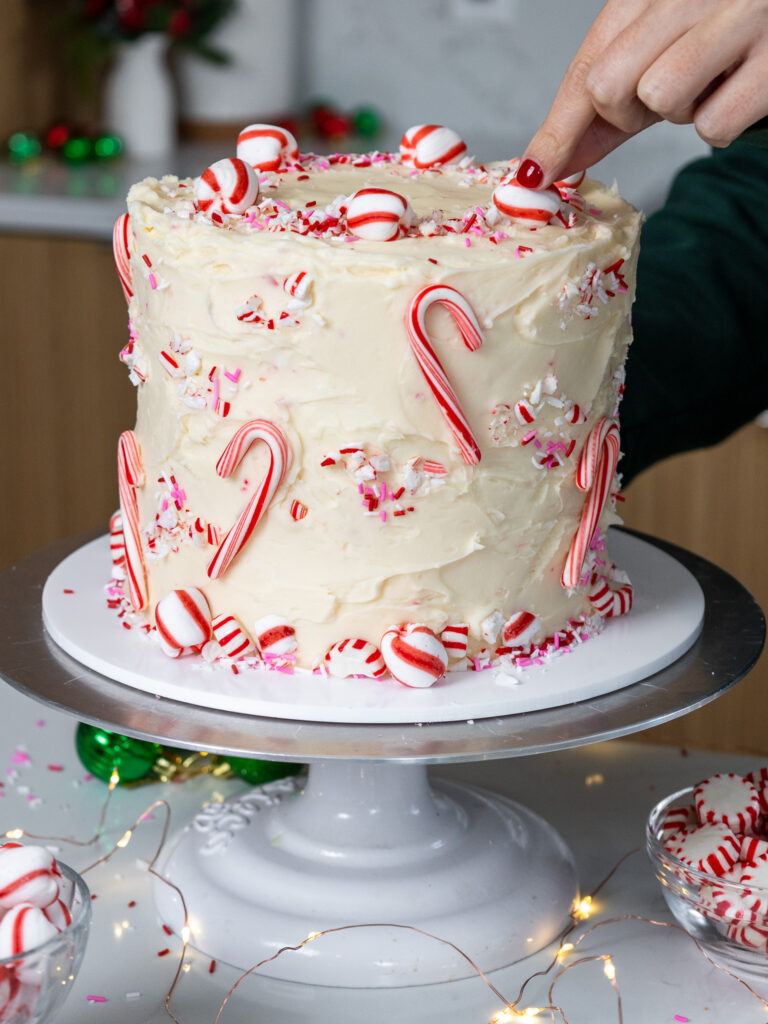
Step 4: Cover the Cake in a Thick Layer of Frosting
Once the cake is chilled, cover it with the remaining candy cane buttercream. Use a large offset spatula or the back of a spoon to create a textured look around the cake.
Cover the base of the cake with peppermint candies and red sprinkles, then add peppermint candies and mini candy canes around the side and top of the cake.

Substitutions and Swaps – Peppermint Layers
This recipe uses quite a few ingredients and I know you might not have them all on hand. Or if you have food allergies or restrictions, I’ve got you covered.
Below are some swaps and substitutions that can be made in this cake recipe.
- All-Purpose Flour – This recipe turns out best with AP flour, but you can use a gluten-free flour blend or cake flour if that’s what you have on hand.
- Granulated Sugar – I do not recommend changing the type or reducing the amount of sugar in the cake batter by much because it will change the texture of the cake layers. If you really want to reduce the sugar, you can decrease it by 1/2 cup. However, I’d recommend just using a less sweet frosting to cut down on the sweetness of the cake if that’s what you’re after.
- Unsalted Butter – If you only have salted butter on hand, you can use it in place of the unsalted butter in this recipe. Just be sure to omit the salt that this cake recipe calls for. You can also use vegan butter in its place (and also omit the salt)!
- Egg whites – I like to use the pasteurized egg whites that come in a carton, but you can also use 7 large egg whites or 4 whole, large eggs. If you have an egg allergy you can use flaxseed eggs or a vegan egg replacer.
- Sour Cream – You can also use full-fat yogurt, whole milk, buttermilk, or an alternative yogurt or milk (almond, soy, oat) if you’re dairy-free.
- Vegetable Oil – Any flavorless oil will work in this recipe. Canola or even sunflower oil would work great!
- Red Gel Food Coloring – Gel or oil-based food coloring works best to color the cake layers. Liquid food coloring can be used (use 1 Tbsp in place of the gel food coloring), but it’s more difficult to create vibrant colors.

Substitutions and Swaps – Buttercream Frosting
- Unsalted Butter – If you only have salted butter on hand, you can use it in place of the unsalted butter. Just be sure to omit the salt that this frosting recipe calls for. You can also use vegan butter in its place (and omit the salt)!
- Heavy Cream – Whole milk or alternative milk (soy, almond, oat) will work fine in this frosting recipe if that’s what you have on hand.
- Crushed Peppermint Candies – Any type of peppermint-flavored candies can be crushed up to decorate the cake and make the frosting. This includes mini candy canes, round peppermints, and even full-sized candy canes.

Making This Candy Cane Cake in Different Sizes
I used 4, 7-inch cake pans to make this cake, but this recipe can be used to make different-sized cakes.
You can make three, 8-inch or four, 6-inch cake layers with one batch of batter. Bake the cake layers at 350 F / 175 C for 34-38 minutes or until a toothpick comes out with a few moist crumbs.
This recipe can also be used to make a candy cane sheet cake! One batch will make 1, 9 x 13-inch cake layer that is about 1 inch tall.
Bake for 35-40 mins at 350 F / 175 C. I recommend using heating cores if you have them to help large cake layers like this bake more evenly and quickly.
You can also make cupcakes using this recipe. Fill the liners 3/4 full and bake them at 350 F / 175 C for 18-21 minutes, or until a toothpick inserted in the center comes out with a few moist crumbs.
Tips for Making the Best Candy Cane Cake
- Ingredients at room temp mix together better! Set out any cold ingredients ahead of time.
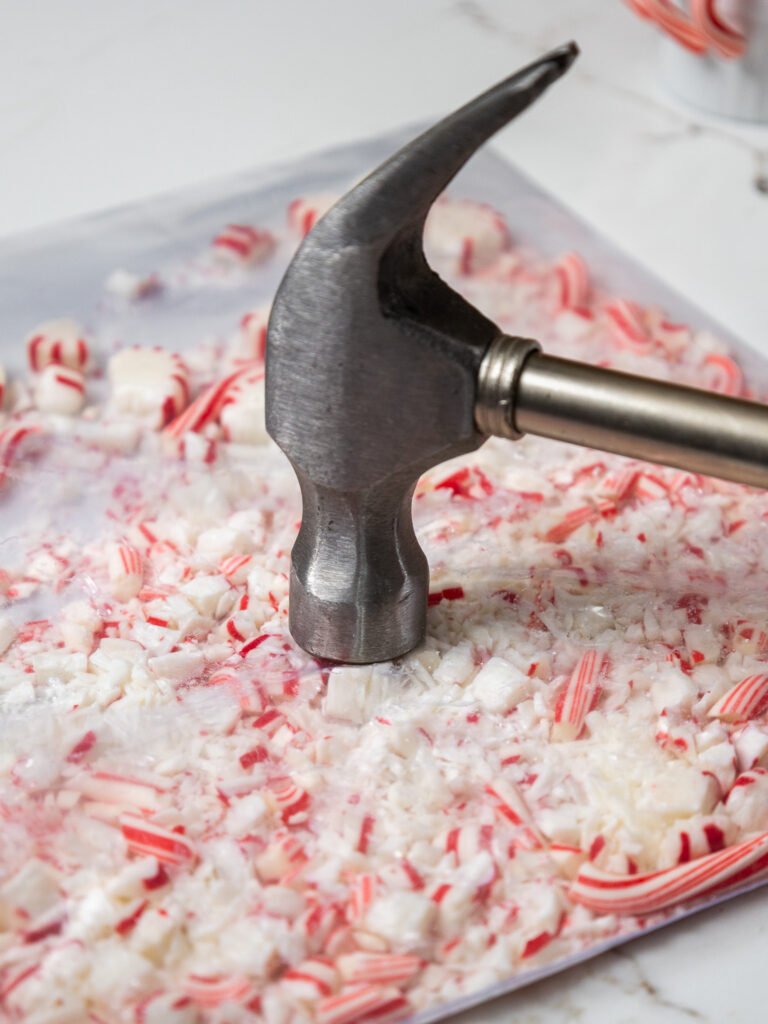
- Use a food processor or hammer to easily crush up the peppermint candy.
- Properly measure the flour (spoon into the cup measure, then level). Or better yet, use a kitchen scale to measure your dry ingredients.
- Use a scale to weigh the cake pans as you fill them. It will make the cake layers bake up to the same height and bake more evenly.
- Level the room temperature or thawed cake layers with a serrated knife to make them easier to stack.
- Make sure the buttercream is the right consistency. This will help give the cake proper structure and make it easier to decorate.
- Chill the cake layers in the freezer for about 20 minutes before assembling the cake. It makes them so much easier to stack and frost!
- If your cake layers turn out less than perfect, read my cake troubleshooting guide to see where things might’ve gone awry.

Making This Candy Cane Cake in Advance
I highly recommend making these cake layers in advance and freezing them. It breaks the process up and makes it more approachable.
You can also make the frosting ahead of time or save any leftover frosting! It can be stored in an airtight container in the fridge for up to 2 weeks, or in the freezer for up to a month.
Be sure to give it a good stir once it thaws to get the consistency nice and smooth again. The buttercream may get a bit of pink tint from the red coloring in the candy canes, but it will still taste great.
A decorated cake can last in the fridge for up to a week, or in the freezer for up to a month. The buttercream locks in all the moisture, keeping the cake fresh and delicious!
If you cut into the cake and have leftovers, use any remaining frosting to cover the cut section to keep it moist and store it in the fridge for up to a week.
Let Me Know What You Think!
If you make this candy cane cake recipe, I’d love to hear what you think of it! Let me know by leaving a rating and comment below.
And don’t forget to tag me @chelsweets use #chelsweets if you share on social media so that I can see your amazing creations.
Other Recipes You Might Like:


Candy Cane Cake

This candy cane cake is made with soft, fluffy peppermint cake layers and frosted with candy cane buttercream.
Ingredients
Peppermint Cake Recipe
- 3 cups all-purpose flour (375g)
- 3 cups granulated sugar (600g)
- 2 1/2 tsp baking powder (10g)
- 1 tsp fine salt (6g)
- 1 cup or 2 sticks unsalted butter, room temperature (226g)
- 1 cup egg whites or about 7 egg whites, room temperature (240g)
- 1 1/2 cups sour cream, room temperature (360g)
- 2 Tbsp vegetable oil (30g)
- 2 tsp peppermint extract (8g)
- 2 tsp vanilla extract (8g)
- Red gel food coloring
Candy Cane Buttercream Frosting
- 2 cups unsalted butter, room temperature (452g)
- 2 tsp peppermint extract (8g) - optional
- 1 tsp vanilla extract (4g)
- 1 tsp fine salt (6g)
- 7 cups powdered sugar (904g or a 2 lb. bag)
- 1/4 cup heavy cream or whipping cream (60g)
- 1 cup peppermint candies, crushed (225g)
- Red gel food coloring
Optional Filling and Decorations
- 1 cup peppermint candies, crushed (225g)
- Mini candy canes and round peppermint candies
- Red and pink sprinkle blend
Instructions
Peppermint Cake Layers
- Preheat the oven to 350 F / 175 C and line four 7-inch or three 8-inch pans with parchment rounds and spray with non-stick baking spray. You can also use this recipe to make 4, 6-inch cake layers but the bake time will be a few minutes longer. If you don't have 4 cake pans, the batter can sit at room temperature for a few hours. Bake as many layers at a time as you can at a time.
- Mix 3 cups all-purpose flour, 3 cups sugar, 2 1/2 tsp baking powder, and 1 tsp salt together in a stand mixer with a paddle attachment or hand mixer until fully combined.
- Mix in 1 cup of room temperature, unsalted butter slowly into the dry ingredients on a low speed. Continue to mix until no large chunks of butter remain, and the mixture looks like moist sand.
- Pour in 1 cup of egg whites and mix on low until fully incorporated. Mix in 1 1/2 cups of sour cream, 2 Tbsp of vegetable oil, 2 tsp of peppermint extract, and 2 tsp of vanilla extract and mix at a low speed until fully incorporated.
- Scrape down the sides and bottom of the bowl with a rubber spatula, then beat on a medium speed for 30 seconds to make sure everything is properly mixed together. This also helps lighten the texture of the cake layers a bit.
- Then it's time to color the batter! This is optional, but it makes the cake slices so pretty. If you're making four layers, Scoop half of the batter into a separate bowl (about 900g per bowl) and color it red with a tsp of gel food coloring. Leave the other bowl of batter uncolored. If you make 3 layers, color 1/3 of the batter (roughly 600g) red with gel food coloring.
- Divide the batter evenly between the prepared cake pans. Bake for 33-37 minutes and rotate the layers halfway through to help them bake evenly. Let the pans cool for 10 minutes, then run an offset spatula around the perimeter of the pan to separate the cake from the pan.
- Place the cake pans into the freezer for 45 minutes to accelerate the cooling process. Once the layers are fully cooled, carefully flip the pans, and remove the layers from the pans.
- Use a serrated knife to level the tops and remove any caramelization around the sides of the layers. I also like to torte the cake layers horizontally (see picture in the post above) to create thinner cake layers, but this is optional.
- If you make these cake layers in advance and freeze them, let them thaw for about 15 minutes before making the cake. The cake layers should still be slightly cold to the touch, which will make it easier to assemble the cake.
Candy Cane Buttercream
- While the cake layers bake and cool, make the candy cane buttercream. Beat 2 cups of unsalted butter on a medium speed for 30 seconds with a paddle attachment until smooth.
- Mix in 2 tsp peppermint extract, 1 tsp vanilla extract, and 1 tsp salt on a low speed.
- Gradually mix in 7 cups of powdered sugar and 1/4 cup of heavy cream on a low speed. Continue to mix on a low speed for a few minutes until the desired consistency is reached.
- If the frosting seems too thick, add additional cream (1 Tbsp at a time). If the frosting is too thin, add more powdered sugar (a quarter of a cup at a time).
- Fold the crushed candy canes or peppermint candies into the frosting with a rubber spatula. Cover the buttercream flush with plastic wrap to prevent crusting, then set aside.
Assembling This Candy Cane Cake
- Stack and frost cake layers on a greaseproof cake board, using a dab of buttercream to help stick the first cake layer to the board.
- Alternate red and white cake layers, and spread an even layer of frosting on top of each cake layer with a large offset spatula. Repeat with the remaining cake layers.
- Once the cake layers are stacked, smooth any overhanging frosting and chill the cake in the freezer for 15 minutes. This will help the frosting between the layers firm up and reduce crumbing as you frost the cake.
- Once the cake is chilled, cover it with the remaining candy cane buttercream. Use a large offset spatula or the back of a spoon to create a textured look around the cake.
- Cover the base of the cake with peppermint candies and red sprinkles, then add peppermint candies and mini candy canes around the side and top of the cake.
Notes
If you need to make any substitutions or swaps in this recipe, please see the section in the post above on ingredient substitutions.
Recipe Variations
One batch of cake batter makes about 1800 grams or 10 cups. If you plan to use four circular cake pans, add 450 grams of batter into each pan. If you make 3 layers, add 600 grams to each pan.
This recipe can also be used to make a candy cane sheet cake! One batch will make 1, 9 x 13-inch cake layer that is about 1 inch tall.
Bake for 40-45 mins at 350 F / 175 C, or until a toothpick inserted in the center comes out with a few moist crumbs. Bake time can vary a lot based on the type of pan you use, if you use heating cores, and your oven. I recommend using heating cores if you have them to help large cake layers like this bake more evenly and quickly.
You can also make cupcakes using this recipe. Fill the liners 3/4 full and bake them at 350 F / 175 C for 18-21 minutes, or until a toothpick inserted in the center comes out with a few moist crumbs.
Tips for Making the Best Candy Cane Cake
- Ingredients at room temp mix together better! Set out any cold ingredients ahead of time.
- Properly measure your flour (spoon into the cup measure, then level). Or better yet, use a kitchen scale to measure your dry ingredients.
- Use a food processor or hammer to easily crush up the peppermint candy.
- Use a scale to weigh your cake pans as you fill them. It will make the cake layers bake up to the same height and bake more evenly.
- Level the room temperature or thawed cake layers with a serrated knife to make them easier to stack.
- Make sure the buttercream is the right consistency. This will help give the cake proper structure and make it easier to decorate.
- Chill the cake layers in the freezer for about 20 minutes before assembling the cake. It makes them so much easier to stack and frost!
- If your cake layers turn out less than perfect, read my cake troubleshooting guide to see where things might've gone awry.
Making This Candy Cane Layer Cake in Advance & Storage Tips
Make these cake layers in advance and freeze them. It breaks the process up and makes it more approachable.
You can also make the frosting can also be made ahead of time or you can save any leftover frosting! It can be stored in an airtight container in the fridge for up to a month, or in the freezer for up to 3 months.
Be sure to give it a good stir once it thaws to get the consistency nice and smooth again. The buttercream may get a bit of pink tint from the red coloring in the candy canes, but it will still taste great.
A frosted cake can last in the fridge for up to a week, or in the freezer for up to a month. The buttercream locks in all the moisture, keeping the cake fresh and delicious!
If you cut into the cake and have leftovers, use any remaining frosting to cover the cut section to keep it moist and store it in the fridge for up to a week.
Nutrition Information
Yield
24Serving Size
1Amount Per Serving Calories 554Total Fat 28gSaturated Fat 17gTrans Fat 0gUnsaturated Fat 10gCholesterol 74mgSodium 288mgCarbohydrates 72gFiber 1gSugar 58gProtein 5g
Samantha
Tuesday 12th of November 2019
Could these be done as cupcakes with your amazing 1 bowl vanilla cupcake recipe? Thank you for all the delicious cakes you bring into my life!
Jessica
Wednesday 24th of January 2018
I love to bake cookies and would love to expand to cakes. I'm a little intimidated but I know that you just gotta go for it! I'm looking for something fun but easy, low on the technique scale, and doesn't require specialized tools since I don't have any yet. Which of your cakes would you recommend?
Chelsweets
Tuesday 6th of February 2018
i'd recommend this: https://www.youtube.com/watch?v=sfh0pg-Z264
it's made with my vanilla layer cake recipe and my american buttercream (the links are in the description of the video) <3