Penguin Cake
This adorable penguin cake is made with moist dark chocolate cake layers and buttercream frosting! It's the cutest winter cake idea.
Servings: 20
Calories: 515kcal
Ingredients
Dark Chocolate Cake Recipe
- 2 cups all-purpose flour 260g
- 2 cups granulated sugar 400g
- 3/4 cup dark or black cocoa powder 75g
- 2 tsp baking powder 8g
- 1 1/2 tsp baking soda 9g
- 1 tsp fine salt 6g
- 1 cup hot water 240g
- 2 tsp instant espresso of coffee 5g
- 1 cup buttermilk, room temperature 240g
- 1/2 cup vegetable or canola oil 110g
- 2 large eggs, room temperature 112g
- 2 tsp vanilla extract or vanilla bean paste 8g
Buttercream Frosting
- 2 cups (4 sticks) unsalted butter, room temperature 454g
- 1 tsp vanilla extract or vanilla bean paste 4g
- 1/2 tsp fine salt 3g
- 7 cups powdered sugar 904g or 2 lb.
- 1/2 cup heavy whipping cream, room temperature 120g
- Gel food coloring -pink, orange, and black - to be added after the cake is crumb coated
- 1 Tbsp black cocoa powder - to be added after the cake is crumb coated
Recommended Tools
- 4, 6- inch cake pans
- Serrated Knife
- Spinning cake stand
- Electric hand mixer or stand mixer
- 8- inch greaseproof cake board
- Small offset spatula
- Thick bubble tea straw or wooden dowel
- 1 Large piping bag
- 4 Small piping bag
- 2 Small grass piping tips like a Wilton 233
- 3 Small round piping tips like a Wilton 10
Instructions
Dark Chocolate Cake Layers
- Bake the cake layers first so that they have time to cool. Preheat the oven to 350 F / 175 C. Line and grease four, six-inch cake pan with parchment rounds and grease with non-stick baking spray or homemade cake release.
- Whisk together 2 cups all-purpose flour, 2 cups sugar, 3/4 cup dark or black cocoa powder, 2 tsp baking powder, 1 1/2 tsp baking soda, and 1 tsp of salt in a large bowl. Whisk together until combined and set aside.
- In a separate, medium-sized bowl, add 1 cup of hot water and 2 tsp instant espresso or coffee. Stir until dissolved. The instant espresso really enhances the chocolate flavor in these cake layers, and I promise you can't taste it! However, if you really hate coffee, you can omit the instant coffee or espresso.
- Add in 1 cup buttermilk, 1/2 cup oil, 2 eggs and 2 tsp vanilla extract into the instant espresso mixture. Whisk the mixture together to combine the ingredients.
- Pour the dry ingredients into the wet ingredients. Mix by hand until fully incorporated. The batter will be on the thin side, but that’s the consistency you're after!
- Divide the batter evenly between the cake pans and bake for about 25-28 minutes. I like to use a kitchen scale to weigh the pans. It makes sure each pan has the exact same amount of batter and helps the cake layers bake up to be the same height.
- Remove the cake layers from the oven and let them cool in the pans for about 15 minutes. Then gently run an offset spatula around the rim of the cake pans to loosen them and flip them into wire racks to finish cooling.
- Once cooled, use a serrated knife to trim the tops of two of the cake layers to make them slightly rounded like in the picture above. This will help give our penguin a more defined head and body. I usually level my cake layers, but this recipe bakes up super flat so that's not necessary with this recipe.
- If you make these in advance, wrap and freeze them at this point.
Buttercream Frosting
- While the cake layers bake and cool, make the buttercream frosting. Beat 2 cups of butter on a medium speed for 30 seconds with a paddle attachment until smooth.
- Add in 1 tsp vanilla extract and 1/2 tsp salt. Mix on low until the ingredients are fully incorporated.
- Gradually mix in 7 cups of powdered sugar and 1/2 cup of heavy cream.
- Once the ingredients are fully combined and the frosting has reached the desired consistency, beat on low until for a couple extra minutes to make the frosting super smooth and push any extra air out of the frosting.
- If the frosting is too thick, add in additional cream (1 Tablespoon at a time). If the frosting is too thin, add in more powdered sugar (1/4 cup at a time). Wait to color the buttercream until we've filled and crumb coated the cake.
- Cover the buttercream flush with plastic wrap to prevent crusting, then set aside.
Assembling This Penguin Cake
- Then it's time to assemble our little penguin! I highly recommend chilling your cake layers in the freezer for about 20 minutes before assembling the cake. It makes it so much easier to stack and frost them!
- Stack and frost the cake layers on a greaseproof cake board or flat plate using a dab of frosting to help stick the first cake layer to the board.
- Spread an even layer of buttercream between each cake layer with an offset spatula. Use the two trimmed cake layers in the middle of the cake to create an hourglass shape. Once you've stacked the first two cake layers, cover the sides of the layers in a thin coat of frosting.
- Then stack and frost the two remaining cake layers and insert either a thick plastic straw (like a bubble tea straw) or a wooden dowel through the center of the cake layers to help stabilize them.
- Spread a thin coat of frosting around the top two cake layers with a small offset spatula or acetate sheet, then chill the cake in the fridge (30 minutes) or freezer (10 minutes) until the frosting is firm to the touch.
Coloring the Buttercream
- While the cake chills, color the buttercream. It sounds crazy, but you can actually color all the frosting in one bowl. We start making the lightest colors and gradually work our way to the darker colors. Using the same bowl to make all the colors actually helps the colors blend together better and look more cohesive.
- Start by scooping about 2 Tbsp of buttercream into a small bowl and color it light pink with a small drop of pink gel food coloring. Place the frosting in a small piping bag fit with a round piping tip like a Wilton 10. Seal the top of the bag with a rubber band or clip and set aside.
- Place 1/4 cup of buttercream into the same bowl and color it orange with a generous squirt of orange gel food coloring. Place the frosting in a small piping bag fit with a round piping tip like a Wilton 10. Seal the top of the bag with a rubber band or clip and set aside.
- Add about 3 tbsp of buttercream into the same bowl and color it black with a generous squirt of black gel food coloring. Place the frosting in a small piping bag fit with a small round piping tip like a Wilton 10. Seal the top with a rubber band or clip and set aside.
- Scoop about a quarter of the remaining buttercream into a small piping bag fit with a small grass tip like a Wilton 233. Seal the top with a rubber band or clip and set aside.
- Add 1 Tbsp of black or dark cocoa and a squirt of black gel food coloring into the remaining buttercream to make it gray. Place the gray frosting into a large piping bag fit with a small grass tip like a Wilton 233. Seal the top with a rubber band or clip and set aside.
Decorating This Penguin Cake
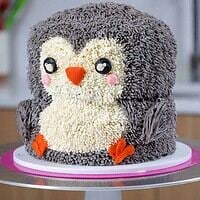
- Then it's finally time to decorate our penguin cake! Use a small offset spatula or butter knife to trace out where you want the penguin's face and tummy to go. Pipe white buttercream into this area to look like the penguin's fuzzy little feathers.
- Next, use the gray buttercream to pipe "feathers' around the rest of the cake. This took me forever, and I highly recommend taking breaks as you do it to prevent any hand cramps!! If your hands run hot, wrap a paper towel, or thin kitchen towel around your piping bag to prevent the transfer of heat from your hands into the frosting.
- Use the gray buttercream to pipe on the penguin's wings like in the photo above, then add on the penguin's eyes, beak, cheeks, and feet using the black, pink, and orange buttercream.
- Then enjoy! If you make this cake in advance, store the frosted cake in the fridge and let the cake sit at room temperature for 1-2 hours before serving to make it easier to cut.
Video
Notes
Tips for Making the Best Penguin Cake
- Ingredients at room temp mix together better! Set out any cold ingredients ahead of time.
- Properly measure your cake flour (spoon into the cup measure, then level). Or better yet, use a kitchen scale to measure your dry ingredients.
- Mix your cake batter just until the ingredients are incorporated. This will ensure your cake layers are tender and fluffy.
- Use a scale to weigh your cake pans as you fill them. Make sure each pan has the same amount of batter will make your cake layers bake to the same height and bake more evenly.
- Level your room temperature or thawed cake layers with a serrated knife to make them easier to stack.
- Chill your cake layers in the freezer for about 20 minutes before assembling the cake. It makes it so much easier to stack and frost them!
- Be patient and give yourself lots of time! Sculpted cakes like this can be challenging. Take your time piping the frosting and adding on the details to this cake.
- If your hands run hot, wrap a paper towel, or thin kitchen towel around your piping bag to prevent the transfer of heat from your hands into the frosting.
Making this Penguin Cake in Advance and Storage Tips
- Make your cake layers in advance and freeze them. It breaks the process up and makes it more approachable.
- You can also make the frosting ahead of time or save any leftover frosting! It can be stored in an airtight container in the fridge for up to a month.
- This frosting can also be stored in the freezer for up to 3 months! Just be sure to give it a good stir once it thaws to make it nice and smooth again.
- A frosted cake can last in the fridge for a week, or in the freezer for a month. The buttercream locks in the moisture and keeps the cake fresh and delicious!
Nutrition
Serving: 1 | Calories: 515kcal | Carbohydrates: 92g | Protein: 6g | Fat: 14g | Saturated Fat: 3g | Polyunsaturated Fat: 8g | Cholesterol: 42mg | Sodium: 407mg | Fiber: 4g | Sugar: 67g