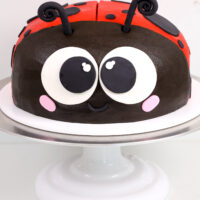
Ladybug Cake
Learn how to make this adorable ladybug cake! My detailed recipe & step by step tutorial share everything you need to nail this design!
Servings: 20
Calories: 619kcal
Ingredients
Buttercream Frosting
- 2 cups unsalted butter, room temperature 434g; 1 lb. box
- 1 Tbsp vanilla extract or vanilla bean paste 12g
- 1/2 tsp fine salt 3g
- 7 cups powdered sugar 907g; 2 lb. bag
- 1/2 cup heavy whipping cream, divided 120g
- 1/2 cup dark chocolate chips, melted and cooled 90g
- 1/4 cup dark or black cocoa powder 25g
- squirt of red gel food coloring
Moist Chocolate Cake Layers
- 2 cups all-purpose flour 260g
- 2 cups granulated sugar 400g
- 3/4 cup dark or black cocoa powder 75g
- 2 tsp baking powder 8g
- 1 1/2 tsp baking soda 9g
- 1 tsp fine salt 6g
- 1 cup very hot water 240g
- 2 tsp instant espresso of coffee 5g
- 1 cup buttermilk, room temperature 240g
- 1/2 cup vegetable or canola oil 110g
- 2 large eggs, room temperature 112g
- 2 tsp vanilla extract or vanilla bean paste 8g
Ladybug's Face
- 1 cup black fondant
- 1/3 cup white fondant
Recommended Tools
- 8- inch cake pans
- Spinning cake stand
- 10- inch greaseproof cake board
- small offset spatula
- Electric hand mixer or stand mixer
- 2 Large Piping Bags
- Circle Cutters
Instructions
Buttercream Frosting
- To help intensify the color of the frosting, make it a day in advance (if possible) and let it sit out at room temperature overnight. It sounds crazy but it really helps deepen the color of the buttercream!!
- Beat 2 cups of unsalted butter on a medium speed for 30 seconds until smooth with a paddle attachment / stand mixer or a hand mixer.
- Mix in 1 Tbsp vanilla extract and 1/2 tsp salt on a low speed.
- Slowly add in 7 cups of powdered sugar while mixing slowly on the lowest setting. Halfway through add in 1/4 cup of heavy cream to make it easier to mix. I like to place a kitchen towel over my mixer to contain any powdered sugar clouds.
- Mix on low until the ingredients are fully incorporated and the desired consistency is reached.
- If the frosting seems too thick, add in additional cream (1 Tbsp at a time). If the frosting is too thin, add in more powdered sugar (quarter of a cup at a time).
- Scoop about a quarter of the frosting into a separate bowl. Mix in 1/2 cup of melted and cooled dark chocolate, 1/4 cup dark or black cocoa powder, and 1/4 heavy cream. Place in a piping bag fit with a large round tip or cut open to have a 2 cm opening and set aside.
- Color the remaining buttercream red with a generous squirt of red gel food coloring. Mix until evenly colored, then cover flush with plastic wrap and set aside.
Chocolate Cake Layers
- Next, make the chocolate cake layers. Preheat the oven to 350 F/ 175 C. Line and grease three, eight-inch cake pans. Set aside.
- Combine 2 cups all-purpose flour, 2 cups sugar, 3/4 cup dark or black baking cocoa, 2 tsp baking powder, 1 1/2 tsp baking soda, and 1 tsp of salt in a large bowl. Whisk together until combined.
- In a separate, medium-sized bowl, add 1 cup of hot water and 2 tsp instant espresso. Stir until dissolved.
- Add in 1 cup buttermilk, 1/2 cup oil, 2 eggs and 2 tsp vanilla extract into the instant espresso mixture. Give the mixture a quick stir to combine the ingredients.
- Pour the wet ingredients into the dry ingredients. Mix by hand until fully incorporated. The batter will be on the thin side, but that’s the consistency you're after!
- Divide the batter evenly between the cake pans and bake for about 24-27 minutes. I like to use a kitchen scale to weigh the pans. It makes sure each pan has the exact same amount of batter and helps the cake layers bake up to be the same height.
- Remove the cake layers from the oven and let them cool in the pans for about 10 minutes. Gently run an offset spatula around the rim of the cake pans to loosen them, then flip them into wire racks to finish cooling.
- Once cooled, use a serrated knife to level two of the cake layers (leave one unleveled). If you make these in advance, wrap and freeze them at this point. Take them out of the freezer about 20 minutes before you want to assemble the cake.
Assembling this Ladybug Cake
- Stack and frost the cake layers on a greaseproof cake board or flat plate. Spread a tablespoon of red buttercream onto the cake board to help keep the first cake layer in place.
- Stack the leveled cake layers first. Spread an even layer of red buttercream on top of the cake layer with an offset spatula. Repeat with the remaining cake layers and top with the unleveled cake layer.
- Chill the cake for about 10 minutes in the freezer. This will help the buttercream between the cake layers firm up and make the cake easier to trim.
- Use a serrated or sharp knife to trim the top cake layer to have rounded sides and give the cake a dome-like shape.
- Cover the cake with a thin layer of red buttercream and smooth using an acetate sheet or small offset spatula. Chill the cake again in the fridge for 30 minutes or freezer for 10 minutes, until the frosting is firm to the touch.
- Cover 2/3 of the cake in a second, thicker layer of red buttercream. Smooth using an acetate sheet or small offset spatula. Pipe a thick layer of black buttercream on the remaining portion of the cake. This will be the ladybug's head. Smooth with an acetate sheet or small offset spatula.
- Use white and black fondant to make the ladybug's eyes, antennae, and spots. If you don't want to use fondant, you can use black and white buttercream to make the eyes and spots, but it will take a lot longer! If you have them on hand, I highly recommend using circle cookie cutters for the eyes and spots. I made the eyes pretty big (about 2.5 inches) and made my spots a variety of sizes. Insert a toothpick into each antenna to make it easier to stick into the cake.
- Gently press the fondant facial features into the frosting. Use a large offset spatula to make a line through the center of the red frosting to make it look like the ladybug has wings.
- Then add the spots! If they aren't sticking on their own, you can always use a little dab of buttercream to help them stay in place. Then enjoy!
Video
Notes
My Tips for Making the Best Ladybug Cake
- Make the buttercream a day in advance! It helps naturally deepen the color of the frosting to create vibrant shades. If you're having a hard time making bright red frosting, check out my red buttercream tutorial.
- Use gel food coloring to make the red buttercream. Liquid food coloring can throw off the consistency of the frosting and won't make as vibrant of a color.
- Ingredients at room temp mix together better! Set out any cold ingredients ahead of time.
- Properly measure your cake flour (spoon into the cup measure, then level). Or better yet, use a kitchen scale to measure your dry ingredients.
- Bang your cake pans on the counter before putting them in the oven. This brings any air bubbles that are trapped in the batter to the surface.
- Use an acetate sheet to make the frosting super smooth.
Making this Ladybug Cake in Advance & Storage Tips
- Make your cake layers in advance and freeze them. It breaks the process up and makes it more approachable.
- Make your frosting ahead of time or save any leftover frosting! It can be stored in an airtight container in the fridge for up to a month.
- This frosting can also be stored in the freezer for up to 3 months! Just be sure to give it a good stir once it thaws to make it nice and smooth again.
- A frosted cake can last in the fridge for a week, or in the freezer for a month. The buttercream locks in the moisture and keeps the cake fresh and delicious!
Nutrition
Serving: 1 | Calories: 619kcal | Carbohydrates: 82g | Protein: 5g | Fat: 31g | Saturated Fat: 15g | Polyunsaturated Fat: 14g | Cholesterol: 84mg | Sodium: 383mg | Fiber: 2g | Sugar: 65g