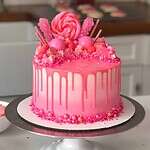
Drip Cake
Want to make the perfect drip cake? This drip cake recipe is super easy and walks you through everything you need to know about drip cakes!
Servings: 24
Calories: 581kcal
Equipment
Ingredients
Vanilla Cake Recipe
- 3 cups all-purpose flour 375g
- 3 cups granulated sugar 600g
- 2 1/2 tsp baking powder 10g
- 1 tsp fine salt 6g
- 1 cup (2 sticks) unsalted butter, room temperature 226g
- 2 tsp vanilla extract or vanilla bean paste 8g
- 1 cup carton egg whites or 7 large egg whites, room temperature 240g
- 1 1/2 cups buttermilk, room temperature 360g
- 2 Tbsp vegetable or canola oil 28g
- gel food coloring - optional
Vanilla Buttercream Frosting
- 2 cups unsalted butter, room temperature 452g
- 1/2 tsp fine salt 3g
- 1 Tbsp vanilla extract or vanilla bean paste 12g
- 7 cups powdered sugar 907g
- 1/4 cup heavy whipping cream, room temperature 60g
Colorful Drip Recipe
- 1/4 cup heavy whipping cream, room temperature 60g
- 1 cup white chocolate chips 175g
- gel food coloring
Instructions
Vanilla Cake Layers:
- Preheat the oven to 350°F/175°C and line three 8" or four 7" pans with parchment rounds, then grease them with non-stick baking spray. Set aside.
- Mix 3 cups all-purpose flour, 3 cups sugar, 2 1/2 tsp baking powder, and 1 tsp salt in a stand mixer with a paddle attachment or hand mixer until fully combined.
- Mix in 1 cup of room temperature, unsalted butter slowly into the dry ingredients on a low speed. Continue to mix until no large chunks of butter remain, and the mixture looks like moist sand.
- Pour in 1 cup of egg whites and mix on low until just incorporated. Mix in 1 1/2 cups of buttermilk in two installments, at a low speed.
- Add in 2 Tbsp of vegetable oil and 2 tsp of vanilla extract and mix at a low speed until fully incorporated. If you plan to color your cake layers, add in the gel food coloring with the oil and vanilla.
- Scrape down the sides of the bowl with a rubber spatula, then beat on a medium speed for about a minute to make sure everything is properly mixed. This also helps lighten the texture of the cake layers a bit.
- Divide the batter evenly between your prepared pans. I like to use a scale to make sure each pan has the same amount of batter and will bake up to the same height.
- Bake for 33-35 minutes or until a toothpick comes out with a few moist crumbs.
- Let the pans cool for 10 minutes, then run a small offset spatula around the perimeter of the pan to separate the cake from the pan.
- Place the cake layers into the freezer for 30 minutes to accelerate the cooling process. Once the layers are fully cooled, carefully flip the pans and remove the layers.
- Use a serrated knife to level the tops of the layers right before you plan to assemble your cake, or you can wrap and freeze them if you're making them in advance.
- If you make these cake layers in advance and freeze them, let them thaw for about 20 minutes before making your cake. The cake layers should still be slightly cold to the touch, which will make it easier to assemble your cake.
Vanilla Buttercream Frosting:
- While the cake layers bake and cool, make the vanilla buttercream frosting. Beat 2 cups of butter on a medium speed for 30 seconds with a paddle attachment or hand mixer until smooth.
- Mix in 1 Tbsp of vanilla extract and 1/2 tsp salt on a low speed.
- Slowly mix in 7 cups of powdered sugar on a low speed. Add 1/4 cup of heavy cream halfway through to make the frosting easier to mix. Continue to mix on a low speed for a few minutes until the desired consistency is reached.
- If the frosting is too thick, add additional cream (1 Tbsp at a time). If the frosting is too thin, add more powdered sugar (a quarter of a cup at a time).
- If you plan to color the buttercream, add the gel food coloring once the frosting is fully made, and beat on low until it reaches the desired color.
White Chocolate Ganache Drips:
- The last component to make is the white chocolate ganache! Add 1/4 cup of heavy cream to a heat-proof bowl and heat the cream until it's steaming and just starting to bubble. If you don't have a microwave, you can use a double boiler.
- Gently pour 1 cup of white chocolate chips into the heavy cream, making sure they are fully covered with cream. Let the mixture sit for 1 minute.
- Stir slowly until the cream and white chocolate are combined. If some bits of chocolate are not fully melted, heat the mixture again for 15 seconds, and stir. Repeat as necessary until all the chocolate bits are fully melted and incorporated.
- Then mix in the gel food coloring, if desired. Let the mixture cool until the desired viscosity is reached (barely warm to the touch). If it seems too thin or thick, you can add a touch more chocolate chips or heavy cream. The type of cream and white chocolate that you use can affect the consistency, so feel free to adjust as needed.
To Assemble The Cake:
- Then it's finally time to assemble this drip cake! Stack and frost cake layers on a greaseproof cake board or flat plate, using a dab of frosting to help stick the first cake layer to the board.
- Add an even layer of buttercream between each cake layer with a large offset spatula.
- Once the layers are stacked, spread a thin coat of frosting around the cake that fully covers the cake layers. Smooth using a bench scraper, then chill the cake in the fridge (30 minutes) or freezer (10 minutes) until the frosting is firm to the touch.
- Next, add a second, thicker layer of frosting to the cake and smooth using a bench scraper. If you're struggling to get smooth sides on your cake, I share all my tips and tricks in this post.
- Chill the cake again in the fridge (30 minutes) or freezer (10 minutes) until the frosting is firm to the touch. This step is crucial because it will prevent the ganache drips from melting the frosting, and it keeps the drips from running too far down the cake.
- Add the drips to the cake using a plastic squirt bottle or spoon, following the pictures and tips in the post above. Then decorate as desired!
Video
Notes
Drip Cake Alternatives
Dairy-free alternative: Full-fat coconut cream (canned) can be used in place of the heavy cream in this recipe to make it dairy-free. You can use this recipe if you want to make a chocolate drip cake.Tips for Making the Best Drip Cake
- Ingredients at room temperature mix together better! Set out any cold ingredients ahead of time.
- Properly measure the flour (spoon into the cup measure, then level). Or better yet, use a kitchen scale to measure your dry ingredients.
- Level the room temperature or thawed cake layers with a serrated knife to make them easier to stack.
- Make sure the buttercream is the right consistency. This will help give the cake proper structure and make it easier to decorate.
- Chill the cake layers in the freezer for about 20 minutes before assembling the cake. It makes them so much easier to stack and frost!
- If your cake layers turn out less than perfect, read my cake troubleshooting guide to see where things might've gone awry.
- You can also use regular white chocolate chips, white chocolate wafers, or even a chopped-up white chocolate bar for the chocolate this recipe calls for.
- The ratio of heavy cream is different if you use white candy melts. Candy melts cannot be swapped 1:1 for the white chocolate in this recipe! They are not interchangeable.
- Be sure to use heavy cream or heavy whipping cream! You need the high-fat content to create the right consistency in this recipe.
Making This Drip Cake in Advance and Storage Tips
I highly recommend making the components of this cake in stages. It breaks the process up and makes it so much more approachable! The cake layers can be made in advance and frozen. They taste just as great when they're frozen as when they're fresh, I promise! You can make the frosting ahead of time or save any leftover frosting! It can be stored in an airtight container in the fridge for up to a month or in the freezer for 3 months. Make this ganache drip recipe ahead of time or save leftovers! Once it's made, wrap the bowl with plastic wrap or cover the top of the plastic bottle and store it in the fridge for up to 3 weeks. To use chilled ganache, heat the bottle or bowl in the microwave for 10-second intervals until it reaches the right consistency. Use leftover ganache to top cupcakes, cookies, or even ice cream! A frosted cake can last in the fridge for a week or in the freezer for a month. The buttercream locks in the moisture and keeps the cake fresh and delicious! If you cut into the cake and have leftovers, use any remaining frosting to cover the cut section to keep it moist and store it in the fridge for up to a week.Nutrition
Serving: 1 | Calories: 581kcal | Carbohydrates: 80g | Protein: 4g | Fat: 28g | Saturated Fat: 17g | Polyunsaturated Fat: 10g | Cholesterol: 68mg | Sodium: 254mg | Sugar: 67g