
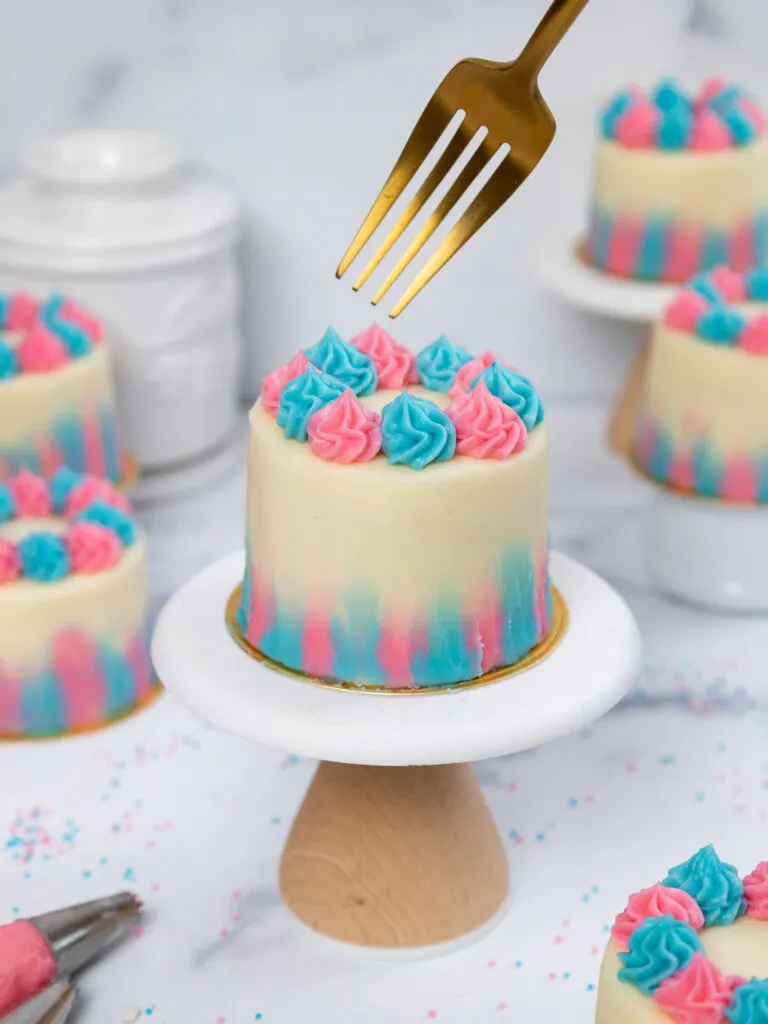
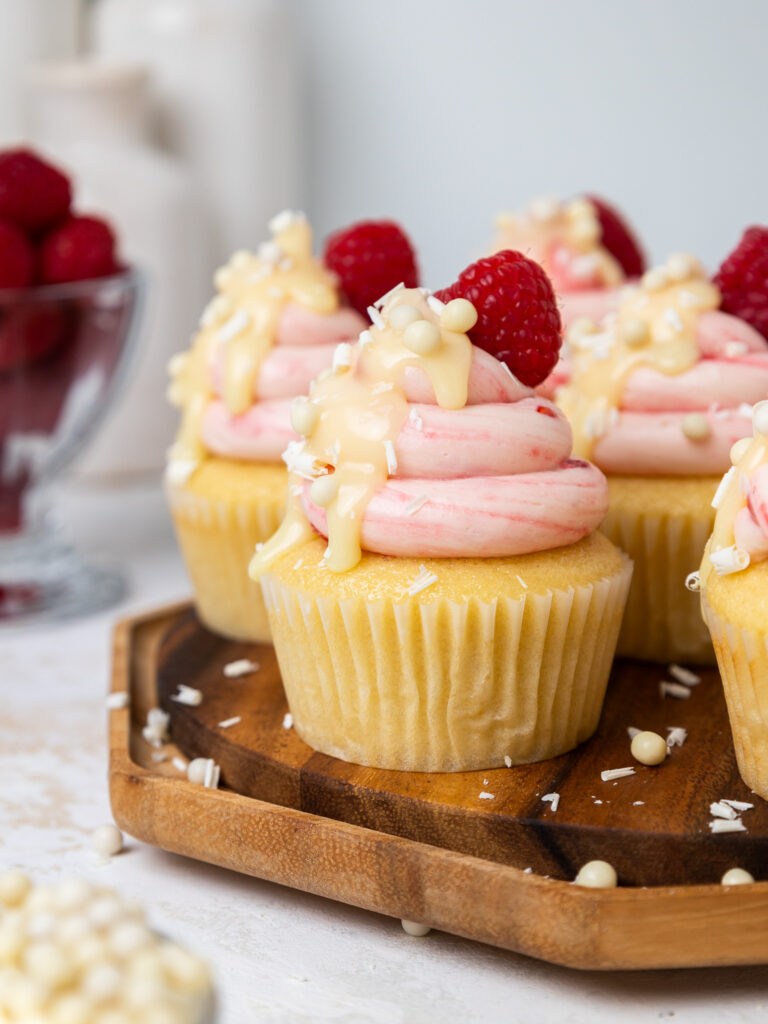
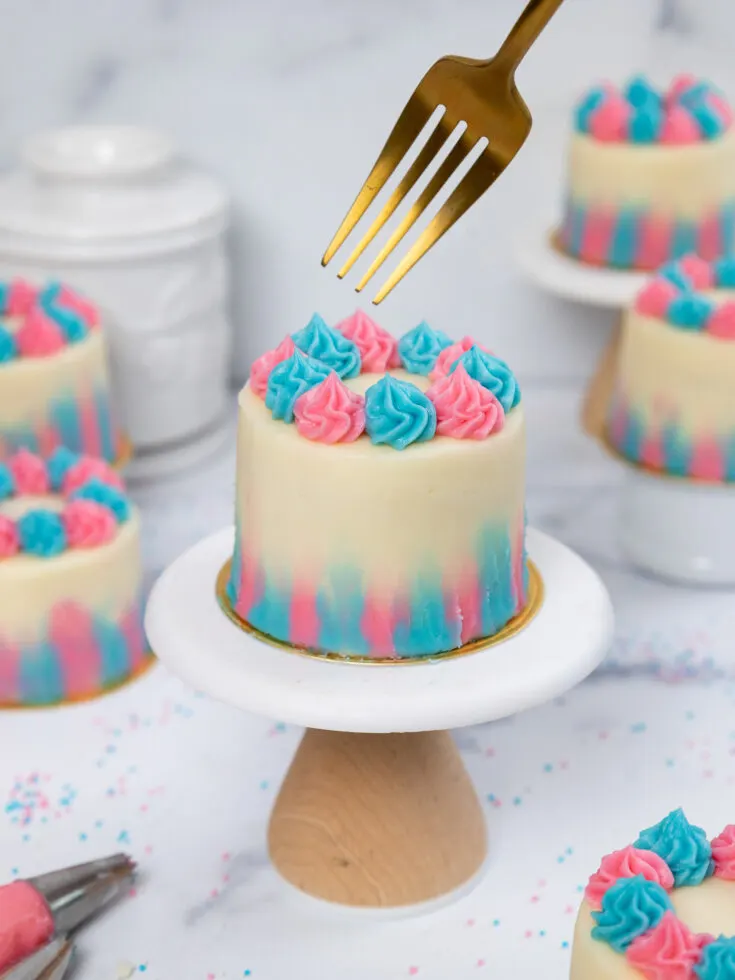
These mini gender reveal cakes are the perfect way to celebrate! They’re adorable, delicious, and such a fun way to share such a special moment.
This recipe makes 12 mini cakes, which lets everyone cut in at the same time to find out!
This post is sponsored by my friends at Domino® Sugar and this recipe uses my favorite types of Domino® Sugar.

Making These Mini Gender Reveal Cakes Together
Let’s walk through each step of this recipe to make sure it turns out as amazing as possible!
I’ve also shared a video tutorial on how to make them below.
Step 1: Make the Vanilla Cupcake Batter
I recommend making the cupcakes first so that they have time to cool before being filled and frosted.
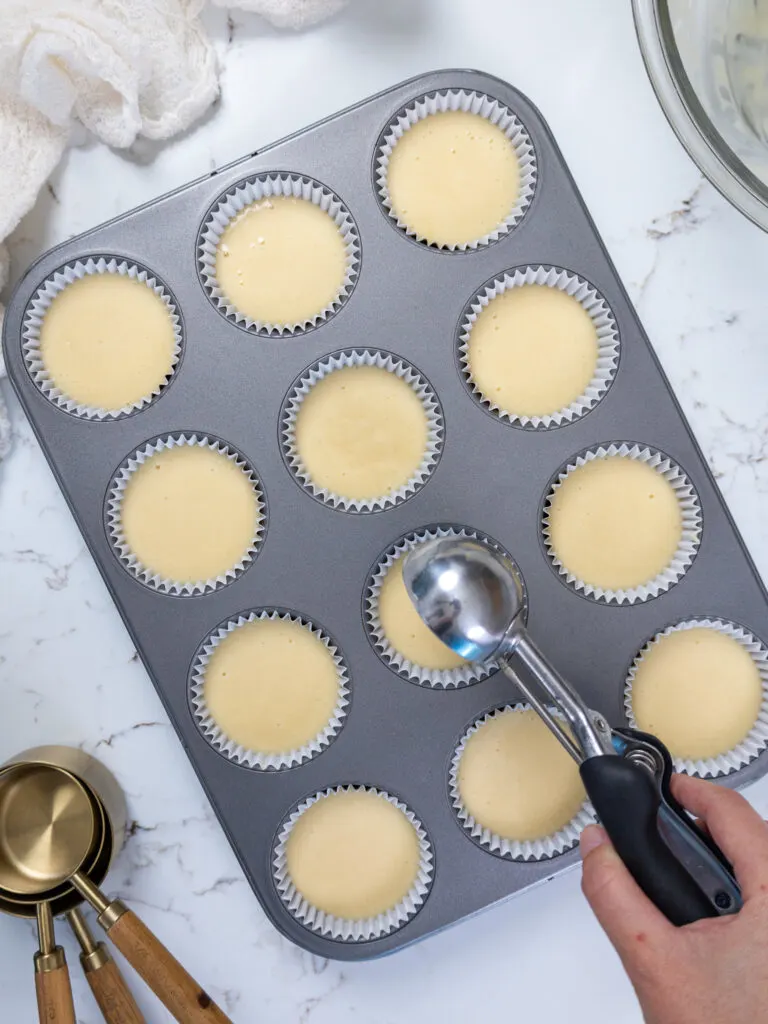
Follow the recipe card at the bottom of this post to make the batter, then divide the batter evenly between 12 cupcake liners. They should be about 3/4 full.
Bake for 18-20 minutes or until a toothpick comes out with a few moist crumbs.


Let the cupcakes cool for 10 minutes before moving them to a cooling rack to finish cooling. If you want to accelerate the cooling process, pop the pan into the freezer for about 30 minutes.
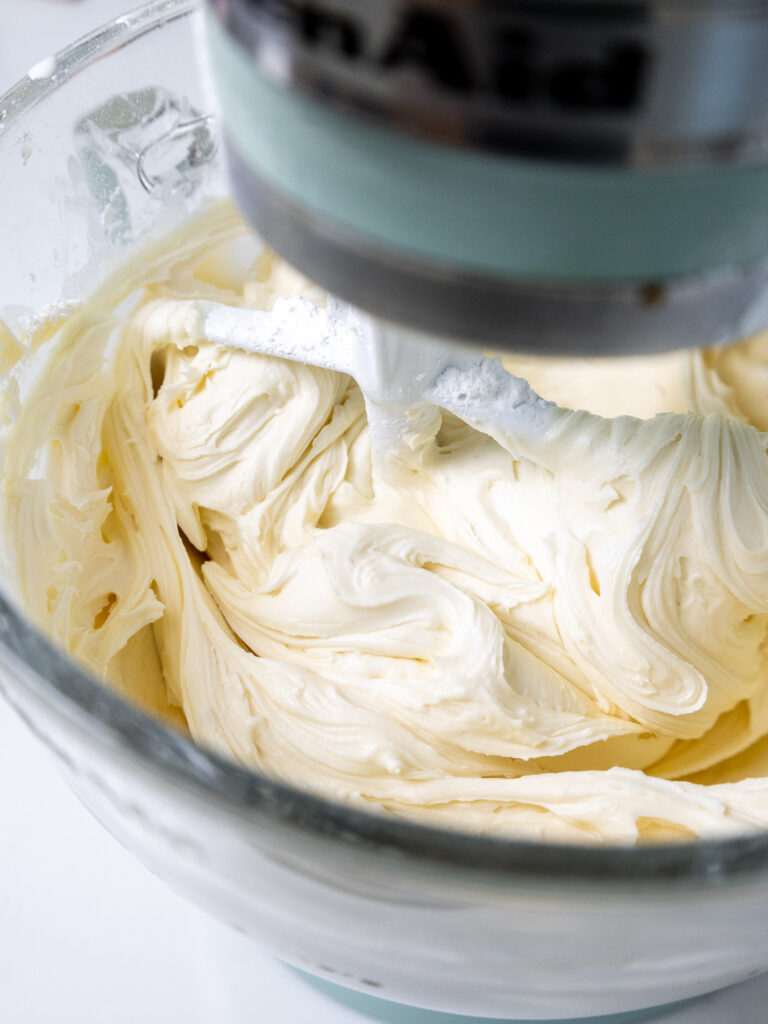
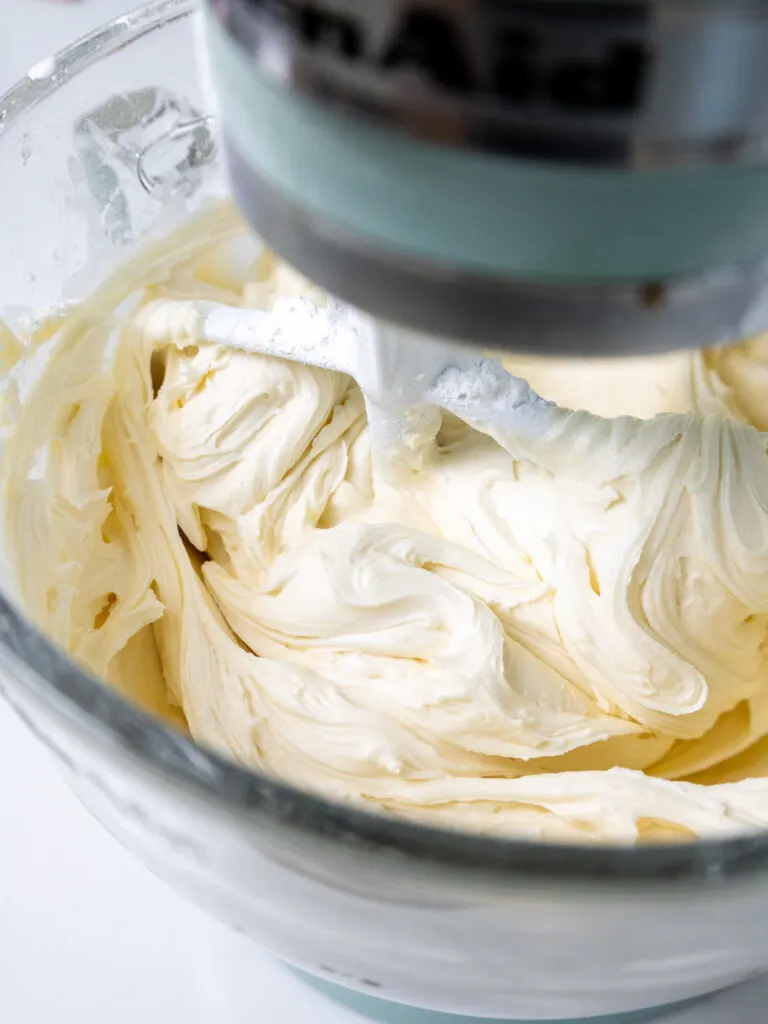
Step 2: Make the Vanilla Buttercream
While the cupcakes bake and cool, make the vanilla frosting.
If the frosting seems too thick, add an extra Tbsp of heavy cream. If it seems too thin, add another 1/4 cup of powdered sugar.
I’m using Domino® Powdered Sugar to make the frosting, which gives it a wonderfully smooth texture.
Or if you’re unsure what consistency the frosting should be, check out my frosting consistency guide.
Once the frosting is made, stir it by hand with a rubber spatula to get it SUPER smooth.
Use the gel food coloring to color 3/4 cup of the frosting pink and 3/4 cup of the frosting blue.
Place the remaining white frosting in a small piping bag fit with a small French tip. Place the pink and blue frosting in their own small piping bags.
Snip a small opening (about 1 cm) at the base of both bags. Set aside.
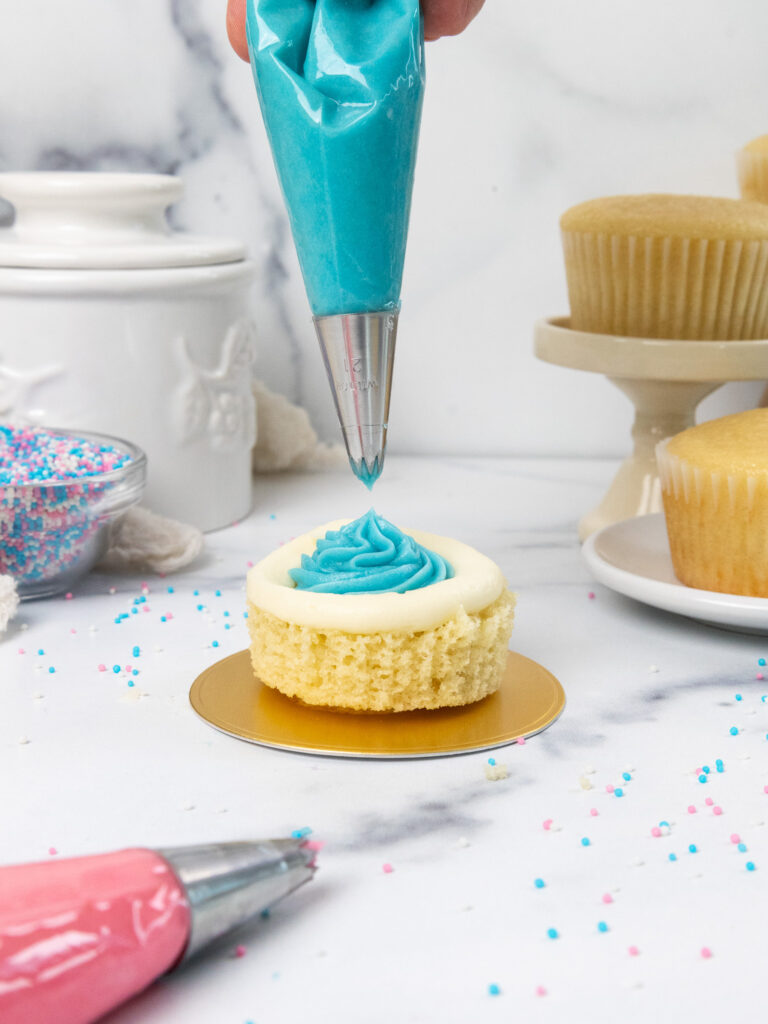
Step 3: Fill and Crumb Coat the Cupcakes
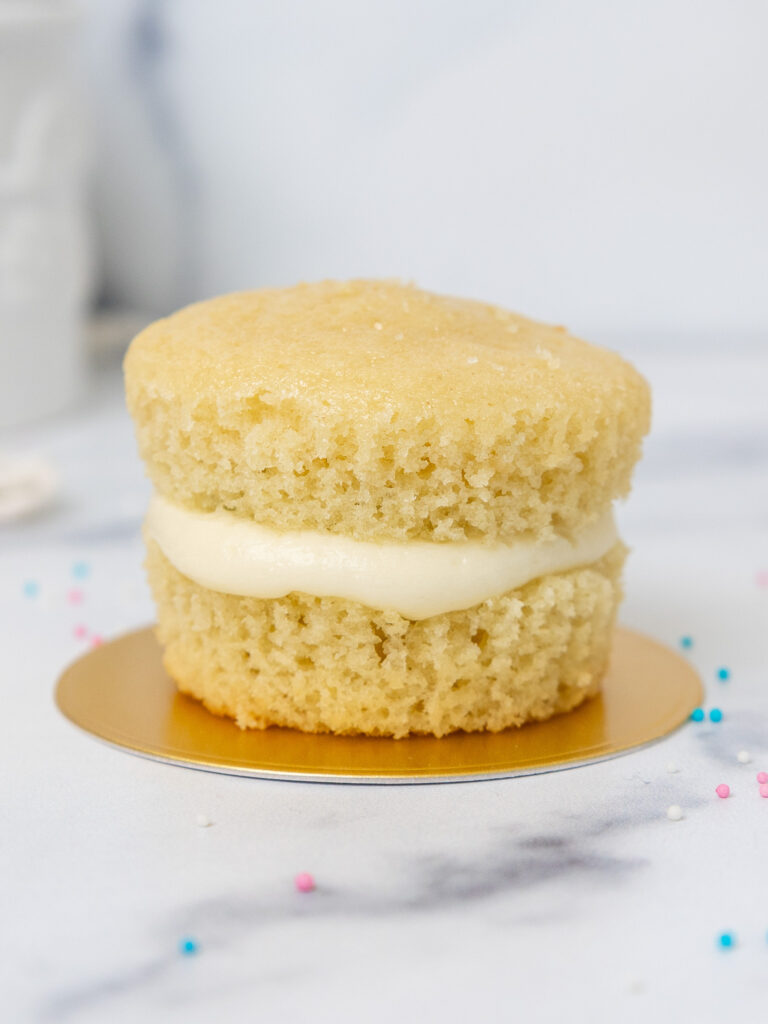
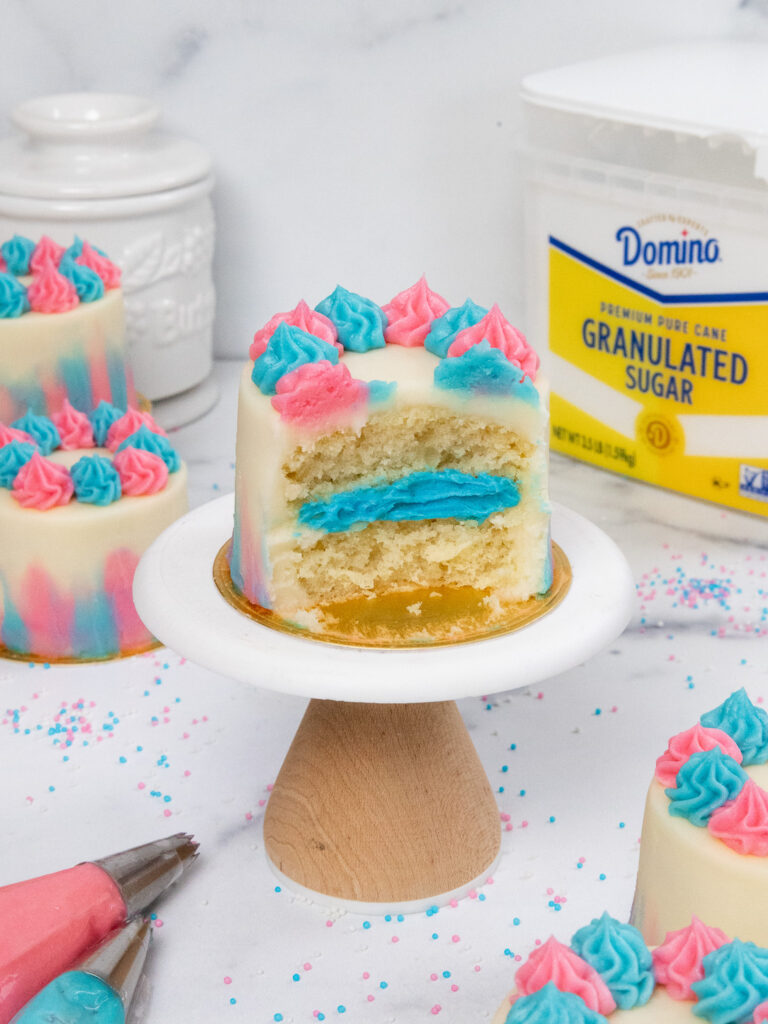
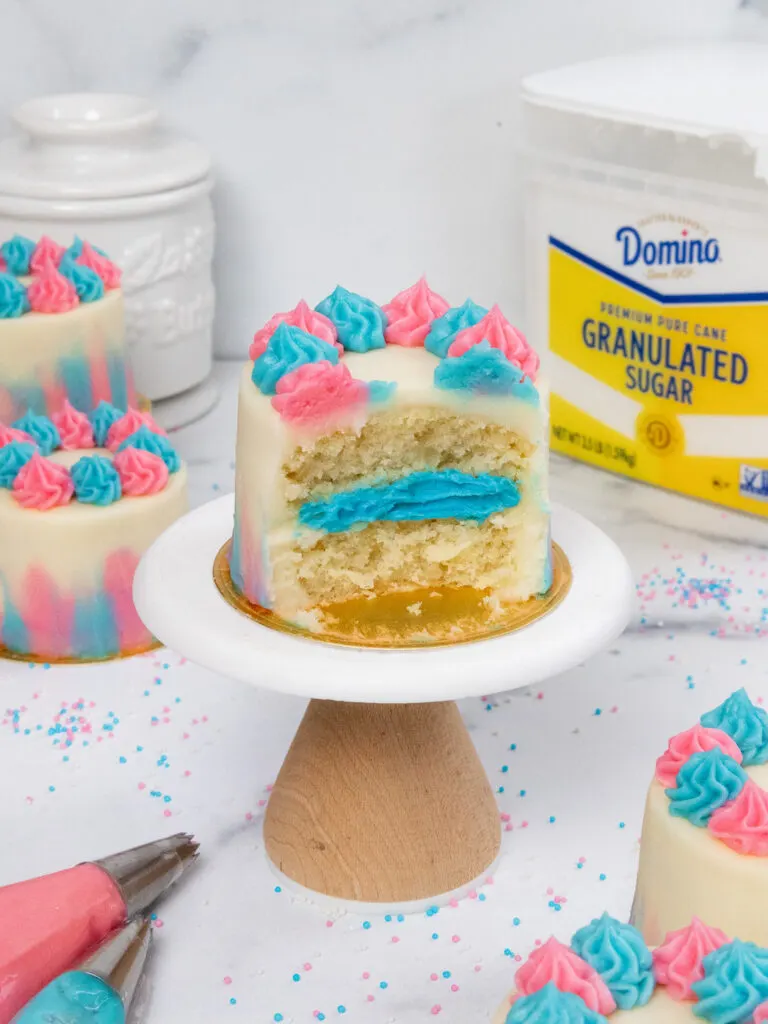
Unwrap one of the cupcakes. Use a sharp knife to cut the cupcake into two horizontal layers. Spread a dab of frosting onto a small, greaseproof cake board. This will help keep the cupcake stack in place on the board.
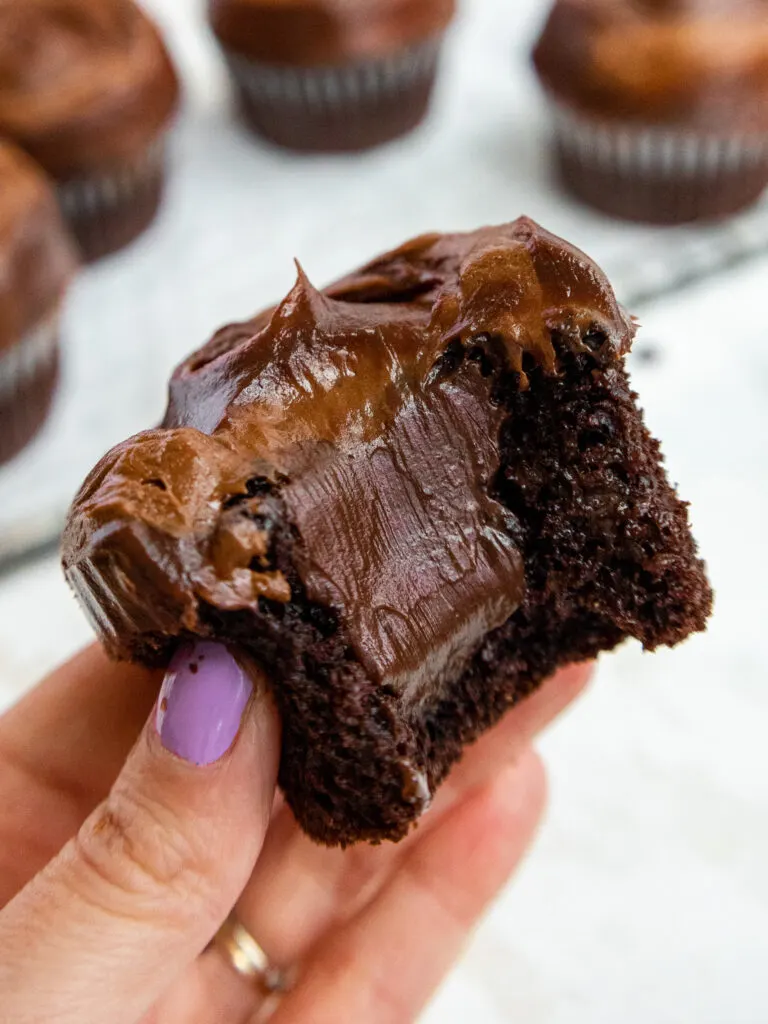
Place the bottom half of the cupcake in the center of the board. Spread an even layer of blue or pink (blue for a boy, pink for a girl) frosting on top of it, then top it with the upper half of the cupcake.

Freeze the stacked cupcakes for 5-10 minutes, until the frosting is firm to the touch.

Step 4: Frost and Decorate the Cupcakes
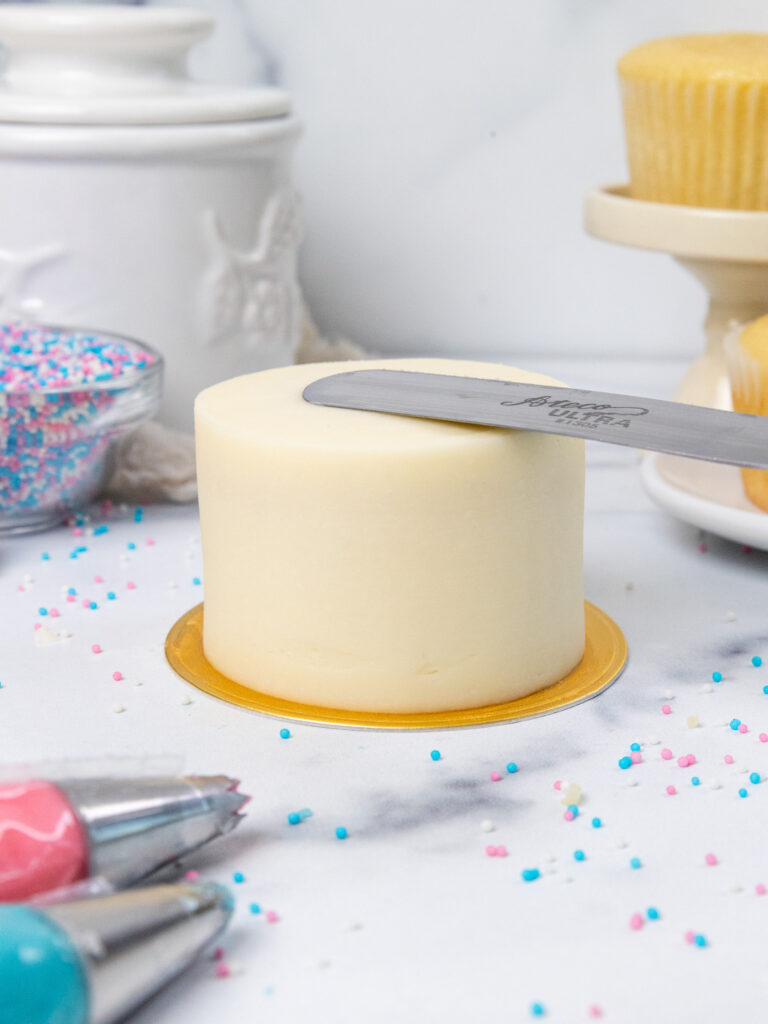
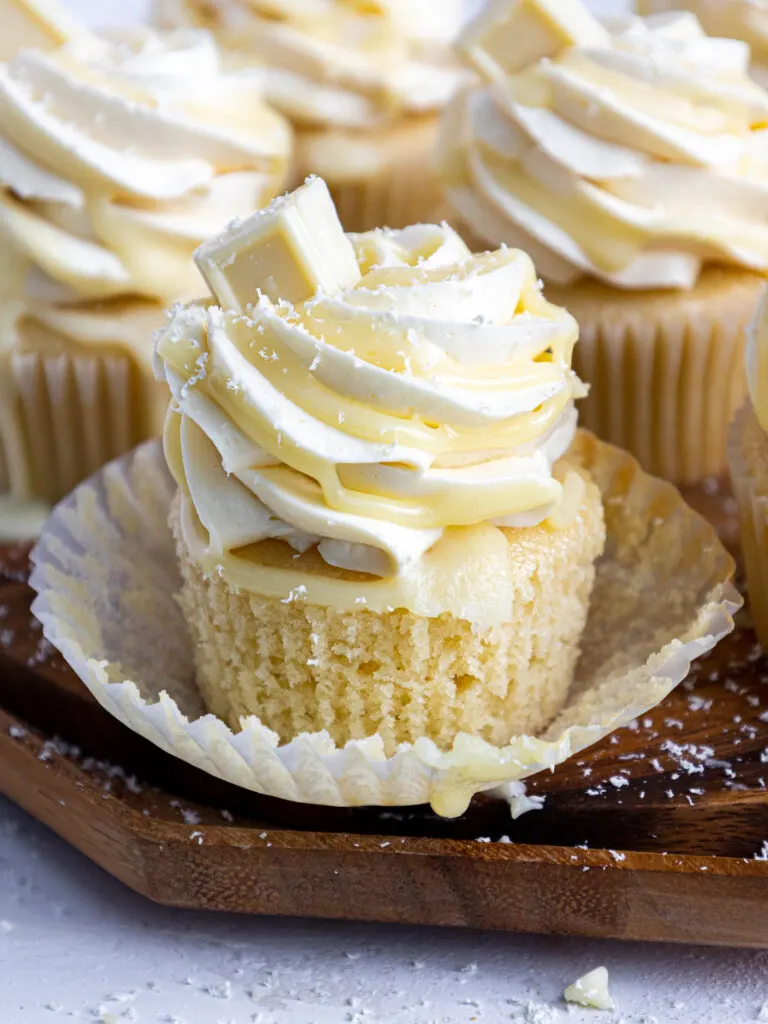
Cover the cupcake stack in a thin layer of white frosting and smooth using a small offset spatula.
Freeze the stacked cupcake for an additional 5-10 minutes, until the frosting is firm to the touch.
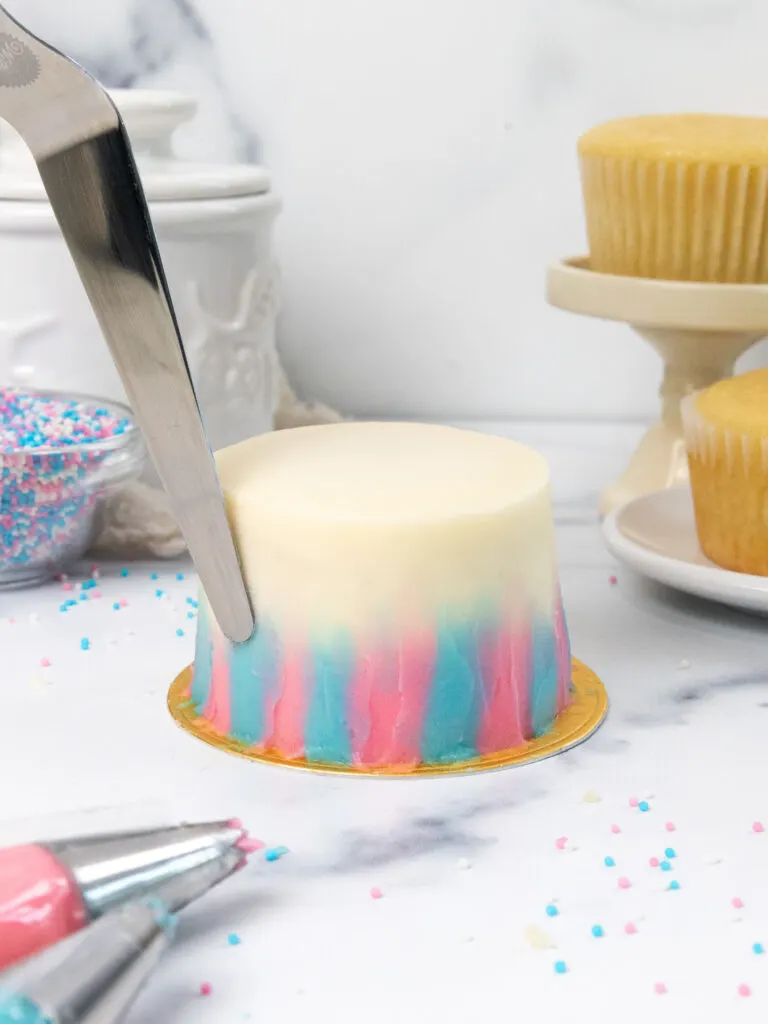
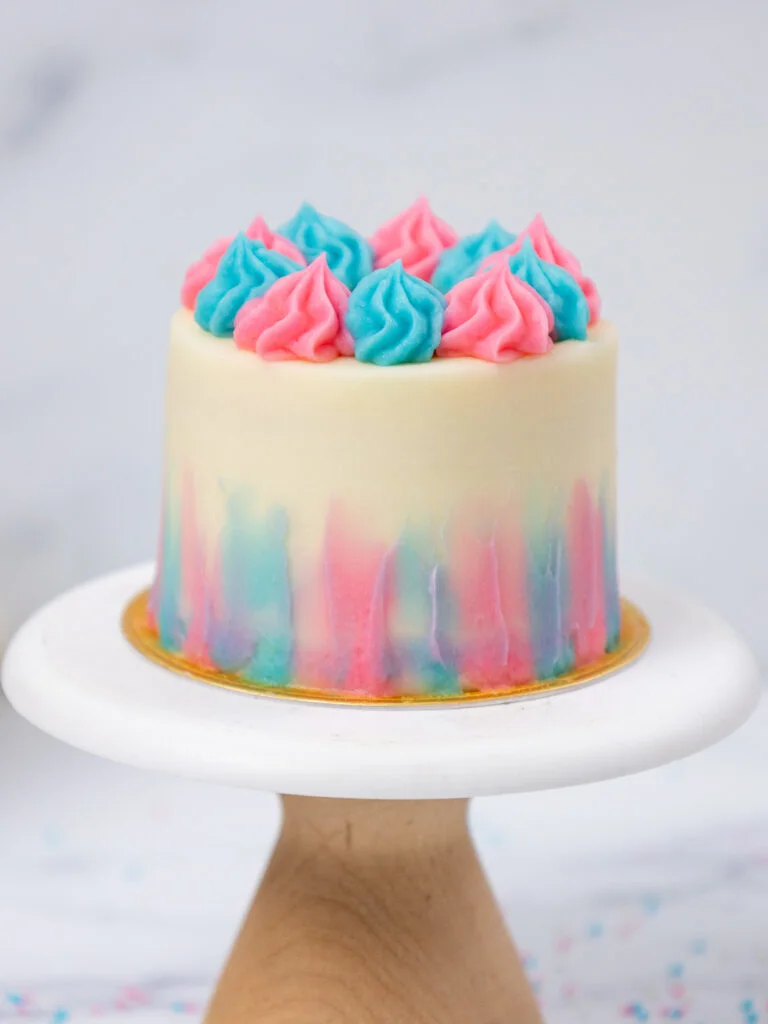
Then spread on a second, thicker layer of white buttercream.

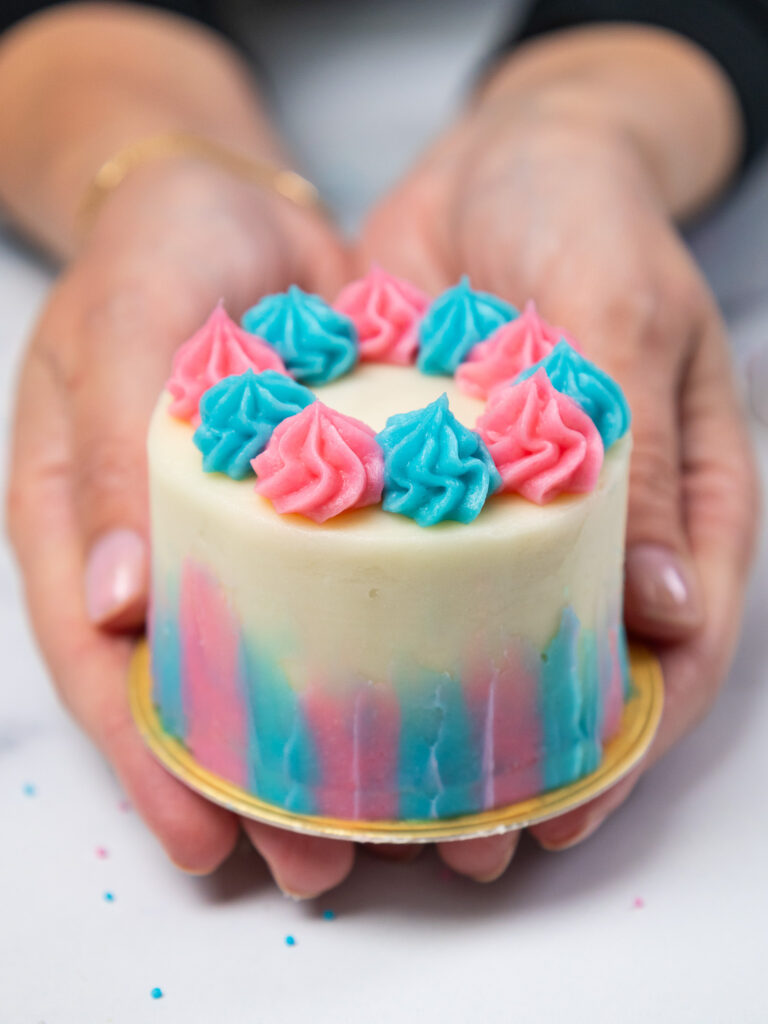
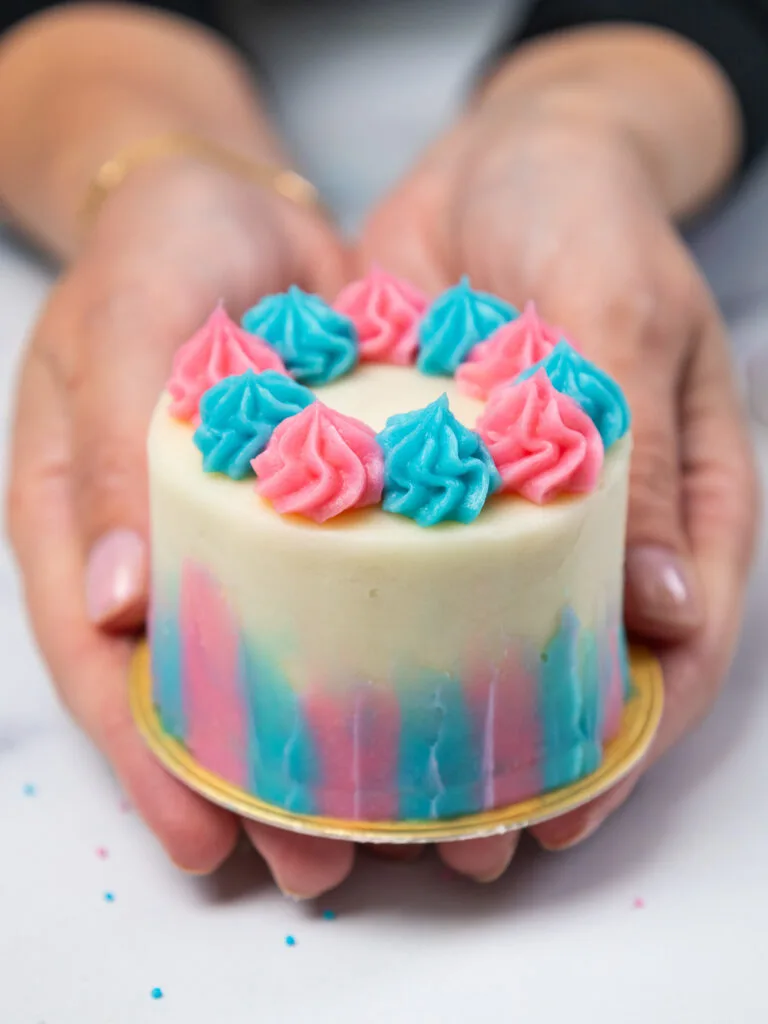
Pipe small dollops of pink and blue frosting around the base of the cake and use a small offset to create vertical streaks of frosting up the side of the mini cake.

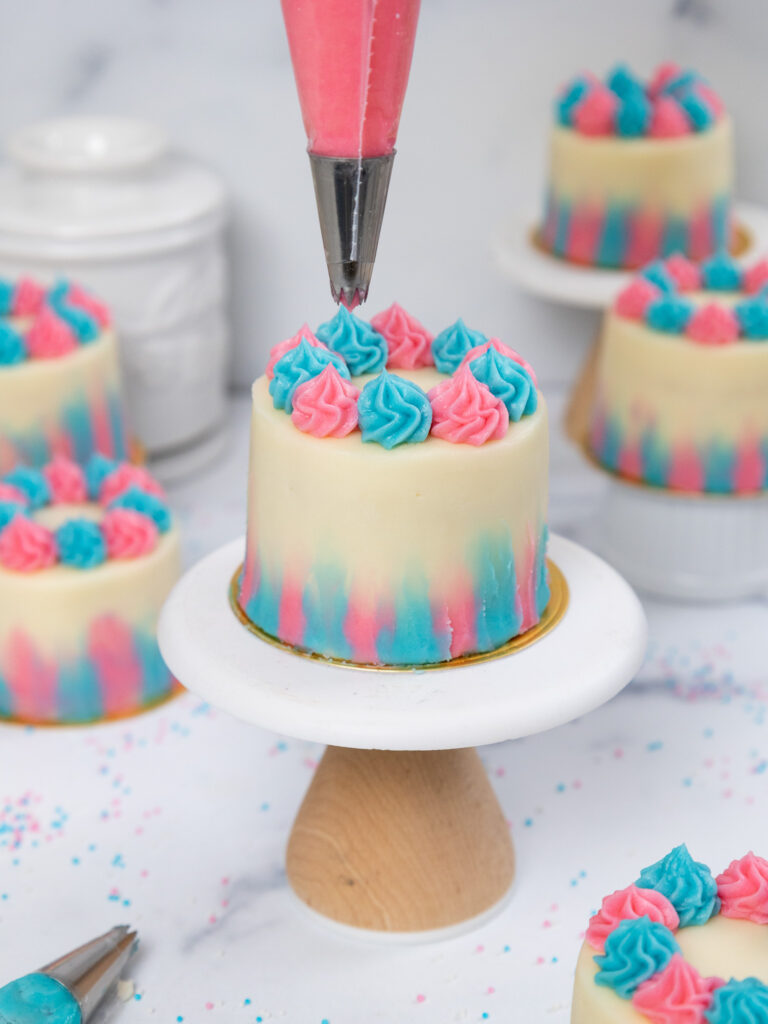
Pipe swirls of pink and blue buttercream in a ring on top of the cake.
Repeat with the remaining cupcakes, then chill them until you’re ready to cut into them.

Substitutions and Swaps – Vanilla Cupcakes
Now that we’ve covered how to make these cupcakes, let’s talk about the ingredients!
This recipe uses quite a few ingredients and I know you might not have them all on hand.
Or if you have food allergies or restrictions, I’ve got you covered. Below are some swaps and substitutions that you can make.
- All-Purpose Flour – This recipe turns out best with AP flour, but you can use a gluten-free flour blend if needed.
- Domino® Granulated Sugar – I used Domino® Granulated Sugar Easy Baking Tub which makes in-home baking more convenient because it’s a refillable and recyclable baking tub with a lid that snaps closed, allowing you to easily scoop, stack, and store the sugar. You can use the lid as a leveler as well! I do not recommend reducing the amount of sugar or changing the type of sugar as it will change the texture of these cupcakes.
- Vegetable Oil – You can use any flavorless oil in this recipe. Canola or sunflower oil would work great!
- Large Egg – If you have an egg allergy, try using a flaxseed egg or a vegan egg replacer like this one made by Bob’s Red Mill.
Substitutions and Swaps – Buttercream Frosting
- Unsalted Butter – If you only have salted butter on hand, you can use it in place of the unsalted butter. Just be sure to omit the salt that this frosting recipe calls for. You can also use vegan butter in its place.
- Domino® Powdered Sugar – I like using Domino® Powdered Sugar because it’s 10x refined and gives the buttercream a super smooth texture.
- Heavy Cream – Whipping cream, coconut cream or alternative milk (soy, almond, oat, coconut) will work fine in this frosting recipe if that’s what you have on hand.
- Vanilla Extract – Other extracts can also be used in place of the vanilla extract if needed.
Cupcake Troubleshooting & FAQs
While I’d love to think everyone’s mini cakes will turn out perfectly every time, I know that sometimes things don’t go to plan. Below are some tips and advice to help!

Why Didn’t My Cupcakes Rise? Why Are My Cupcakes Dense?
This can be caused by a few things. The most common is that either the ingredients weren’t all at room temperature, you over-mixed the batter after adding the flour, or your leavening agents are expired.
Using cold ingredients has a huge damper on how much baked goods rise. Make sure to set out cold ingredients ahead of time to let them come to room temperature.
Over-mixed batter can also create dense, chewy baked goods. Make sure that you mix the batter until it’s just combined once you’ve added in the flour.
Expired baking powder is a sneaky one. Check the dates on your baking powder container. It can start to lose its leavening power after it’s been open for 6 months.
A quick and easy way to check your baking soda is to mix it with a bit of water. It should bubble. If it doesn’t, it’s time to get some new baking soda.
Why Did My Cupcakes Sink in the Middle? Why Did They Overflow on the Sides?
This can happen when the cupcakes are under-baked, overfilled, or if your oven runs cool.
One batch of batter should be the perfect amount to make 12 cupcakes, but it needs to be evenly distributed between the liners. If they’re overfilled, they can overflow on the sides of the liners and/or sink in the middle.
Some cupcake pans and liners vary a bit in size, and this can also impact how the cupcakes bake up.
Another factor could be that your oven isn’t properly calibrated. I highly recommend getting an oven thermometer to make sure it’s baking at the right temperature.
Can I Make These Mini Gender Reveal Cakes in Advance?
These mini cakes can be made in advance! Frosted mini cakes can sit at room temperature for a day or be stored in the fridge for up to 5 days in an airtight container.
You can make the buttercream ahead of time too or save any leftovers. This buttercream frosting will last in the fridge for up to a month.
Be sure to stir the frosting well once it thaws to make the consistency nice and smooth again.
You can also store buttercream in a piping bag in the fridge. I find buttercream keeps its consistency well in piping bags and doesn’t require any mixing after it’s thawed.

Tips for Making the Mini Gender Reveal Cakes
- Ingredients at room temp mix together better. Set out any cold ingredients ahead of time.
- Properly measure the flour (spoon into the cup measure, then level) or use a kitchen scale to measure the dry ingredients.
- Mix the cupcake batter until the ingredients are just incorporated. This will ensure the cupcakes are tender and fluffy.
- Use a large cookie scoop to easily fill the cupcake liners. It also makes sure the cupcakes end up being the same height.
- Seal off the top of the piping bag with a rubber band to prevent any frosting from coming out of the top of the bag and make the piping bag easier to use.
Let Us Know What You Think!
If you make these mini gender reveal cakes, I’d love to hear what you think of them! Please leave a comment and rating below.
Don’t forget to tag me @chelsweets and @dominosugar so that we can see your delicious creations on social media.
Other Recipes You Might Like:


Mini Gender Reveal Cakes

These mini gender-reveal cakes are the perfect way to celebrate! They're adorable, delicious, and such a fun way to share such a special moment.
Ingredients
Vanilla Cupcakes
- 1 1/4 cup all-purpose flour (160g)
- 1 cup Domino® Granulated Sugar (200g)
- 1 1/2 tsp baking powder (6g)
- 1/2 tsp fine salt (3g)
- 1/2 cup sour cream, room temperature (125g)
- 1/2 cup water, room temperature (120g)
- 1/4 cup vegetable oil (54g)
- 1 large egg, room temperature (56g)
- 1 Tbsp vanilla extract or vanilla bean paste (12g)
Buttercream Frosting
- 2 cups or 4 sticks unsalted butter, room temperature (454g)
- 2 tsp vanilla extract (8g)
- 1/2 tsp fine salt (3g)
- 7 cups Domino® Powdered Sugar (904g or 2 lb. bag)
- 1/4 cup heavy cream or whipping cream (60g)
- Blue and pink gel food coloring
Suggested Equipment
- Cupcake Pan
- 12 Cupcake Liners
- Electric Hand Mixer or Stand Mixer
- 12, 4-inch Dessert Boards or Small Plates
- 3 Small Piping Bags & Tips or Ziplock Bags
- 2 Small French Piping Tips
- Small Offset Spatula
- Blue and Pink Sprinkles - Optional
Instructions
Vanilla Cupcakes
- Preheat the oven to 350°F / 175°C and line a muffin pan.
- Whisk 1 1/4 cups all-purpose flour, 1 cup Domino® Granulated Sugar, 1 1/2 tsp baking powder, and 1/2 tsp salt together in a large bowl.
- Make a well in the middle of the dry ingredients and add 1/2 cup of sour cream, 1/2 cup water, 1/4 cup vegetable oil, 1 large egg, and 1 Tbsp vanilla extract into the opening. Whisk the wet ingredients together, then whisk them into the dry ingredients. Mix until the batter is smooth.
- Divide the batter evenly between the cupcake liners, filling them about 3/4 of the way full. Bake for 18-20 minutes or until a toothpick comes out with a few moist crumbs.
- Let the cupcakes cool for 10 minutes before moving them to a cooling rack to finish cooling. If you want to accelerate the cooling process, pop the pan into the freezer for about 30 minutes.
Vanilla Buttercream
- While the cupcakes bake and cool, make the vanilla buttercream. In a large bowl or the bowl of a stand mixer, beat 2 cups of room-temperature butter on a medium speed for 30 seconds with a hand mixer or paddle attachment until smooth.
- Add 2 tsp vanilla extract and 1/2 tsp salt and mix on a low speed.
- Mix in 7 cups of Domino® Powdered Sugar and 1/4 cup of heavy cream on a low speed until combined. Scrape the bottom and sides of the bowl with a rubber spatula as needed.
- Mix on low until the ingredients are fully incorporated and the desired consistency is reached. If the frosting seems too thick, add an extra Tbsp of heavy cream. If it's too thin, add another 1/4 cup of powdered sugar.
- Stir by hand with a rubber spatula for a couple of minutes to make the frosting SUPER smooth.
- Use gel food coloring to color 3/4 cup of the frosting pink and 3/4 cup of the frosting blue. Place the pink and blue frosting in their own small piping bags fit with small French piping tips.
- Place the remaining white frosting in a large piping bag. Snip a small opening (about 1 cm) at the base of the bag and set aside.
Decorating These Mini Gender Reveal Cakes
- Unwrap one of the cupcakes. Use a sharp knife to cut the cupcake into two horizontal layers. Spread a dab of frosting onto a small, greaseproof cake board. This will help keep the cupcake stack in place on the board.
- Place the bottom half of the cupcake in the center of the board. Spread an even layer of blue or pink (blue for a boy, pink for a girl) frosting on top of it, then top it with the upper half of the cupcake. Freeze the stacked cupcakes for 5-10 minutes, until the stack is firm to the touch.
- Cover the cupcake stack in a thin layer of white frosting and smooth using a small offset spatula. Freeze the stacked cupcake for an additional 5-10 minutes, until the frosting is firm to the touch.
- Then spread on a second, thicker layer of white buttercream. Pipe small dollops of pink and blue frosting around the base of the cake and use a small offset to create vertical streaks of frosting up the side of the mini cake.
- Pipe swirls of pink and blue buttercream in a ring on top of the cake. Repeat with the remaining cupcakes, then chill them until you're ready to cut into them.
Notes
Ingredient Swaps & Substitutions
For a detailed list of ingredient swaps and substitutions that can be made in each component of this recipe, please refer to the "swaps and substitutions" section above.
Tips for Making the Best Mini Gender Reveal Cakes
- Ingredients at room temp mix together better. Set out any cold ingredients ahead of time.
- Properly measure your flour (spoon into the cup measure and then level) or use a kitchen scale to measure your dry ingredients.
- Once you add the flour, mix the cupcake batter just until the ingredients are incorporated. This will ensure the cupcakes bake up tender and fluffy.
- Use a large cookie scoop to fill your cupcake liners easily. It also makes sure the cupcakes end up being the same height.
- Seal off the top of your piping bag with a rubber band to prevent any frosting from seeping out the top of the bag and make the piping bag easier to use.
Gluten-Free Variation
To make gluten-free mini gender reveal cakes, swap in your favorite gluten-free flour blend for the AP flour this recipe calls for. Be sure to over-mix your batter and let it sit for at least 30 minutes before baking for best results.
Making These Mini Gender Reveal Cakes in Advance & Storage Tips
You can make these mini cakes in advance! Frosted mini cakes can sit at room temperature for a day or be stored in the fridge for up to 5 days in an airtight container.
You can make the buttercream ahead of time too or save any leftovers. This buttercream frosting will last in the fridge for up to a month.
Be sure to stir the frosting well once it thaws to make the consistency nice and smooth again.
You can also store buttercream in a piping bag in the fridge. I find buttercream keeps its consistency well in piping bags and doesn't require any mixing after it's thawed.
Nutrition Information
Yield
12Serving Size
1Amount Per Serving Calories 483Total Fat 25gSaturated Fat 12gTrans Fat 0gUnsaturated Fat 11gCholesterol 69mgSodium 242mgCarbohydrates 63gFiber 0gSugar 51gProtein 3g