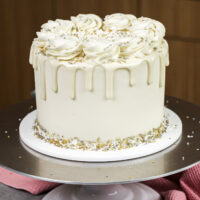
White Drip Cake
Want to learn how to make a white drip cake? This recipe and tutorial walk you through everything you need to know about drip cakes!
Servings: 16
Calories: 652kcal
Ingredients
Vanilla Cake Recipe
- 2 cups all-purpose flour 250g
- 2 cups granulated sugar 400g
- 1 1/2 tsp baking powder 6g
- 1/2 tsp fine salt 3g
- 2/3 cup unsalted butter, room temperature 150g - 1 and 1/3 sticks
- 2/3 cup carton egg whites or 5 large egg whites, room temperature 155g
- 1 cup full-fat sour cream, room temperature 240g
- 2 Tbsp vegetable or canola oil 30g
- 1 tsp vanilla extract or vanilla bean paste 4g
Vanilla Buttercream Frosting
- 1 1/2 cups unsalted butter, room temperature 339g
- 2 tsp vanilla extract or vanilla bean paste 10g
- 1/4 tsp fine salt 2g
- 5 cups powdered sugar 625g
- 2 Tbsp heavy whipping cream, room temperature 30g
White Drip Recipe
- 3 Tbsp heavy whipping cream, room temperature 45g
- 1/2 cup white chocolate chips 90g
- white gel food coloring
Additional Decorations – Optional
- Fun sprinkle blend
Equipment Needed
- 6- inch cake pans
- Spinning cake stand
- 8- inch cake board
- Large offset spatula
- Bench Scraper
- Electric hand mixer or stand mixer
- Microwave
- Plastic Squirt Bottle or metal spoon
Instructions
Vanilla Cake Layers:
- Preheat oven to 350°F. Grease three, 6-inch pans or two, 8-inch cake pans with baking spray and parchment rounds or homemade cake release.
- Mix the all-purpose flour, granulated sugar, baking powder, and salt in a large bowl. Use a stand mixer with a paddle attachment or hand mixer to mix on a low speed until combined.
- Mix the unsalted butter into the dry ingredients on a medium-low speed. Continue to mix until no large chunks of butter remain, and the mixture becomes crumbly.
- Pour in the egg whites and mix on low until just incorporated and the batter looks wet.
- Mix in the sour cream, oil and vanilla on a low speed. Scrape the sides and bottom of the bowl as needed with a rubber spatula.
- If desired, add in gel food coloring at this stage and stir by hand with a rubber spatula until the batter is evenly colored.
- Divide batter evenly between the prepared cake pans. I like to use a digital kitchen scale to weigh my pans and ensure they all have the same amount of batter. This guarantees the layers will bake to be the same height.
- Bake for 32-35 minutes or until a toothpick comes out with a few moist crumbs.
- Allow the pans to cool for 10 minutes, then run a small offset spatula around the perimeter of the pan to separate the cake from the pan.
- Flip the cake layers onto a wire rack to finish cooling.
- Use a serrated knife to level the tops of the layers once they’ve cooled completely. If you want to make your cake layers ahead of time, level them then wrap and freeze them.
- If you make these cake layers in advance and freeze them, let them thaw for about 20 minutes before making your cake. The cake layers should still be slightly cold to the touch, which will make it easier to assemble your cake.
Vanilla Buttercream Frosting:
- While the cake layers bake and cool, make the vanilla buttercream frosting.
- Beat the unsalted butter on a medium speed for 30 seconds with a paddle attachment, until smooth.
- Mix in the vanilla extract and salt on a low speed.
- Slowly mix in 5 cups of powdered sugar on a low speed. Add 2 Tbsp of heavy cream halfway through to make the frosting easier to mix.
- Continue to mix on low speed for a few minutes, until the desired consistency is reached.
- If the frosting is too thick, add in additional cream (1 Tbsp at a time). If the frosting is too thin, add in more powdered sugar (quarter of a cup at a time).
- If you make this buttercream in advance, cover the bowl with plastic wrap to prevent crusting. American buttercream can sit out at room temperature for up to 24 hours or lasts up to a month in the fridge. Just be sure to give the frosting a good stir with a rubber spatula once it thaws to push out any air bubbles and get the consistency smooth again.
Assembling This White Drip Cake:
- Stack and frost cake layers on a greaseproof cake board or flat plate.
- Add an even layer of buttercream between each cake layer with a large offset spatula.
- Add a thin coat of frosting around the cake, fully cover the cake layers.
- Smooth using a bench scraper, then chill the cake in the fridge (20 minutes) or freezer (5 minutes) until the frosting is firm to the touch.
- Add a second, thicker layer of frosting to the cake, and smooth using a bench scraper. Place the cake in the fridge (30 minutes) or freezer (10 minutes) until the frosting is totally chilled.
White Chocolate Ganache Drips:
- While the cake chills, make the white chocolate ganache drip.
- Heat the heavy cream in a heat proof bowl in the microwave for 30-45 seconds, until it's steaming and just beginning to bubble.
- Gently pour the heavy cream over the white chocolate chips, making sure they are fully covered with cream. Allow the mixture to sit for 1 minute.
- Stir slowly until the cream and white chocolate are combined. Some bits of chocolate may not be fully melted yet. If you notice this in your mixture, heat the mixture again for 15 seconds and stir. Repeat as necessary until all the chocolate bits are fully melted and incorporated.
- Once the ganache is smooth, mix in the white gel food coloring until the ganache is evenly colored. If you plan to use a plastic bottle to add your drips, pour the mixture into a plastic bottle.
- Let the mixture cool until the desired viscosity is reached and it's barely warm to the touch.
- If it seems too thin or thick, you can add a touch more chocolate chips or heavy cream! The type of cream and white chocolate that you use can affect the consistency, so feel free to adjust as needed.
- Make a test drip with your ganache to see if it's the right consistency, then adjust as needed (i.e. if the ganache is too thin let it cool more or add more white chocolate, or if it’s too thick pop it in the microwave for 5 seconds or add a tiny bit more heavy cream).
- Once it's the right consistency, add the drips to the chilled cake using a plastic squirt bottle or spoon. After covering the sides of the cake with drips, chill the cake in the freezer for 5 minutes to help the drips set.
- Add some of the remaining ganache on top of the cake and carefully spread it over the top of the chilled cake.
- Then decorate as desired! I like to add a fun sprinkle blend around the base of the cake and use the leftover buttercream to pipe dollops on top of the cake using your favorite frosting tip (I used a Wilton 1M).
Video
Notes
Dairy free alternative: Full-fat coconut cream (canned) can be used in place of the heavy cream in this recipe to make it dairy free.
Tips for Making the Best White Drip Cake
- Properly measure your flour (spoon into the cup measure, then level) or use a kitchen scale.
- Make sure your ingredients are at room temperature to help them mix together better.
- Don't level your cake layers until they are completely cooled.
- Make sure your buttercream is the right consistency. This will help give your cake proper structure and make it easier to decorate.
- If your cake layers turn out less than perfect, read my cake troubleshooting guide to see where things might've gone awry.
- Use this drip recipe on any type of buttercream cake that's been thoroughly chilled.
- Don't use this white drip recipe on fondant. It can do weird things to the fondant and create a goopy mess.
- For the white chocolate, I love using the whole foods mini white chocolate chips because they melt so easily.
- You can also use regular white chocolate chips, white chocolate wafers, or even a chopped up white chocolate bar for the chocolate this recipe calls for.
- The ratio of heavy cream is different if you use white candy melts. Candy melts cannot be swapped 1:1 for the white chocolate in this recipe! They are not interchangeable.
- Be sure to use heavy cream or heavy whipping cream! You need the high fat content to create the right consistency in this recipe. Milk cannot be used in place of the cream.
Making This White Dripping Cake in Advance and Storage Tips
- Make your cake layers in advance and freeze them. It breaks the process up and makes it more approachable.
- Make your frosting ahead of time too or save any leftover frosting! It can be stored in an airtight container in the fridge for up to a month, or in the freezer for up to 3 months. Be sure to give it a good stir once it thaws to get the consistency nice and smooth again.
- Make this ganache drip recipe ahead of time or save leftovers! Once it's made, wrap the bowl with plastic wrap or cover the top of the plastic bottle and store in the fridge for up to 3 weeks.
- To use chilled ganache, heat the bottle or bowl in the microwave for 10 second intervals until it reaches the right consistency. Use leftover ganache to top cupcakes, cookies, or even ice cream!
- A frosted cake can last in the fridge for up to a week, or in the freezer for up to a month. The buttercream locks in all the moisture, keeping the cake fresh and delicious!
- If you cut into the cake and have leftovers, use any remaining frosting to cover the cut section to keep it moist and store in the fridge for up to a week.
Nutrition
Serving: 1 | Calories: 652kcal | Carbohydrates: 80g | Protein: 4g | Fat: 37g | Saturated Fat: 21g | Polyunsaturated Fat: 13g | Cholesterol: 86mg | Sodium: 259mg | Sugar: 77g