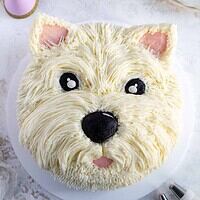
Westie Cake
This cute westie cake is made with tender vanilla cake layers and decorated with delicious, homemade buttercream frosting.
Servings: 16
Calories: 576kcal
Ingredients
Vanilla Cake
- 2 cups + 2 Tbsp all-purpose flour 270g
- 2 cups granulated sugar 400g
- 1 1/2 tsp baking powder 6g
- 1/2 tsp fine salt 3g
- 2/3 cup (1 1/3 sticks) unsalted butter, room temperature 150g
- 2/3 cup carton egg whites or 5 large egg whites, room temperature 155g
- 1 cup buttermilk, room temperature 240g
- 1 Tbsp vegetable or canola oil 14g
- 1 tsp vanilla extract or vanilla bean paste 4g
Vanilla Buttercream Frosting
- 2 cups unsalted butter, room temperature 452g
- 7 cups powdered sugar 907g or a 2 lb. bag
- 1/3 cup heavy whipping cream, room temperature 80g
- 1 Tbsp vanilla extract or vanilla bean paste 12g
- 1/2 tsp fine salt 3g
Recommend Equipment
- Two 8-inch cake pans
- Serrated Knife
- Offset Spatula
- 1 Small Piping Bag
- 2 Small Piping Bags
- 2 Small Round Piping Tips like a Wilton 10
- 1 Small Grass Piping Tip like a Wilton 233
- 1 Very Small Round Piping Tip like a Wilton 3
- 1 Plastic Coupler
- Small Acetate Sheet I cut these down into smaller squares with scissors
- Gel Food Coloring - Pink and Black
- 2 White Chocolate Squares
- Electric Hand Mixer or Stand Mixer
Instructions
Vanilla Cake Layers:
- Preheat oven to 350°F / 175°C. Line two 8 inch pans with parchment rounds and grease with non-stick baking spray.
- Mix 2 cups + 2 Tbsp all-purpose flour, 2 cups granulated sugar, 1 1/2 tsp baking powder, and 1/2 tsp salt in a large bowl. Use a stand mixer with a paddle attachment or hand mixer to mix on a low speed until combined.
- Mix in 2/3 cup (1 & 1/3 stick) unsalted butter slowly into the dry mix, on a medium-low speed. Continue to mix until no large chunks of butter remain, and the mixture becomes crumbly.
- Pour in 2/3 cup or 5 large egg whites and mix on low until just incorporated and the batter looks wet.
- Mix in 1 cup of buttermilk, 1 Tbsp of vegetable oil, and 1 tsp vanilla extract on a low speed. Scrape the sides and bottom of the bowl as needed with a rubber spatula, then beat on a medium speed for about a minute to make sure everything is properly mixed together. This also helps lighten the texture of the cake layers a bit.
- If desired, add in gel food coloring and stir by hand with a rubber spatula until the batter is evenly colored.
- Divide batter evenly between the prepared cake pans. I like to use a digital kitchen scale to weigh my pans and ensure they all have the same amount of batter. This guarantees the layers will bake up to be the same height.
- Bake for 33-35 minutes, or until a toothpick comes out with a few moist crumbs. Let the pans cool for 10 minutes, then run a small offset spatula around the perimeter of the pan to separate the cake from the pan.
- Once the layers are fully cooled, carefully flip the pans, and remove the layers. Use a serrated knife to level the top of the layers right before you plan to assemble your cake.
Vanilla Buttercream Frosting:
- While the cake layers bake and cool, make the vanilla buttercream frosting.
- Beat 2 cups of unsalted butter on a medium speed for 30 seconds with a paddle attachment or hand mixer until smooth.
- Gradually mix in 7 cups of powdered sugar and 1/4 cup of heavy cream on a low speed. Scrape the sides and bottom of the bowl as needed with a rubber spatula.
- Once the frosting is fully mixed and smooth, add in 1 Tbsp of vanilla extract and 1/2 tsp salt. Mix on the lowest speed for a couple minutes to help make the frosting silky smooth.
- If the frosting seems too thick, add in additional cream (1 teaspoon at a time). If the frosting is too thin, add in more powdered sugar (a quarter of a cup at a time). If you're unsure how thick your frosting should be, you can learn what consistency you're looking for in my frosting consistency post.
- Wait to color the buttercream until the cake is filled and crumb coated. Cover the frosting flush with plastic wrap to prevent it from crusting, then set aside.
Assembling This Cake:
- Stack and frost the cake layers on a greaseproof cake board or flat plate using a dab of frosting to help stick the first cake layer to the board.
- Spread an even layer of buttercream between the cake layers with a large offset spatula. Place the top cake layer upside down to make it easier to get sharp corners.
- Add a thin coat of frosting around the cake to fully cover the cake layers. Smooth using a bench scraper, then chill the cake in the fridge (20 minutes) or freezer (10 minutes) until the frosting is firm to the touch.
Color the Buttercream Frosting:
- While the cake chills, color the remaining buttercream.
- Color 2 Tbsp of buttercream pink with gel food coloring. Place the frosting into a piping bag fit with a small, round piping tip (like a small, round piping tip (like a Wilton 10). Seal the top of the bag with a rubber band or clip. Set aside.
- Color 1/4 cup of buttercream black with gel food coloring. Place the frosting into a piping bag fit with a plastic coupler. Twist a small, round piping tip (like a Wilton 10) into place and seal the top of the bag with a rubber band or clip. Set aside.
- Place the remaining frosting into a large piping bag fit with a plastic coupler. Wait to add a piping tip and seal the top of the bag with a rubber band or clip. Set aside.
Decorating This Westie Cake:
- Use a toothpick or scribe to trace out where you want to pipe the westie's face. This helps ensure that the westie's face will be even and properly spaced out.
- Pipe a mound of white buttercream on the muzzle/nose of the westie and smooth using an offset spatula. This helps give the face a bit of depth.
- Then use black buttercream to pipe the westie's eyes and nose like in the pictures above. Add a very small, round tip (Wilton 3) to the bag of white buttercream and pipe small circles on the eyes to give them a bit more life. Use the pink buttercream to add on a small mouth about an inch below the nose.
- Swap the piping tip on the bag of white buttercream and secure a small grass tip (like a Wilton 233). Start by filling in the chin and around the mouth with short buttercream fur. Then work on the muzzle. Make long, arching lines of buttercream starting at the nose and going toward the edge of the cake. This can take a bit of time, so be patient and give your hand breaks as you go. If you notice the heat from your hands is melting the frosting and changing its consistency, wrap the piping bag in a couple of layers of paper towel or in a thin kitchen towel.
- Then make medium length lines of buttercream up the nose and around the eyes like in the picture above. Once the top half of the cake is covered, pipe some additional buttercream lines above the westie's eyes to look like eyebrows.
- Press two, large chocolate squares (about 1.5 x 1.5 inches) into the sides of the cake and cover the top of them with pink buttercream. Pipe white buttercream around the edges.
- A frosted cake can last in the fridge for up to 5 days, or in the freezer for up to a month. The buttercream locks in all the moisture, keeping the cake fresh and delicious.
Video
Notes
Tips for Making the Best Westie Cake
- Properly measure the flour (spoon into the cup measure, then level) or use a kitchen scale.
- Make sure the ingredients are at room temperature to help them mix together better.
- Wait to level the cake layers until they are completely cooled.
- I used piping bags to decorate this cake, but you can also use Ziplock bags if you don't have piping bags! I recommend using the freezer type because they're a bit sturdier. Cut a 1 cm hole in the corner of each.
- If you notice the heat from your hands is melting the frosting and changing its consistency, wrap the piping bag in a couple of layers of paper towel or in a thin kitchen towel.
- Make sure the buttercream is the right consistency. This will make the cake much easier to decorate.
- If your cake layers turn out less than perfect, read my cake troubleshooting guide to see where things might've gone awry.
Making This Westie Cake in Advance and Storage Tips
Make these cake layers in advance and freeze them. It breaks the process up and makes it more approachable. You can also make the frosting ahead of time too or save any leftover frosting! It can be stored in an airtight container in the fridge for up to a month, or in the freezer for up to 3 months. Be sure to give it a good stir once it thaws to get the consistency nice and smooth again. A frosted cake can last in the fridge for up to 5 days, or in the freezer for up to a month. The buttercream locks in all the moisture, keeping the cake fresh and delicious. If you cut into the cake and have leftovers, use any remaining frosting to cover the cut section to keep it moist and store it in the fridge for up to a week.Nutrition
Serving: 1 | Calories: 576kcal | Carbohydrates: 78g | Protein: 3g | Fat: 29g | Saturated Fat: 17g | Polyunsaturated Fat: 10g | Cholesterol: 76mg | Sodium: 272mg | Sugar: 75g