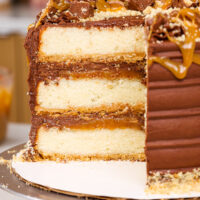
Twix Cake
This Twix cake tastes and looks just like our favorite candy! Its tender vanilla cake layers are filled with buttery homemade caramel and decadent chocolate buttercream!!
Servings: 24 servings
Calories: 794kcal
Ingredients
Thick Caramel Filling
- 1/2 cup unsalted butter, room temperature 113g
- 1 cup packed light brown sugar 200g
- 1/2 cup light corn syrup 120ml
- 7 oz or 1/2 can sweetened condensed milk 198g
- 1 Tbsp heavy whipping cream, room temperature 15ml
- 1 tsp vanilla extract or vanilla bean paste 4ml
- 1 tsp fine salt 6g
Shortbread Base
- 1 1/2 cups (3 sticks) unsalted butter, room temperature 339g
- 3 cups all-purpose flour 375g
- 3/4 cup powdered sugar 95g
- 1 tsp fine salt 6g
Vanilla Cake Recipe
- 1 cup (2 sticks) unsalted butter, room temperature 226g
- 3 cups granulated sugar 600g
- 1 cup carton egg whites or 7 large egg whites, room temperature 240ml
- 3 cups cake flour 360g
- 2 1/2 tsp baking powder 10g
- 1 tsp fine salt 6g
- 1 1/2 cups full-fat sour cream, room temperature 360g
- 1/4 cup vegetable or canola oil 60ml
- 1 tsp vanilla extract or vanilla bean paste 4ml
Chocolate Buttercream Frosting
- 2 cups (4 sticks) unsalted butter, room temperature 452g
- 1/2 cup unsweetened baking cocoa 40g
- 1 tsp vanilla extract or vanilla bean paste 4ml
- 1/2 tsp fine salt 3g
- 6 cups powdered sugar 750g
- 2/3 cup heavy whipping cream, room temperature 180ml
- 1 cup semi-sweet chocolate chips, melted and cooled 180g
Recommended Tools
- Digital Kitchen Thermometer
- 8- inch cake pans
- Spinning cake stand
- 10- inch greaseproof cake board
- Large offset spatula
- Electric hand mixer or stand mixer
- Icing Comb
Instructions
Caramel Filling
- Make the caramel filling first so that it can thicken up before being added to the cake. This can be made up to a month in advance and stored in the fridge.
- Add 1/2 cup of unsalted butter, 1 cup of light brown sugar, 1/2 cup of corn syrup, and 7 oz. of sweetened condensed milk into a large saucepan.
- Heat over a medium-high heat. Stir constantly until the mixture starts to bubble.
- Slowly stir in 1 Tbsp of heavy cream. Place a digital thermometer in the pan at this point. Continue to stir until the caramel reaches 225 F / 110 C (just before the softball stage).
- Remove from heat and add 1 tsp of vanilla and 1 tsp of salt. Pour into a separate container to let the caramel cool. Cover the bowl once the caramel has reached room temperature. This can be stored at room temperature for up to 2 days, or a month in the fridge.
Shortbread Crust
- Use a fork or pastry cutter to combine 1 1/2 cups softened butter, 3 cups flour, 3/4 cup powdered sugar, and 1 tsp fine salt. It should form a slightly crumbly dough once combined.
- Divide the dough into three equal portions and press them into the bottom of the prepared pans with your fingers to create an even layer.
- Prick the crust thoroughly with a fork, then bake for 22-25 minutes, or until the edges are just starting to brown.
- Place the pan on a wire rack to cool and keep the oven.
Vanilla Cake Layers
- Add 1 cup of unsalted butter into the bowl of a stand mixer or a large bowl and beat with a whisk attachment on a medium speed until smooth and creamy.
- Add 3 cups of granulated sugar and cream together on a high speed for 2-3 minutes with a whisk attachment or hand mixer. Scrape the sides of the bowl with a rubber spatula as needed. The mixture should become lighter in color.
- Pour in 1 cup of egg whites and mix at a medium speed until incorporated.
- Whisk together 3 cups of cake flour, 2 1/2 tsp baking powder, and 1 tsp salt by hand in a medium-sized bowl, then mix half of the dry ingredients into the butter/egg mixture on a medium speed until combined.
- Add 1 1/2 cups of sour cream, 1/4 cup vegetable oil, and 1 tsp vanilla extract. Mix at a medium speed until combined, scraping the sides and bottom of the bowl as needed.
- Mix in the remaining half of the dry ingredients on a medium speed. Scrape the sides of the bowl with a rubber spatula as needed.
- Pour the batter on top of the baked shortbread crusts, dividing the batter evenly between the pans. I like to use a digital kitchen scale to weigh my pans to make sure my layers will be the same height.
- Bake for 34-36 minutes or until a toothpick comes out with a few moist crumbs. Rotate the pans halfway through to help them bake evenly.
- Allow the pans to cool for 10 minutes, then run an offset spatula around the perimeter of the pan to separate the cake from the pan. Be careful as you do this so that you don't break up the shortbread crust at the bottom!
- Place cake layers into the freezer for 45 minutes to accelerate the cooling process. Once the layers are fully cooled, carefully flip the pans and remove the layers from the pans.
- Use a serrated knife to level the top of each cake layer. Set the cake layers aside or wrap them and freeze them at this point if you're making them in advance.
Chocolate Buttercream Frosting
- Melt 1 cup of semi-sweet chocolate chips first so that it has time to cool off before being added to the frosting. Otherwise, it can melt the butter! Melt the chocolate chips by heating them in 15-second intervals in the microwave (stirring between) or with a double boiler.
- Beat 2 cups of butter on a medium speed for 30 seconds with a paddle attachment or in a large bowl with a hand mixer until smooth.
- Add in 1/2 cup of baking cocoa, 1 tsp of vanilla extract, and 1/2 tsp fine salt. Mix on low until the ingredients are fully incorporated.
- Slowly mix in 6 cups of powdered sugar. Halfway through, add in 2/3 cup of heavy cream to make the frosting easier to mix.
- Once all the powdered sugar has been incorporated, add in the melted and cooled chocolate.
- Mix on a low speed until the ingredients are fully incorporated and the desired consistency is reached. I also like to stir it by hand with a rubber spatula once it's fully made. This will help make the frosting silky smooth, and easier to smooth onto your cake.
- Place the frosting in 2 large piping bags and set aside.
Assembling This Twix Cake
- Stack and frost the cake layers on a greaseproof cake board or flat plate, using a dab of chocolate buttercream to help stick the first cake layer to the board (crust side down).
- As you assemble the cake, pipe a ring of chocolate buttercream around the cake layer. Heat up the caramel filling for 15-30 seconds, until it's just fluid enough to spread. Spread about 1 cup of the caramel in an even layer inside the buttercream ring. Be careful not to overheat the caramel or else the layers can slide around as you assemble the cake. If you run into this, chill the cake after adding each layer of caramel.
- Cover the caramel with a layer of chocolate buttercream. Repeat with the remaining cake layers, and reserve about 1/4 cup of caramel filling to decorate the cake later.
- Once you've stacked the cake layers, smooth a thin coat of chocolate buttercream around the cake with a large offset spatula and bench scraper. Freeze the cake for about 10 minutes in the freezer or 30 minutes in the fridge, or until the frosting is firm to the touch.
- Cover the cake with a second, thicker layer of chocolate buttercream and smooth using a bench scraper. If desired, use an icing comb to add a fun pattern to the sides of the cake.
- Decorate the top of the cake with a ring of chopped-up Twix and frosting dollops. Heat up the remaining caramel in the microwave in 10-second intervals until it's thinner, then drizzle it over the top of the cake and enjoy!
Video
Notes
My Tips for Making the Best Twix Cake
- Ingredients at room temp mix together better! Set out any cold ingredients ahead of time.
- Properly measure your flour (spoon into the cup measure, then level). Or better yet, use a kitchen scale to measure your dry ingredients.
- Once you add in the flour, mix your cake batter just until the ingredients are incorporated. This will ensure your cake layers are tender and fluffy.
- Use a scale to weigh your cake pans as you fill them. It helps the cake layers bake to the same height and bake more evenly.
- Level your room temperature or thawed cake layers with a serrated knife to make them easier to stack.
- Chill your cake layers in the freezer for about 20 minutes before assembling the cake. It makes it so much easier to frost them!
Making This Twix Cake in Advance & Storage Tips
- Make your cake layers in advance and freeze them. It breaks the process up and makes it more approachable.
- Make your chocolate frosting ahead of time or save any leftover frosting! It can be stored in an airtight container in the fridge for up to a month. This frosting can also be stored in the freezer for up to 3 months. Just be sure to give it a good stir once it thaws to make it nice and smooth again.
- The caramel can be made up to a month is advance if stored in an airtight container in the fridge.
- A frosted cake can last in the fridge for up to a week, or in the freezer up to a month. If you freeze the cake, transfer it to the fridge the night before you plan to eat it. This will help it gradually thaw and minimize any temperature shock. Remove the cake from the fridge about 30 minutes before you plan to cut into it.
Nutrition
Serving: 1 | Calories: 794kcal | Carbohydrates: 113g | Protein: 6g | Fat: 37g | Saturated Fat: 19g | Polyunsaturated Fat: 15g | Cholesterol: 82mg | Sodium: 443mg | Fiber: 1g | Sugar: 90g