Pumpkin Cake Pops
These pumpkin cake pops are so delicious and equally adorable!! They're made with moist pumpkin cake layers and are dipped in white chocolate to look just like little pumpkins.
Servings: 13 cake pops
Calories: 202kcal
Ingredients
Pumpkin Cake
- 1 cup all-purpose flour 130g
- 1 cup packed light brown sugar 200g
- 1 tsp baking powder 4g
- 1 1/2 tsp ground cinnamon
- 1/2 tsp ground ginger
- 1/2 tsp fine salt
- 1/4 tsp ground nutmeg
- 1/8 tsp ground cloves - optional
- 5 Tbsp unsalted butter, room temperature 70g
- 1/2 cup pumpkin puree 110g
- 1/2 cup buttermilk, room temperature 120g
- 1 tsp vanilla extract or vanilla bean paste 4g
Buttercream
- 3 Tbsp the rest of the stick of unsalted butter, softened 42g
- 1 cup powdered sugar 125g
- 1 tsp vanilla extract or vanilla bean paste 5g
- 1 tsp milk of your choice or heavy cream 5g
Cake Pop Decorations
- 13 cake pop sticks
- 1/4 cup milk or dark chocolate chips 40g
- Green Fruit Roll-Up or Fruit by the Foot or green fondant
- Orange oil-based food coloring - optional
ONE OF THE FOLLOWING COATINGS:
- 2 1/2 cups white melting wafers
- 2 1/2 cups orange candy melts
- 2 1/2 cups good-quality white chocolate, melted with 2 tsp flavorless oil like vegetable, canola, or coconut oil
Instructions
Pumpkin Cake
- Preheat oven to 350°F/175°C. Line an 8-inch round pan with a parchment round and grease with non-stick cooking spray or homemade cake release.
- Mix 1 cup flour, 1 cup packed light brown sugar, 1 tsp baking powder, 1 1/2 tsp cinnamon, 1/2 tsp ginger, 1/2 tsp salt, 1/4 tsp nutmeg, and 1/8 tsp ground cloves (optional) in a stand mixer with a paddle attachment or hand mixer until fully combined.
- Gradually mix 5 Tbsp room-temperature unsalted butter into the dry ingredients at a low speed. Continue to mix until no large chunks of butter remain, and the mixture looks like moist sand.
- Mix in 1/2 cup pumpkin puree on low until just incorporated. Scrape the sides and bottom of the bowl as needed with a rubber spatula.
- Then mix in 1/2 cup buttermilk and 1 tsp of vanilla extract on a low speed until fully incorporated. Scrape down the sides of the bowl with a rubber spatula one more time, then beat on a medium speed for about 30 seconds to make sure everything is properly mixed together.
- Pour the batter into the prepared pan and bake for 25-30 minutes or until a toothpick comes out with a few moist crumbs. Rotate the pan halfway through to help it bake evenly.
- Remove the cake from the oven and place the pan on a wire rack to cool for 15 minutes, then run a small offset spatula around the perimeter of the pan to separate the cake from the pan.
Buttercream
- Next, we make the buttercream. While the cake itself is quite moist, it needs a bit of buttercream to give it the right texture and shape it into a little pumpkin. Add 3 Tbsp (the remainder of the stick) of softened butter, 1 cup of powdered sugar, 1 tsp vanilla extract, and 1 tsp of milk or cream into a small bowl.
- Stir together with a spatula or spoon until the ingredients are combined and the frosting is smooth. If the butter isn't soft enough, it can make the frosting hard to mix together. If you run into this, pop the bowl into the microwave and heat in 5-second increments until you're able to stir the ingredients together. Set aside.
Make the Pumpkin Cake Pop Dough
- Flip the cake layer (it's ok if it's still warm) into a large bowl. Use a fork to break the cake layer up into crumbs, then mix in the buttercream. Mix until it reaches a dough-like consistency.
- Use a 3-tbsp cookie scoop or a Tablespoon measure to make dough balls that use roughly 2.5 Tbsp of dough. You should end up with about 13 balls. Use your hands to roll them into spheres, then place them on a parchment-lined pan.
- Use a cake pop stick to make 6 vertical indentations around the dough balls to look like the panels of a pumpkin.
- Then melt 1/4 cup of milk or dark chocolate in a small bowl. Cover about 1 1/2 inches of a cake pop stick with the melted chocolate, then press it into one of the dough balls. I found that rolling the stick against the bottom of a spatula was the easiest way to coat each stick.
- About 1 cm of the chocolate-covered portion of the stick should remain visible above the cake pop to look like a pumpkin's stem. Repeat with the remaining cake pops, then place them in the freezer for 5-10 minutes to firm up (you don't want them to get too cold or else it can cause the coating to crack!).
Decorate the Pumpkin Cake Pops
- Then it's finally time for the fun part, decorating the cake pops! You can coat these cake pops in 2 1/2 cups white chocolate wafers + oil-based food coloring, 2 1/2 cups orange candy melts, or 2 1/2 cups good-quality white chocolate + 2 tsp flavorless oil (like vegetable, canola, or coconut, added after the white chocolate is melted) + oil food coloring. I prefer using white chocolate oil!
- Whatever coating you choose, melt it in a short, heat-proof glass. A short glass makes them way easier to dip! I like to use a heavy, thick glass because it retains heat well and keeps it fluid throughout the dipping process (it takes a while to dip 13 cake pops!). Heat them at half power in 15-second intervals, stirring between, until smooth.
- Mix the coloring in once the coating is melted, and be sure to use the right type of coloring outlined in step 1, or else the coating can seize.
- Remove the cake pops from the freezer and carefully dunk them one at a time. You want to fully cover the cake pop, but not cover up the stem. This takes a bit of practice, but I promise it gets easier as you go. Gently shake off any excess, then use the back of a butter knife or a small spatula to gently remove some of the coating from the indents around the pumpkin. It tends to pool there but will flow off with a little encouragement. Then carefully scrape the bottom of each cake pop on the edge of the glass to prevent the coating from pooling at the base. Place them back on the parchment paper to firm up.
- If the cake pops start to soften or fall off the stick as you try to dunk them, you may need to either pop them back in the freezer to firm up or heat the melting wafers or white chocolate a bit more (at half-power) to make it more fluid.
- If desired, brush a bit more chocolate around the stem with another cake pop stick to give it a bit of texture. You can also brush a bit of cocoa powder around the pumpkins to give them more dimension.
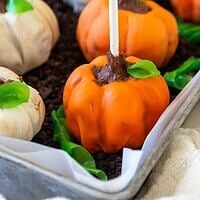
- Then use a small circle cutter (about 1/2 inch) to cut out 13 circles from a green fruit roll-up. Pinch the ends with your fingertips to make them look like little leaves.
- Dab a tiny bit of leftover milk chocolate onto the bottom of each leaf, then gently press a leaf on top of each pumpkin cake pop. I like to serve these on a little tray filled with crushed-up Oreos so it looks like a little pumpkin patch and twist the leftover fruit roll-up scraps into vines.
Video
Notes
Substitutions and Swaps
If you want to know what ingredients can be substituted or swapped, please check out the "Substitutions and Swaps" section in the post above.Can This Recipe Be Doubled?
This recipe can be doubled (bake 2, 8-inch cake layers) or tripled (bake 3, 8-inch cake layers) if you want to increase the yield. Bake time will remain the same. It can also be halved and baked in a 6-inch cake pan, and bake time will remain the same.Tips for Making the Best Pumpkin Cake Pops
- Ingredients at room temp mix together better! Set out any cold ingredients ahead of time.
- Properly measure your flour (spoon into the cup measure, then level). Or better yet, use a kitchen scale to measure your dry ingredients.
- If the cake pops start to soften or fall off the stick as you try to dunk them, you may need to either pop them back in the freezer to firm up or heat the melting wafers or white chocolate a bit more (at half-power) to make it more fluid.
- Use oil-based food coloring to color melting wafers, white chocolate, or candy melts! Gel or liquid food coloring can make the coating seize.
Making These Pumpkin Cake Pops in Advance & Storage Tips
These cake pops can be made in advance and keep super well! They can be stored in an airtight container at room temperature for up to 2 days or in the fridge for up to a week.Nutrition
Serving: 1 | Calories: 202kcal | Carbohydrates: 31g | Protein: 2g | Fat: 8g | Saturated Fat: 5g | Polyunsaturated Fat: 3g | Cholesterol: 22mg | Sodium: 172mg | Fiber: 1g | Sugar: 23g