Mini Vanilla Cake Recipe
This mini vanilla cake recipe is made in one bowl & is incredibly moist! One batch makes three, 4 inch cake layers that are perfect for a small celebration.
Servings: 8
Calories: 575kcal
Ingredients
Mini Vanilla Cake Recipe
- 1 cup all-purpose flour 125g
- 1 cup granulated sugar 200g
- 1 tsp baking powder 4g
- 1/4 tsp fine salt 1g
- 1/4 cup (1/2 stick) unsalted butter, melted and cooled 56g
- 1/4 cup vegetable or canola oil 56g
- 1 large egg, room temperature 56g
- 1/2 cup buttermilk, room temperature 120g
- 1 tsp vanilla extract or vanilla bean paste 4g
- gel food coloring if desired
Vanilla Buttercream Frosting
- 3/4 cup unsalted butter, room temperature 170g
- 2 tsp vanilla extract or vanilla bean paste 8g
- 1/4 tsp fine salt 1g
- 3 cups powdered sugar 375g
- 1 Tbsp + 1 tsp heavy cream or whipping cream 20g
Instructions
Mini Vanilla Cake Layers:
- Preheat oven to 350°F/175°C. Line three 4-inch or two 6-inch cake pans with parchment paper, then grease them with non-stick spray. This recipe turns out best with light-colored metal pans - preferably aluminum!
- This recipe can be made by hand with a whisk or with a hand mixer. I prefer making it with a whisk.
- In a large bowl, whisk together 1 cup flour, 1 cup sugar, 1 tsp baking powder, and 1/4 tsp salt.
- Add 1/4 cup of melted butter, 1/4 cup oil, and 1 egg into the dry ingredients and whisk until combined. The batter will be thick.
- Then mix in 1/2 cup buttermilk, 1 tsp vanilla extract, and gel food coloring if you want to color the cake layers. Mix until combined and scrape the sides and bottom of the bowl with a rubber spatula as needed. Then, continue to mix the batter for an additional 30 seconds to make sure everything is properly combined. This will also help lighten the texture of the cake layers - this recipe uses the reverse crumbing method, so I promise this won't overmix the batter!.
- Divide batter evenly between the prepared cake pans. Bake for 32-35 minutes on the middle rack of the oven, or until a toothpick comes out with a few moist crumbs. Allow the pans to cool for 10 minutes, then run an offset spatula around the perimeter of the pan to separate the cake from the pan.
- Place cake layers into the freezer for 20 minutes to accelerate the cooling process. Once the layers are fully cooled, carefully flip the pans and remove the layers from the pans.
- Use a serrated knife to level the tops of the layers, then set aside. If you're making these in advance, wrap and freeze them at this point.
Vanilla Buttercream Frosting:
- While the cake layers bake and cool, make the vanilla buttercream frosting. Beat 3/4 cup butter on medium speed for 30 seconds with either a hand mixer or a stand mixer fit with a paddle attachment.
- Mix in 2 tsp vanilla extract or vanilla bean paste and 1/4 tsp fine salt on a low speed.
- Gradually mix in 3 cups of powdered sugar and 1 Tbsp + 1 tsp of heavy cream. Scrape the sides and bottom of the bowl with a rubber spatula to make sure everything is properly mixed together.
- Continue to mix on low speed for a few minutes, until the desired consistency is reached.
- If the frosting seems too thick, add additional cream (1 tsp at a time). If the frosting is too thin, add more powdered sugar (a quarter of a cup at a time).
- If you want to color the buttercream, add in the gel food coloring once the frosting is fully made, and beat on low until it's evenly colored.
Assembling This Mini Vanilla Cake:
- Stack and frost cake layers on a small plate or cake stand using a dab of frosting to help stick the first cake layer in place.
- Add an even layer of buttercream between each cake layer with a small offset spatula.
- Add a thin coat of frosting around the cake that fully covers the cake layers. Smooth using a bench scraper, then chill the cake in the fridge (20 minutes) or freezer (5 minutes) until the frosting is firm to the touch.
- Add a second, thicker layer of frosting to the cake, and smooth using a bench scraper. If you're struggling to get smooth sides on your cake, I share all my tips and tricks in this smooth cake tutorial.
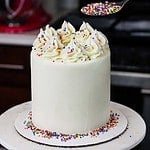
- Then decorate as desired! I used a Wilton 1M frosting tip (any open star tip would work great)to pipe some fun swirls on top of the cake and topped them with nonpareil sprinkles.
Video
Notes
How Many People Does This Mini Cake Feed?
If you make this cake with 3, 4-inch cake layers or 2, 6-inch cake layers, it will feed about 8 people. For more information on cake sizes and servings, check out my cake portion guide.Tips for Making the Best Mini Vanilla Cake
- Make sure you're properly measuring your flour! Fluff it up in the bag, then spoon it into the measuring cup and level it with a knife, or use a kitchen scale. You don't want to pack it into the measuring cup, or else you'll end up using a lot more flour than the recipe calls for.
- Ingredients at room temperature mix together better! Set out any cold ingredients ahead of time.
- Properly measure the flour (spoon into the cup measure, then level). Or better yet, use a kitchen scale to measure your dry ingredients.
- Use a scale to weigh your cake pans as you fill them. It will make your cake layers bake to the same height and bake more evenly.
- Make sure the buttercream is the right consistency. This will help give the cake proper structure and make it easier to decorate.
- Level the room temperature or thawed cake layers with a serrated knife to make them easier to stack.
- Chill your cake layers in the freezer for about 20 minutes before assembling the cake. It makes it so much easier to stack and frost them!
- If your cake layers turn out less than perfect, read my cake troubleshooting guide to see where things might've gone awry.
Making This Vanilla Layer Cake in Advance & Storage Tips
I highly recommend making the cake layers in advance and freezing them. It breaks the process up and makes it more approachable and enjoyable, and I promise they taste just as delicious! You can also make the frosting ahead of time or save any leftover frosting! It can be stored in an airtight container in the fridge for up to a month or in the freezer for up to 3 months. Be sure to give it a good stir once it thaws to get the consistency nice and smooth again. A frosted cake can last in the fridge for up to a week (as long as it doesn't have a perishable fruit filling) or in the freezer for up to a month. The buttercream locks in all the moisture, keeping the cake fresh and delicious! If you cut into the cake and have leftovers, use any remaining frosting to cover the cut section to keep it moist and store it in the fridge for up to a week.Nutrition
Serving: 1 | Calories: 575kcal | Carbohydrates: 81g | Protein: 4g | Fat: 27g | Saturated Fat: 15g | Polyunsaturated Fat: 10g | Cholesterol: 89mg | Sodium: 264mg | Fiber: 1g | Sugar: 68g