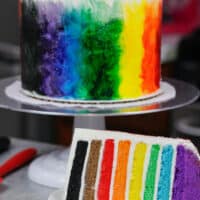
How to Make Rainbow Cake Layers
This colorful rainbow cake is an amazing way celebrate any occasion! It's made with 8 rainbow cake layers and a fluffy vanilla buttercream.
Servings: 24
Calories: 660kcal
Ingredients
Rainbow Cake Layers
- 3 cups all-purpose flour 390 grams
- 3 cups granulated sugar 600 grams
- 2 1/2 tsp baking powder 10 grams
- 1 tsp fine salt 6 grams
- 1 cup unsalted butter, room temperature 226 grams - 2 sticks
- 1 cup carton egg whites, room temperature or about 7 egg whites (235 grams)
- 1 1/2 cups buttermilk, room temperature 345 grams
- 2 Tbsp vegetable or canola oil 28 grams
- 2 tsp vanilla extract or vanilla bean paste 8 grams
- purple, blue, green, yellow, orange, red, brown, and black gel food coloring if desired
Vanilla Buttercream Frosting
- 3 cups unsalted butter, room temperature 678 grams
- 1 Tbsp vanilla extract or vanilla bean paste 12 grams
- 1 tsp fine salt 6 grams
- 11 cups powdered sugar 1375 grams
- 1/2 cup heavy whipping cream, room temperature or whipping cream (120 grams)
Optional Decorations
- rainbow gel food coloring
- 4 tsp vodka or clear extract like lemon or almond extract
- clean paint brush
Instructions
Rainbow Cake Layers:
- Preheat oven to 325°F. Line eight, 6-inch or 7-inch pans with parchment rounds, and grease with a light spray of non-stick cooking spray.
- Mix together 3 cups all purpose flour, 3 cups sugar, 2 1/2 tsp baking powder and 1 tsp salt in a stand mixer with a paddle attachment or hand mixer until fully combined.
- Mix in 1 cup of unsalted butter slowly into the dry ingredients on a low speed. Continue to mix until no large chunks of butter remain and the mixture looks crumbly.
- Pour in 1 cup of egg whites and mix on low until just incorporated. Mix in 1 1/2 cups buttermilk in two installments, on a low speed.
- Add in 2 tsp of vanilla extract and 2 Tbsp of vegetable oil, and mix at a low speed until fully incorporated.
- Scrape down the sides of the bowl with a rubber spatula, then beat on a low speed for about 30 seconds to make sure everything is properly mixed together.
- Divide the batter evenly between 8 bowls. I like to use a digital scale to make sure each bowl has the same amount of batter, so that each cake layer is the same height.
- Color each bowl a different color using purple, blue, green, yellow, orange, red, brown, and black gel food coloring. You can also use 1 tsp baking cocoa and 1 tsp black cocoa to naturally color the brown and black cake layers.
- Bake for 18-21 minutes, or until a toothpick comes out with a few moist crumbs.
- I couldn't fit all 8 pans in my oven at once, so I baked the cake layers in two batches. It's fine to let the batter sit out at some of the cake layers bake! Just cover the bowls or pans with a kitchen towel as they sit.
- Allow the pans to cool for 10 minutes, then run a small offset spatula around perimeter of the pan to separate the cake from the pan.
- Place cake layers into the freezer for 15 minutes to accelerate the cooling process. Once the layers are fully cooled, carefully flip the pans and remove the layers.
- If you make these cake layers in advance and freeze them, let them thaw for about 10 minutes before making your cake. The cake layers should still be slightly cold to the touch, which will make it easier to assemble your cake.
Fluffy Vanilla Buttercream Frosting:
- While the cake layers bake and cool, make the vanilla buttercream frosting.
- Beat 3 cups of unsalted butter on a high speed for 3 minutes with a whisk attachment. It should become lighter in color and increase in volume as air is incorporated into the butter.
- Mix in 1 Tbsp of vanilla extract or vanilla bean paste and 1 tsp salt on a medium speed.
- Slowly add in 11 cups of powdered sugar, 1 cup at a time. Alternate with small splashes of 1/2 cup of heavy cream or milk.
- Continue to mix on low speed for a few minutes, until the desired consistency is reached.
- If the frosting is too thick, add in additional cream (1 TBSP at a time). If the frosting is too thin, add in more powdered sugar (quarter of a cup at a time).
To Assemble This Rainbow Cake:
- Stack and frost the rainbow cake layers on a greaseproof cake board, using a dab of frosting to help stick the first cake layer to the board. Start with the purple cake layer.
- Spread an even layer of fluffy vanilla buttercream between each cake layer.
- Repeat and stack the cake layers in color order: purple, blue, green, yellow, orange, red, brown, black.
- Cover the cake in a thin coat of frosting, being sure you fully cover the cake layers. Smooth using a bench scraper, then chill the cake in the fridge (10 minutes) or freezer (5 minutes) until the frosting is firm to the touch.
- Add a second, thicker layer of frosting to the cake, and smooth using a bench scraper. Place the cake in the freezer to chill for 10-15 minutes, or in the fridge for 30 minutes.
- In a plastic paint palette, combine a couple drops of each color of gel food coloring with 1/2 tsp of vodka or clear extract to create edible paint.
- Use a clean, thick paintbrush to paint the food coloring mixture up the the sides of the cake.
Video
Notes
One batch of cake batter makes about 1800 grams, so when I'm making a cake with 8 layers I add 225 grams of batter into each pan.
These cake layers can be made in advance!! Learn more about how far in advance they can be made, and how to properly wrap them in my post on how to make cake layers ahead of time.
Since this frosting will be used to decorated a cake, it is important to mix the buttercream on the lowest speed at the end of the process for a couple minutes, to get out any extra air that might have be incorporated during the mixing process.
You can also stir the frosting in a bowl with a rubber spatula, pushing it from side to side, to get rid of any air bubbles. This will make it easier to get super smooth sides on your cake!
Nutrition
Serving: 1 | Calories: 660kcal | Carbohydrates: 89g | Protein: 4g | Fat: 33g | Saturated Fat: 20g | Polyunsaturated Fat: 11g | Cholesterol: 86mg | Sodium: 297mg | Fiber: 1g | Sugar: 75g