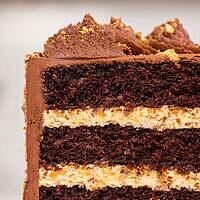
Butterfinger Cake
Love Butterfinger?? Then this butterfinger cake recipe is for you! It's made with moist chocolate cake layers, a crunchy butterfinger filling, and decadent milk chocolate buttercream.
Servings: 24
Calories: 497kcal
Ingredients
Moist Chocolate Cake Recipe
- 2 cups all-purpose flour 250g
- 2 cups granulated sugar 400g
- 2 tsp baking powder 8g
- 1 1/2 tsp baking soda 9g
- 1 tsp fine salt 6g
- 1 cup warm water 240ml
- 1 cup buttermilk, room temperature 240ml
- 3/4 cup unsweetened cocoa powder, sifted 60g
- 2 large eggs, room temperature 112g
- 1/3 cup vegetable or canola oil 73ml
- 1/4 cup melted butter 56g
- 1 tsp vanilla extract or vanilla bean paste 4ml
Simple Syrup - Optional
- 1/2 cup granulated sugar 100g
- 1/2 cup water 120ml
Buttercream Filling and Frosting
- 2 cups (4 sticks) unsalted butter, room temperature 454g or 1 lb.
- 1/2 cup creamy peanut butter 140g
- 1 tsp vanilla extract or vanilla bean paste 4ml
- 1/2 tsp fine salt 3g
- 6 cups powdered sugar 750g
- 1/2 cup heavy whipping cream, room temperature 120ml
- 1 cup chopped butterfinger pieces - about 10 fun-sized bars 200g
- 1 1/3 cups milk chocolate chips, melted and cooled 230g
Additional Cake Decoration
- 1 cup chopped butterfinger pieces - about 10 fun-sized bars 200g
Recommended Tools
- 8- inch cake pans
- Spinning cake stand
- 10- inch greaseproof cake board
- Large offset spatula
- Bench Scraper
- Electric hand mixer or stand mixer
Instructions
Chocolate Cake Layers
- Preheat oven to 350 F / 175 C. Grease and line four, seven-inch or three eight-inch cake pans.
- Sift or whisk together the flour, sugar, baking powder, baking soda and salt into a large bowl.
- Pour in the warm water, buttermilk, and cocoa powder into a separate medium-sized bowl and whisk together until smooth. Add in the eggs, oil, melted butter and vanilla into a separate bowl and whisk together until combined.
- Mix the wet ingredients into the dry ingredients just until the ingredients are fully incorporated. The batter should look smooth and be somewhat thin.
- Divide the batter evenly between the prepared cake pans and bake for 22-25 minutes or until a toothpick comes out with a few moist crumbs.
- Remove the cake layers from the oven and let them cool in the pans for about 10 minutes. Gently run an offset spatula around the rim of the cake pans to loosen them, then flip them into wire racks to finish cooling.
- Once cooled, use a serrated knife to level the top of each cake layer. If you are making these in advance, wrap and freeze them at this point.
Simple Syrup
- Place the granulated sugar and water in a small sauce pan over medium heat, stirring occasionally.
- The sugar should be fully dissolved by the time the mixture begins to boil. Remove from heat and pour into a separate container to cool the mixture to room temperature. Set aside.
Buttercream Filling and Frosting
- Beat the butter on a medium speed for 30 seconds with a paddle attachment until smooth.
- Add in the creamy peanut butter, vanilla extract, and salt. Mix on low until the ingredients are incorporated.
- Slowly mix in the powdered sugar. Halfway through, add in the heavy cream to make the frosting easier to mix. Scrape the sides and bottom of the bowl as needed with a rubber spatula.
- Place 2 cups of the peanut butter frosting in a separate bowl. Fold in 1 cup of chopped up Butterfinger bits with a rubber spatula. Cover with plastic wrap and set aside.
- Once the milk chocolate is melted, let it sit at room temp for 10 minutes before mixing it into the remaining frosting on a low speed. It should still be fully liquid, but not as warm to the touch. This will prevent it from melting the butter in the frosting and throwing off the consistency of the frosting. Mix until the chocolate is fully incorporated and the desired consistency for the frosting is reached. Cover with plastic wrap to prevent crusting and set aside.
Assembling this Butterfinger Cake
- If you decide to add simple syrup, gently brush it on on top of each leveled cake layer with a silicone pastry brush. The top of each cake layer should look moist when you're done.
- Stack and frost cake layers on a greaseproof cake board using a dab of chocolate buttercream to help stick the first cake layer to the board.
- Spread an even layer of the peanut butter butterfinger filling on top of each cake layer as you stack them with a large offset spatula.
- Repeat with the remaining cake layers, then cover the cake with a thin layer of chocolate peanut butter frosting. Smooth using a bench scraper, then chill the cake in the fridge (20 minutes) or freezer (5 minutes) until the frosting is firm to the touch.
- Add a second, thicker layer of chocolate peanut butter frosting to the cake and smooth using a bench scraper. Don't worry if the frosting isn't perfectly smooth!
- Carefully press bits of chopped butterfinger into the frosting around the side of the cake until it's completely covered.
- Then decorate as desired! I like to place the leftover chocolate peanut butter frosting in a piping bag fit with an open star tip (I used an Ateco 829) and pipe swirls around the top of the cake. Then enjoy!
Video
Notes
My Tips for Making the Best Butterfinger Cake
- Ingredients at room temp mix together better! Be sure you set out any cold ingredients ahead of time.
- Properly measure your flour (spoon into the cup measure, then level). Or better yet, use a kitchen scale to measure your dry ingredients.
- Mix your cake batter just until the ingredients are incorporated. This will ensure your cake layers are tender and fluffy.
- Use a scale to weigh your cake pans as you fill them. Make sure each pan has the same amount of batter will make your cake layers bake to the same heigh and bake more evenly.
- Bang your cake pans on the counter before putting it in the oven. This brings any air bubbles that are trapped in the batter to the surface.
- Level your room temperature or thawed cake layers with a serrated knife to make them easier to stack.
- Chill your cake layers in the freezer for about 20 minutes before assembling the cake and before adding the simple syrup. It makes it so much easier to stack and frost them!
Making this Butterfinger Cake in Advance & Storage Tips
- Make your cake layers in advance and freeze them. It breaks the process up and makes it more approachable.
- Make your chocolate frosting ahead of time or save any leftover frosting! It can be stored in an airtight container in the fridge for up to a month.
- This frosting can also be stored in the freezer for up to 3 months! Just be sure to give it a good stir once it thaws to make it nice and smooth again.
- A frosted cake can last in the fridge for a week, or in the freezer for a month. The buttercream locks in the moisture and keeps the cake fresh and delicious!
Nutrition
Serving: 1 | Calories: 497kcal | Carbohydrates: 81g | Protein: 6g | Fat: 18g | Saturated Fat: 7g | Polyunsaturated Fat: 9g | Cholesterol: 38mg | Sodium: 405mg | Fiber: 2g | Sugar: 64g