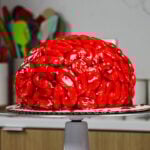
Brain Cake
This brain cake is perfect for Halloween! It's made with moist red velvet cake layers, pink buttercream and raspberry jam blood.
Servings: 20
Calories: 596kcal
Equipment
Ingredients
Red Velvet Cake
- 2 1/2 cups cake flour 300g
- 2 Tbsp unsweetened cocoa powder, sifted 10g
- 1 tsp baking soda 6g
- 1/2 tsp fine salt 3g
- 1/2 cup (1 stick) unsalted butter, room temperature 113g
- 1 3/4 cups granulated sugar 350g
- 2 large eggs, room temperature 112g
- 1 1/4 cups buttermilk, room temperature 300g
- 1/2 cup vegetable or canola oil 120g
- 2 tsp vanilla extract or vanilla bean paste 8g
- 1 tsp white vinegar 4g
- 1 tsp red gel food coloring or 1 Tbsp liquid food coloring
Cream Cheese Buttercream Frosting
- 1 1/2 cups (3 sticks) unsalted butter, room temperature 339g
- 1 cup (8 oz) full-fat cream cheese, room temperature 226g
- 1 Tbsp vanilla extract or vanilla bean paste 12g
- 1 tsp fine salt 6g
- 7 cups powdered sugar 904g or a 2lb. bag
- 3 Tbsp heavy whipping cream, room temperature 45g
- small squirt of red gel food coloring or 1 tsp liquid food coloring
Edible Fake Blood
- 1/2 cup seedless raspberry or strawberry jam
- 3 Tbsp water 45g
- [1/4 tsp red gel food coloring or 1 tsp liquid food coloring - optional]
Instructions
Red Velvet Cake:
- Preheat oven to 350°F/175°C. Grease three 8-inch or three 7-inch cake pans with non-stick baking spray and parchment paper. Set aside.
- In a medium bowl, sift together 2 1/2 cups cake flour, 2 Tbsp cocoa powder, 1 tsp baking soda, and 1/2 tsp salt. Set aside.
- In a large bowl or the bowl of a stand mixer, use either a hand mixer or a stand mixer fit with a whisk attachment to cream together 1/2 cup of butter and 1 3/4 cups granulated sugar. Mix on a medium-high speed for 1-2 minutes until the mixture becomes lighter in color. Scrape the sides and bottom of the bowl as needed with a rubber spatula.
- Mix in 2 large eggs on a medium speed until fully combined.
- Add in 1 1/4 cups buttermilk, 1/2 cup of oil, 2 tsp vanilla extract, 1 tsp white vinegar, and 1 tsp of red gel food coloring. Mix on a low speed until combined. The mixture might look broken at this stage but I promise it will come together once we add in the dry ingredients.
- Slowly mix the dry ingredients into the wet ingredients at a low speed in two additions. Mix until just combined, and you can no longer see any visible streaks of cake flour.
- Divide the batter evenly between the prepared pans (about 415g per pan). Bake for 24-28 minutes, or until a toothpick inserted in the center of the cake comes out with a few moist crumbs.
- Remove the pans from the oven and let them cool for 10 minutes then run a small offset spatula around the perimeter. Carefully flip the layers out of their pans and place them on a wire rack to finish cooling. I chose not to level the layers because they bake up pretty flat.
- Stack the cake layers on top of each other and cut 2 sides of the cake to create an oval/brain shape (about 1 inch off of each side). Use a small, sharp knife to make the top of the cake a bit more rounded. If your cake layers seem to be tearing or you're having a hard time cutting them, pop the cake layers in the freezer for about 20 minutes. It will help them keep their shape better and make them a lot easier to cut. If you're making these in advance, wrap and freeze them at this point.
Cream Cheese Buttercream Frosting:
- Beat 1 1/2 cups of butter and 1 cup of cream cheese on medium speed for 30 seconds with a paddle attachment until smooth. If you don't like cream cheese frosting use additional butter in place of the cream cheese in this frosting recipe.
- Add in 1 Tbsp vanilla and 1 tsp salt, and beat on low until the ingredients are fully incorporated.
- Slowly mix in 7 cups of powdered sugar and 3 Tbsp of heavy cream on a low speed. Place a kitchen towel over your mixer to avoid powdered sugar clouds. Scrape the sides and bottom of the bowl as needed with a rubber spatula.
- If the frosting seems too thick, add in additional cream (1 Tbsp at a time). If the frosting is too thin, add in more powdered sugar (1/4 cup at a time). Once the frosting reaches the desired consistency, add a small squirt of red food coloring and mix until the frosting is a light shade of pink and evenly colored.
- Cover the frosting with a piece of plastic wrap to prevent a crust from forming. Set aside.
Edible Blood Recipe:
- Place the seedless raspberry jam, 3 tablespoons of water, and 1/4 tsp of red gel food coloring in a small bowl. Whisk together until the jam has a thin, smooth consistency and is bright red. Cover and set aside.
Decorating this Brain Cake:
- Stack and frost the cake layers on a greaseproof cake board, using a dab of frosting to help stick the first cake layer to the board. Spread an even layer of frosting between each cake layer.
- Once the layers are frosted and stacked, trim the cake as needed with a small, sharp knife to give it a rounded, brain-like shape.
- Add a thin coat of frosting around the cake that fully covers the cake layers. Smooth using an offset spatula or small acetate sheet, then chill the cake in the fridge (20 minutes) or freezer (5 minutes) until the frosting is firm to the touch. Place the frosting in a large piping bag fitted with a large round tip like an Ateco 805.
- Remove the cake from the fridge or freezer and use an offset spatula or butter knife to create a line down the center of the cake to create the right and left hemispheres of the brain. Pipe squiggly lines on each side of the cake to look like a brain. Don't stress if your lines aren't perfect or if there are some small gaps, the frosting is going to get completely coated in jam and no one will notice!!
- Once the cake is fully covered, chill the cake in the fridge (30 minutes) or freezer (10 minutes) again until the frosting is completely firm to the touch.
- Remove the cake from the fridge or freezer and use a pastry brush to spread a thick layer of the jam mixture over the pink frosting. Make sure you get the blood into all the nooks and crannies between the frosting squiggles! Then add a bit around the base to make this cake look even scarier and enjoy!
Video
Notes
Because this cake is trimmed down quite a bit, it feeds about 20 people. For more information on cake sizes and servings, check out my cake portion guide.
Recipe Variations - Making This Cake in Different Sizes
If you want to make a tiered cake or different-sized cake with this recipe, check out my cake batter calculator to see how many batches of batter you'll need.Can I Make This Brain Cake Ahead of Time?
I highly recommend making the cake layers in advance and freezing them. It breaks the process up and makes it more approachable. You can also make the frosting ahead of time or save any leftover frosting! Store it in an airtight container in the fridge for up to a month, or in the freezer for up to 3 months. Be sure to stir it well once it thaws to get the consistency nice and smooth again. A frosted cake can last in the fridge for up to a week or in the freezer for up to a month. The buttercream locks in all the moisture, keeping the cake fresh and delicious! Remove the cake from the fridge an hour or two before you plan to cut into it to allow it to come to room temperature. If you cut into the cake and have leftovers, use any remaining frosting to cover the cut section to keep it moist and store it in the fridge for up to a week.Tips for Making the Best Brain Cake:
- Properly measure the flour. Either spoon it into the cup measure, then level with a knife, or use a kitchen scale.
- Make sure the ingredients are at room temperature to help them mix together better.
- Chill the cake layers in the freezer for about 20 minutes before assembling the cake. This makes them easier to stack and frost.
- Make sure your buttercream is the right consistency before frosting your cake. It will help give your cake proper structure and make it easier to decorate.
- Use gel food coloring to avoid throwing off the consistency of the frosting and cake layers or giving them a bitter taste.
- Make this brain cake vegan or dairy-free if needed! Use your favorite type of dairy-free milk to replace the buttermilk and heavy cream, and use vegan butter sticks in place of the butter. For the eggs, I recommend using an egg replacer like this.
- Don't stress if your piped frosting isn't perfect or if there are some small gaps, the frosting is going to get completely coated in jam and no one will notice!!
- Use the leftover cake trimmings to make cake pops, enjoy them as a snack with leftover buttercream, or crumble up the layers and sprinkle on top of ice cream! Store them in an airtight container at room temperature for up to 3 days.
Nutrition
Serving: 1 | Calories: 596kcal | Carbohydrates: 77g | Protein: 4g | Fat: 31g | Saturated Fat: 16g | Polyunsaturated Fat: 14g | Cholesterol: 89mg | Sodium: 333mg | Fiber: 1g | Sugar: 60g