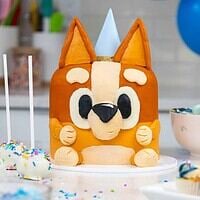
Bingo Cake
This Bingo birthday cake is made with tender funfetti cake layers and decorated with homemade buttercream to look just like Bluey's sister Bingo!
Servings: 16
Calories: 681kcal
Ingredients
Funfetti Cake Layers
- 2 cups + 2 Tbsp all-purpose flour 276g
- 2 cups granulated sugar 400g
- 1 1/2 tsp baking powder 6g
- 1/2 tsp fine salt 3g
- 2/3 cup unsalted butter, room temperature 150g or 1 1/3 sticks
- 2/3 cup carton egg whites or 5 large egg whites, room temperature 155g
- 1 cup buttermilk, room temperature 240g
- 1 Tbsp vegetable or canola oil 15g
- 1 tsp vanilla extract or vanilla bean paste 4g
- 1 tsp almond extract - optional 4g
- 1/3 cup rainbow jimmie sprinkles 60g
Vanilla Buttercream Frosting
- 2 cups unsalted butter, room temperature 454g
- 2 tsp vanilla extract or vanilla bean paste 8g
- 1/2 tsp fine salt 6g
- 7 cups powdered sugar 904g or a 2 lb. bag
- 1/3 cup heavy whipping cream, room temperature 80g
Cake Decorating Rice Krispie Treats
- 1 cup regular or mini marshmallows - mini work best 50g
- 1 1/2 cups puffed rice cereal 40g!
Bingo Cake Decorations
- 3, 6- inch Cake Pans
- Spinning Cake Stand
- 8- inch Cake Board or Flat Plate
- Offset Spatula
- Acetate Sheet - cut down into a small piece with scissors
- Orange, Brown, and Black Gel food Coloring
- 4 Large, Round Piping Tips like a Wilton 1A
- 1 Medium, Round Piping Tips like a Wilton 10
- 2 Small Piping Bags
- 3 Large Piping Bags
- 3 small bamboo skewers or toothpicks for the ears and snout
Instructions
Funfetti Cake Layers
- Preheat the oven to 350°F/175°C. Line 3, 6-inch cake pans with parchment rounds and grease with nonstick spray. If you don't have that many cake pans, the batter can sit at room temperature for a few hours. Bake as many layers at a time as you can at a time.
- Mix 2 cups + 2 Tbsp all-purpose flour, 2 cups sugar, 1 1/2 tsp baking powder, and 1/2 tsp salt together in a stand mixer with a paddle attachment or hand mixer until fully combined.
- Mix in 2/3 cup of room temperature, unsalted butter slowly into the dry ingredients on a low speed. Continue to mix until no large chunks of butter remain, and the mixture looks like moist sand.
- Pour in 2/3 cup of egg whites and mix on low until just incorporated.
- Next, mix in 1 cup of buttermilk on a low speed.
- Add 1 Tbsp of vegetable oil, 1 tsp of vanilla extract, and 1 tsp almond extract and mix at a low speed until fully incorporated. If you want to color these cake layers, add the gel food coloring with the oil and extracts.
- Scrape down the sides of the bowl with a rubber spatula, then beat on a medium speed for about a minute to make sure everything is properly mixed together. This also helps lighten the texture of the cake layers a bit.
- Fold 1/3 cup of sprinkles into the cake batter using a rubber spatula and mix until they're evenly distributed.
- Divide batter evenly between the prepared cake pans. Bake for 34-37 minutes or until a toothpick comes out with a few moist crumbs. Let the pans cool for 10 minutes, then run an offset spatula around the perimeter of the pan to separate the cake from the pan. This also helps lock in the steam and makes the layers nice and moist.
- Place the cake pans into the freezer for 45 minutes to accelerate the cooling process. Once the layers are fully cooled, carefully flip the pans and remove the layers from the pans.
- These layers bake up pretty flat, so leveling them is optional! If you want to level them, use a serrted knife to level the top of each cake layer. If you make these in advance, wrap and freeze them at this point.
Vanilla Buttercream Frosting
- While the cake layers bake and cool, make the vanilla buttercream frosting.
- Beat 2 cups of unsalted butter on medium speed for 30 seconds with a paddle attachment until smooth.
- Mix in 2 tsp of vanilla extract and 1/2 tsp fine salt on a low speed.
- Slowly mix in 7 cups of powdered sugar on a low speed. Add 1/3 cup of heavy cream halfway through to make the frosting easier to mix.
- Continue to mix on a low speed for a few minutes until the desired consistency is reached.
- If the frosting is too thick, add in additional cream (1 Tbsp at a time). If the frosting is too thin, add more powdered sugar (a quarter of a cup at a time).
- Cover the buttercream flush with plastic wrap to prevent crusting, then set aside.
Stacking the Cake Layers
- Stack and frost the cake layers on an 8-inch greaseproof cake board or flat plate using a dab of frosting to help keep the first cake layer in place. Place the cake layers a bit off-center so that you have room to add Bingo's legs and feet.
- Then spread an even layer of buttercream between each cake layer with an offset spatula. If desired, add some sprinkles on top of the frosting for a bit of texture. Repeat with the remaining cake layers.
- Once all the cake layers are stacked, spread a thin coat of frosting around the cake. Smooth using a bench scraper and/or large offset spatula, then chill the cake in the fridge (30 minutes) or freezer (10 minutes) until the frosting is firm to the touch.
Coloring the Buttercream
- While the cake chills, color the buttercream. It's going to sound crazy, but all the frosting can be colored in one, medium-sized bowl. We start with the lightest colors and work our way to the darkest.
- Scoop about 1/2 cup of uncolored/white buttercream into a small piping bag fitted with a large round piping tip.
- Place 1/2 cup of uncolored buttercream into a small piping bag fitted with a large round tip (like a Wilton 1A) or cut an opening about 1/2-inch wide and set aside.
- Color 3/4 cup of buttercream a light orange color with orange and the tiniest bit of brown gel food coloring to make Bingo's snout and paw. Add the coloring gradually in small drops to make sure you get the right shade. You can always add more, but you can't take it back once it's mixed in! Place the tan buttercream in a small piping bag fitted with a large piping tip (like a Wilton 1A) or cut an opening about 1/2 inch wide and set aside.
- Color 1 1/2 cup of buttercream medium orange using orange gel food coloring to make Bingo's fur and arms. Place in a large piping bag fitted with a medium round tip (like a Wilton 10) or cut an opening about 1 cm wide and set aside.
- Color 1 1/2 cups of buttercream deep orange with orange gel food coloring, plus a tiny bit of brown gel food coloring. Place in a large piping bag fitted with a large round piping tip (like a Wilton 1A) or cut an opening about 1/2 inch wide and set aside.
- Color 1/3 cup of frosting using black gel food coloring. Place in a small piping bag fitted with a medium piping tip (like a Wilton 10) or cut an opening about 1 cm wide and set aside.
- If you have any remaining buttercream, cover it with plastic wrap to prevent it from crusting, then set aside. It's nice to have some leftover frosting in case any of the colors don't turn out quite right!
Cake Decorating Rice Krispies
- Next, make the rice krispie snout and ears. Place 1 cup of marshmallows in a heatproof bowl and heat in the microwave for 30 seconds at full power.
- Stir then heat in 15-second intervals (stirring between) until the marshmallows look soft and are melted.
- Pour in 1 1/2 cups of rice krispies or puffed rice cereal and stir until the cereal is fully coated in melted marshmallows.
- Grease your hands with cooking spray then create two triangles (about 2.5 inches tall, 2 inches wide, and 1/2-inch thick) and a small, slightly oval snout (1 1/2 inches long and about 3/4 of an inch thick). Hold them up against the crumb-coated cake to make sure the size looks right.
- I recommend firmly pressing the rice krispies together to compact them into a firm shape. This will make them easier to frost.
- Press two small bamboo skewers or toothpicks into the bottom of the ears to help secure them on the cake. I also recommend pressing a toothpick into the back of the snout, to prevent it from sliding down the cake once it's frosted. Set aside.
Decorating This Bingo Cake
- Then it's time to finally decorate the cake! Before we start frosting it, use a toothpick or scribe to outline Bingo's eyes, snout, and fur patches.
- Pipe and smooth the dark orange buttercream around the top half of the cake (like in the photos above).
- Next, cover the lower half of the cake with medium orange buttercream. I find using a tapered offset spatula and a small piece of acetate sheet makes it easier to smooth the frosting. Then pipe a light orange stripe of frosting between Bingo's eyes, from where the top of her snout will be to where her ears will be (see pictures above - I accidentally initially made this stripe with medium orange buttercream, but it should be light orange buttercream!).
- Use the light orange frosting to pipe a shallow semi-circle at the base of the front of the cake to be Bingo's tummy. It should be about as wide as Bingo's eyes.
- If you've covered where the eyes will go, gently retrace the shape with a toothpick. Then use the white buttercream to pipe on Bingo's eyes. Smooth with an offset spatula. Next, pipe on Bingo's pupils with black buttercream.
- Then gently press the rice krispie snout into place. Cover it with light orange buttercream and smooth with a piece of acetate sheet. Trace the shape of the nose with a toothpick, then pipe a black triangle of frosting at the top of the snout, and use a toothpick to carve a little smile on the snout.
- Then press the rice krispie ears into place on top of the cake. Cover the front of the rice krispies with a thin layer of medium orange buttercream, then pipe deep orange buttercream around the sides and back of the ears. Smooth with an acetate sheet or offset spatula.
- Use the medium orange and light buttercream to add Bingo's tail.
- The last step is to use the medium orange frosting to add on Bingo's arms and legs, and the light orange frosting to add her paws and eyebrows. I also carved some lines in the paws with a toothpick to give Bingo toes. And voila! Several hours later, you have an adorable Bingo birthday cake :)
Video
Notes
Note: This recipe can be made with a stand mixer or hand mixer. I like to use the paddle attachment when making the batter, but you can also use a whisk attachment or a large bowl and hand mixer.
How Many People Does This Cake Feed?
If you make this cake with 3, 6-inch cake layers, it will feed about 24 people. For more information on cake sizes and servings, check out my cake portion guide.Recipe Variations - Making this Cake in Different Sizes
This recipe makes about 6 1/2 cups of batter or about 1200 grams. If you plan to use four circular cake pans, add about 400 grams of batter into each pan. If you want to use a different recipe or make a different flavor of cake, that's totally fine! Just be sure to pick one that makes 3, 6-inch cake layers.Tips for Making the Best Bingo Cake
- Properly measure the flour. Either spoon it into the cup measure, then level with a knife or use a kitchen scale.
- Make sure the ingredients are at room temperature to help them mix together better.
- Chill the cake layers in the freezer for about 20 minutes before assembling the cake. This makes them easier to stack and frost.
- Make sure your buttercream is the right consistency before frosting your cake. It will help give your cake proper structure and make it easier to decorate.
- Use gel food coloring to create vibrant colors of frosting without throwing off the consistency of the frosting.
- If possible, use an acetate sheet to smooth the frosting! It's just a thin piece of plastic, but it makes it so much easier to get a nice, smooth look than using just an offset spatula. You can order packs of them on Amazon for $8 and cut them down with scissors into smaller pieces that are easier to handle.
Making this Bingo Cake in Advance and Storage Tips
I highly recommend making the cake layers in advance and freezing them. It breaks the process up and makes it more approachable. You can also make the frosting ahead of time or save any leftover frosting! It can be stored in an airtight container in the fridge for up to a month, or in the freezer for up to 3 months. Be sure to give it a good stir once it thaws to get the consistency nice and smooth again. You can also color the frosting ahead of time. Coloring the frosting takes a surprisingly long amount of time (it's hard to get the shades just right!). Just keep in mind that the colors will get slightly deeper over time, so keep that in mind as you color them. The frosting can be stored in the piping bags in the fridge. When you're ready to use them, pull them out of the fridge and let them sit on the counter for a few hours until they come to room temperature. A frosted cake can last in the fridge for up to a week, or in the freezer for up to a month. The buttercream locks in all the moisture, keeping the cake fresh and delicious! If you cut into the cake and have leftovers, use any remaining frosting to cover the cut section to keep it moist and store it in the fridge for up to a week.Nutrition
Serving: 1 | Calories: 681kcal | Carbohydrates: 87g | Protein: 4g | Fat: 37g | Saturated Fat: 21g | Polyunsaturated Fat: 13g | Cholesterol: 99mg | Sodium: 306mg | Sugar: 80g