Yield: Two 6-inch Lunch Box Cakes
Lunch Box Cakes
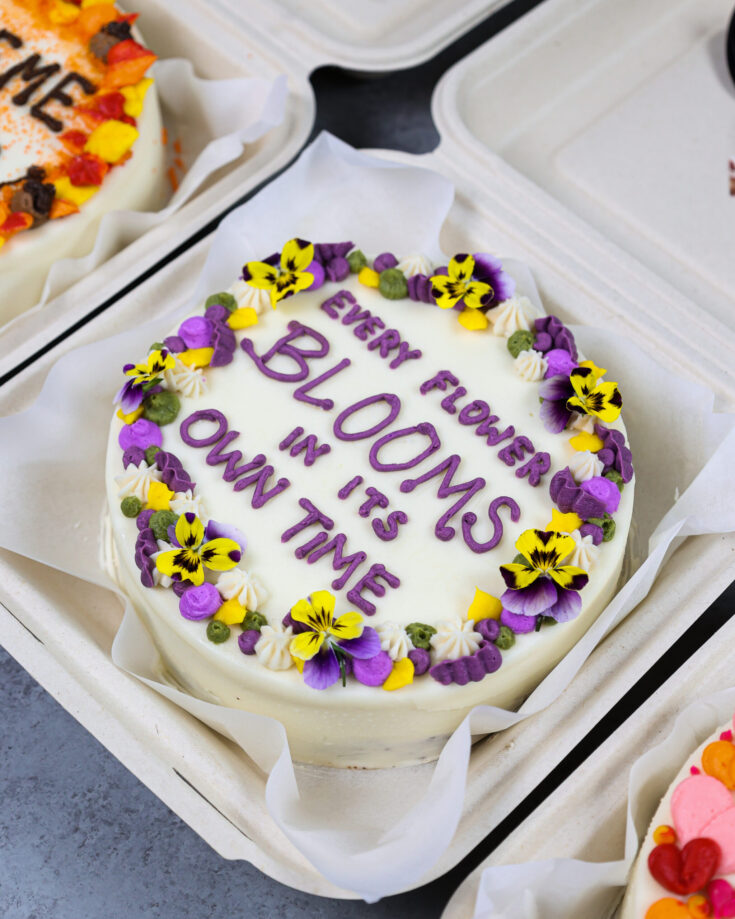
Learn how to make these adorable lunch box cakes! They're made with tender chocolate cake layers, vanilla buttercream, and are topped with the cutest sayings! One batch makes 2, 6-inch cakes.
Prep Time
30 minutes
Cook Time
25 minutes
Additional Time
1 hour
Total Time
1 hour 55 minutes
Ingredients
Moist Chocolate Cake Recipe
- 1 cup all-purpose flour (130)
- 1 cup granulated sugar (200g)
- 1/3 cup sifted dark cocoa powder (30g)
- 1 tsp baking powder (4g)
- 3/4 tsp baking soda (5g)
- 1/2 tsp salt (3g)
- 1/2 cup hot water (120g)
- 1/2 cup buttermilk, room temperature (120g)
- 1/4 cup vegetable oil (55g)
- 1 large egg, room temperature (56g)
- 1 tsp vanilla extract (4g)
Vanilla Buttercream Frosting
- 1 cup (or 2 sticks) unsalted butter, room temperature (226g)
- 1 tsp vanilla extract (4g)
- 1/4 tsp fine table salt (2g)
- 3 cups powdered sugar (375g)
- 1/2 cup heavy cream, room temperature (120g)
- gel food coloring
Recommended Tools
- 2, 6-inch cake pans
- Electric hand mixer or stand mixer
- Spinning cake stand
- small offset spatula
- 8-inch square to-go container
- Small Piping Bags
- Small Round Piping Tip (like a Wilton 4)
Instructions
Chocolate Cake Layers
- Preheat oven to 350 F / 175 C. Grease and line two, six-inch round cake pans with non-stick spray or homemade cake release. If you want to use an 8-inch round cake pan, make one cake layer.
- Sift or whisk together the dry ingredients (flour, sugar, dark cocoa powder, baking powder, baking soda and salt) into a large bowl.
- Pour in the hot water, sour cream, oil, eggs, and vanilla into a separate bowl and whisk together until fully incorporated.
- Mix the wet ingredients into the dry ingredients just until they're incorporated into the batter.
- Divide the batter evenly between the prepared cake pans. Bake for about 25-28 minutes or until a toothpick comes out with a few moist crumbs. Bake time can vary quite a bit based on your oven, so keep an eye on the cake once it's been in the oven for 25 minutes.
- Remove the cake layers from the oven and let them cool in the pans for about 10 minutes, then flip them onto wire racks to finish cooling.
- Once cooled, use a serrated knife to cut the cake layers horizontally, creating a total of four thin cake layers. This recipe makes 2, 6-inch cakes. If you want to make one taller 6-inch cake, you don't need to torte your cake layers. If you're making these in advance, wrap and freeze them at this point.
Vanilla Buttercream Frosting
- This recipe makes a sweet American buttercream frosting. If you don't like sweet frosting, I recommend making a half batch of my Swiss meringue buttercream or using a half batch of my Russian buttercream.
- Beat the butter on a medium speed for 30 seconds with a paddle attachment until smooth.
- Add in the vanilla extract and salt. Mix on low until the ingredients are fully incorporated.
- Slowly mix in the powdered sugar. Half way through, add in the heavy cream to make the frosting easier to mix.
- Mix on a low speed until the ingredients are fully incorporated and the desired consistency is reached.
- Cover the frosting with plastic wrap to prevent crusting and set aside.
Assembling these Lunch Box Cakes
- Stack and frost the cake layers on a square sheet of parchment paper that is 1 inch larger than your box (i.e. 9 inch parchment square for an 8-inch box). I also like to tape the parchment paper to a cake board to make the cake easier to move in and out of the freezer and keep the sheet in place.
- Spread an even layer of vanilla buttercream on top of the cake layer with an offset spatula.
- Stack the next cake layer on top and cover the cake with a thin layer of buttercream. Smooth the frosting using a bench scraper and/or small offset spatula.
- Chill the cake again in the fridge (20 minutes) or in the freezer (10 minutes) until the frosting is firm to the touch.
- Cover the cake with a thicker layer of vanilla buttercream and smooth using a bench scraper and/or small offset spatula. Chill the cake again in the fridge (20 minutes) or in the freezer (10 minutes) until the frosting is firm to the touch. This will make it much easier to place in its box.
- Repeat steps 1-5 with the second set of cake layers.
- Carefully lift both cakes off the cake boards using the parchment paper and place them inside the containers. Color the remaining buttercream using gel food coloring in whatever color scheme you'd like and place in small piping bags.
- Use a toothpick or scribe to sketch out your message on top of the cake. This helps ensure your letters are centered and evenly spaced. Then use buttercream to pipe the cute message on top of the cake and decorate the border with the remaining buttercream and enjoy!
Notes
My Tips for Making the Best Lunch Box Cake
- Ingredients at room temp mix together better! Be sure you set out any cold ingredients ahead of time.
- Be sure to properly measure your cake flour (spoon into the cup measure, then level). Or better yet, use a kitchen scale to measure your dry ingredients.
- Mix your cake batter just until the ingredients are incorporated. This will ensure your cake layers are tender and fluffy.
- Use a scale to weigh your cake pans as you fill them. Make sure each pan has the same amount of batter will make your cake layers bake to the same heigh and bake more evenly.
- Bang your cake pans on the counter before putting it in the oven. This brings any air bubbles that are trapped in the batter to the surface.
- Level your room temperature or thawed cake layers with a serrated knife to make them easier to stack.
- Chill your cake layers in the freezer for about 20 minutes before assembling the cake and before adding the simple syrup. It makes it so much easier to stack and frost them!
- If you don't want to make two cakes, you can make one tall, 6-inch layer cake (but the box won't close!), or you can make one 8-inch cake layer to make a larger cake.
- Use a toothpick or scribe to sketch out your message on top of the cake. This helps ensure your letters are centered and evenly spaced.
- If you don't like sweet American buttercream frosting, I recommend making a half batch of my Swiss meringue buttercream or using a half batch of my Russian buttercream.
- The size of the cake layer is the same as the bottom of the container that you plan to put the cake in. It should sit flush in the bottom of the box. While the boxes I use are 8 x 8-inches, the bottom is tapered and actually has a 6 x 6-inch cavity. This is why I use 6-inch cake layers, they fit perfectly in these boxes.
Making these Lunch Box Cakes in Advance & Storage Tips
- Make your cake layers in advance and freeze them. It breaks the process up and make it more approachable.
- Make your frosting ahead of time or save any leftover frosting! It can be stored in an airtight container in the fridge for up to a month.
- This frosting can also be stored in the freezer for up to 3 months! Just be sure to give it a good stir once it thaws to make it nice and smooth again.
- A frosted cake can last in the fridge for a week, or in the freezer for a month. The buttercream locks in the moisture and keeps the cake fresh and delicious!
- If you freeze the cake, transfer it the fridge overnight then bring to room temperature the following day to prevent condensation.
Nutrition Information
Yield
12Serving Size
1Amount Per Serving Calories 357Total Fat 12gSaturated Fat 4gTrans Fat 0gUnsaturated Fat 7gCholesterol 38mgSodium 332mgCarbohydrates 61gFiber 1gSugar 49gProtein 3g