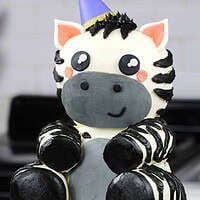
Zebra Cake
This zebra cake is just as much fun to make as it is to eat! It's made w/ delicious zebra cake layers & frosted w/ homemade buttercream.
Servings: 24
Calories: 439kcal
Ingredients
Vanilla Cake Recipe*
- 3 cup all-purpose flour 360g
- 3 cups granulated sugar 600g
- 2 1/2 tsp baking powder 10g
- 1 tsp fine salt 6g
- 1 cup (2 sticks) unsalted butter, room temperature 226g
- 1 cup carton egg whites or 7 large egg whites, room temperature 240ml
- 1 1/2 cups buttermilk, room temperature 360ml
- 2 Tbsp vegetable or canola oil 30ml
- 2 tsp vanilla extract or vanilla bean paste 8ml
- *additional ingredients for the chocolate cake are listed below
Additional Ingredients (to be added after the vanilla cake batter is made, to change it into chocolate batter):
- 1/3 cup unsweetened baking cocoa 28g
- 1/4 cup granulated sugar 50g
- 1/4 cup large egg whites, room temperature 60ml or 2 egg whites
- 1/4 cup buttermilk, room temperature 60ml
- 1/2 tsp baking powder 2g
- 1/4 tsp fine salt 1g
Vanilla Buttercream Frosting
- 3 cups unsalted butter, room temperature 678g
- 1 Tbsp vanilla extract or vanilla bean paste 12g
- 1 tsp fine salt 6g
- 11 cups powdered sugar 1375g
- 1/3 cup heavy whipping cream, room temperature 80g
- 1/2 cup dark chocolate chips, melted and cooled - to be added later 85g
- 1 Tbsp heavy cream - to be added later 15g
- black gel food coloring
Rice Krispie Treats - Zebra Legs and Head
- 3 cups mini marshmallows 150g
- 4 1/2 cups puffed rice cereal 112g
Zebra Face
- 1 Tbsp black fondant
- 3 Tbsp white fondant
- 2 Tbsp pink fondant
Suggested Tools / Equipment
Instructions
Step 1: Make the Marble Cake Layers
- Preheat oven to 350°F / 175 C. Grease and line 6, 6-inch cake pans, and two 4-inch cake pans and set aside.
- Begin by making the vanilla cake batter. Mix together the dry ingredients (3 cups flour, 3 cups sugar, 2 1/2 tsp baking powder, and 1 tsp salt) in a stand mixer with a paddle until fully combined.
- Mix 1 cup of room-temperature butter into the dry ingredients on a low speed. Continue to mix until no large chunks of butter remain, and the mixture looks like moist sand.
- Pour in 1 cup of egg whites and mix on low until just incorporated, then mix in 1 1/2 cups of buttermilk, 2 Tbsp vegetable oil, and 2 tsp vanilla extract. on a low speed.
- Scrape down the sides of the bowl with a spatula, then beat on medium-low speed for about 30 seconds.
- Pour 2/3 of the batter into a separate bowl (roughly 1200 grams) and set aside.
- In the other bowl, transform the vanilla cake batter into chocolate cake batter. Mix in the additional 1/3 cup baking cocoa, 1/4 sugar, 1/4 cup egg whites, 1/4 cup buttermilk, 1/2 tsp baking powder, and 1/4 tsp salt on a low speed until combined and set aside.
- Alternate spoonfuls of chocolate and vanilla cake batter into the prepared cake pans. Fill them roughly 1-inch high with batter. I like to use a digital kitchen scale to make sure each pan has the same amount of batter.
- Drag a small offset spatula or butter knife through the batter in horizontal and vertical lines to create a marbled pattern. Save the leftover chocolate mixture to decorate the cake layer. It can sit out at room temperature for up to 8 hours.
- Bake for 32-35 minutes (or until a toothpick comes out with a few moist crumbs). Check on the 4-inch cake pans after 25 minutes, as they'll bake up faster.
- Once the cake layers are out of the oven, run a small offset spatula around the edge of the pans to help separate the cake layers from the pans.
- Allow the layers to cool in the pan for about 15 minutes, then flip them onto a wire rack to finish cooling.
- Once the cake layers have finished cooling, use a to level the tops and trim one of the 3 of the 6-inch cake layers to have tapered sides. This will make it easier to give the zebra a curved head and shoulders.
- If you're making these cake layers in advance, wrap and freeze them like this. When you're ready to assemble the cake, unwrap the frozen layers and allow them to thaw for about 30 minutes before you plan to frost the cake.
Step 2: Make the Vanilla Buttercream Frosting
- While the cake layers bake and cool, make the buttercream frosting.
- Beat 3 cups of butter on a medium speed for 30 seconds with a paddle attachment or hand mixer until smooth.
- Add in 1 Tbsp of vanilla extract and 1 tsp of salt and mix on a low speed.
- Slowly add in 11 cups of powdered sugar, 1 cup at a time. Add 1/3 cup of heavy cream halfway through to make it easier to mix.
- Once fully mixed and has reached the desired consistency, beat on low until for a couple extra minutes to make the frosting super smooth and to push any extra air out of the frosting.
- If the frosting is too thick, add in additional cream (1 Tablespoon at a time). If the frosting is too thin, add in more powdered sugar (quarter of a cup at a time).
- Wait to color some of the frosting black until the cake is fully frosted. Cover the buttercream with plastic wrap to prevent crusting, then set aside.
Step 3: Assemble this Zebra Cake
- Stack and frost cake layers on a 10-inch greaseproof cake board or cake drum using a dab of frosting to help stick the first cake layer to the board.
- Add an even layer of buttercream between each cake layer with a large offset spatula and stack them in the following order: 6-inch, 6-inch, tapered 6-inch, 4-inch, 4-inch, tapered 6-inch, 6-inch, tapered 6-inch.
- Once the cake layers are stacked, insert a wooden dowel or bubble tea straw through them to give the cake stability as you frost it.
- Spread a thin coat of frosting around the cake to fully cover the cake layers. Smooth using a bench scraper and/or acetate sheet, then chill it in the fridge (30 minutes) or freezer (10 minutes) until the frosting is firm to the touch.
Step 4: Make the Zebra's Legs and Head with Rice Krispies
- While the crumb coat chills, make the cake-decorating friendly rice krispies to create our zebra's limbs and head.
- Place 3 cups of mini marshmallows in a heatproof bowl and heat in the microwave for 45-60 seconds at full power until the marshmallows are melted (mine usually take about 1 minute to melt fully).
- Pour in 4 1/2 cups of rice krispies or puffed rice cereal and stir until the cereal is fully coated in melted marshmallows.
- Grease your hands with cooking spray, then shape 2 hind legs, 2 thin front legs and a head by compacting the rice krispies firmly in your hands.
- Place the legs against the cake as you make them to make sure they're proportionate, shaped properly, and fit around the cake.
Step 5: Decorate this Zebra Cake
- Add a second, thicker layer of white buttercream around the cake then chill the cake again in the fridge (20 minutes) or freezer (10 minutes) until the second coat of frosting firms up.
- Place 1/2 cup of buttercream in a small bowl and color grey with a small squirt of black gel food coloring. Place in a small piping bag and pipe two large ovals on the zebra's body and face to make its tummy and snout.
- Press the rice krispie treat legs into place. They should still be slightly warm and should stick in place with a bit of pressure. If they're not sticking, use a little extra buttercream to keep them in place.
- Cover the rice krispies in a thick layer of white buttercream. Smooth using a small offset spatula and an acetate sheet.
- Color the remaining buttercream black by adding 1/2 cup of melted and cooled dark chocolate chips, a Tbsp of heavy cream and a generous squirt of black gel food coloring. Place this frosting a small piping bag fit with a round frosting tip and set aside.
- Chill the cake again in the fridge (20 minutes) or freezer (10 minutes) until the second coat of frosting firms up.
- Pipe black buttercream stripes all over the cake, and on the zebra's feet to look like hooves. Use the same buttercream to pipe a mane of black butter cream fur down the back of the zebra's head.
- Roll out the black, white, and pink fondant and use circle cutters to cut out the eyes, ears, nostrils, and cheeks. Place the fondant facial features and ears on the chilled cake with a small dab of buttercream and/or toothpicks.
- Let the cake sit out at room temperature for 1-2 hours before serving to make it easier to cut.
Video
Notes
Tips for Making the Best Zebra Cake
- Try to be patient and give yourself lots of time! Sculpted cakes like this can be challenging. Take your time smoothing the frosting and adding on the details to this cake.
- Properly measure your flour (spoon into the cup measure, then level) or use a kitchen scale to measure your dry ingredients.
- Use gel food coloring to create truly black frosting without throwing off the consistency of the frosting or giving it a bitter taste.
- Ingredients at room temperature mix together better, so be sure you set out any cold ingredients ahead of time.
- Chill your cake layers in the freezer for about 20 minutes before assembling the cake. This makes it easier to stack and frost.
- Make this zebra cake vegan or dairy-free if needed! Use your favorite type of dairy-free milk to replace the buttermilk and heavy cream, and use vegan butter sticks in place of the butter. For the eggs, I recommend using an egg replacer like this.
- Insert a thick bubble tea straw or wooden dowel through the layers once they're stacked to help keep the cake stable as you decorate it.
- Shape the fondant ears before you start assembling the cake, and press toothpicks into them to allow you to easily add them to the cake later.
- Use an acetate sheet to help you get your final coat of frosting super smooth.
- If you want to make a standard / non-sculpted zebra layer cake, you can bake 4, 8-inch cake layers and frost them with half a batch of the frosting recipe included above.
Making this Cake in Advance
I recommend making your cake layers in advance and freezing them. It breaks the process up and makes it more approachable. You can also make your frosting ahead of time or save any leftover frosting! It can be stored in an airtight container in the fridge for up to a month or in the freezer for up to 3 months. Be sure to give it a good stir once it thaws to get the consistency nice and smooth again. A frosted cake can last in the fridge for up to a week or in the freezer for up to a month. The buttercream locks in all the moisture, keeping the cake fresh and delicious! If you cut into the cake and have leftovers, use any remaining frosting to cover the cut section to keep it moist and store in the fridge for up to a week.Nutrition
Serving: 1 | Calories: 439kcal | Carbohydrates: 60g | Protein: 5g | Fat: 20g | Saturated Fat: 11g | Polyunsaturated Fat: 8g | Cholesterol: 81mg | Sodium: 272mg | Fiber: 1g | Sugar: 39g