April Showers Cake
Whether you're celebrating a baby shower, a spring birthday, or just love the rain, this April Showers cake is a cheerful way to brighten up any party!
Servings: 24
Calories: 584kcal
Ingredients
Blue Vanilla Cake Recipe
- 3 cups all-purpose flour 390 grams
- 3 cups granulated sugar 600 grams
- 2 1/2 tsp baking powder 10 grams
- 1 tsp fine salt 5 grams
- 1 cup unsalted butter, room temperature 226 grams - 2 sticks
- 2 tsp. vanilla extract or vanilla bean paste 9 grams
- 1 cup large egg whites, room temperature or about 7 egg whites (244 grams)
- 1 1/2 cups buttermilk, room temperature 360 grams
- 1/8 cup vegetable or canola oil 28 grams
- blue gel food coloring
Vanilla Buttercream Frosting
- 2 cups unsalted butter, room temperature 434 grams
- 7 cups powdered sugar 907 grams - or a 2lb bag
- 1/2 tsp fine salt 3 grams
- 2 Tbsp heavy whipping cream, room temperature or whipping cream (30 grams)
- 1 Tbsp vanilla extract or vanilla bean paste 12 grams
- Blue, green, purple, yellow, orange, and red gel food coloring
Blue White Chocolate Drip Recipe
- 1/3 cup heavy whipping cream, room temperature 77 grams
- 1 cup mini white chocolate chips 175 grams
- blue gel food coloring
Instructions
Blue Marbled Cake Layers:
- Preheat oven to 350°F. Line four, seven-inch pans with parchment rounds, and grease with non-stick cooking spray.
- Mix together all dry ingredients (flour, baking powder, sugar, and salt) in a stand mixer with a paddle until fully combined.
- Mix chunks of room-temperature butter slowly into the dry mix, on a low speed. Continue to mix until no large chunks of butter remain, and the mixture becomes crumbly.
- Pour in egg whites, and mix on low until just incorporated. Mix in the buttermilk in two installments, on a low speed. Add in vanilla and oil, and mix at a low speed until fully incorporated. Scrape down the sides of the bowl with a spatula, then beat on low speed for about 15 seconds.
- Pour half of the batter into a separate bowl, and color blue with gel food coloring.
- Alternate spoonfuls of the uncolored cake batter and the blue batter into the prepared cake pans. Once the batter has been evenly split between the pans, use a butter knife or offset spatula to swirl the batter together in each pan.
- Bake for 34-36 minutes (or until a skewer comes out clean). Allow to cool for 10 minutes, then run an offset spatula around perimeter of the pan to separate the cake from the pan. Place cake layers into the freezer for 45 minutes, to accelerate the cooling process.
Vanilla Buttercream Frosting:
- Beat the butter on a medium speed for 30 seconds with a paddle attachment, until smooth. Slowly add in the powdered sugar, 1 cup at a time. Alternate with small splashes of cream.
- Once fully mixed, add in the vanilla and salt, and beat on low until the ingredients are fully incorporated, and the desired consistency is reached.
- If the frosting is too thick, add in additional cream (1 teaspoon at a time). If the frosting is too thin, add in more powdered sugar (quarter of a cup at a time).
- Wait to color the buttercream with gel food coloring until you've filled and crumb coated the cake. The white buttercream will create a beautiful contrast against the blue cake layers.
Blue White Chocolate Ganache Drips:
- Heat heavy cream in a heat-proof bowl in the microwave for 45 seconds, until it's just beginning to bubble. Gently pour white chocolate chips into the heavy cream, making sure they are fully covered with cream. Allow mixture to sit for 1 minute.
- Stir slowly until the cream and white chocolate are combined. Some bits of chocolate may not be fully melted yet. Heat the mixture again for 20 seconds, and stir. Repeat as necessary until all the chocolate bits are fully melted and incorporated.
- Add in the blue gel food coloring, if desired. Allow it to cool until desired viscosity is reached (barely warm to the touch).
- If it seems too thin or thick, you can add a touch more chocolate chips or heavy cream! The type of cream and white chocolate that you use can affect the consistency, so feel free to adjust as needed.
To Assemble The Cake:
- Stack and frost cake layers on a greaseproof cake board, using a dab of frosting to help stick the first cake layer to the board.
- Add an even layer of buttercream between each cake layer.
- Apply a thin coat of frosting around the the cake, to fully cover the cake layers. Smooth using a bench scraper, then chill the cake in the fridge (10 minutes) or freezer (5 minutes) until the frosting is firm to the touch.
- Place about 3 cups of frosting into a separate bowl and color blue.
- Add a second, thicker layer of blue frosting to the cake, and smooth using a bench scraper.
- Place 1 1/2 cups of white frosting into a piping bag fitted with a large round tip. Set aside.
- Color 1 cup of the remaining frosting green, and then color the rest yellow, orange, red, and purple. Place the colored frosting in to small piping bags, cut with a small opening (less than 1 cm)
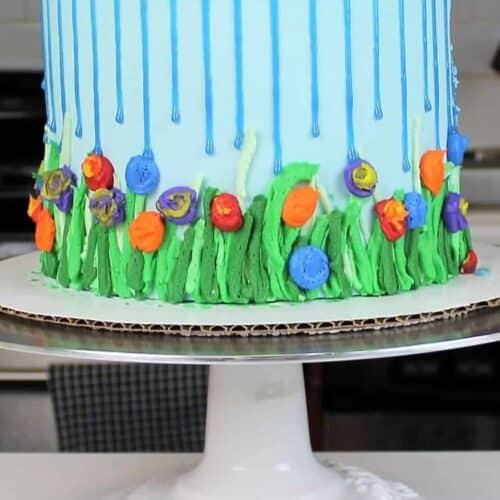
- Pipe green lines around the base of the cake, to look like tall grass. Pipe colorful circles of the red, orange, and yellow frosting around the top of the "grass" to look like wild flowers.
- Add the blue drips to the cake using a plastic squirt bottle.
- Then decorate the top perimeter of the cake with a white buttercream boarded, to look like clouds.
Video
Notes
Once the layers have fully cooled, I sometimes like to trim the caramelized bits from the sides of the layers using a serrated knife. While these layers bake pretty flat, sometimes I’ll also trim the top of the layers too.
Since this frosting will be used to decorated a cake, it is important to mix the buttercream on the lowest speed at the end of the process for a couple minutes, to get out any extra air that might have be incorporated during the mixing process.
You can also stir the frosting in a bowl with a rubber spatula, pushing it from side to side, to get rid of any air bubbles.This will make it easier to get super smooth sides on your cake!
Nutrition
Serving: 1 | Calories: 584kcal | Carbohydrates: 81g | Protein: 4g | Fat: 28g | Saturated Fat: 17g | Polyunsaturated Fat: 10g | Cholesterol: 68mg | Sodium: 254mg | Fiber: 1g | Sugar: 68g