Strawberry Matcha Cake
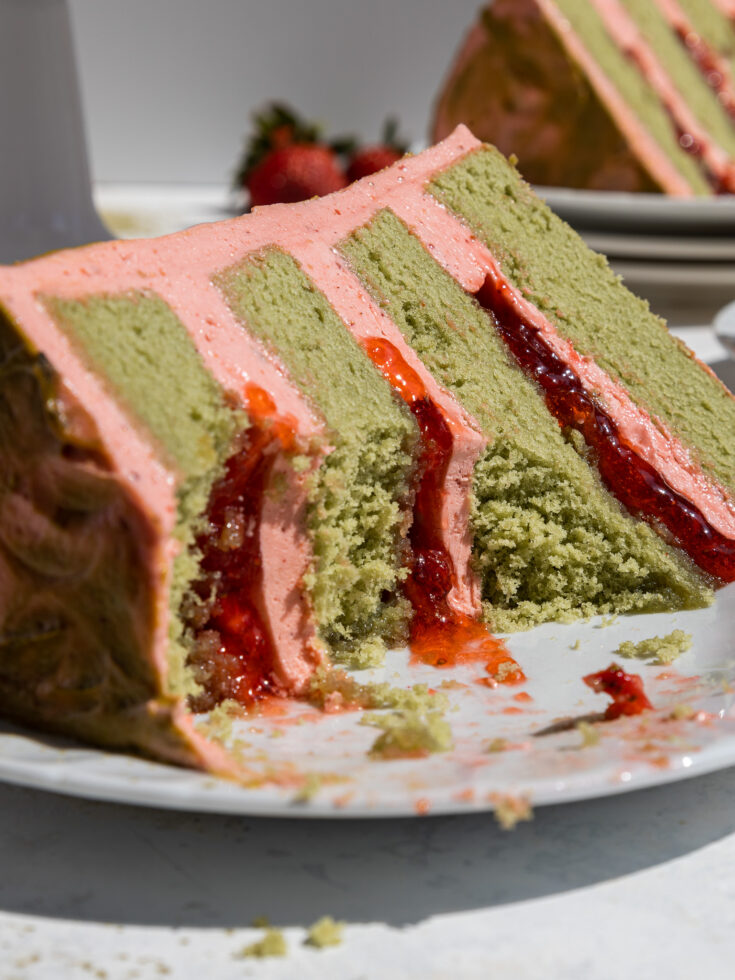
This strawberry matcha cake is so delicious and has the perfect balance of flavor between the earthy notes of matcha and sweet, bright strawberries!
Ingredients
Matcha Cake Recipe
- 2 3/4 cups cake flour (330g)
- 2 1/2 cups granulated sugar (500g)
- 3 Tbsp matcha powder (18g)
- 2 1/2 tsp baking powder (10g)
- 1 tsp fine salt (6g)
- 1 cup (2 sticks) unsalted butter, room temperature (226g)
- 1 cup pasteurized egg whites from a carton or 7 large egg whites, room temperature (240g)
- 1 1/2 cups full-fat sour cream, room temperature (370g)
- 2 Tbsp vegetable oil (28g)
- 1 tsp vanilla extract (4g)
- electric green gel food coloring - optional
Strawberry Buttercream Frosting
- 8 large egg whites (260g)
- 2 1/2 cups granulated sugar (500g)
- 2 cups (4 sticks) unsalted butter, room temperature (454g)
- 1/2 cup strawberry jam (150g)
- 1 Tbsp freshly squeezed lemon juice - about 1/2 small lemon (15g)
- 1 tsp vanilla extract (4g)
- 1/2 tsp fine salt (3g)
- 1/2 cup freeze-dried strawberry powder (55g)
- Red gel food coloring - optional
Cake Filling
- 1 1/2 cups strawberry jam (450g)
Recommend Equipment
- Saucepan
- Heat-proof bowl
- 3, 8-inch cake pans or 4, 7-inch cake pans
- Serrated Knife
- Spinning cake stand
- Electric hand mixer or stand mixer
- 10-inch greaseproof cake board
- Large offset spatula
- 1 Large piping bag
Instructions
Matcha Cake Layers:
- Make the cake layers first so that they have time to bake and cool. Preheat the oven to 350°F/175°C and line and grease three, 8-inch cake pans or four, 7-inch cake pans with parchment rounds and non-stick spray (I used 7-inch cake pans).
- Add 2 3/4 cups cake flour, 2 1/2 cups sugar, 3 Tbsp matcha, 2 1/2 tsp baking powder, and 1 tsp salt into the bowl with the sugar and whisk together until combined.
- Cut 1 cup (2 sticks) of unsalted butter into Tbsp-sized pieces and mix them into the dry ingredients with a paddle attachment or hand mixer on a low speed. Continue to mix until no large chunks of butter remain, and the mixture looks like moist sand.
- Mix in 1 cup of egg whites on a medium speed until incorporated. The batter should be quite thick at this point.
- Then add in 1 1/2 cups sour cream, 2 Tbsp vegetable oil, and 1 tsp vanilla extract. If desired, add in a small drop of electric green gel food coloring to brighten the green color of the layers. Mix on a low speed until incorporated.
- Scrape down the sides and bottom of the bowl with a rubber spatula, then beat on a medium speed for about 30 seconds to make sure everything is properly mixed together. This cake recipe uses the reverse creaming method, so this step is important to help give the cake layers a lighter texture.
- Divide the batter evenly between the prepared cake pans. Bake for 33-36 minutes or until a toothpick comes out with a few moist crumbs. Let the cake layers cool in the pans for 10 minutes, then run a small offset spatula around the perimeter of the pan to separate the cake from the pan.
- Flip the cake layers onto a wire rack to cool. Use a serrated knife to level the top of the layers once they're fully cooled.
- If you make these cake layers in advance and freeze them, let them thaw for about 20 minutes before assembling your cake. The cake layers should still be cold to the touch, which will make it easier to assemble your cake.
Strawberry Swiss Meringue Frosting:
- While the cake layers bake and cool, make the strawberry buttercream frosting. Before making the frosting, be sure to thoroughly clean your mixing bowl. If there’s any grease it can make it difficult to whip up the meringue.
- In a medium sized pot, add about 1 inch of water and bring to a simmer.
- Add 8 egg whites and 2 1/2 cups of granulated sugar into a large metal bowl. Place the bowl on top of the pot filled with simmering water. The bowl should create a seal over the pot. Make sure the water isn’t actually touching the bottom of the bowl, or it can cook the egg whites.
- Whisk the mixture constantly for about 3 minutes, until it reaches 160°F / 71°C. You can test the mixture to see if it’s ready by rubbing a tiny bit between your fingertips. The sugar should be fully dissolved, and it should feel super smooth and hot to the touch.
- Lift the bowl away from the pot and dry the bottom with a towel. Pour the mixture into the bowl of a stand mixer and beat on a medium-high speed with a whisk attachment. Mix for about 10 minutes, or until you have stiff, glossy peaks.
- Mix in 2 cups of unsalted butter at a medium speed, 1 stick at a time. The frosting should have a thick, whipped consistency at this point. If it looks lumpy or broken, keep mixing until it looks smooth and thick. If it doesn't seem to come together after an additional 10 minutes of mixing, check out my Swiss meringue buttercream troubleshooting guide.
- Then add in 1/2 cup strawberry jam, 1 Tbsp fresh lemon juice, 1 tsp vanilla extract, and 1/2 tsp salt and mix on medium until fully incorporated. Once combined, mix in 1/2 cup of freeze-dried strawberry powder. Scrape the sides and bottom of the bowl with a rubber spatula as needed. If you want the frosting to be a brighter pink color, add in a small drop of red gel food coloring.
- To make the frosting extra smooth, swap out the whisk attachment for a paddle attachment and continue mixing on a low speed for a couple minutes.
- Place half of the frosting in a large piping bag and cut a 1-inch opening at the base of the bag. Set aside.
Assembling this Strawberry Matcha Cake:
- Stack and frost cake layers on a greaseproof cake board or flat plate using a dab of frosting to help stick the first cake layer to the board.
- Spread a thin layer of buttercream on top of the cake layer. Pipe a thick ring of buttercream around the edge of the cake layer and fill the center with strawberry jam. I like to add about 1/2 cup between each layer. If you plan to eat the cake the day you make it, you can also add some diced strawberries. Repeat with the remaining cake layers. Flip the top cake layer upside down to make it easier to frost and get sharp corners.
- Chill the cake in the freezer for 5-10 minutes to prevent the layers from sliding, then add a thin coat of frosting around the cake that fully covers the cake layers. Smooth using a bench scraper, then chill the cake again in the fridge (30 minutes) or freezer (10 minutes) until the frosting is firm to the touch.
- Set aside 1/3 cup of frosting, then add a second layer of frosting to the cake with the remaining buttercream. Use a large offset spatula to give the frosting a textured look.
- Color the reserved frosting green with a Tbsp of matcha powder and a small drop of electric green gel food coloring. Use a small offset spatula to add colorful swipes of green frosting around the cake and blend them into the strawberry frosting. Then enjoy!
Notes
Substitutions and Swaps
If you need to make any substitutions or swaps in this recipe, please check out the section on ingredient substitutions in the post above.
Making this Strawberry Matcha Layer Cake in Different Sizes
One batch of batter is about 1800g or 10 cups, so I add roughly 600g to each of my cake pans when using 3, 8-inch cake pans, or 450g to my cake pans when using 4, 7-inch cake pans.
You can also use one batch of batter to make 2, 9-inch cake layers or 4, 6-inch cake layers. Bake time will be a few minutes longer at 350 F / 175 C.
If you want to make a tiered cake with this recipe, check out my cake batter calculator to see how many batches of batter you'll need.
If you want to make strawberry matcha cupcakes, fill the liners 3/4 full and bake them at 350F / 175C for 18-21 minutes. One batch of batter will make about 3 dozen cupcakes (yield will vary based on the size of your liners).
Or if you just want to make a dozen cupcakes, you can use my matcha cupcake recipe.
Tips for Making the Best Strawberry Matcha Layer Cake:
- Properly measure the flour (spoon into the cup measure, then level) or use a kitchen scale to measure your dry ingredients.
- Use a scale to weigh the cake pans as you fill them with batter. This
- Ingredients at room temperature mix together better. Set out any cold ingredients ahead of time.
- Chill the cake layers in the freezer for about 20 minutes before assembling the cake. This makes it a lot easier to stack and frost.
- Chill the entire cake before adding on the crumb coat. This will help lock all the lemon curd filling in place and prevent the cake layers from sliding.
- If your cake layers do seem to be sliding, insert a wooden dowel or chopstick through the center of the cake to help keep the layers in place.
- If your cake layers turn out less than perfect, check out my cake troubleshooting guide to try to figure out what happened.
Making This Cake in Advance and Storage Tips
I highly recommend making the components of this cake in stages. It breaks the process up and makes it so much more approachable!
The cake layers can be made in advance and frozen. They taste just as great when they're frozen as when they're fresh, I promise!
You can also make the frosting ahead of time or save any leftover frosting! It can be stored in an airtight container in the fridge for up to a month.
Be sure to give it a good stir once it thaws to get the consistency nice and smooth again.
A frosted cake can be stored for up to a week in the fridge as long as there's no fresh fruit in it. The buttercream will lock all the moisture in and keep it fresh.
If you cut into the cake and have leftovers, use any remaining frosting to cover the cut section to keep it moist and store in the fridge for up to a week.
Nutrition Information
Yield
24Serving Size
1Amount Per Serving Calories 526Total Fat 16gSaturated Fat 6gTrans Fat 0gUnsaturated Fat 8gCholesterol 97mgSodium 380mgCarbohydrates 90gFiber 1gSugar 70gProtein 9g