
It may be because I have about a million leftover cupcakes from recipe testing my red velvet cupcakes last week, but I have been all about cupcake creations latey. Get ready for pull-apart cupcake wreaths, red velvet grinch cupcakes, and the works!! My latest creation with them are these mini christmas tree cakes.
These mini cakes are unique in the fact that they’re actually made by stacking cupcakes! I really fell in love with stacking cupcakes after I made my little monster cupcakes this past halloween.
Cupcakes bake up so much more quickly than cake layers, and sometimes it’s nice to make a smaller dessert.
Cakes always seem big enough to feed a crowd, but one batch of these fun little trees can be shared among a group of friends.
Keeping Your Cupcake Stacks In Place
One challenging aspect of stacked cupcake cakes (that’s the name I’ve given them :P) is that they’re not the most stable.
Let’s be honest. They’re crazy looking!!! I used my leftover cupcakes that baked unevenly, or overflowed onto my pan.
While it may look silly unfrosted, it’s nothing a bit of buttercream can’t fix! This is actually a great way to use wonky cupcakes.


With this in mind, I highly recommend using a wooden skewer to help you frost them. Insert the skewer into the top of your cupcake stack once it’s frosted.
Leave it in place while you add on your crumb coat and while you chill the cupcake stack.
When it’s time to add the second layer of frosting, gently spin the skewer to help it release, and pull it out. I promise this makes the process about 20 times easier!!
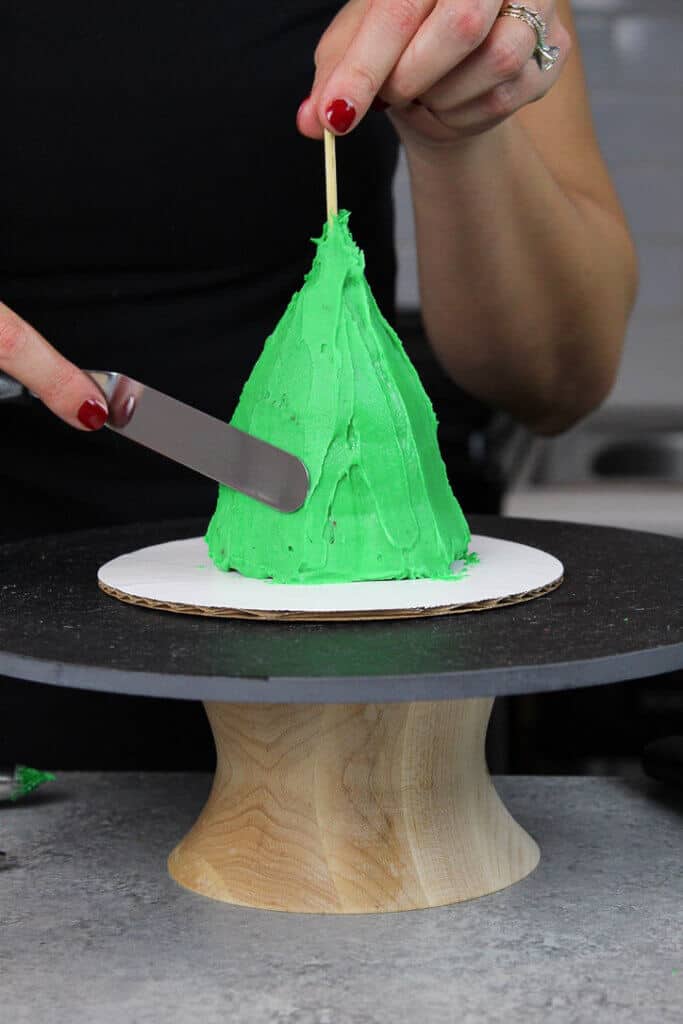
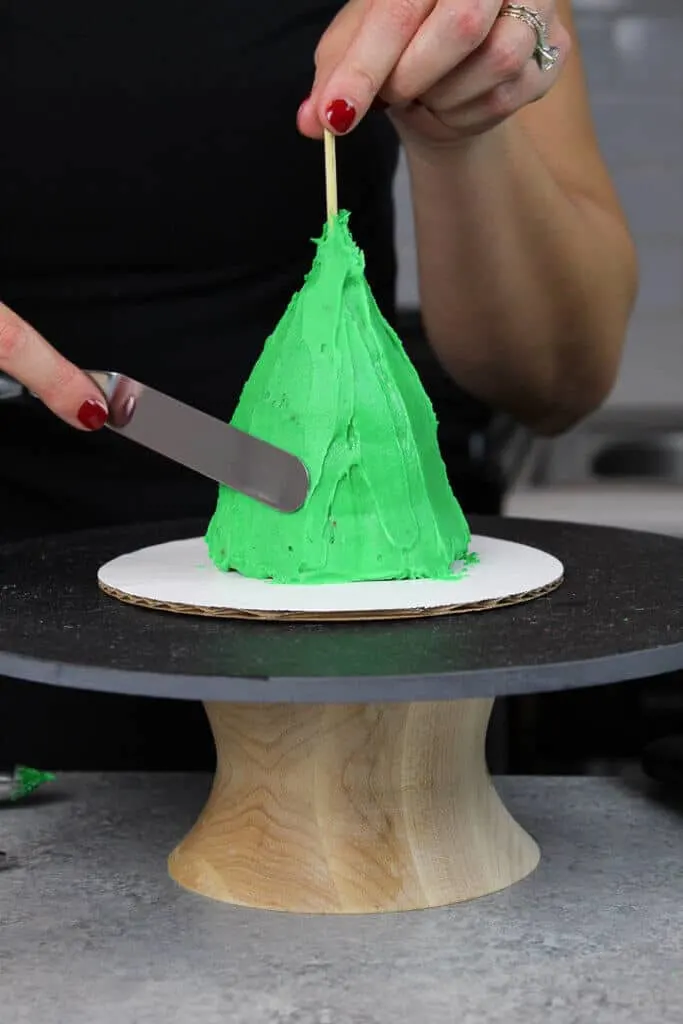
The other crucial part to these is the crumb coat. Once the crumb coat is chilled, your stack will be nice and stable.
It makes the decoration process so much easier, so be sure you don’t skip this step!
Decorating Your Mini Christmas Tree Cakes
After the cupcake stack is crumb-coated and actually in the shape of a tree, it’s time to decorate! To make those pretty little branches, use a small french piping tip.
My tip here (no pun intended) is to take your time as you pipe. Start at the base of the tree, and try to pipe uniformly sized dollops of frosting. Continue up the mini cake until your reach the top.
I happened to have these silly gold star cupcake toppers on hand from a friend’s 30th birthday cake, and I used them to top my trees.
If you don’t have something like this on hand, fear not! You can always pipe a dollop of yellow buttercream on top of your tree, or cut out tiny yellow fondant stars. Some sprinkle blends also have stars in them, which is another option!
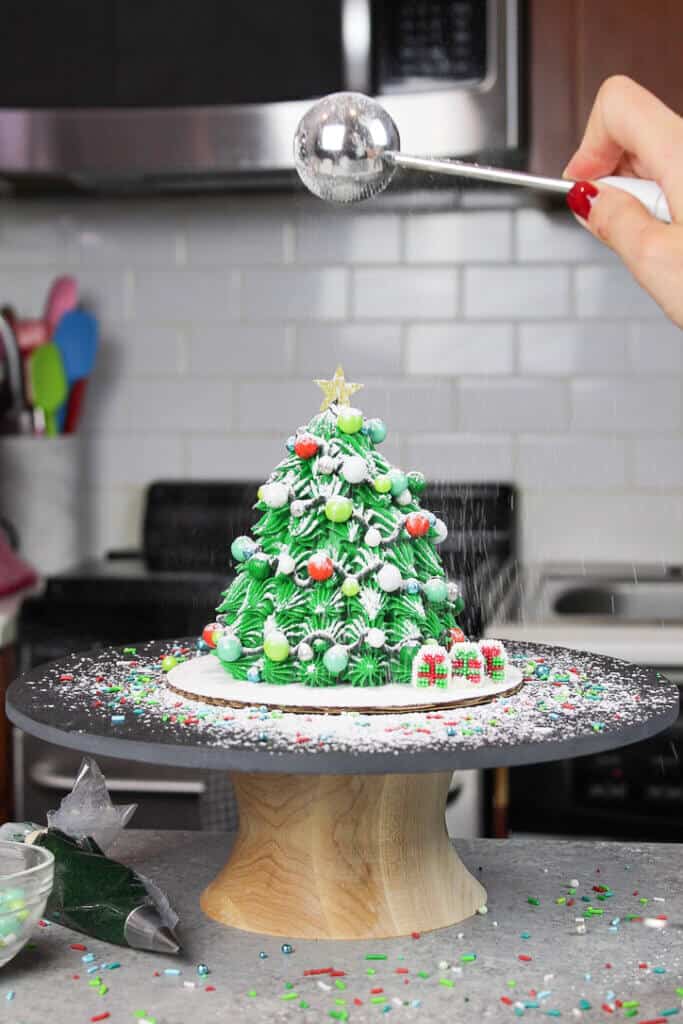
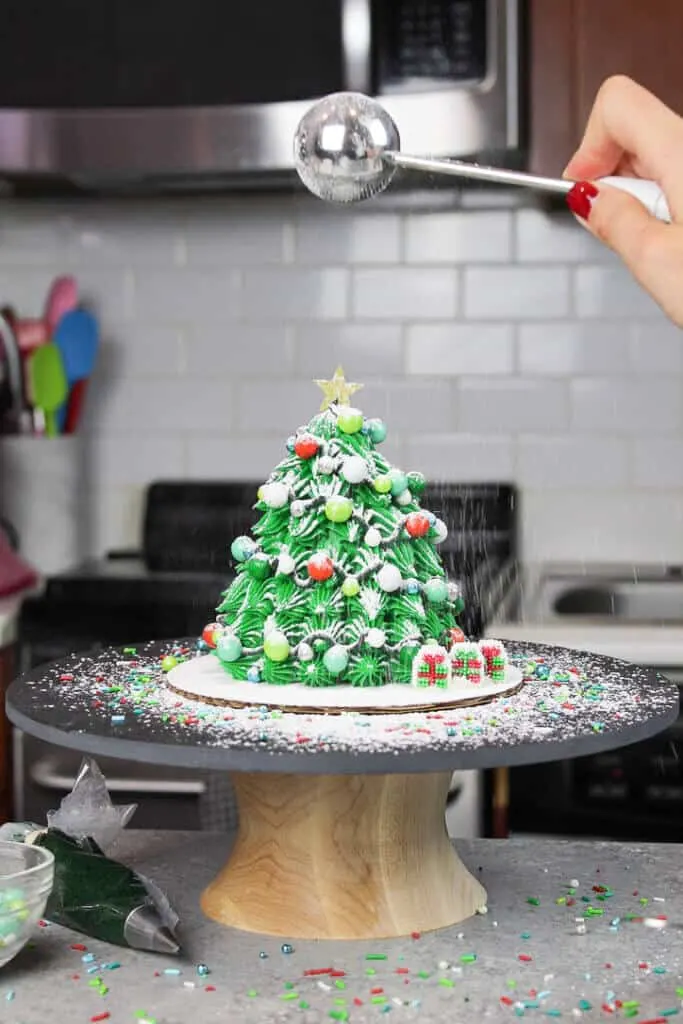
Speaking of sprinkle blends, that’s exactly what I used to decorate these trees. I piped a thin line of green buttercream around the tree to look like a string of christmas lights, then placed big sprinkles underneath it.
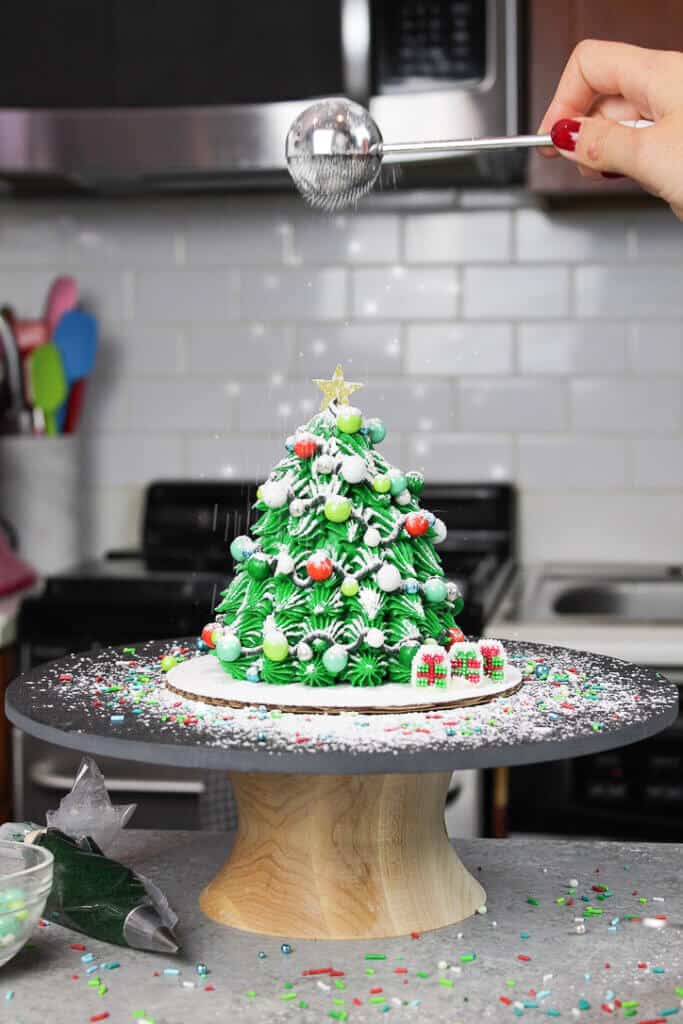

The finishing touch is to add a dusting of powdered sugar. It adds a great contrast against the colorful frosting, and gives it the perfect wintery feel.
I use this dusting wand, which I like to refer to as my fairy godmother wand. I call it that because I kind of feel like a fairy every time I use it. That also is its name because dusting desserts with powdered sugar always feels so magical!
Getting a Bit Creative with These Little Trees
Like always, I encourage you to get creative with the decoration of these mini christmas tree cakes!
Make different colors of frosting, or maybe you make an ombre christmas tree cake! You could also decorate the trees with your favorite candies or cookies. Or maybe you stack 3 cupcakes to make a super tall tree!!
I got this crazy idea in my head to make a pink christmas tree. And you know what? It turned out pretty cute. Or at least I think so 🙂

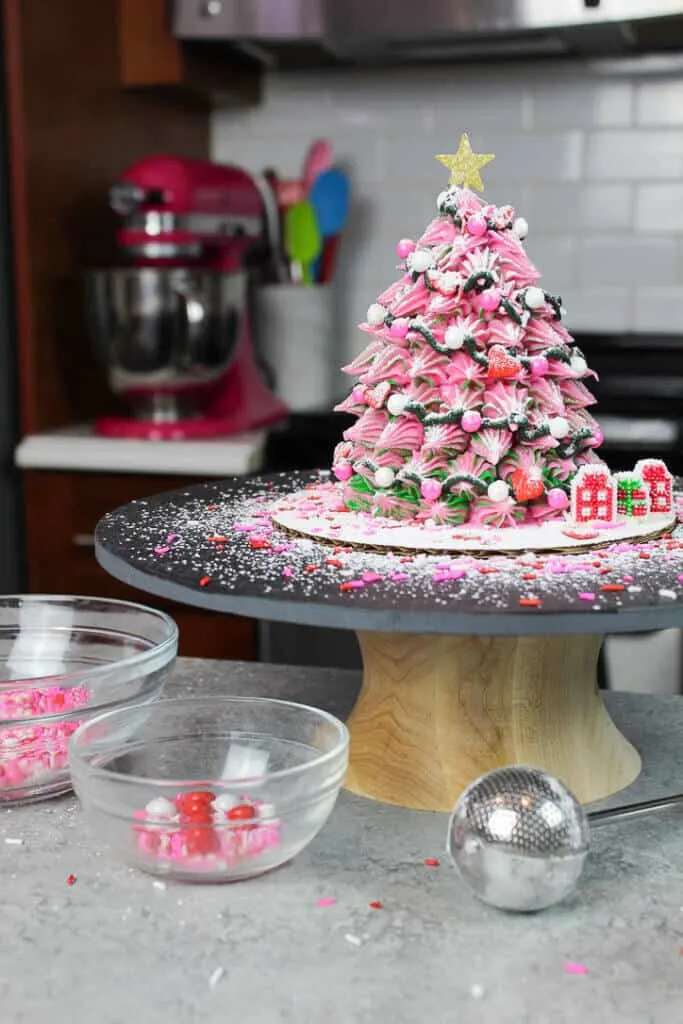
I originally envisioned making a christmas tree scenery type thing with all my different trees together, but ran out of steam after I decorated my 4th tree.
So don’t be afraid to put your own spin on these! That’s half the fun of baking, right??
Tips for Making the Best Mini Christmas Tree Cakes
- Insert a skewer into the stacked cupcakes to make them easier to frost. Chill the stack with the skewer in, then remove it as you pipe on the second layer of frosting.
- Thoroughly chill the crumb coat of each tree to help them keep their shape
- You can make the cupcakes for these christmas tree cakes in advance! The cupcakes can be refrigerated for up to a week, if stored in an airtight container.
- You can also decorate these ahead of time! Once the cupcakes are fully frosted, the buttercream will lock in all the moisture. They keep in the fridge for several days.
- Dust the christmas tree cakes with powdered sugar to look like snow!
Let Me Know What You Think!
If you try making these mini Christmas tree cakes, I’d love to hear what think of it! Please let me know your thoughts in the comments section below.
If you feel like you need more christmas cake inspo, I’ve got you covered. Here are 15 awesome & easy Christmas cake decorations that are sure to brighten your holiday celebrations!
Mini Christmas Tree Cakes


These festive mini Christmas tree cakes are super easy to make! Simply stack and frost two cupcakes on top of each other, and then add some sprinkles!!
Ingredients
Red Velvet Cupcakes
- 1/4 cup vegetable oil (56 grams)
- 1/4 cup melted butter (57 grams)
- 1 egg (56 grams)
- 1/2 cup buttermilk, room temperature (114 grams)
- 1 1/2 tsp white vinegar (5 grams)
- 1 tsp vanilla extract (3 grams)
- 1 cup granulated sugar (200 grams)
- 1 tsp. unsweetened cocoa powder (4 grams)
- 1/2 tsp salt (3 grams)
- 1/2 tsp baking soda (3 grams)
- 1 1/4 cups all-purpose flour (163 grams)
- 1 squirt of red gel food coloring (or 1 1/2 tsp liquid food coloring)
Green Buttercream Frosting
- 1 cup unsalted butter, room temperature (226 grams) - 2 sticks
- 3 1/2 cups powdered sugar (454 grams) - or a 1 lb box
- 1/2 tsp salt (3 grams)
- 1 Tbsp heavy cream (or whipping cream) (15 grams)
- 1 tsp vanilla extract (4 grams)
- green gel food coloring
Additional Tools
- piping bag
- french piping tip
- fun sprinkles / candy
Instructions
Red Velvet Cake
- Preheat oven to 350 degrees F (175 degree C).
- Line a standard sized muffin tin with 12 cupcake liners.
- In a large bowl, whisk together the butter and vegetable oil.
- Mix in the egg, buttermilk, white vinegar and vanilla extract.
- Add granulated sugar, and whisk for 30 seconds to help the dissolve the sugar.
- Mix in the cocoa powder, salt and baking soda, and whisk until no clumps remain.
- Mix the flour into the batter in two installments.
- Add red gel food coloring, and mix until the batter is evenly colored a deep shade of red. If desired, divide the batter between two bowls, and color one half red, the other half green.
- Divide the batter evenly between the cupcake tins, and bake for about 18-20 minutes (or until a toothpick comes out with moist crumbs).
- Remove the cupcake pan from the oven, and allow them to cool in the pan for 10 minutes.
- Carefully remove the cupcakes from the pan, and place on a wire rack to finish cooling.
Green Buttercream Frosting:
- Beat the butter on a medium speed for 30 seconds with a paddle attachment, until smooth.
- Add in the vanilla extract and salt, and beat on low until the ingredients are fully incorporated.
- Slowly mix in the powdered sugar on a very low speed, 1 cup at a time. Alternate with small splashes of cream.
- If the frosting is too thick, add in additional cream (1 tablespoon at a time).
- If the frosting is too thin, add in more powdered sugar (1/4 cup at a time).
- Color the buttercream green using gel food coloring.
Red Velvet Cupcake Decoration:
- Once the cupcakes are fully cooled, remove them from their liners, and cut them in half horizontally.
- Start by stacking two cupcake tops on each other, adding a generous layer of buttercream between the two.
- Top with a cupcake bottom and another layer of frosting. Use a small circle cutter or knife to cut a 1 inch circle from the last cupcake bottom, and place on top of the cupcake stack.
- Insert a wooden skewer into the cupcake stack to keep it stable and add a thin layer of frosting all around the cupcakes. Smooth with a small offset spatula, then chill in the freezer for 10 minutes (or fridge for 20 minutes)
- Repeat with remaining cupcakes.
- Place the remaining frosting in a piping bag fitted with a french piping tip.
- Pipe small dollops of frosting all the way around the tree! Start at the bottom, and work your way up to the top.
- Decorate with fun sprinkles, and a gold star on top.
- If desired, add a dusting of powdered sugar, to look like snow!
Notes
Be sure to add a dab of buttercream underneath the first cupcake to keep it in place, and prevent the stack from sliding once they're decorated.
These cupcake can be made in advance! If stored unfrosted in an airtight container, they can last for:
- 2 days at room temp
- Up to a week in the fridge
- Up to 3 months in the freezer
If you have extra buttercream you don't use, it can be stored in the fridge for up to 2 weeks.
Nutrition Information
Yield
6Serving Size
1Amount Per Serving Calories 1002Total Fat 50gSaturated Fat 26gTrans Fat 1gUnsaturated Fat 21gCholesterol 136mgSodium 621mgCarbohydrates 138gFiber 1gSugar 116gProtein 5g
Gnome Cake - Delicious Vanilla Cake Recipe with Buttercream Frosting
Thursday 16th of December 2021
[…] Mini Christmas Tree Cake […]
Dollar Cakes
Thursday 13th of August 2020
We,
Dollar Cakes provide the Best Handcrafted Cakes for All the Occasion.
Winni
Thursday 19th of December 2019
Wow, I saw this is the world's most beautiful cake. I love so much this. Thank you so much for sharing mini Christmas tree cake.
Chelsweets
Thursday 26th of December 2019
aw thank you Winni! You are too sweet! I hope you had a wonderful Christmas!!