
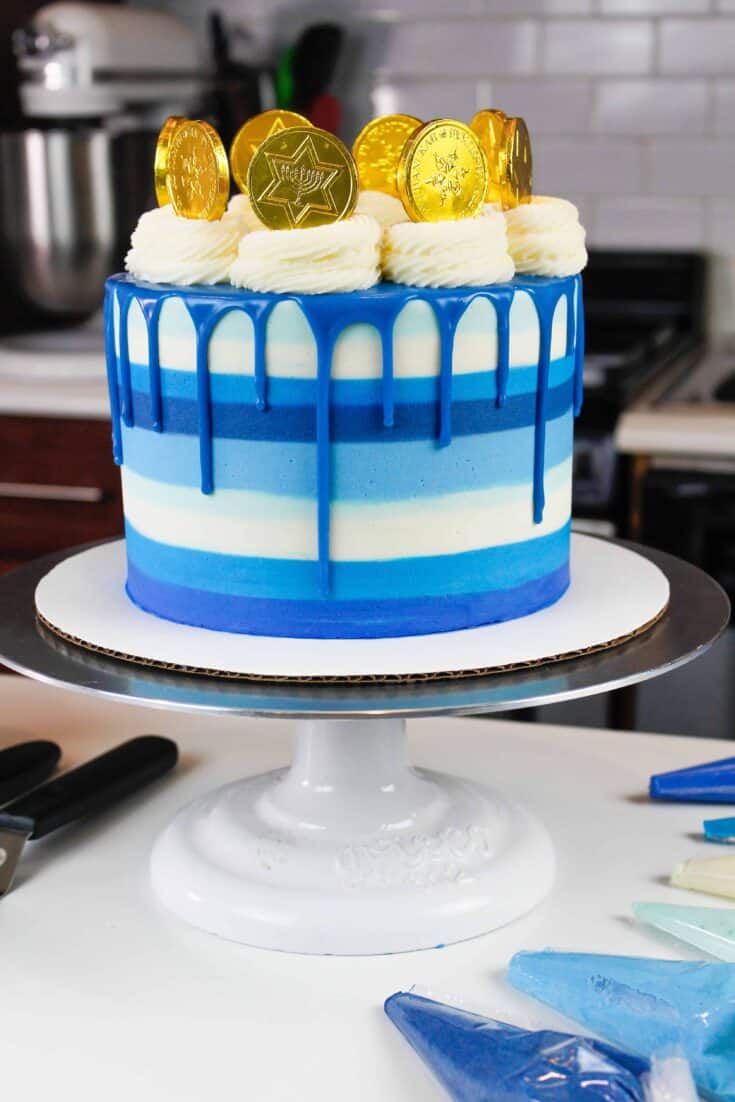
This is the first Hanukkah cake I’ve ever made! I wanted it to be beautiful, festive, and the perfect cake to cut into when you’re surrounded by family and friends.
When I was trying to strategically name this post, I was horrified to learn that more people search for “Hannukah cake” than “Hanukkah cake.” Isn’t that wild?!
In the end, it turns out not that many people are trying to make a layer cake for Hanukkah! So I didn’t have to get too creative or specific with the name of this cake 😛
I suppose regulach and apple tarts are a bit more fitting, but if you feel adventurous and want to make something different, you have come to the right place.
I wanted this cake to be blue and white throughout, and I definitely I accomplished that.
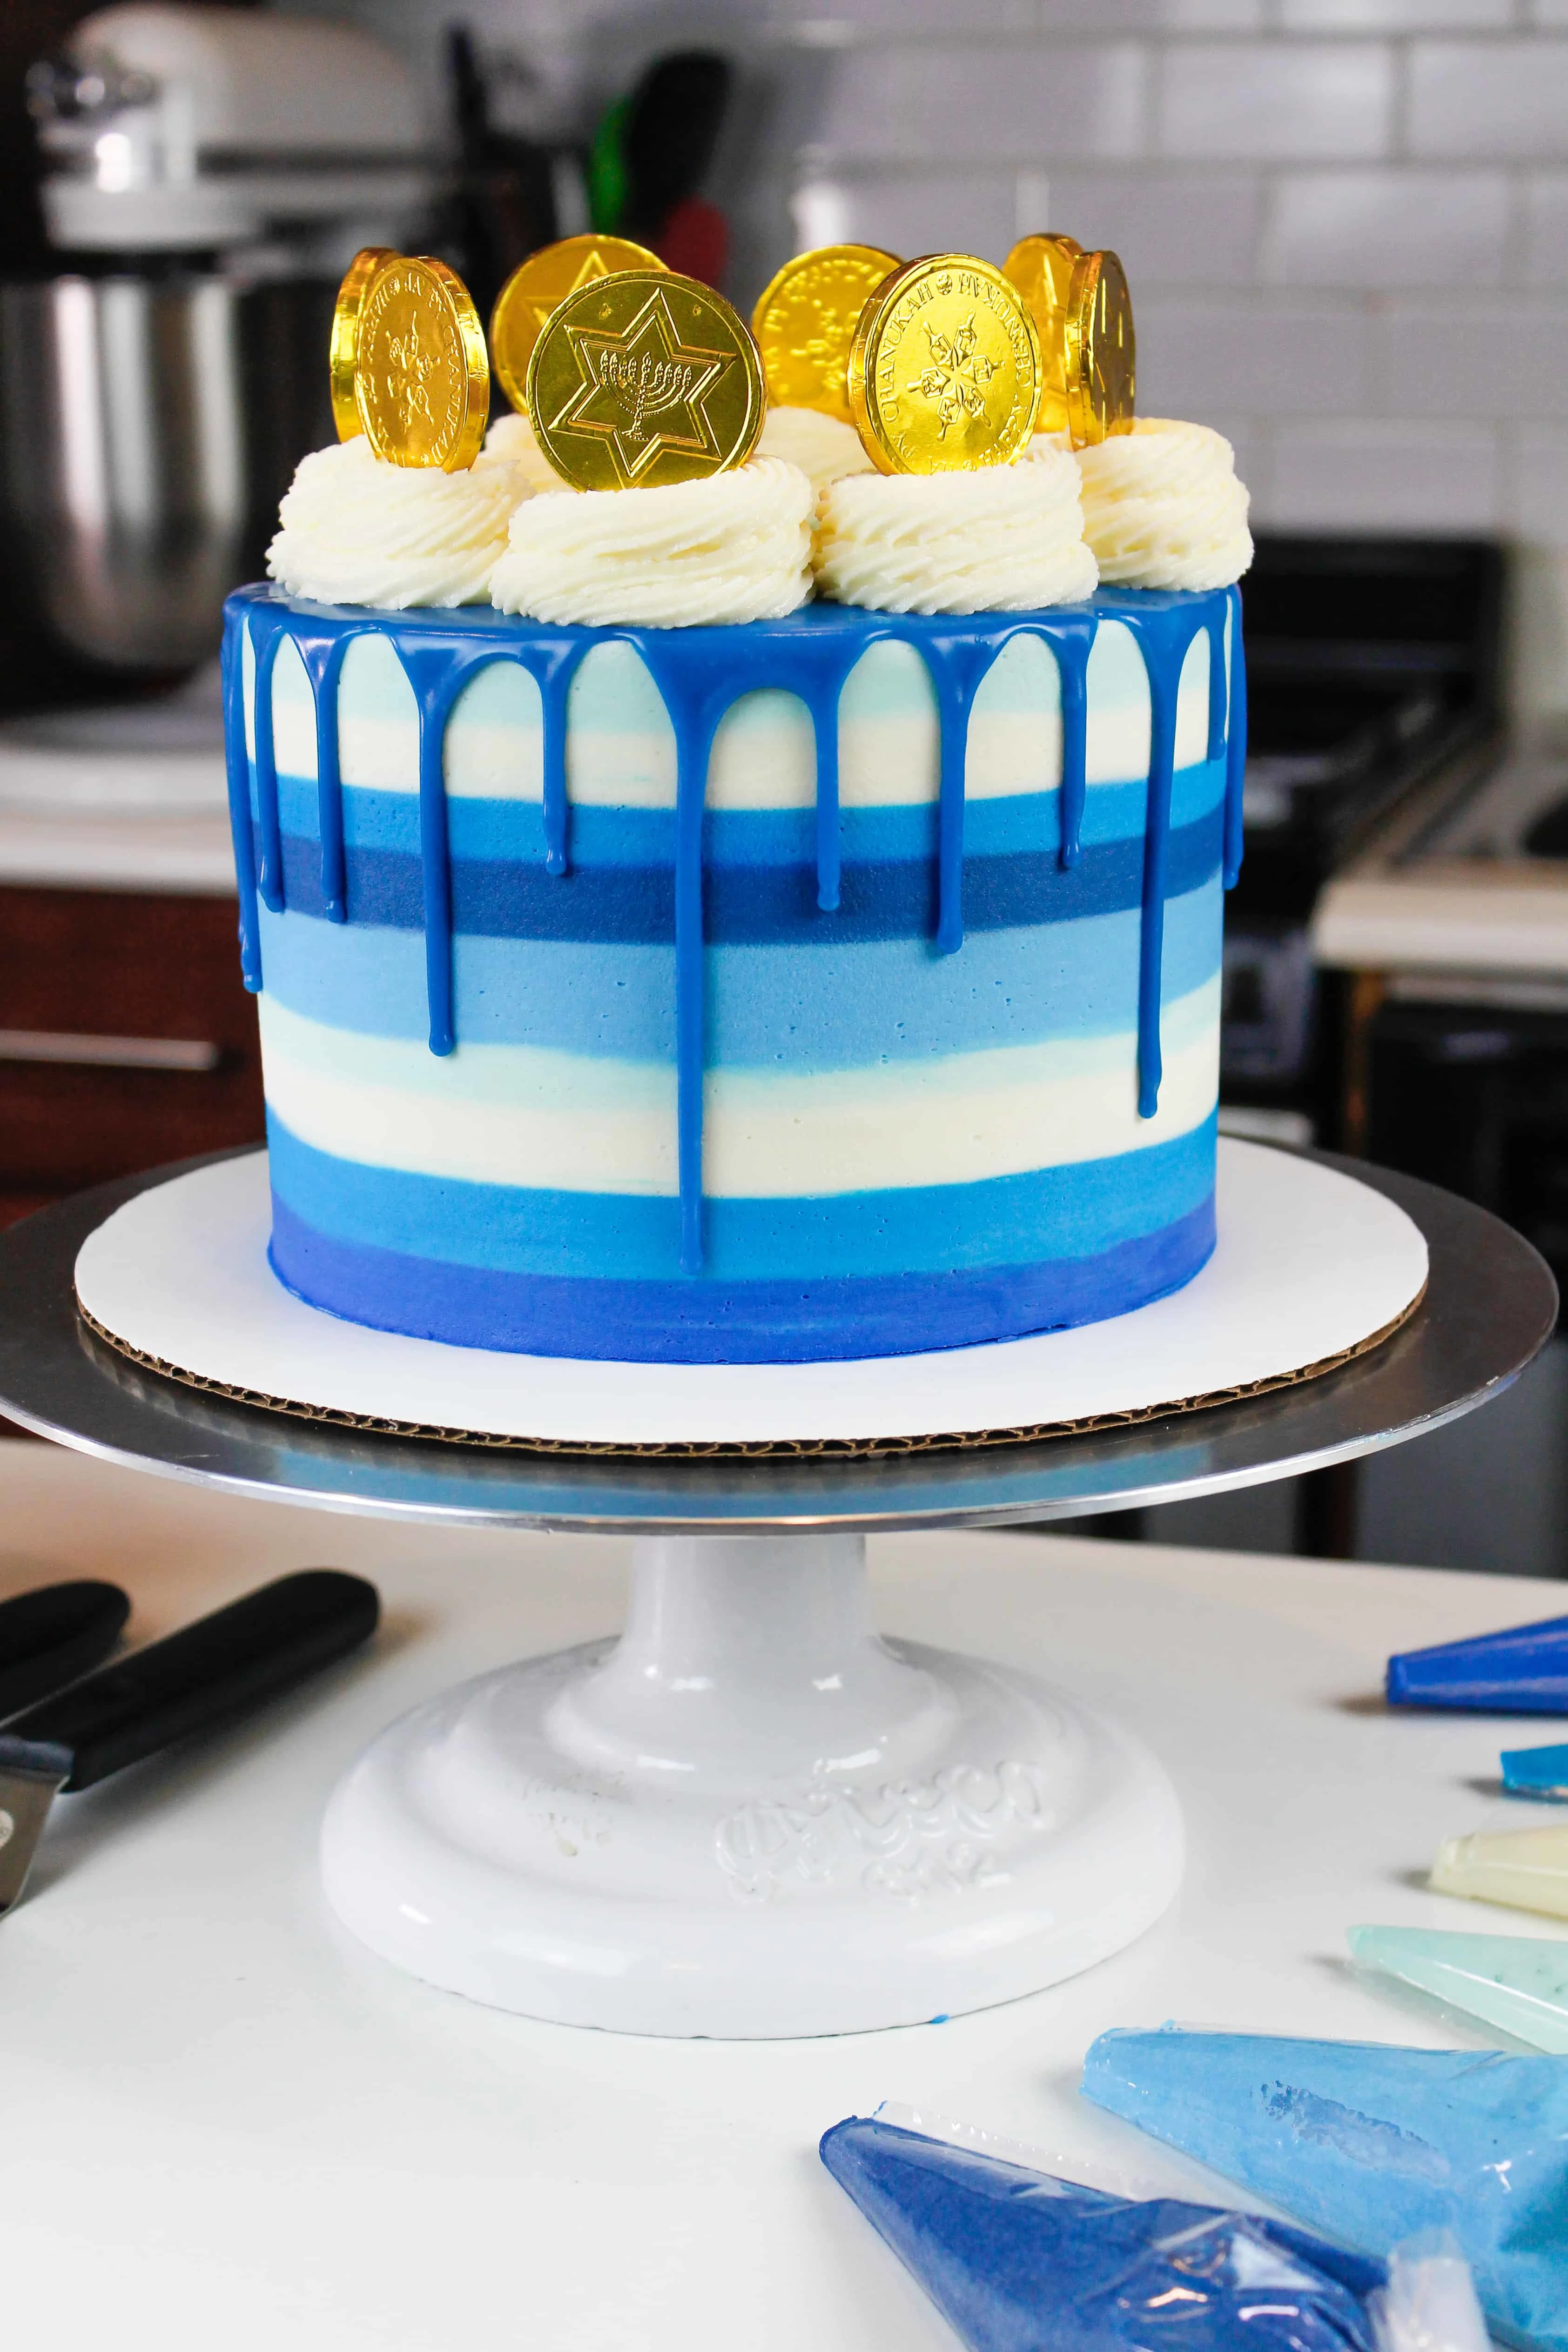
This cake is made with blue cake layers, blue and white buttercream, and it’s filled with blue and white sprinkles and candy. This cake is festive through and through!

The Flavor of This Cake
I’m going to be totally honest. I was so focused on the decoration and sprinkle filling of this cake, I just stuck with my tried and true vanilla layer cake recipe and frosted the cake with my vanilla buttercream.
If you felt like being more adventurous, you could fill the cake with an apple filling, or use a spiced buttercream to make the flavor of this cake a bit more festive.
You could also top the cake with other hanukkah treats, like rugelach!
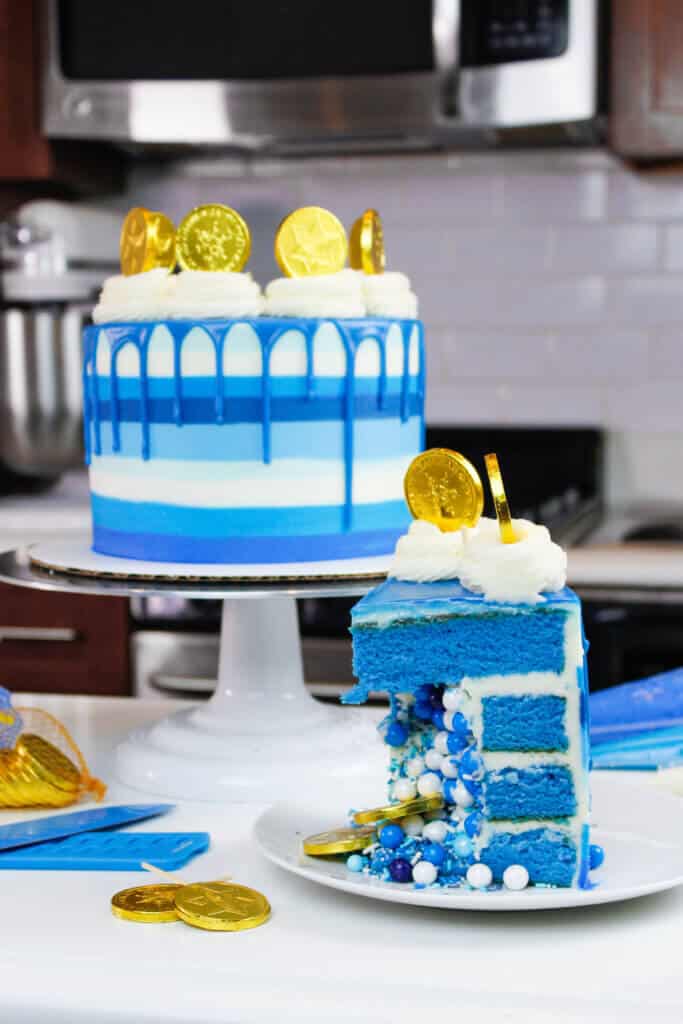
The Wow Factor: Surprise-Inside Cake
Since the holidays are a time to spend with your loved ones, I wanted to make this cake exciting to cut into. I envision you carrying this cake out to a crowded table, and having everyone captivatingly watch you cut into it!
The best way to get this type of reaction is to make a surprise-inside cake, or a pinata cake.


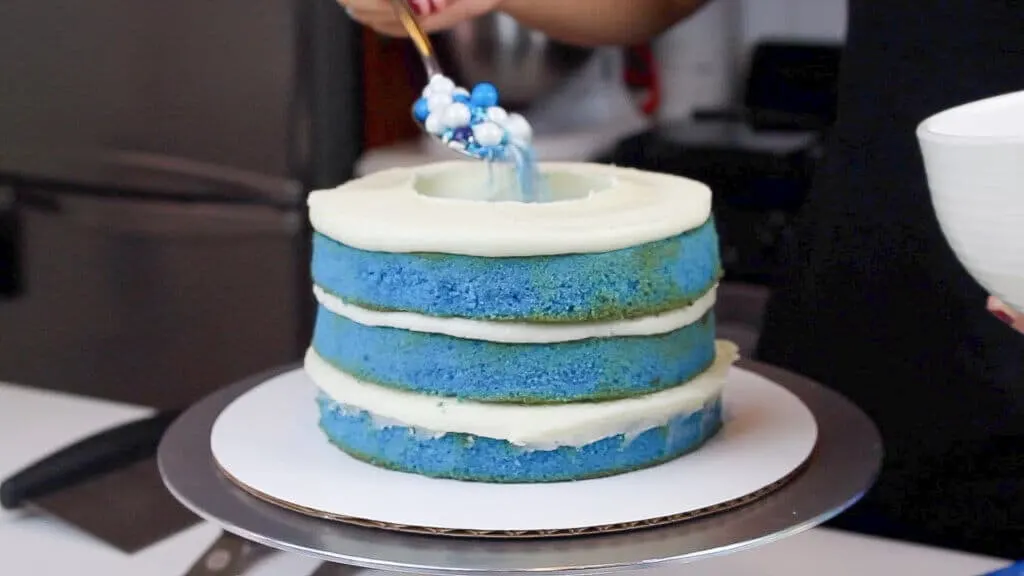
To do this, you cut out the center of two of your cake layers using a circle cutter, and then stack these two layers in the middle of the cake.
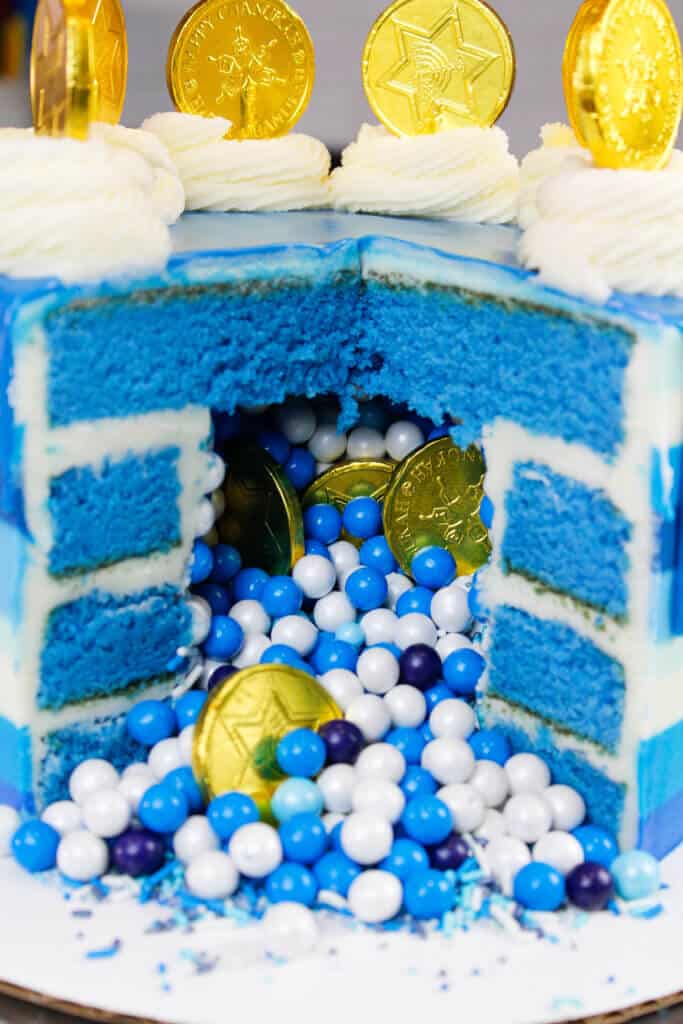
This creates a cavity in the center of the cake, that you can filled with anything! For this cake, I chose to add a blue and white sprinkle blend, blue and white sixlets, and even some pieces if gelt.

Adding gelt inside the cake is totally optional. Some people are highly opposed to adding wrapped candy inside a cake, and I totally get it.
But the thought of golden gelt tumbling out of the cake with a wave of blue and white sprinkles was too appealing for me!
I carefully placed the gelt perpendicular to the sides of the cake cut out, so that I wouldn’t cut through any of the pieces when I cut the cake.

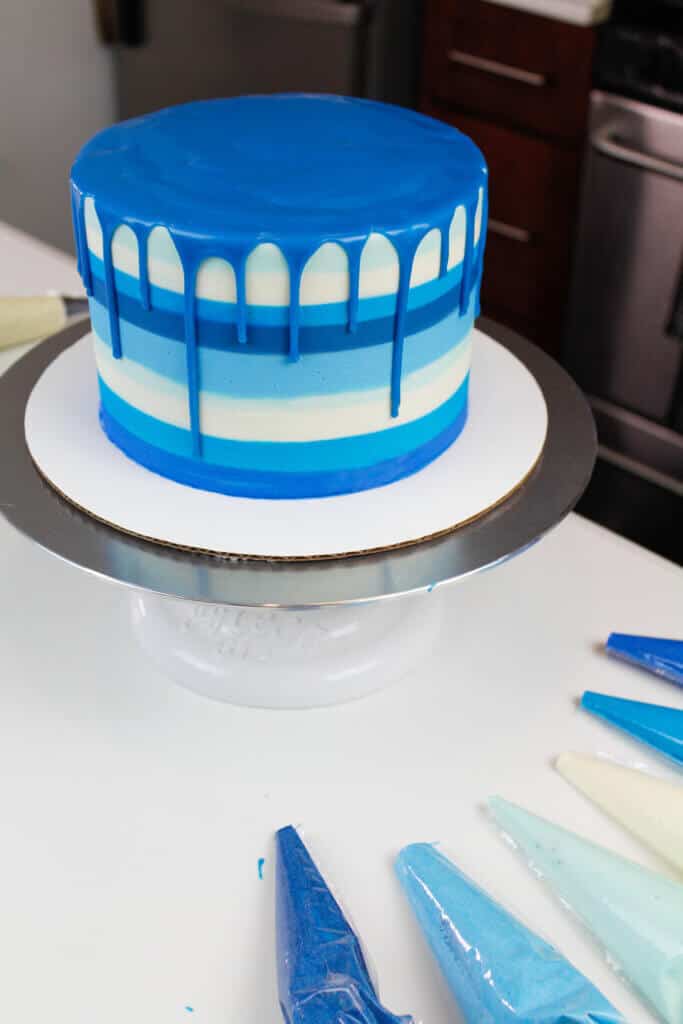
Adding the Blue Drip to Cake
Drip cakes aren’t as difficult to make as you may think, but there are a few things to keep in mind to make sure you get that perfect drip look! The most common issues people run into when making drip cakes include:
- Runaway drips – drips that run all the way down the cake and right off the cake board
- Watery, thin drips, that looks more like colorful streaks than drips
- Ganache that seems to melt the buttercream
- Short, stubby drips that resemble candle wax
Most of these problems are caused by adding the ganache to a cake when it isn’t right temperature.
You can also have issues if the cake hasn’t been properly chilled. If you follow my tips below, I promise you can avoid all of these issues!!

Step #1 : Chill Your Cake
My first tip is to make sure your cake is properly chilled. Once frosted, you should allow it sit it your fridge for at least 20 minutes, or in your freezer for 10 minutes. This makes sure the frosting is cold and firm to the touch.
Chilling the cake helps the buttercream keep its shape, and stand up to the slightly warmed ganache.
It will also help slow down the speed at which the drips run down the cake, which will help them from running all the way down the cake.
Step #2 : Temperature Of Your Ganache
The second tip is to make sure your ganache is the right temperature!! It should be just slightly warmer than room temperature.
If your ganache is too warm, it will be thinner than you want, and will run straight down the cake and pool at the bottom of your cake board.
On the other hand, if it’s not warm enough, you will end up with short, stubby little drips.

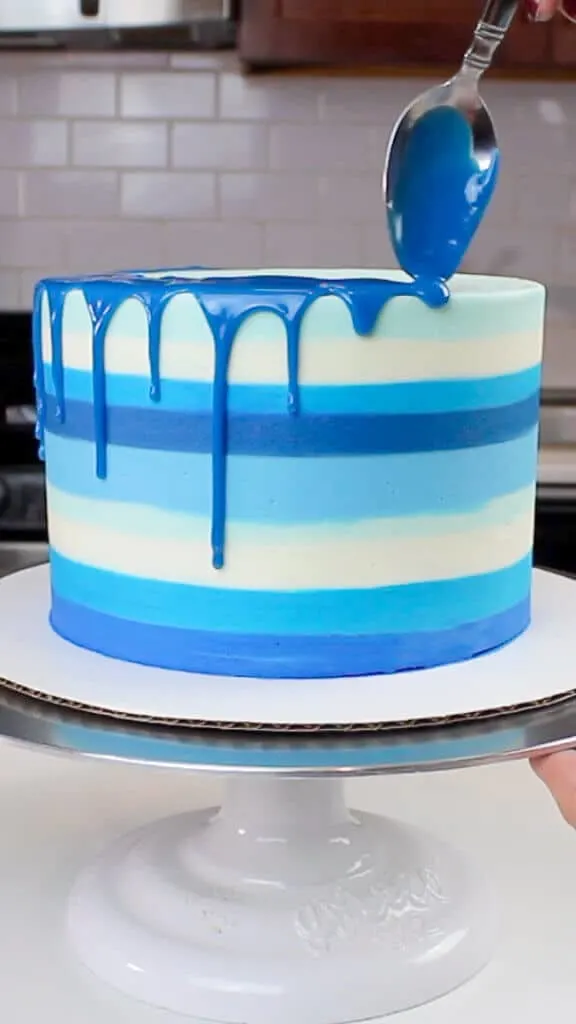
Step #3: The Test Drip
The best way to ensure your ganache is the right temperature is do a test drip. THIS IS SUCH A CRUCIAL STEP!!! Make one drip on the side of your cake, and let it flow. Allow it to slowly run down the side of the cake for a couple minutes.
If it looks how you had hoped, then go ahead and add drips to the rest of the cake. If not, adjust as needed.
Either pop the ganache into the fridge for a couple minutes to allow it to cool off a bit more, or pop the bottle (or bowl) in the microwave and heat for 5-10 seconds.
Then test out one more drip, just to be safe! While these extra steps may lengthen the process, it’s worth it to make sure your drips are perfect.
If you’re more of a visual learner, here is a video tutorial showing how to add drips to a cakes.
Techniques For Adding Drips To The Cake
There are two ways to add colorful drips to a cake.
One way is to use plastic bottles. Using a squirt bottle does make the process easier, but you have a bit less control while adding the drips.
If you don’t have any plastic bottles on hand, you can also use a spoon or an offset spatula to carefully push the ganache over the edge of your cakes, creating each drip.
The spoon method is much slower, but gives you more control. I used the spoon method on this cake, and loved the way it turned out!

Tips for Making this Surprise-Inside Hanukkah Cake:
- Use gel food coloring to color the cake, frosting, and drip, rather than liquid food coloring! It will give you a more vibrant color, and won’t change the consistency
- Carefully insert a toothpick into the bottom of each piece of gelt before placing it on top of the cake. It will help keep them elevate high above the frosting, and keep them upright.
- Use a serrated knife to level your cake layers once they’re fully cooled, to make it easier to assemble and frost your cake
- You can make these cake layers in advance! The holidays are such a busy time, it’s nice to be plan to prep ahead of time
- Once this cake is frosted, it can sit in the fridge for several days. Just take it out a couple hours before you plan to cut into it.
Let Me Know What You Think!
If you try this Hanukkah cake, I’d love to hear what think of it! Please leave a rating, and let me know your thoughts by sharing a comment.
Hanukkah Cake

This striped blue drip cake is perfect for Hanukkah! It's filled with sprinkles and candy to make for an epic cut, and is even decorated with gelt!
Ingredients
Blue Vanilla Cake Recipe
- 3 cups all-purpose flour (390 grams)
- 3 cups granulated sugar (600 grams)
- 2 1/2 tsp baking powder (10 grams)
- 1 tsp salt (5 grams)
- 1 cup unsalted butter, room temperature (226 grams) - 2 sticks
- 2 tsp. vanilla extract (9 grams)
- 1 cup egg whites (or about 7 egg whites) (244 grams)
- 1 1/2 cups buttermilk, room temperature (360 grams)
- 1/8 cup vegetable oil (28 grams)
- Blue gel food coloring
Vanilla Buttercream Frosting
- 2 cups unsalted butter, room temperature (434 grams)
- 7 cups powdered sugar (907 grams) - one 2 lb bag
- 1/2 tsp salt (3 grams)
- 2 Tbsp heavy cream (or whipping cream) (30 grams)
- 1 Tbsp vanilla extract (12 grams)
- Blue gel food coloring
Blue Drip Recipe
- 1/3 cup heavy cream (77 grams)
- 1 cup white chocolate chips (175 grams)
- Blue gel food coloring
Additional Decorations
- Blue and white sprinkle blend
- Blue and white sixlets
- 15 pieces of chocolate gelt
- tooth picks
- 3 1/2 inch circle cutter
Instructions
Blue Cake Layers:
- Preheat oven to 350°F. Line three eight-inch pans or four seven-inch pans with parchment rounds, and grease with non-stick cooking spray.
- Mix together all dry ingredients (flour, baking powder, sugar, and salt) in a stand mixer with a paddle until fully combined.
- Mix chunks of room-temperature butter slowly into the dry mix, on a low speed. Continue to mix until no large chunks of butter remain, and the mixture becomes crumbly.
- Pour in egg whites, and mix on low until just incorporated. Mix in the buttermilk in two installments, on a low speed. Add in vanilla and oil, and mix at a low speed until fully incorporated. Scrape down the sides of the bowl with a spatula, then beat on medium speed for about 30 seconds.
- Add in a generous squirt of blue gel food coloring. Mix the batter on a low speed, scraping the sides and bottom of the bowl part way through to evenly color the batter.
- Divide batter evenly between the prepared cake pans. I like to use a digital kitchen scale to weigh my pans, and ensure they all have the same amount of batter. This guarantees your layers will bake to be the same height.
- Bake for 34-36 minutes (or until a skewer comes out clean). Allow to cool for 10 minutes, then run an offset spatula around perimeter of the pan to separate the cake from the pan.
- Place cake layers into the freezer for 45 minutes, to accelerate the cooling process.
- Once the cake layers are cooled. level the tops with a serrated knife.
- Use a large circle cutter to remove the center from two of the cake layers, to allow you to fill the cake with sprinkles.
Vanilla Buttercream Frosting:
- Beat the butter on a medium speed for 30 seconds with a paddle attachment, until smooth. Slowly add in the powdered sugar, 1 cup at a time. Alternate with small splashes of cream.
- Once fully mixed, add in the vanilla and salt, and beat on low until the ingredients are fully incorporated, and the desired consistency is reached.
- If the frosting is too thick, add in additional cream (1 Tbsp at a time). If the frosting is too thin, add in more powdered sugar (quarter of a cup at a time).
- Wait to color the buttercream blue with gel food coloring until you've filled and crumb coated the cake. The white buttercream will have a great contrast against the blue cake layers.
Blue White Chocolate Ganache Drips:
- Heat heavy cream in a heatproof bowl in the microwave for 45 seconds, until it's just beginning to bubble. Gently pour white chocolate chips into the heavy cream, making sure they are fully covered with cream. Allow mixture to sit for 1 minute.
- Stir slowly until the cream and white chocolate are combined. Some bits of chocolate may not be fully melted yet. Heat the mixture again for 20 seconds, and stir. Repeat as necessary until all the chocolate bits are fully melted and incorporated.
- Add in the blue gel food coloring, if desired. Allow to cool until desired viscosity is reached (barely warm to the touch).
- If it seems too thin or thick, you can add a touch more chocolate chips or heavy cream! The type of cream and white chocolate that you use can affect the consistency, so feel free to adjust as needed.
To Assemble The Cake:
- Start with an uncut cake layer. Stack and frost the cake layers on a greaseproof cake board, using a dab of frosting to help stick the first cake layer to the board.
- Add an even layer of buttercream between each cake layer.
- Add the two cut cake layers next.
- Frost the inside cavity of the cake with a thin layer of buttercream. Fill with blue and white sprinkles and sixlets, and a few pieces of gelt (if desired).
- Top with the final uncut cake layer.
- Spread a thin coat of frosting around the the cake, to fully cover the cake layers. Smooth using a bench scraper, then chill the cake in the fridge (10 minutes) or freezer (5 minutes) until the frosting is firm to the touch.
- Color the remaining frosting different shades of blue, leaving one cup uncolored. Place each color into a piping bag and cut openings varying in size from 1/2 cm to 1 cm.
- Pipe stripes of different colored frosting around the cake, and smooth using a bench scraper.
- Add the blue drips to the cake using a spoon.
- Pipe swirls on top of the cake with a french tip, and place pieces of gelt on top.
Notes
Once the layers have fully cooled, I sometimes like to trim the caramelized bits from the sides of the layers using a serrated knife. While these layers bake pretty flat, sometimes I’ll also trim the top of the layers too.
Since this frosting will be used to decorated a cake, it is important to mix the buttercream on the lowest speed at the end of the process for a couple minutes, to get out any extra air that might have be incorporated during the mixing process.
You can also stir the frosting in a bowl with a rubber spatula, pushing it from side to side, to get rid of any air bubbles.This will make it easier to get super smooth sides on your cake!
Nutrition Information
Yield
30Serving Size
1Amount Per Serving Calories 466Total Fat 24gSaturated Fat 14gTrans Fat 0gUnsaturated Fat 8gCholesterol 55mgSodium 206mgCarbohydrates 62gFiber 0gSugar 51gProtein 3g
18+ Hanukkah Desserts To Make Your Holiday Merry 2022
Saturday 3rd of December 2022
[…] 13. Hanukkah Cake […]
SA
Monday 13th of June 2022
Not trying to be a picky but wanted to let you know hamantaschen is for a completely different holiday. Different time of year and rugelach is not really a Hanukkah treat. I would Honestly take that part out. It’s Equivalent to telling people to put a Easter egg on a Christmas cake. Again I’m not offended but I would want somebody to tell me if Wrote that. Beautiful cake!!
Chelsweets
Sunday 19th of June 2022
I appreciate your feedback and have removed that from this post! I'm cringing reading that comparison!! I definitely still have a lot to learn. Thank you so much for sharing this <3
Bettye
Tuesday 30th of March 2021
Can you tell me what brand of gel food coloring you used for the frosting and ganache on your Hanukkah cake? I used Wilton gel and it turned green!!
Leora
Thursday 13th of February 2020
The instructions above say to line 3 8-inch cake pans but the video calls for four layers. Can this recipe be done using 4 thinner 8-inch cake layers? (I don't have 7-inch pans)
Chelsweets
Friday 21st of February 2020
Hi Leora,
Sorry for any confusion, I just updated the recipe card to reflect that!
Like you guessed I used 7 inch pans to make the four layers of the cake in the video. You can make 4, 8-inch cakelayers but they will be thinner and bake more quickly! They should bake in 30-32 minutes. Hope that helps, happy baking!
Hanukkah Drip Cake | CHELSWEETS | GoDiva Recipes
Sunday 22nd of December 2019
[…] The recipe can be found here: https://chelsweets.com/2019/12/02/hanukkah-cake/ […]