
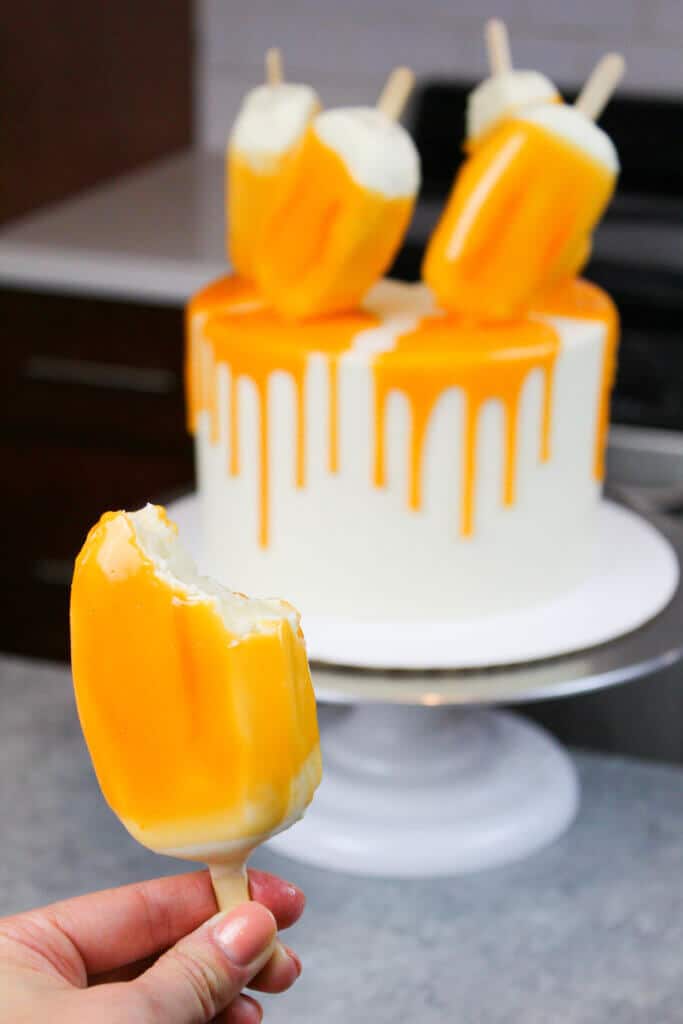
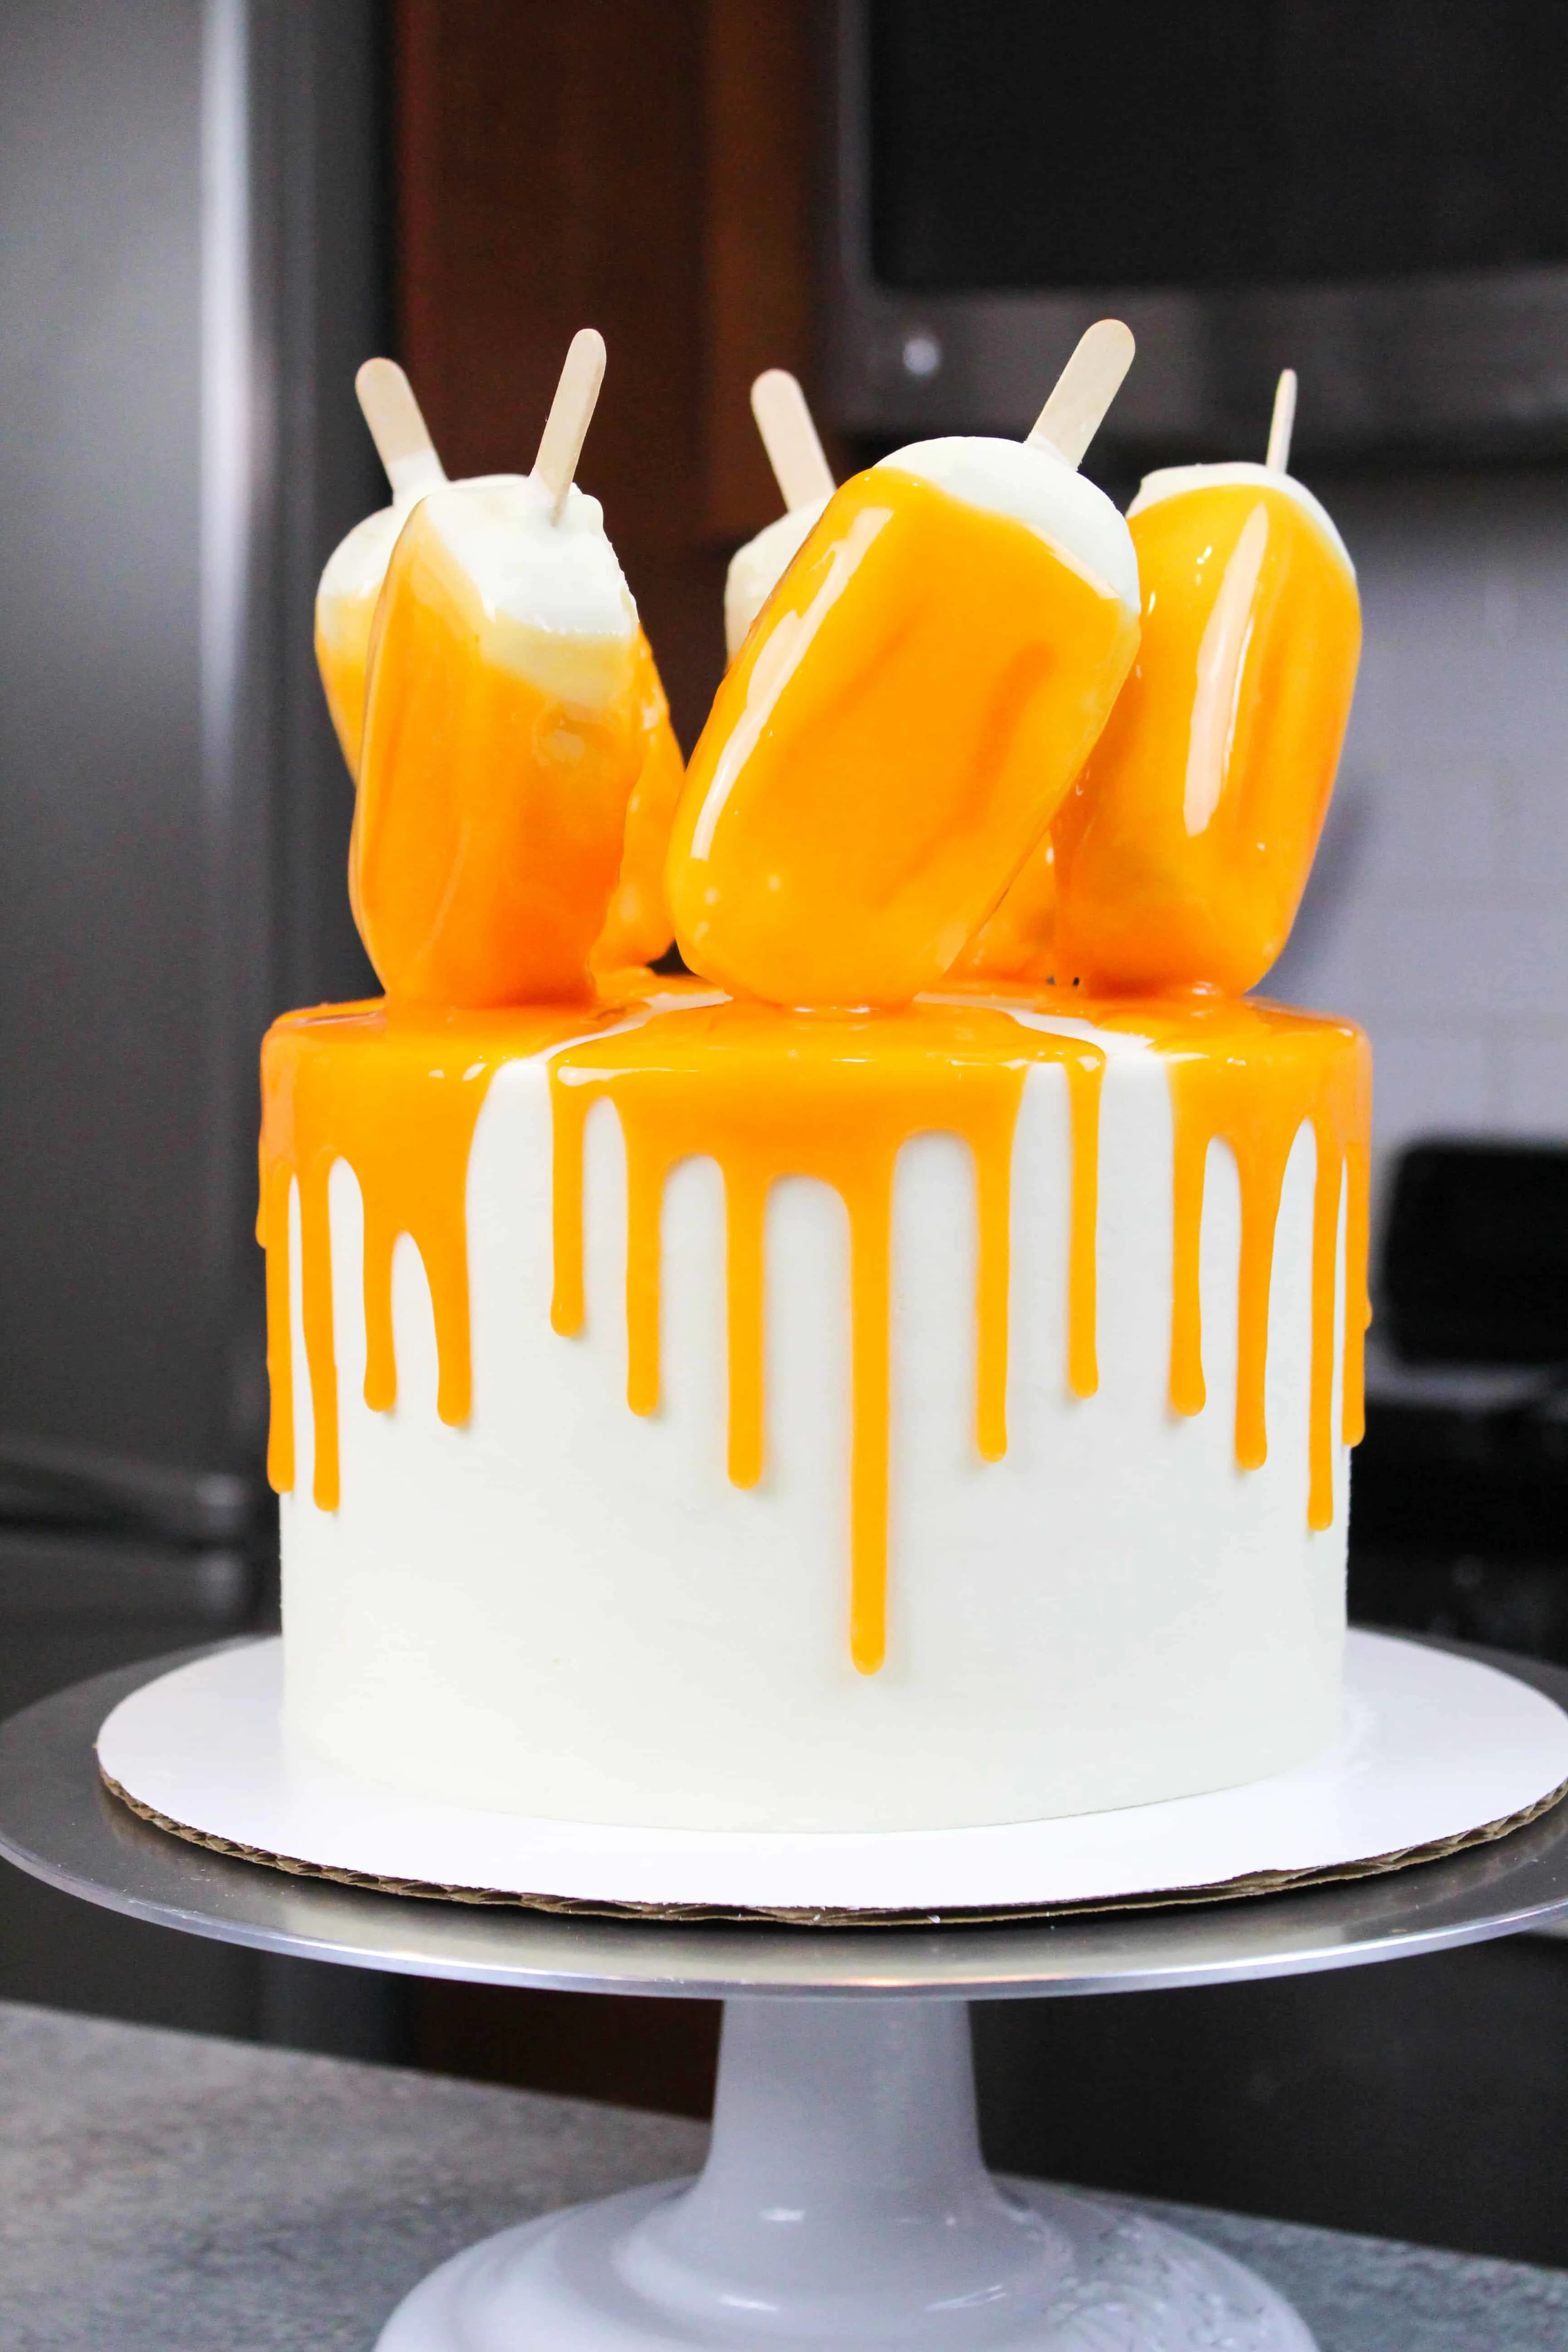
We’ve all seen the melted ice cream cake trend across social media (which I’m pretty sure is the brainchild of the amazing Katherine Sabbath), and I love the idea! To put my own spin on it, I wanted to make this orange dreamsicle cake.
In my mind, an orange dreamsicle cake is an orange creamsicle-inspired cake with a bit more imagination!!
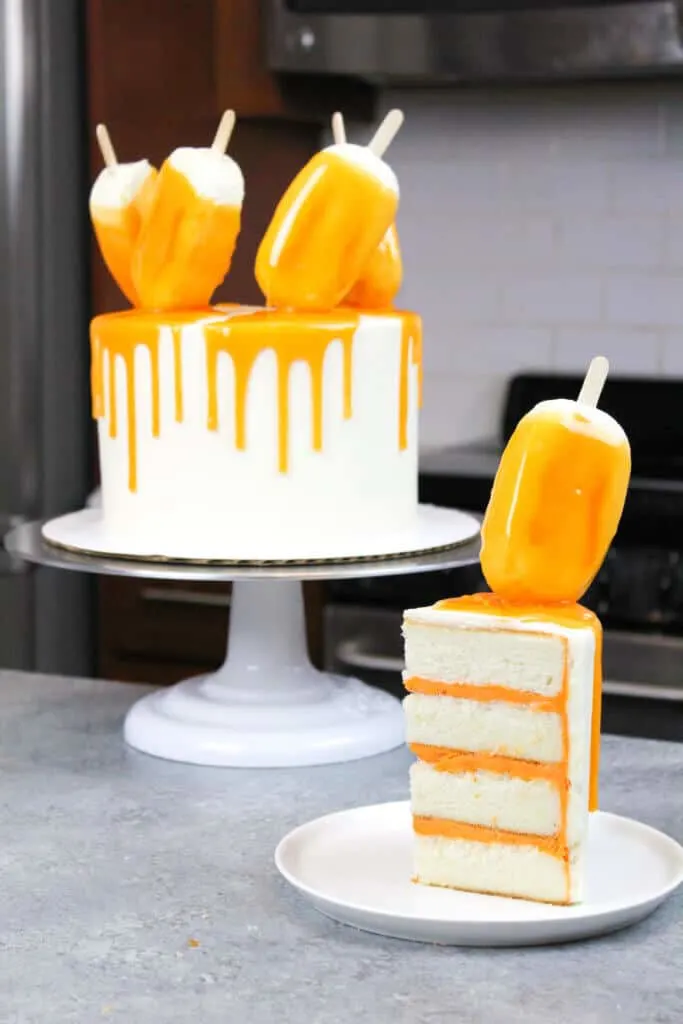
Between the “melting” orange creamsicle cake pops and the shiny mirror glaze drip, this cake feels so playful. It just screams summer to me!
I grew up eating orange creamsicles each summer and am a sucker for them to this day.


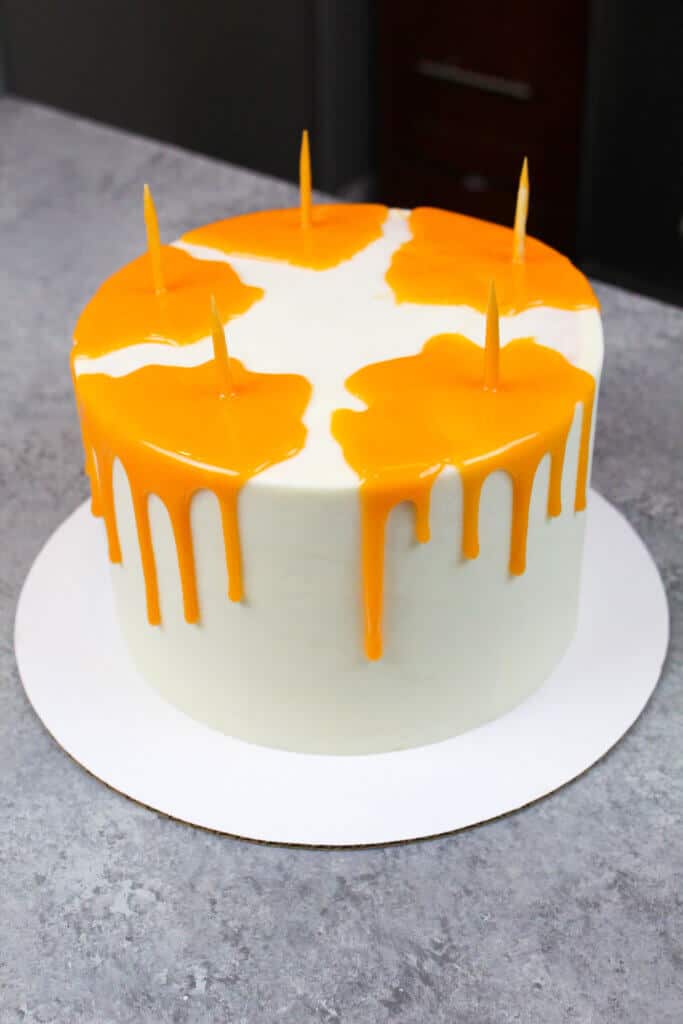
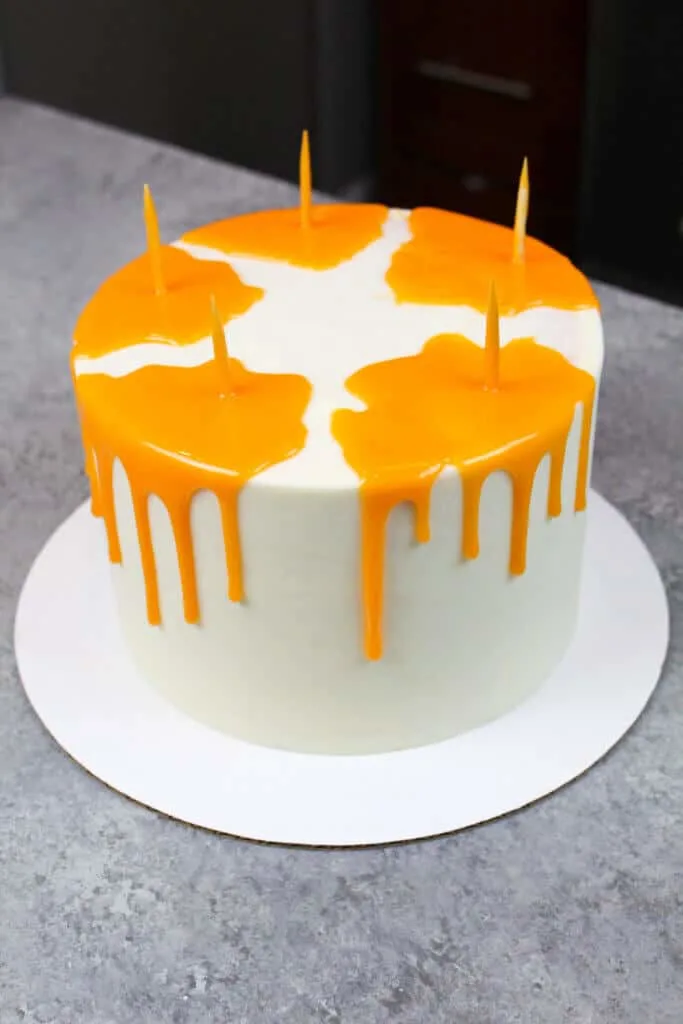
Orange Dreamsicle Cake Drips
I’ve made a ton of drip cakes with colorful white chocolate ganache drips in the past.
This time I wanted to mix things up. I chose to make the drips on this cake with my easy mirror glaze recipe!
It made this cake a bit more exciting but also a bit scary. I had a hard time sleeping the night before making this cake, because I wasn’t sure the concept would work.
Doing anything for the first time is a bit nerve wracking. But I stayed true to the idea, and was convinced a mirror glaze would be an awesome medium for drips.
Mirror glaze drips turned out to be much easier to make than I expected. I used the spoon technique to add then to a chilled cake. As long as the mirror glaze cool a bit, it works like a dream.
To know whether your mirror glaze is the right temperature, I recommend making a test drip.
Make a single drip on your cake, and let it sit for a couple minutes. See how far it ran down the cake, and how thick the drip is.
Adjust as needed. If the drips are too short, heat up the mirror glaze for a few seconds in the microwave.
If the drip seems too thin / translucent, let it cool a bit longer.
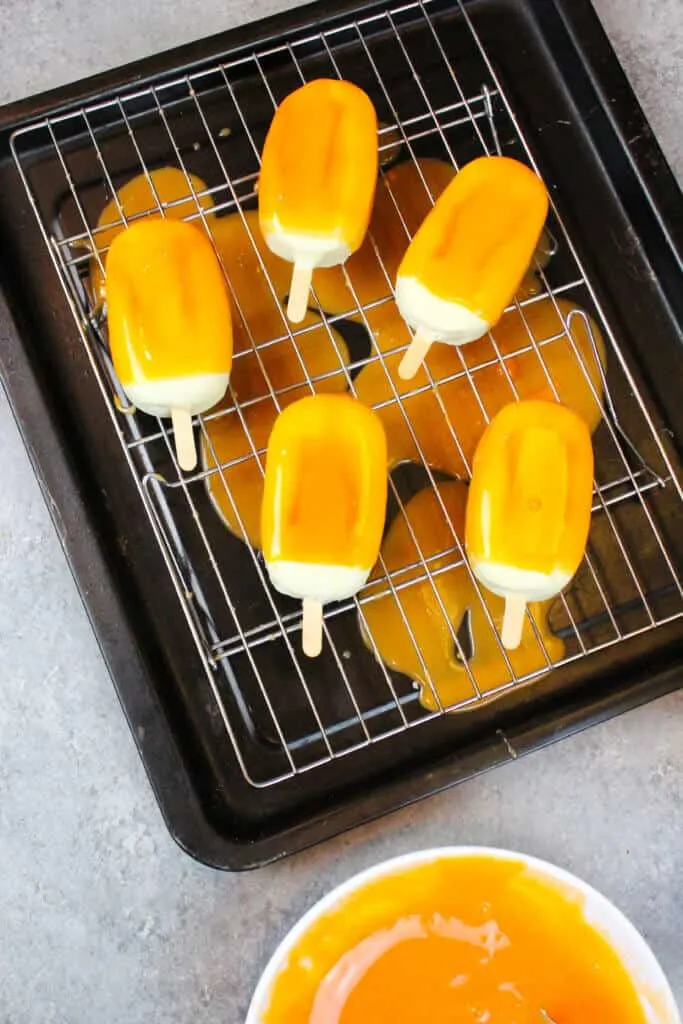
The Orange Creamsicle Cake Pops
Once I nailed the mirror glaze drips, I had to start thinking about the orange creamsicles that would decorate the top of the cake!
These were going to be the star of the show and I wanted them to be perfect!
They needed look like the orange creamsicles we know and love. Getting the shape right was imperative. I figured the easiest way to do this would be to use a silicone mold, and make some cakesicles.
Cakesicles are exactly what they sound like. They’re like cake pops, but bigger and better!!

I saved the tops of my leveled cake layers and mixed them with buttercream to make the filling of my cakesicles.
Next, I firmly packed my popsicle molds with this mixture. I was able to make about 6 cakesicles. I found this silicone mold on amazon, and it worked great. To make life easier, I ordered two of them so that I could make all of the cakesicles at once.
I inserted the wooden popsicle sticks into the cakesicles, then froze them for about 20 minutes.
Once they were fully chilled, I dipped them in melted white chocolate, and set them aside to firm up.
The white chocolate makes the orange mirror glaze really pop, and helps the cakesicles keep their shape at room temperature.
The final step was to dip the cakesicles twice into my orange mirror glaze.
The color of the creamsicles wasn’t bright enough (in my opinion) after the first dip. I found letting the first layer set, then dipping a second time gave them the bright, shiny look I was after.
The Orange Dreamsicle Ganache Filling
Next I needed to figure out how to get that orange creamsicle flavor into the cake.
I did some experimenting with fresh orange zest, orange extract, and even orange starbursts.

Orange extract created the best creamsicle flavor in white chocolate ganache. I was surprised but pleased that a simple extract worked best.
It kept things simple, because all you have to do is add a couple teaspoons into the ganache as you make it.
Cutting the Cake / Actually Eating It
Now that I had spent hours creating this epic orange dreamsicle cake, it was time to cut in. I had my orange knife all ready to go, but I was terrified to cut this cake on camera.
It is definitely intimidating to cut. Between the cakesicles delicately balancing on top, and a mirror glaze coating, I had no idea how the cut would go.

However, it’s nothing that a sharp, warm knife can’t handle. Run your knife under hot water, then dry it with a dish towel.
I recommend removing the creamsicle from the section you plan to slice before you cut. It makes pulling out the first slice a lot less stressful.
I didn’t do that, and it made life a lot harder!!
Once I finally got to taste the cake, I was surprised by how much I enjoyed the orange creamsicle cakesicles. They were irresistible!
Tips for Making The Best Orange Dreamsicle Cake
- Make your own buttermilk if you don’t any! Add 1 Tbsp of lemon juice or vinegar to 1 cup of whole milk.
- Be sure to properly measure your flour (spoon into the cup measure then level) or use a kitchen scale to measure your dry ingredients.
- Natural food coloring (either liquid or powder) can be used in place of the gel food coloring. The colors won’t be quite the same, but it will still be beautiful.
- Ingredients at room temp mix together better, so be sure you set out any cold ingredients ahead of time.
- Mix your cake batter just until the ingredients are incorporated. This will ensure your cake layers are tender and fluffy.
- Chill your cake layers in the freezer for about 20 minutes before assembling the cake. This makes it easier to stack and frost.
Making This Orange Dreamsicle Cake In Advance & Storage Tips
- Make your cake layers in advance and freeze them. It breaks the process up and make it more approachable.
- Make your frosting ahead of time too or save any leftover frosting. It can be stored in an airtight container in the fridge for up to a month. Or store it in the freezer for up to 3 months! Be sure to give it a good stir once it thaws to get the consistency smooth again.
- A frosted cake can last in the fridge for up to a week. In the freezer it can last for up to a month! The buttercream locks in all the moisture, keeping the cake fresh and delicious.
- I recommend waiting to add the cakesicles to the top of the cake until the day you plan to serve it, as their additional height makes it incredible hard to store in the fridge.
- If you cut into the cake and have leftovers, use any remaining frosting to cover the cut section to keep it moist. It can be stored in the fridge like this for up to a week.
Let Me Know What You Think
If you try this orange dreamsicle cake recipe, please let me know what you think by leaving a comment and rating below!
You can also tag me @chelsweets or use the #chelsweets so that I can see your amazing creations.
Other Recipes You Might Enjoy:


Orange Creamsicle Cake

This orange creamsicle cake recipe is made from scratch, and tastes like summer! Its made with vanilla cake layers, orange creamsicle ganache, and creamsicle cake pop toppers!
Ingredients
Vanilla Cake
- 3 cups all-purpose flour (390 grams)
- 3 cups granulated sugar (600 grams)
- 2 1/2 tsp baking powder (10 grams)
- 1 tsp salt (6 grams)
- 1 cup unsalted butter, room temperature (226 grams) - 2 sticks
- 1 cup pasteurized egg whites from a carton (or about 7 egg whites) (235 grams)
- 1 1/2 cups buttermilk, room temperature (345 grams)
- 2 Tbsp vegetable oil (28 grams)
- 2 tsp vanilla extract (8 grams)
Orange Creamsicle Ganache Filling
- 750 grams white chocolate (about 2 bags of white chocolate chips)
- 350 grams heavy cream (1 and 1/2 cups)
- 1 Tbsp orange extract (18 grams)
- orange gel food coloring
Orange Buttercream Frosting
- 1 1/2 cups unsalted butter, room temperature (339 grams)
- 1/2 tsp salt (3 grams)
- 1 1/2 tsp vanilla extract (9 grams)
- 1 1/2 tsp orange extract (9 grams)
- 6 cups powdered sugar (750 grams)
- 2 Tbsp heavy cream or whipping cream (28 grams)
Orange Mirror Glaze
- 2 tsp or 1 envelope of powdered unflavored gelatin (7 grams), bloomed in 1/4 cup of additional water
- 1 1/2 cups granulated sugar (300 grams)
- 3/4 cup water, room temp (237 grams)
- 2/3 cup sweetened condensed milk (200 grams)
- 2 cups miniature white chocolate chip (350 grams)
- orange gel food coloring
Orange Cakesicles
- 4 cake tops (from leveled vanilla cake layers above)
- 2/3 cup orange buttercream (made in recipe above)
- 1 1/2 cups melted white chocolate
- wooden popsicle sticks
Instructions
Vanilla Cake Layers:
- Preheat oven to 350°F. Line four 7" or three 8" pans with parchment rounds, and grease with non-stick baking spray.
- Mix together 3 cups all purpose flour, 3 cups sugar, 2 1/2 tsp baking powder and 1 tsp salt in a stand mixer with a paddle attachment or hand mixer until fully combined.
- Mix in 1 cup of unsalted butter slowly into the dry ingredients on a low speed. Continue to mix until no large chunks of butter remain and the mixture looks crumbly.
- Pour in 1 cup of egg whites and mix on low until just incorporated. Mix in 1 1/2 cups buttermilk in two installments, on a low speed.
- Add in 2 Tbsp of vegetable oil and 2 tsp of vanilla extract and mix at a low speed until fully incorporated.
- Scrape down the sides of the bowl with a rubber spatula, then beat on a low speed for about 30 seconds to make sure everything is properly mixed together.
- Divide the batter evenly between your prepared pans. I like to use a digital scale to make sure each pan has the same amount of batter, so that each cake layer is the same height.
- Bake for 33-35 minutes, or until a toothpick comes out with a few moist crumbs. Allow the pans to cool for 10 minutes, then run a small offset spatula around perimeter of the pan to separate the cake from the pan.
- Place cake layers into the freezer for 30 minutes to accelerate the cooling process. Once the layers are fully cooled, carefully flip the pans and remove the layers.
- Use a serrated knife to level the tops of the layers right before you plan to assemble your cake, or you can wrap and freeze them in you're making them in advance.
- If you make these cake layers in advance and freeze them, let them thaw for about 20 minutes before making your cake. The cake layers should still be slightly cold to the touch, which will make it easier to assemble your cake.
- Place cake tops in a bowl and set aside for the cakesicles.
Orange Creamsicle Ganache:
- Place 750 grams or about 2 bags of white chocolate in a heatproof bowl, and set aside.
- Heat 350 grams or about 1 1/2 cups of heavy cream in a separate heatproof bowl in the microwave for 45 seconds to 1 minute, until gently bubbling.
- If you don’t have a microwave or prefer to use the stove top, you can heat the cream over a medium heat in a pan until it begins to simmer. Remove from heat.
- Gently pour the heavy cream over the white chocolate, making sure they are covered with cream. Allow mixture to sit for 1-2 minutes.
- Stir slowly until the cream and chocolate are fully combined, and ganache is silky smooth.
- Mix in 1 Tbsp orange extract and a few drops of orange gel food coloring, then pour into a shallow pan to allow it cool.
- Cover with plastic wrap and set aside for about 20 minutes, until the ganache has thickened to a peanut butter like consistency.
Orange Buttercream Frosting:
- While the cake layers bake and cool, make the orange buttercream frosting.
- Beat 1 1/2 cups of butter on a medium speed for 30 seconds with a paddle attachment, until smooth.
- Add in 1 1/2 tsp vanilla extract, 1 1/2 tsp orange extract, and 1/2 tsp salt. Mix on a low speed until the ingredients are combined.
- Slowly add in 6 cups of powdered sugar, 1 cup at a time. Half way through adding the powdered sugar, add in 2 Tbsp of heavy cream.
- Mix on a low speed until the ingredients are fully incorporated and the desired consistency is reached.
- If the frosting is too thick, add in additional cream (1 teaspoon at a time). If the frosting is too thin, add in more powdered sugar (quarter of a cup at a time).
Orange Mirror Glaze:
- Begin by mixing 1 envelope of about 2 tsp gelatin in a bowl with 1/4 cup of water. Set aside to let it bloom while you begin the glaze.
- Pour 1 1/2 cups of granulated sugar, 3/4 cup of water, and 2/3 cup sweetened condensed milk in a heat proof bowl.
- Heat for 1 minute on high power in the microwave.
- Remove the mixture, and stir to incorporate the ingredients.
- Pour in the bloomed gelatin, and stir until it's fully dissolved.
- Melt 2 cups of white chocolate chips in microwave by heating it in 30 second intervals, stirring between each interval.
- Once the white chocolate is fully melted, pour the chocolate into the warm gelatin mixture.
- Carefully whisk mixture until fully combined.
- Add a couple squirts of orange gel food coloring, and mix until evenly colored.
Orange Cakesicles:
- In a large bowl, crumble the vanilla cake tops with a fork(reserved from the vanilla cake layers) and mix together with 2/3 cup of orange buttercream.
- Press the mixture into the popsicle mold to make six cakesicles.
- Insert wooden sticks into the cakesicles.
- Place the molds into the freezer for 20 minutes.
- Remove cakesicles from mold.
- Dip each frozen cakesicle in melted white chocolate, and set on parchment paper to harden.
- Dip white chocolate covered cakesicles into the orange mirror glaze twice, then place on a wire rack to set.
- Carefully make a hole into the bottom of each cakesicle with a sharp skewer, to make them easier to place onto the cake.
Cake Assembly:
- Stack and frost cake layers on a greaseproof cake board, using a dab of frosting to help stick the first cake layer to the board.
- Add an even layer of orange creamsicle ganache between each cake layer.
- Spread a thin coat of ganache around the cake, to fully cover the cake layers. Smooth using a bench scraper, then chill the cake in the fridge (20 minutes) or freezer (5 minutes) until the frosting is firm to the touch.
- Add a thick layer of frosting to the cake, and smooth using a bench scraper.
- Insert 5 bamboo skewers around the top of the cake, to hold up the cakesicles.
- Chill the cake in the freezer for 10 minutes.
- Add mirror glaze around each skewer with a spoon, allowing the glaze to flow over the edge of the cake to create drips.
- Carefully add the orange creamsicle cakesicles onto of each skewer, lining up the precut hole at the bottom of each cakesicle.
Notes
Recipe Variations
One batch of cake batter makes about 1800 grams or 10 cups. If you plan to use four circular cake pans, add 450 grams of batter into each pan. If you make 3 layers, add 600 grams to each pan.
This recipe can also be used to make an orange sheet cake! One batch will make 1, 9 x 13-inch cake layer that is about 1 inch tall.
Bake for 40-45 mins at 350 F / 175 C, or until a toothpick inserted in the center comes out with a few moist crumbs. Bake time can vary a lot based on the type of pan you use, if you use heating cores, and your oven. I recommend using heating cores if you have them to help large cake layers like this bake more evenly and quickly.
You can also make cupcakes using this recipe. Fill the liners 3/4 full and bake them at 350 F / 175 C for 18-21 minutes, or until a toothpick inserted in the center comes out with a few moist crumbs.
Tips for Making the Best Orange Creamsicle Cake
- Ingredients at room temp mix together better! Set out any cold ingredients ahead of time.
- Properly measure your flour (spoon into the cup measure, then level). Or better yet, use a kitchen scale to measure your dry ingredients.
- Use a scale to weigh your cake pans as you fill them. It will make the cake layers bake up to the same height and bake more evenly.
- Level the room temperature or thawed cake layers with a serrated knife to make them easier to stack.
- Make sure the buttercream is the right consistency. This will help give the cake proper structure and make it easier to decorate.
- Chill the cake layers in the freezer for about 20 minutes before assembling the cake. It makes them so much easier to stack and frost!
- If your cake layers turn out less than perfect, read my cake troubleshooting guide to see where things might've gone awry.
Making This Orange Layer Cake in Advance & Storage Tips
Make these cake layers in advance and freeze them. It breaks the process up and makes it more approachable.
You can also make the frosting can also be made ahead of time or you can save any leftover frosting! It can be stored in an airtight container in the fridge for up to a month, or in the freezer for up to 3 months.
Be sure to give it a good stir once it thaws to get the consistency nice and smooth again.
A frosted cake can last in the fridge for up to a week, or in the freezer for up to a month. The buttercream locks in all the moisture, keeping the cake fresh and delicious!
If you cut into the cake and have leftovers, use any remaining frosting to cover the cut section to keep it moist and store it in the fridge for up to a week.
Nutrition Information
Yield
24Serving Size
1Amount Per Serving Calories 949Total Fat 48gSaturated Fat 28gTrans Fat 0gUnsaturated Fat 17gCholesterol 95mgSodium 343mgCarbohydrates 126gFiber 1gSugar 111gProtein 9g
Shaylah
Friday 15th of March 2024
Can you turn this to a sheet cake without the cream sicle bars?
Chelsweets
Sunday 17th of March 2024
Hi Shaylah,
Great question! You totally can, one batch will make 1, 9 x 13-inch cake layer that is about 1 inch tall.
Bake for 40-45 mins at 350 F / 175 C, or until a toothpick inserted in the center comes out with a few moist crumbs (bake time can vary a lot based on the type of pan you use, if you use heating cores, and your oven). I recommend using heating cores (like these: https://amzn.to/3TFmloM) if you have them to help large cake layers like this bake more evenly and quickly.
Hope that helps, happy baking!
Regina
Monday 24th of April 2023
I love your creative ideas as I made your margarita cake for my bosses birthday last year which falls on Cinco de Mayo. It was a huge hit! The creamsicle cake is such a fun idea and my husband said it tasted just like a creamsicle! When I made the cake I had a lot of glaze leftover and wasn’t sure if I was supposed to put it in the layers as well. So, this was my practice cake, could I use the extra glaze between the layers?
Thanks for sharing your creativity!
Chelsweets
Sunday 30th of April 2023
Hi Regina,
You're too sweet! I'm so happy to hear that the margarita cake was a big hit!!
I found that I had to cover the creamsicles twice with glaze, and that there inevitably is a decent amount of run off / leftover glaze to fully coat them. I'm not sure I'd recommend adding the glaze between the cake layers, I would think it would cause the layers to slide around and make it a lot harder to frost. The texture also is kinda of jelly like, and I think that might be a weird combination with the orange ganache filling.
A fun way to use of the leftover glaze would be to freeze frosted cupcakes, then dip the frosting in the glaze! That's probably my best suggestion.
Or if you're able to fully coat the cakesicles and add the drip to the cake, you can also reduce the amount of glaze you make. Hope that helps, happy baking!
Arua
Thursday 20th of January 2022
I made this cake for my youngest son's 15th bday last year and he loved it. Everyone loved it and thought the ice cream was real.
Grace
Monday 27th of September 2021
For the orange butter cream in the cake sicles does the icing have to be orange?
Delena
Monday 2nd of August 2021
I have a question, in the video you take out some mirror glaze and color it with more orange color. But On the video and in the recipe I can’t find why. Is this something you ended up not needing or did I miss it. Sorry if you have already answered this or if I’m over looking the answer somehow. Thank you.