
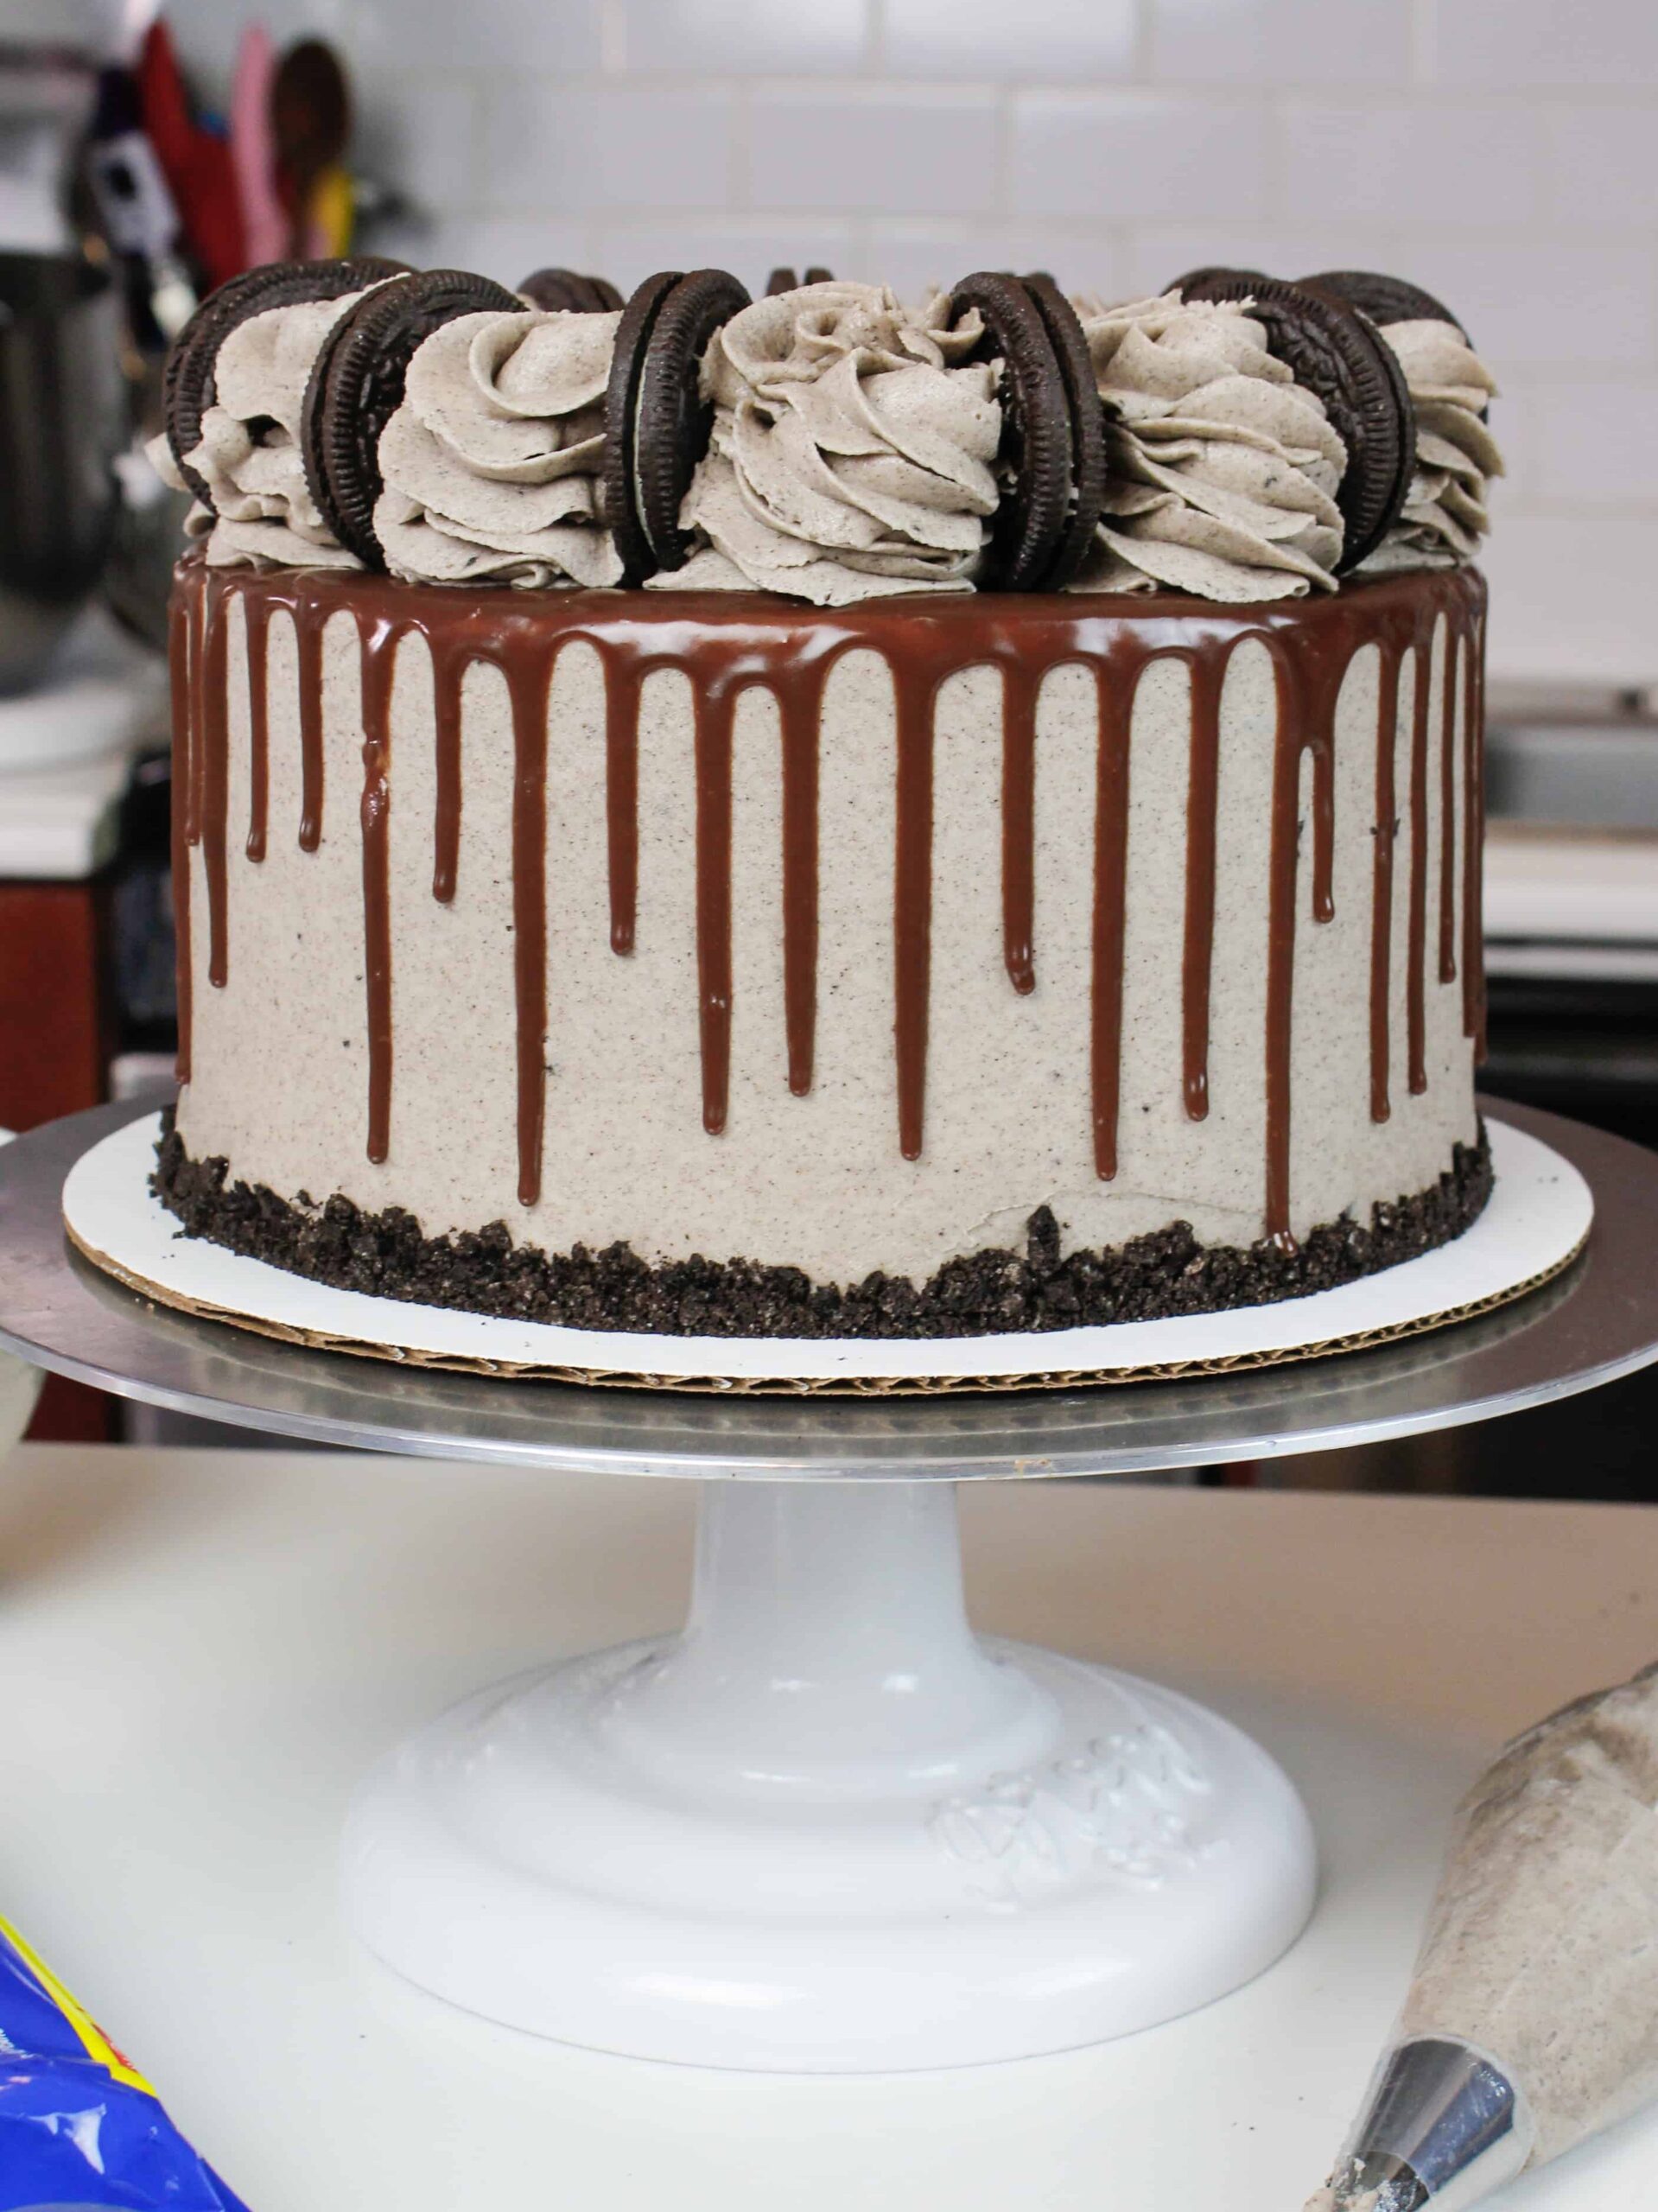
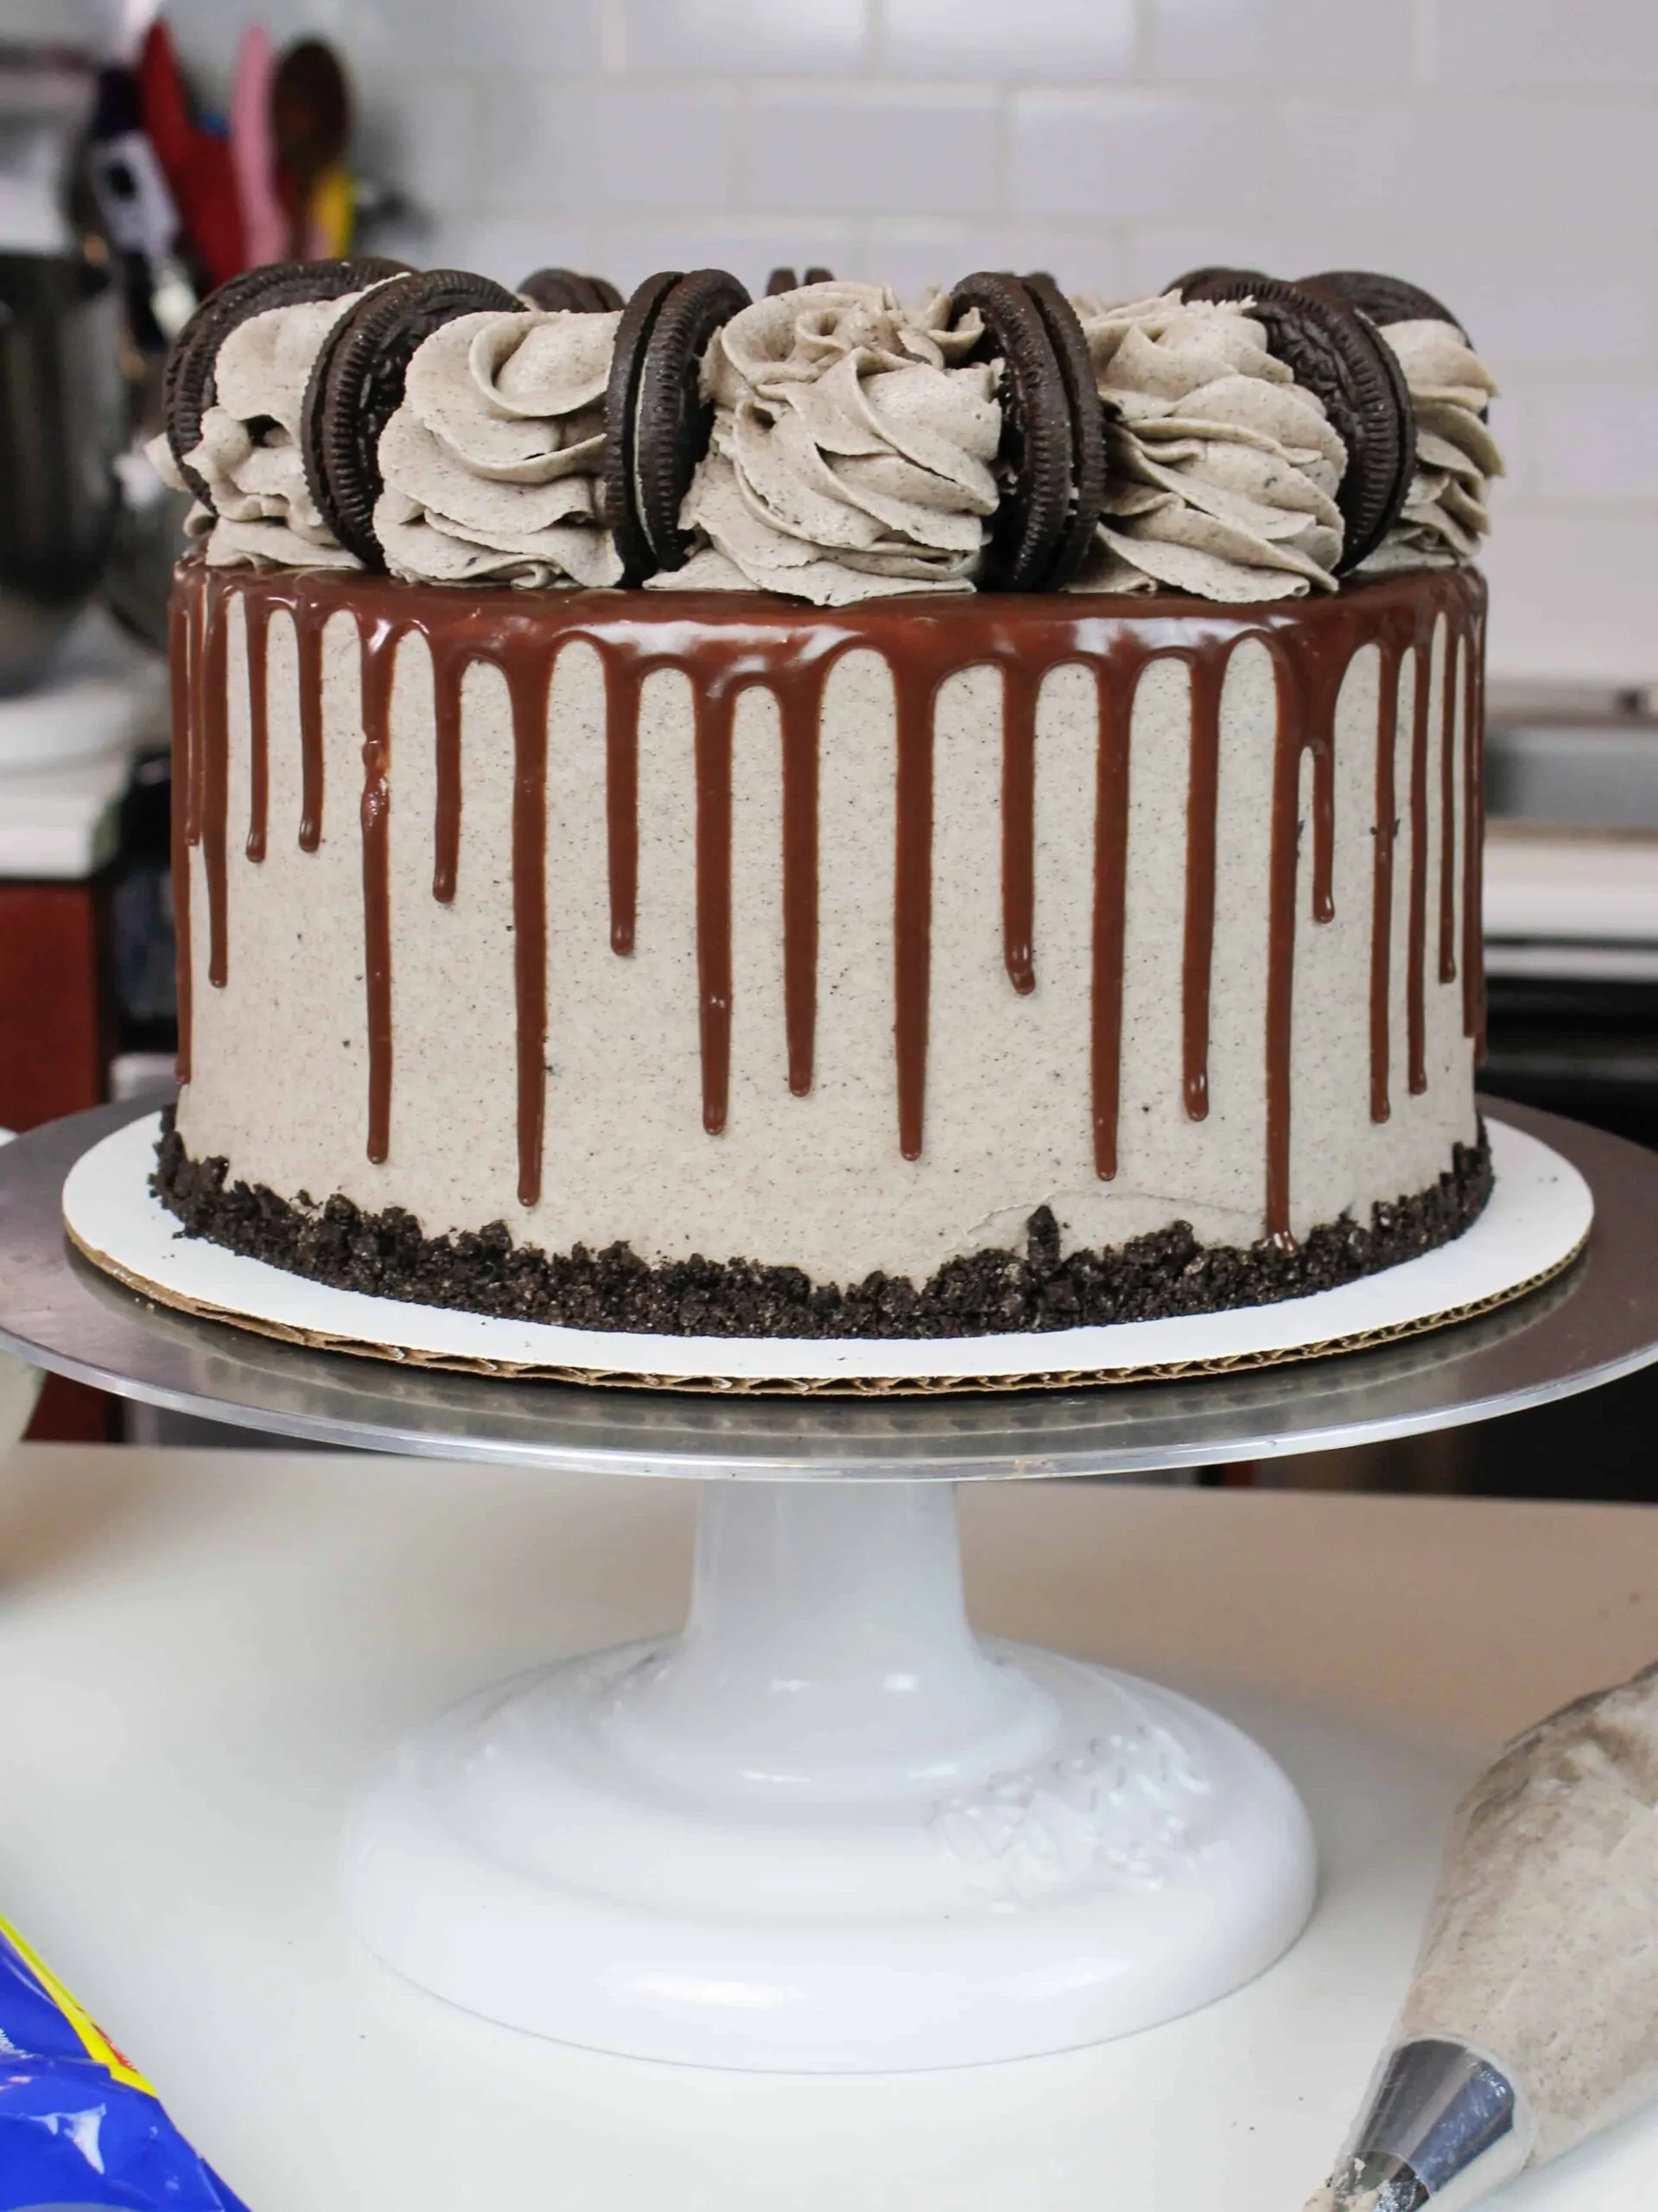
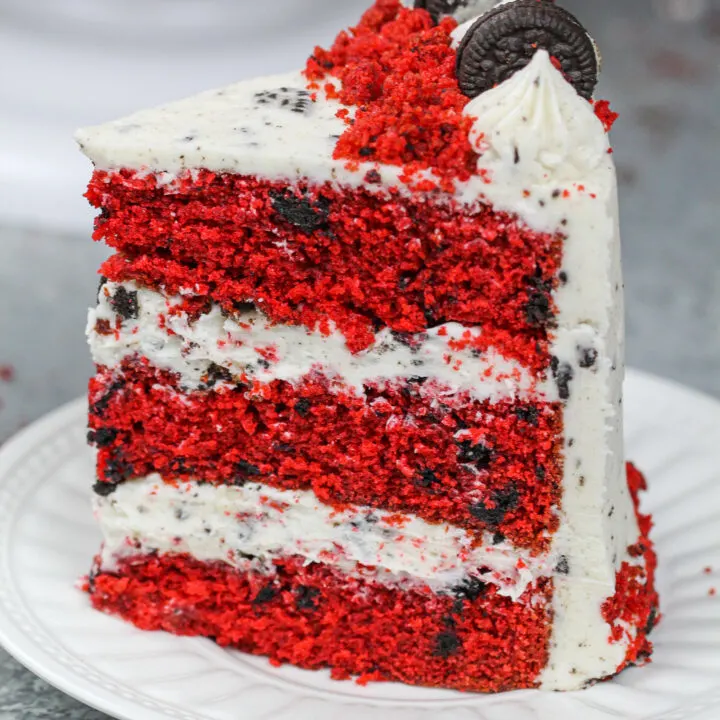
Oreo is one of the most tried and true cake flavors out there, and is the inspiration for this oreo drip cake. On their own, Oreos are chocolaty, crunchy, chewy, and simply delicious.
It has everything you could want in a cookie, and all of this translates so well into a cake!! This Oreo drip cake is inspired in both design and taste by this classic cookie.
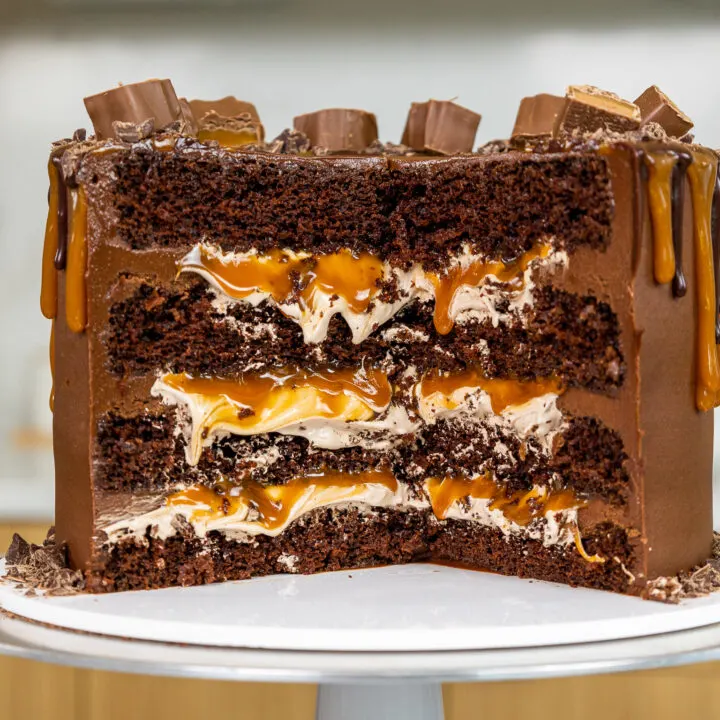
This cake is made with my chocolate buttermilk layer cake recipe. While I have a few different chocolate cake recipes, this one is perfect for this cake.
It has great structure and an amazingly fluffy, unique texture.
However, I swapped out the regular baking cocoa for a secret ingredient. It’s actually my favorite type of cocoa, and I love to use it in my recipes.
The Secret Ingredient in this Oreo Drip Cake: Black Cocoa
Oreos have such a unique taste, and dark color. To help translate both of these aspects into this Oreo drip cake, I use black cocoa.
Black cocoa has a slightly higher pH than dutch-processed cocoa (8 vs.7), and is much less acidic than natural baking cocoa (5-6).
This gives the cake layers a bittersweet, chocolaty taste just like an Oreo cookie! It’s absolutely delicious.
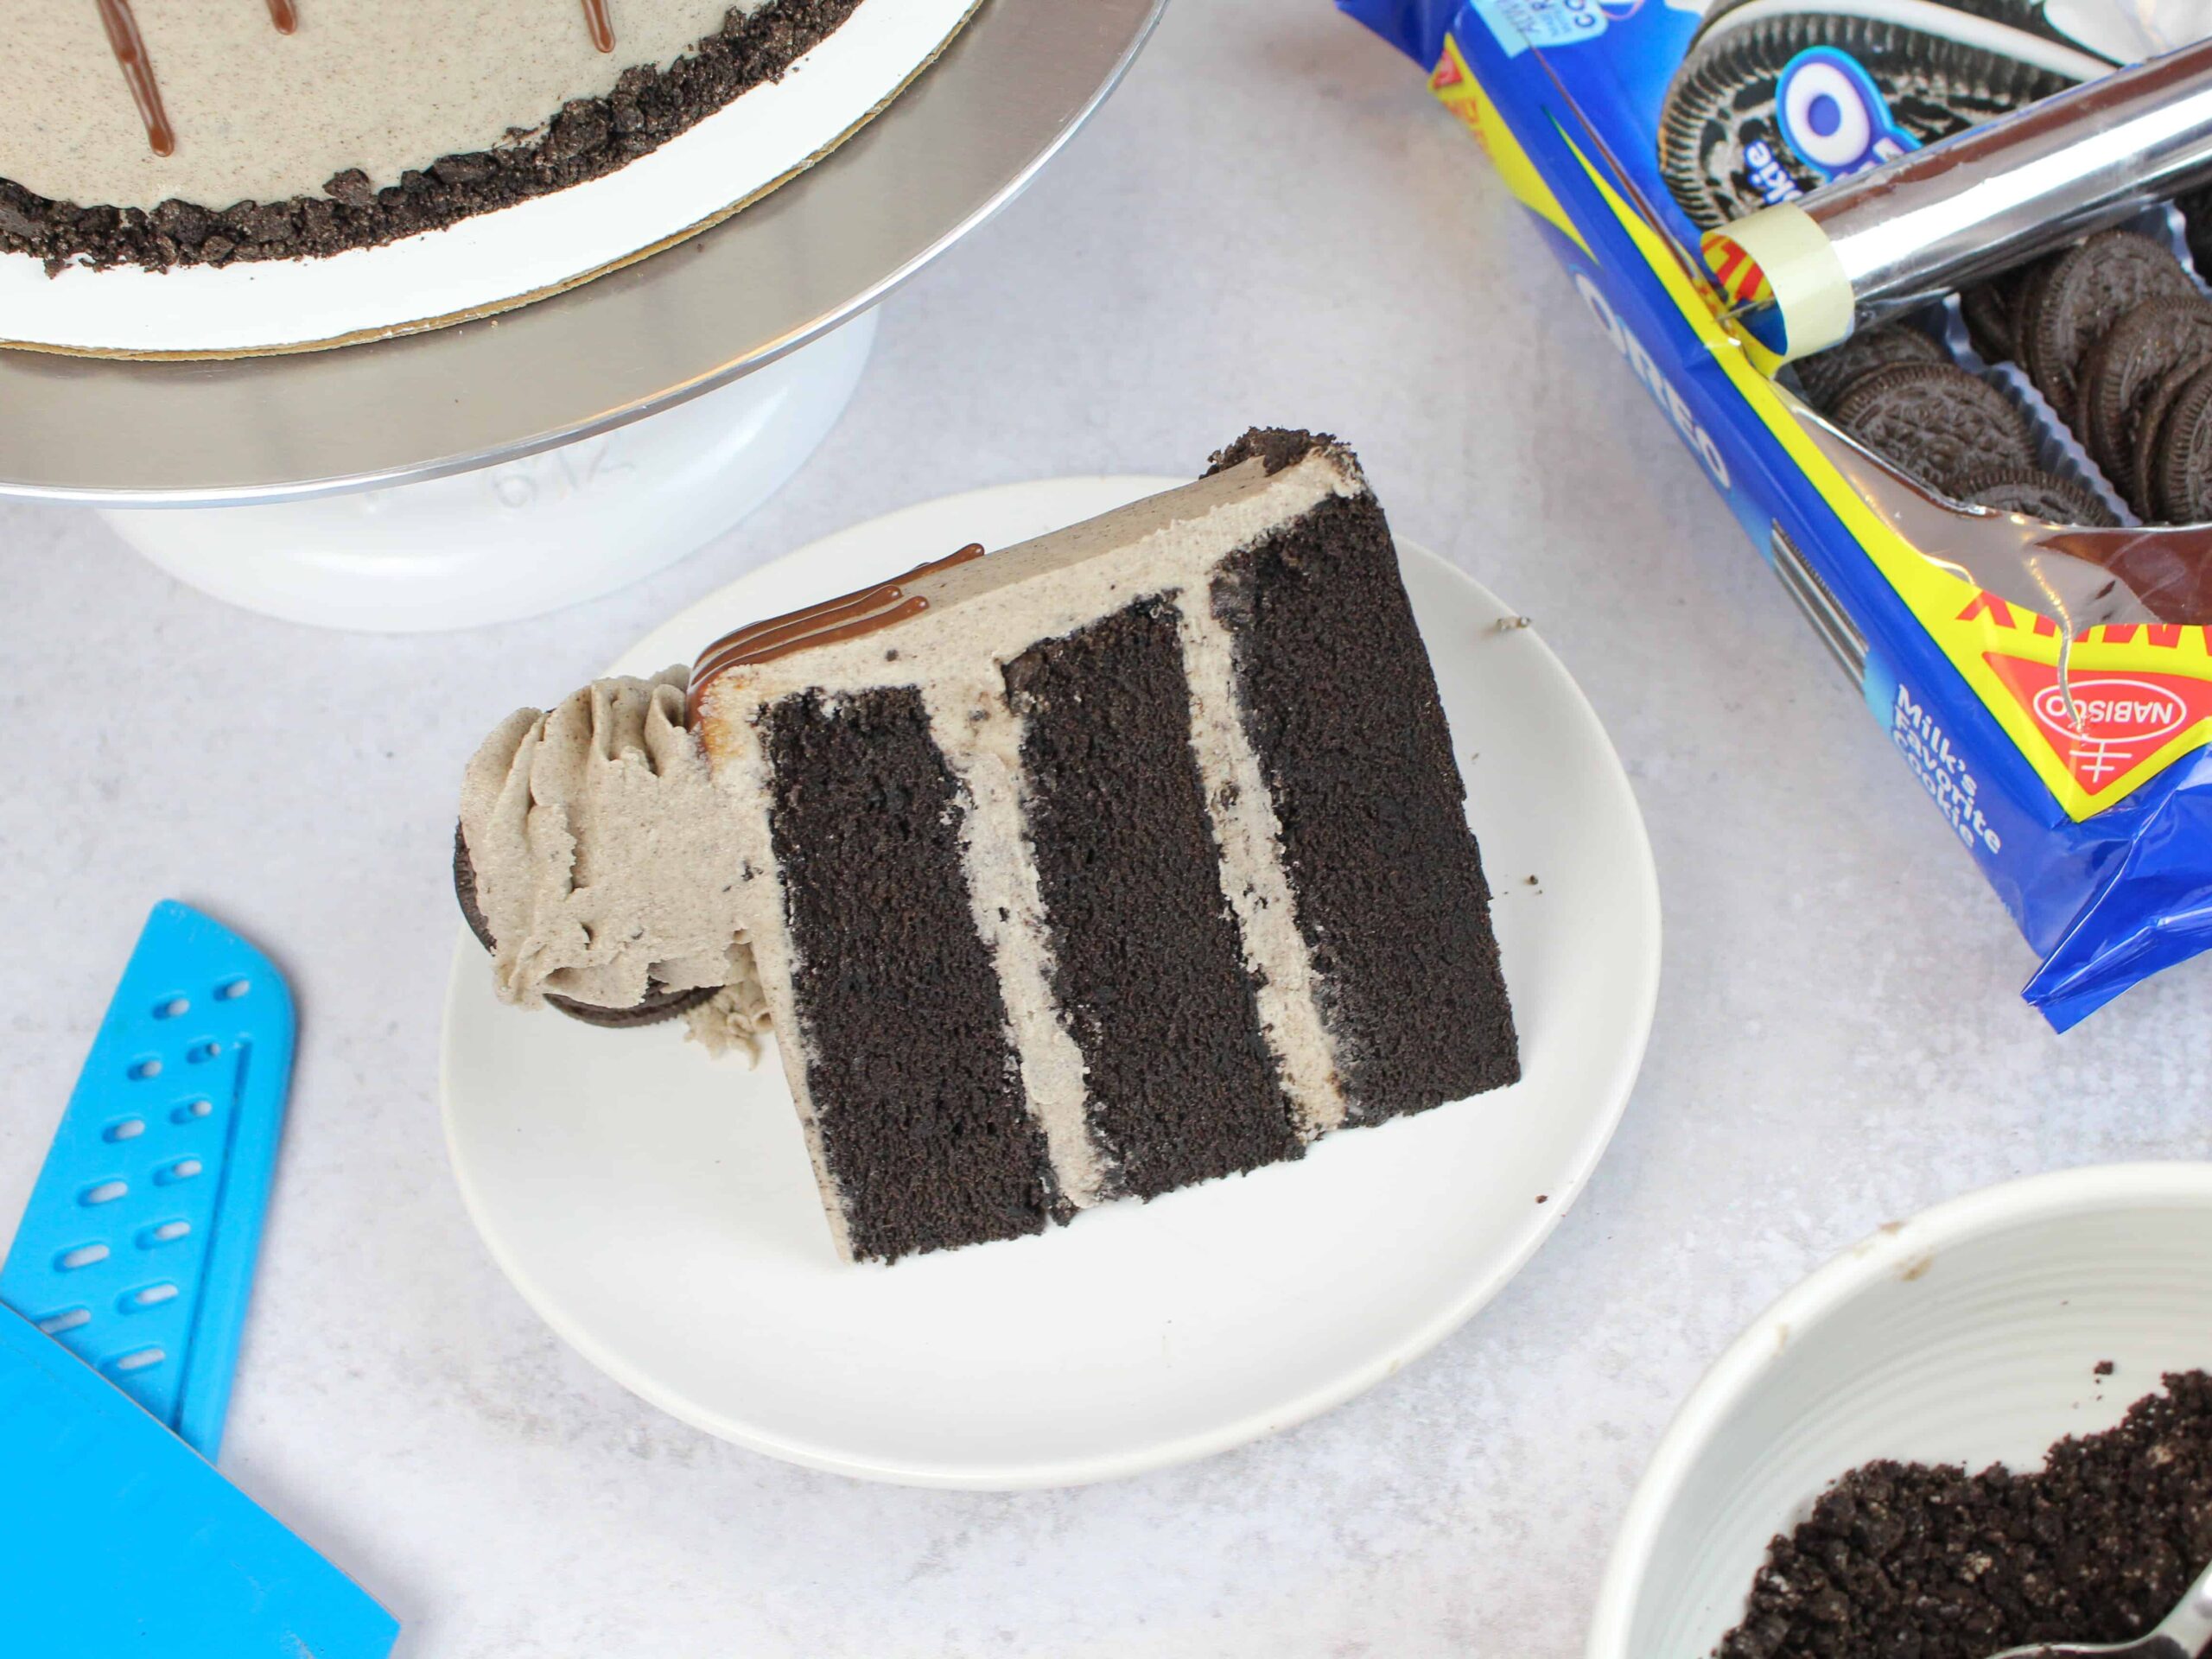

Black cocoa also has a beautiful dark color, which makes the cake layers the same color as an Oreo.
It can be hard to find in grocery stores, so I like to order it on amazon. If you can’t get it in time, dark baking cocoa (like this) will work too!
My Favorite Part: The Oreo Buttercream
I’m already a huge frosting fan, and the Oreo buttercream in this cake is a real game changer. It’s simply addicting.
I found myself eating scoops of it with leftover Oreos while I was filming this cake. It took all my self control to resist it!
The base of this frosting is my classic American buttercream recipe. This is my go-to frosting base, and I love the way it tastes and how easy it is to make.
This frosting is also pretty much foolproof, and only takes about 5 minutes to make.
American buttercream is definitely on the sweet side, but I have a huge sweet tooth so I love it.
The only thing that could make it better is…you guessed it…crushed Oreos!!
It may seems like all you have to do is cut up some Oreos and throw them into the buttercream.
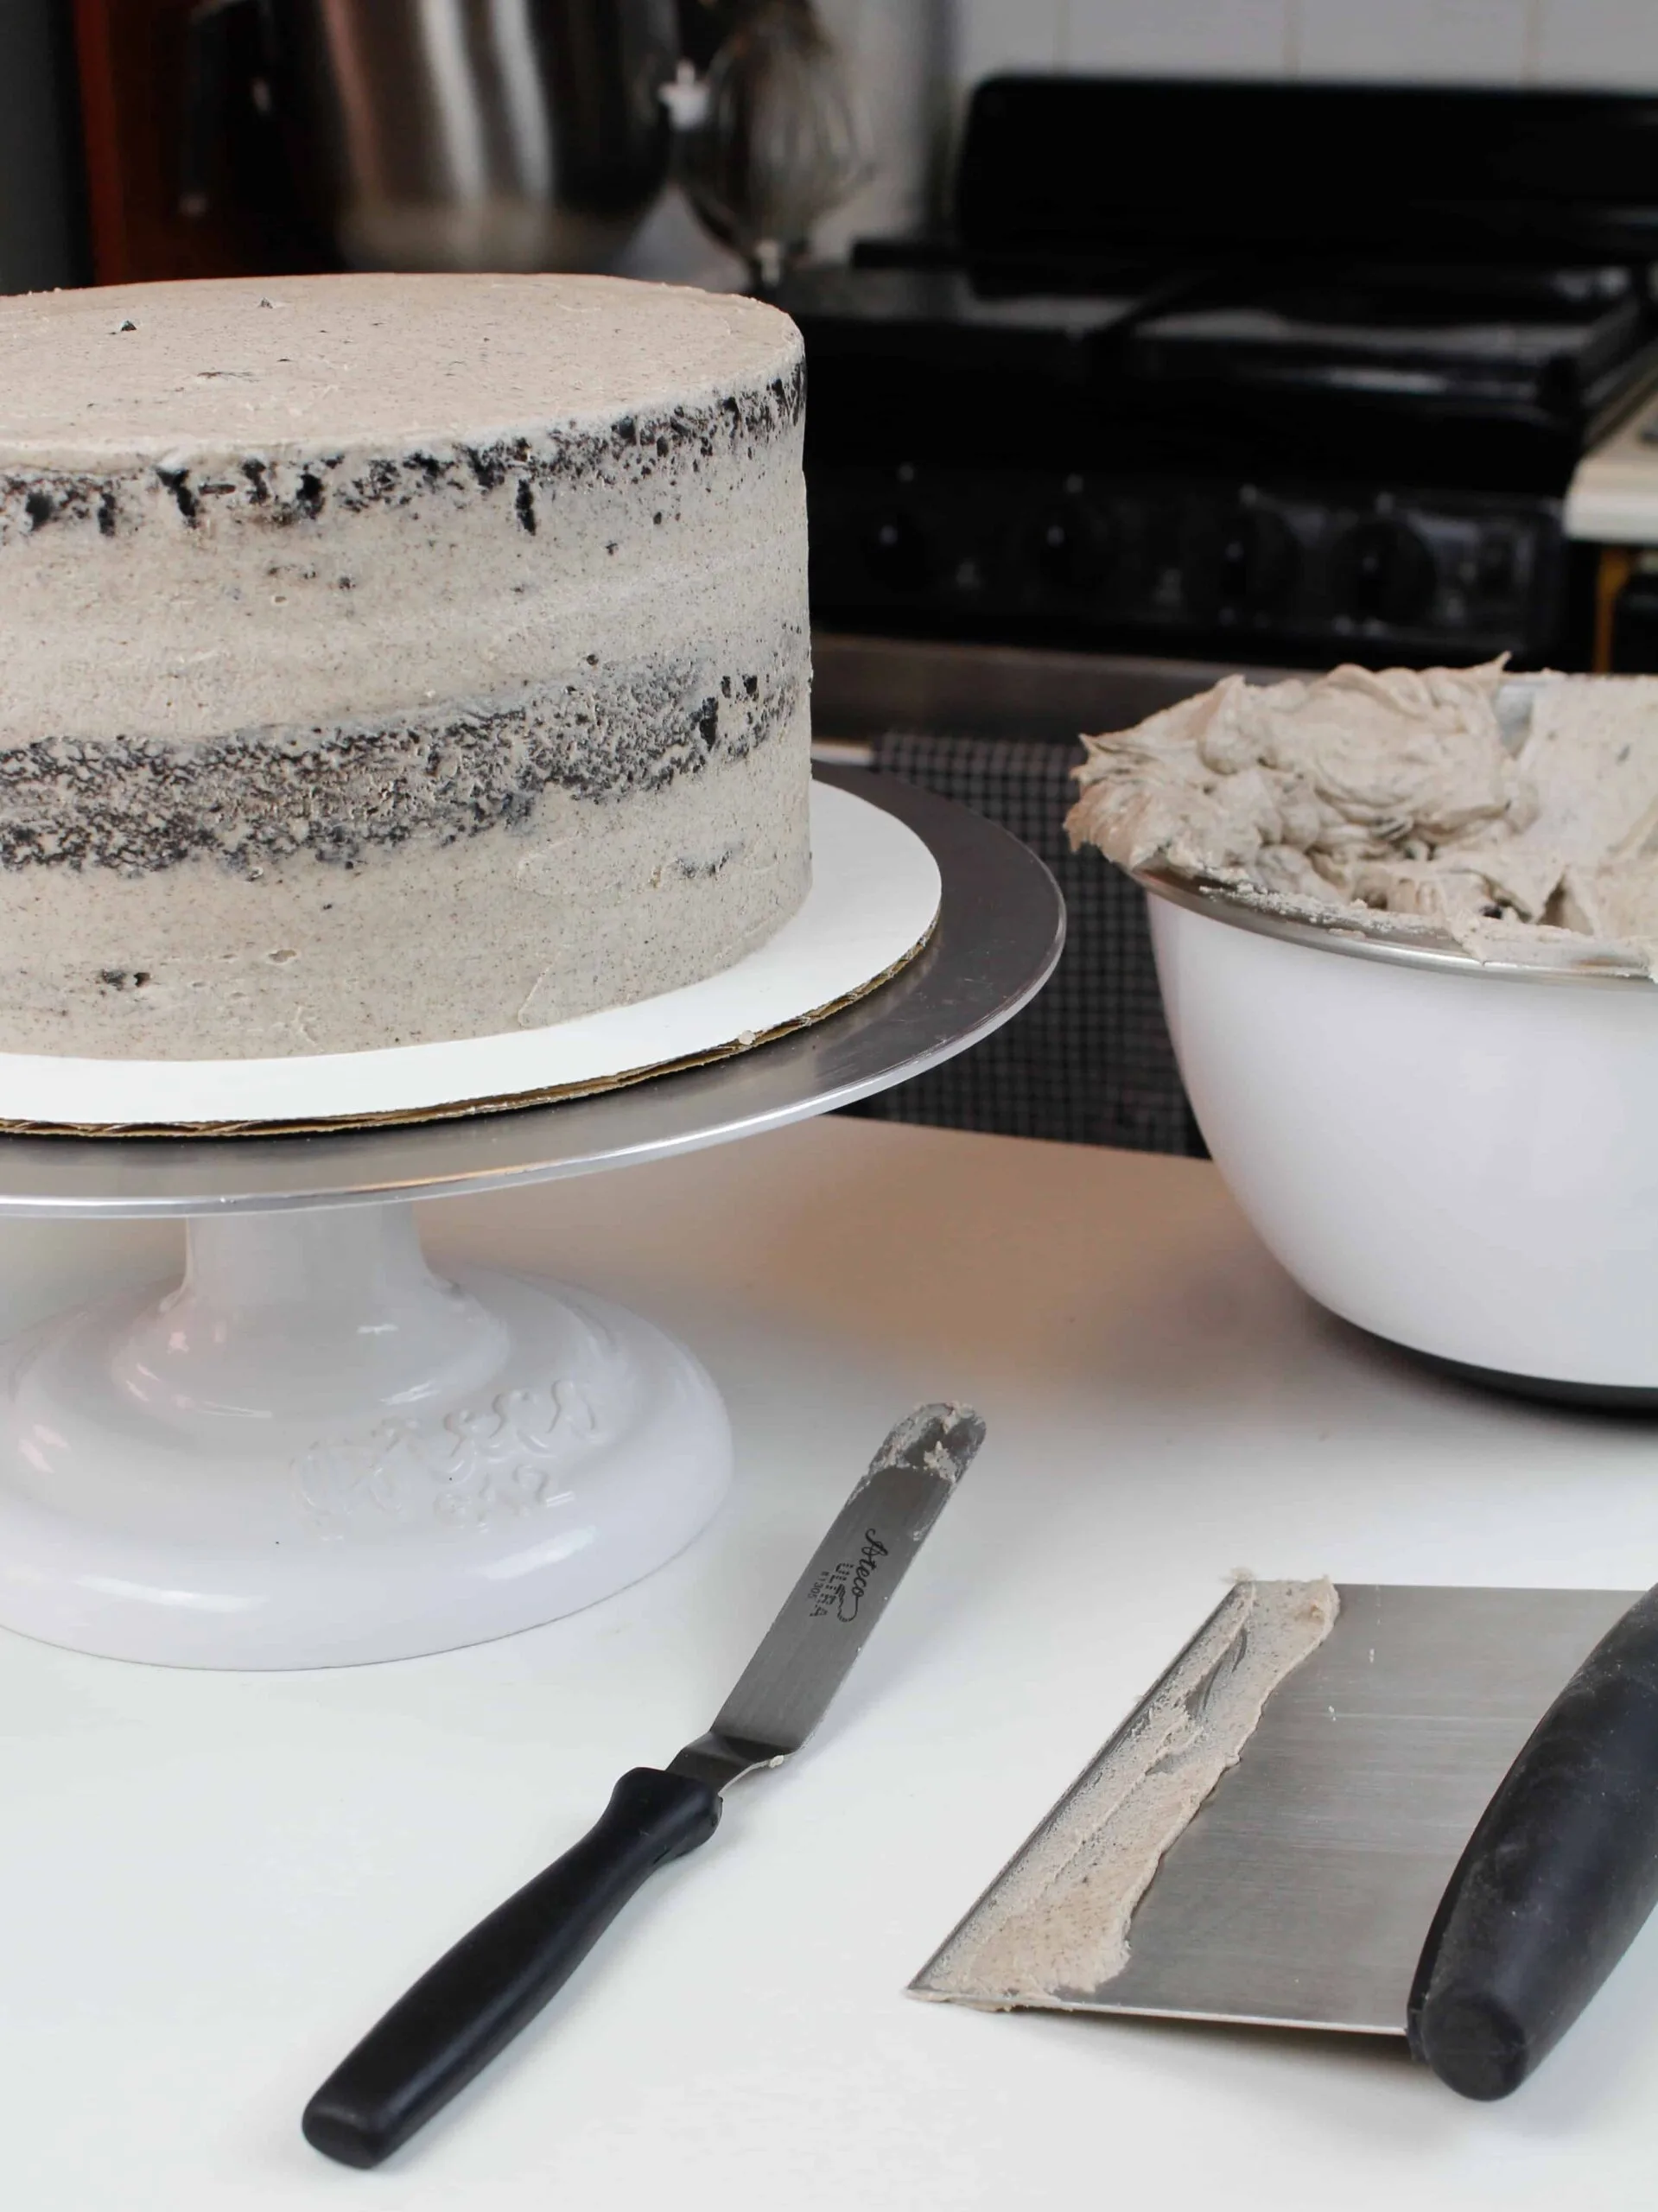
However, it’s actually not that simple! If you plan to pipe with this buttercream you need to use a food processor to completely crush the Oreos.
Bits of Oreo will get stuck in your piping tip if you don’t. Trust me, there is nothing more frustrating than being mid-swirl with a Wilton 1M, only to have the frosting tip get plugged and ruin your perfect design.

Large bits of Oreos also make smoothing the frosting on the sides of your cake almost impossible.
It’s worth reaching up to your highest cabinet (or the back of your pantry), and pulling out your food processor.
If you don’t have a food processor, be sure to cut your Oreos up into superfine pieces.
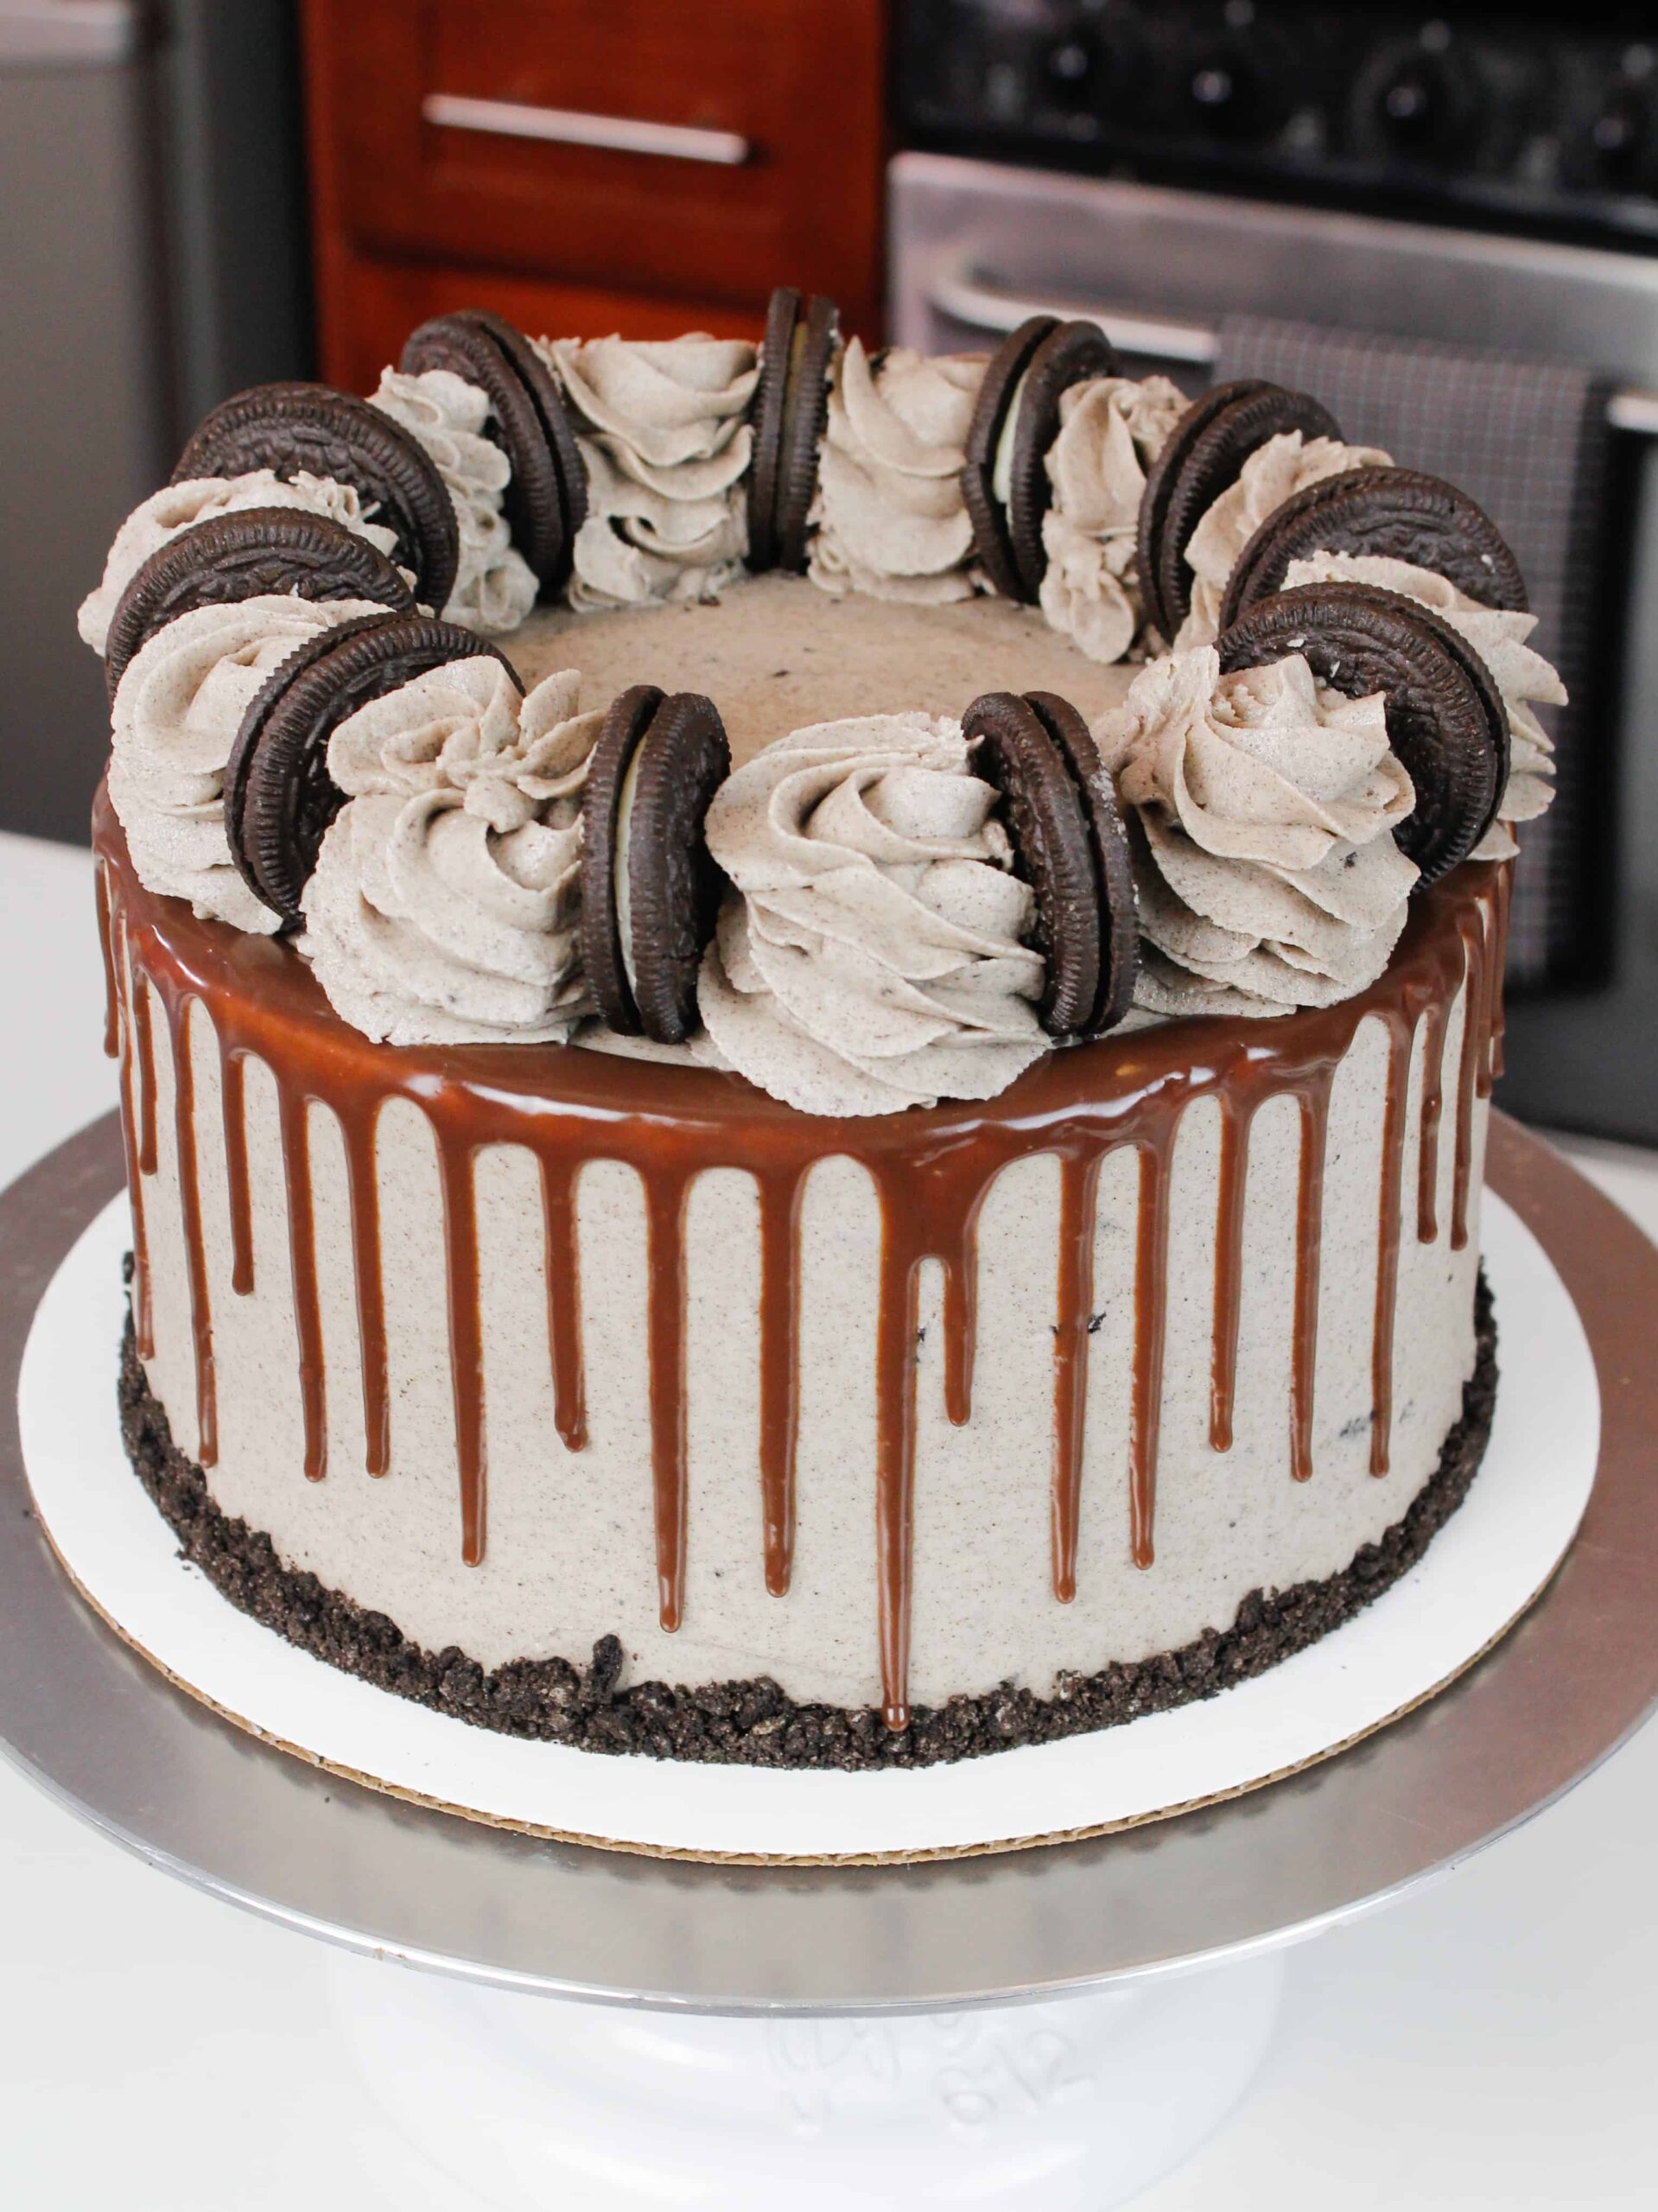
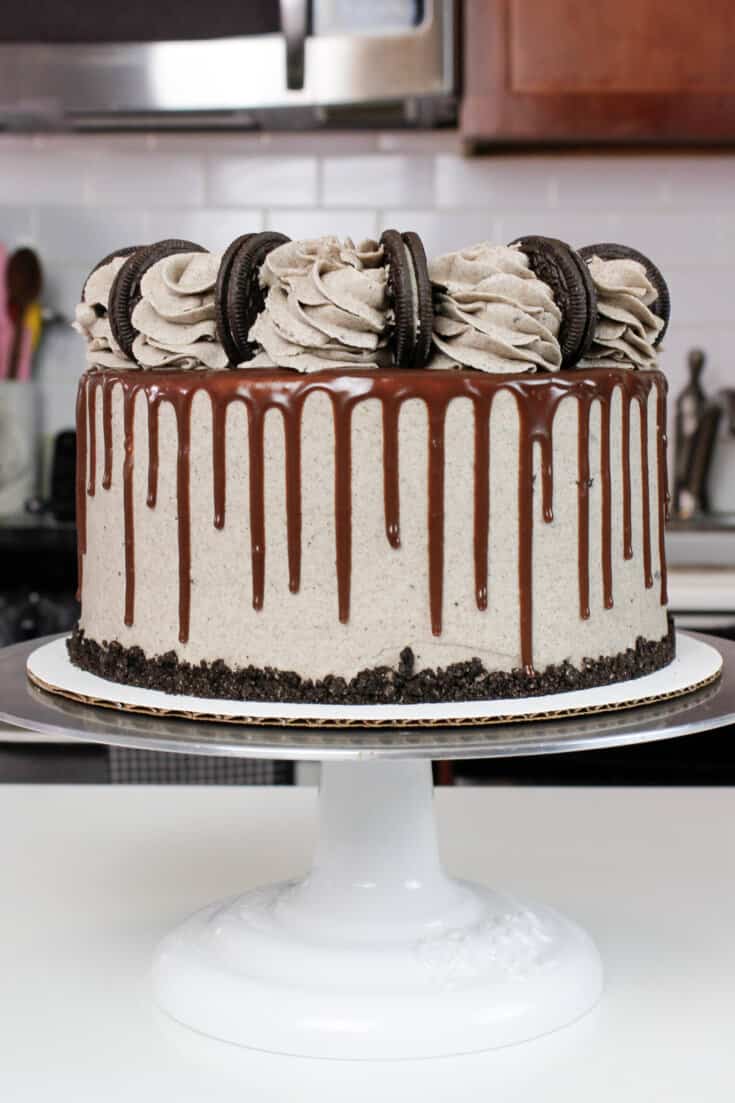
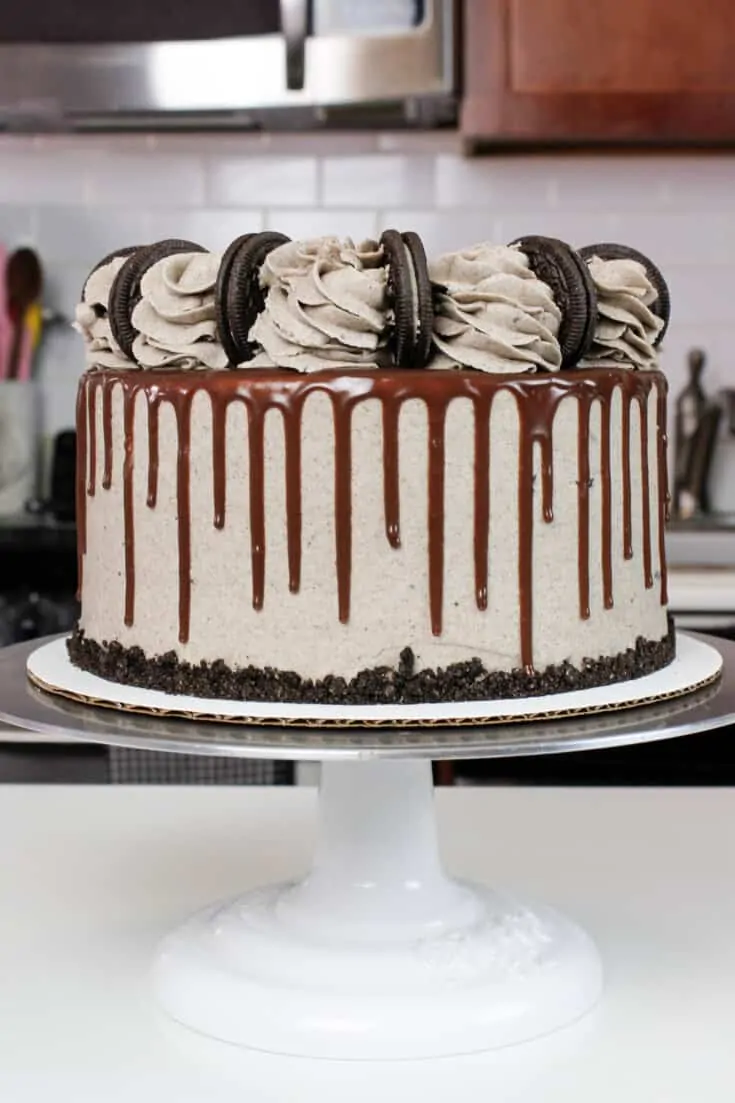
The Decorative Touch: A Chocolate Drip
The sides of this cake seemed a bit bare, so I added a chocolate drip! I use chocolate ganache to make my chocolate drips. It’s made with heavy cream and chocolate.
Chocolate ganache is also super easy to make! The hard part is mastering the perfect drip. It really comes down to two factors, chilling your cake, and letting your ganache cool to the right temperature.

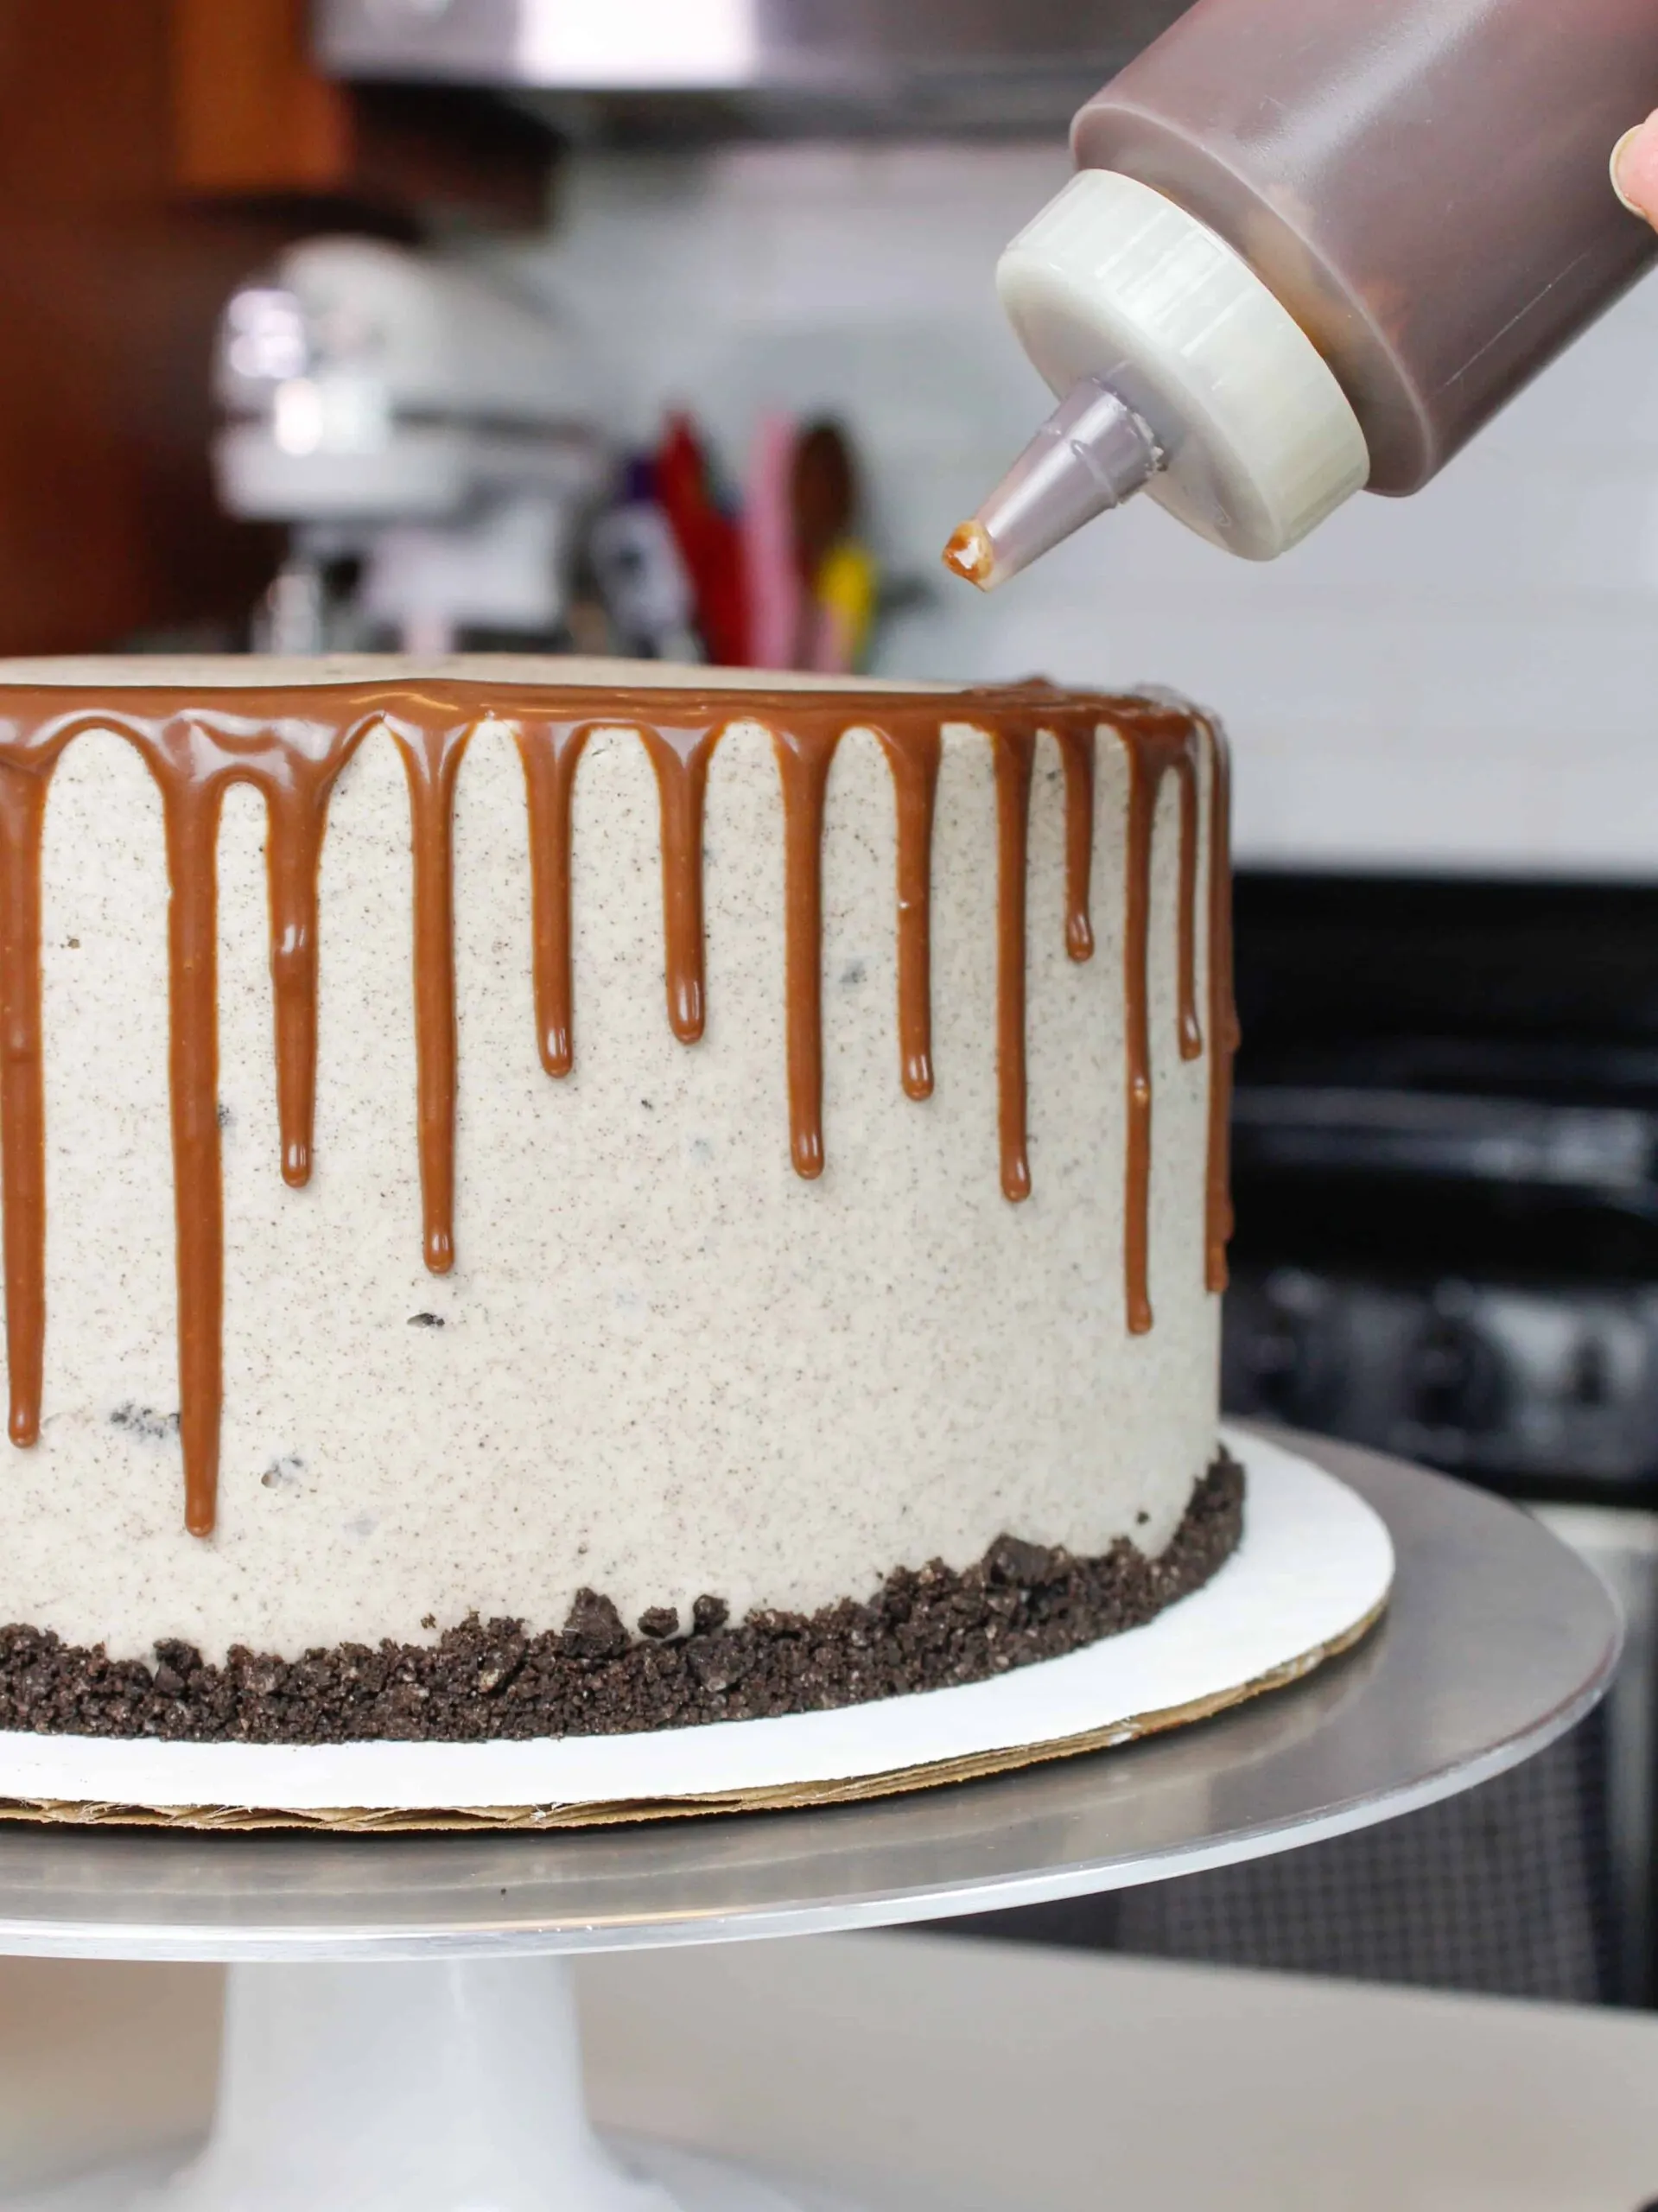
If your ganache is too warm, it can right all the way down your cake and right off your cake board.
If the chocolate ganache is too cool, it can result in short, little, stubby drips. The best way to know if your ganache is the right temperature is to make a test drip.
Make a single drip on your chilled cake, and see what it looks like after a couple minutes. Is it too thick? Too thin?? Adjust accordingly, then add drips around your entire cake.
It might be scary the first time, but I promise it gets easier the more drip cakes you make!
Tips for Making the Best Oreo Drip Cake
- Ingredients at room temp mix together better! Set out any cold ingredients ahead of time.
- Properly measure your flour (spoon into the cup measure, then level). Or better yet, use a kitchen scale to measure your dry ingredients.
- Mix the cake batter just until the ingredients are incorporated. This will ensure your cake layers are tender and fluffy.
- Use a scale to weigh your cake pans as you fill them. It will make your cake layers bake to the same height and bake more evenly.
- Bang your cake pans on the counter before putting it in the oven. This brings any big air bubbles that are trapped in the batter to the surface.
- Level your room temperature or thawed cake layers with a serrated knife to make them easier to stack.
- Chill your cake layers in the freezer for about 20 minutes before assembling the cake. It makes it so much easier to stack and frost them!

Making These Oreo Cake in Advance and Storage Tips
Make your cake layers in advance and freeze them. It breaks the process up and makes it more approachable.
Make your frosting ahead of time too or save any leftover frosting! It can be stored in an airtight container in the fridge for up to a month, or in the freezer for up to 3 months. Be sure to give it a good stir once it thaws to get the consistency nice and smooth again.
A frosted cake can last in the fridge for up to a week or in the freezer for up to a month. The buttercream locks in all the moisture, keeping the cake fresh and delicious!
If you cut into the cake and have leftovers, use any remaining frosting to cover the cut section to keep it moist and store in the fridge for up to a week.
Leftover ganache can also be stored in the fridge for up to 3 week! Either leave it in the bottle, or place it in an airtight container. Reheat it in 10 second intervals in the microwave when you’re ready to use it again.
Let Me Know What You Think!
If you try this Oreo drip cake recipe, please tag me @chelsweets and use #chelsweets so that I can see your baking!
Other Recipes You Might Like:


Oreo Drip Cake
This Oreo drip cake is the best!! It's made with delicious dark chocolate cake layers and Oreo buttercream, and is decorated with a gorgeous chocolate drip!
Ingredients
Chocolate Cake Layers
- 2 ½ cups all-purpose flour (310g)
- 3 cups granulated sugar (600g)
- 3/4 cup unsweetened black cocoa powder (60g)
- 2 1/2 tsp baking powder (10g)
- 1 tsp salt (6g)
- 1 cup or 2 stick unsalted butter, room temperature (226g)
- 1 cup egg whites or about 7 large egg whites (240ml)
- 1 1/2 cups buttermilk, room temperature (360ml)
- 2 Tbsp vegetable oil (28ml)
- 1 tsp instant espresso or coffee, dissolved in 1 tablespoon of hot water
- 2 tsp vanilla extract (8ml)
Oreo Buttercream
- 3 cups unsalted butter, room temperature (678g)
- 11 cups powdered sugar (1375g)
- 1 tsp salt (6g)
- 1/3 cup heavy cream or whipping cream (80ml)
- 1 Tbsp vanilla extract (12ml)
- 1 1/2 cups of crushed Oreos (225g)
Chocolate Drip
- 1/2 cup milk chocolate chips (85g)
- 1/3 cup heavy cream (80ml)
Additional Decorations/Tools:
Instructions
Chocolate Cake Layers
- Preheat oven to 350°F / 175°C. Line 3, 8-inch round pans with parchment rounds and grease with non-stick baking spray or homemade pan release.
- Sift the flour, sugar, cocoa, baking powder, and salt into the bowl of a stand mixer or a large mixing bowl
- Mix chunks of room-temperature butter slowly into the dry mix, on a low speed using a paddle attachment or a hand mixer. Continue to mix until no chunks of butter remain and the mixture becomes crumbly. It should resemble moist sand.
- Pour in egg whites and mix on low until just incorporated.
- Mix in the buttermilk in two installments on a low speed.
- Scrape down the sides of the bowl with a spatula, then add in the vegetable oil, liquid espresso, and vanilla extract. Mix at a low speed until fully incorporated.
- Divide batter evenly between the prepared cake pans. I like to use a digital kitchen scale to weigh my pans. It helps make sure they all have the same amount of batter and this guarantees the layers will end up the same height.
- Bang the bottom of each pan on our counter. This helps removes any air bubbles before the pans are placed in the oven. I recommend placing a kitchen towel on the counter to make the process less loud.
- Bake for 32-34 minutes or until a toothpick inserted in the center of the cake comes out with a few moist crumbs.
- Allow the layers to cool for 10 minutes on wire racks, then run an offset spatula around the perimeter of the pan to separate the cake from the pan.
- To accelerate the cooling process, I like to pop my cake layers in the freezer. You can also leave them on wire racks to finish cooling at room temperature.
- Once the layers are fully cooled, I like to level the top of each layer with a serrated knife.
Oreo Buttercream
- Beat the butter on a medium speed for 30 seconds with a paddle attachment, until smooth.
- Slowly add in the powdered sugar, 1 cup at a time. Place a kitchen towel over the stand mixer, to help reduce the powdered sugar clouds. Alternate with small splashes of cream.
- Once fully mixed, add in the vanilla extract and salt, and beat on low.
- Add in 1 cup of crushed Oreos (saving the rest for the cake decoration), and mix on low until the ingredients are fully incorporated, and the desired consistency is reached.
- If the frosting is too thick, add in additional cream (1 Tbsp at a time). If the frosting is too thin, add in more powdered sugar (1/4 cup at a time).
Chocolate Drip
- Place 1/2 cup milk chocolate chips in a heat proof bowl and set aside.
- Heat 1/3 heavy cream in a heatproof bowl in the microwave for 45 seconds to 1 minute, until gently bubbling.
- If you don’t have a microwave or prefer to use the stove top, you can heat the cream over a medium heat in a pan until it begins to simmer. Remove from heat.
- Gently pour the heavy cream over the chocolate chips. Make sure they are covered with cream. Allow mixture to sit for 1-2 minutes.
- Stir until the cream and chocolate are fully combined and ganache is silky smooth.
- Let the mixture cool for about 20 minutes, until it is just slightly warm to the touch.
Oreo Drip Cake Assembly
- Stack and frost cake layers on a greaseproof cake board using a dab of frosting to help secure the first cake layer to the board.
- Spread an even layer of Oreo buttercream between each cake layer with a large offset spatula and top with a large spoonful of crushed Oreos.
- Repeat with the remaining cake layers. Flip the top cake layer upside down to make it easier to frost.
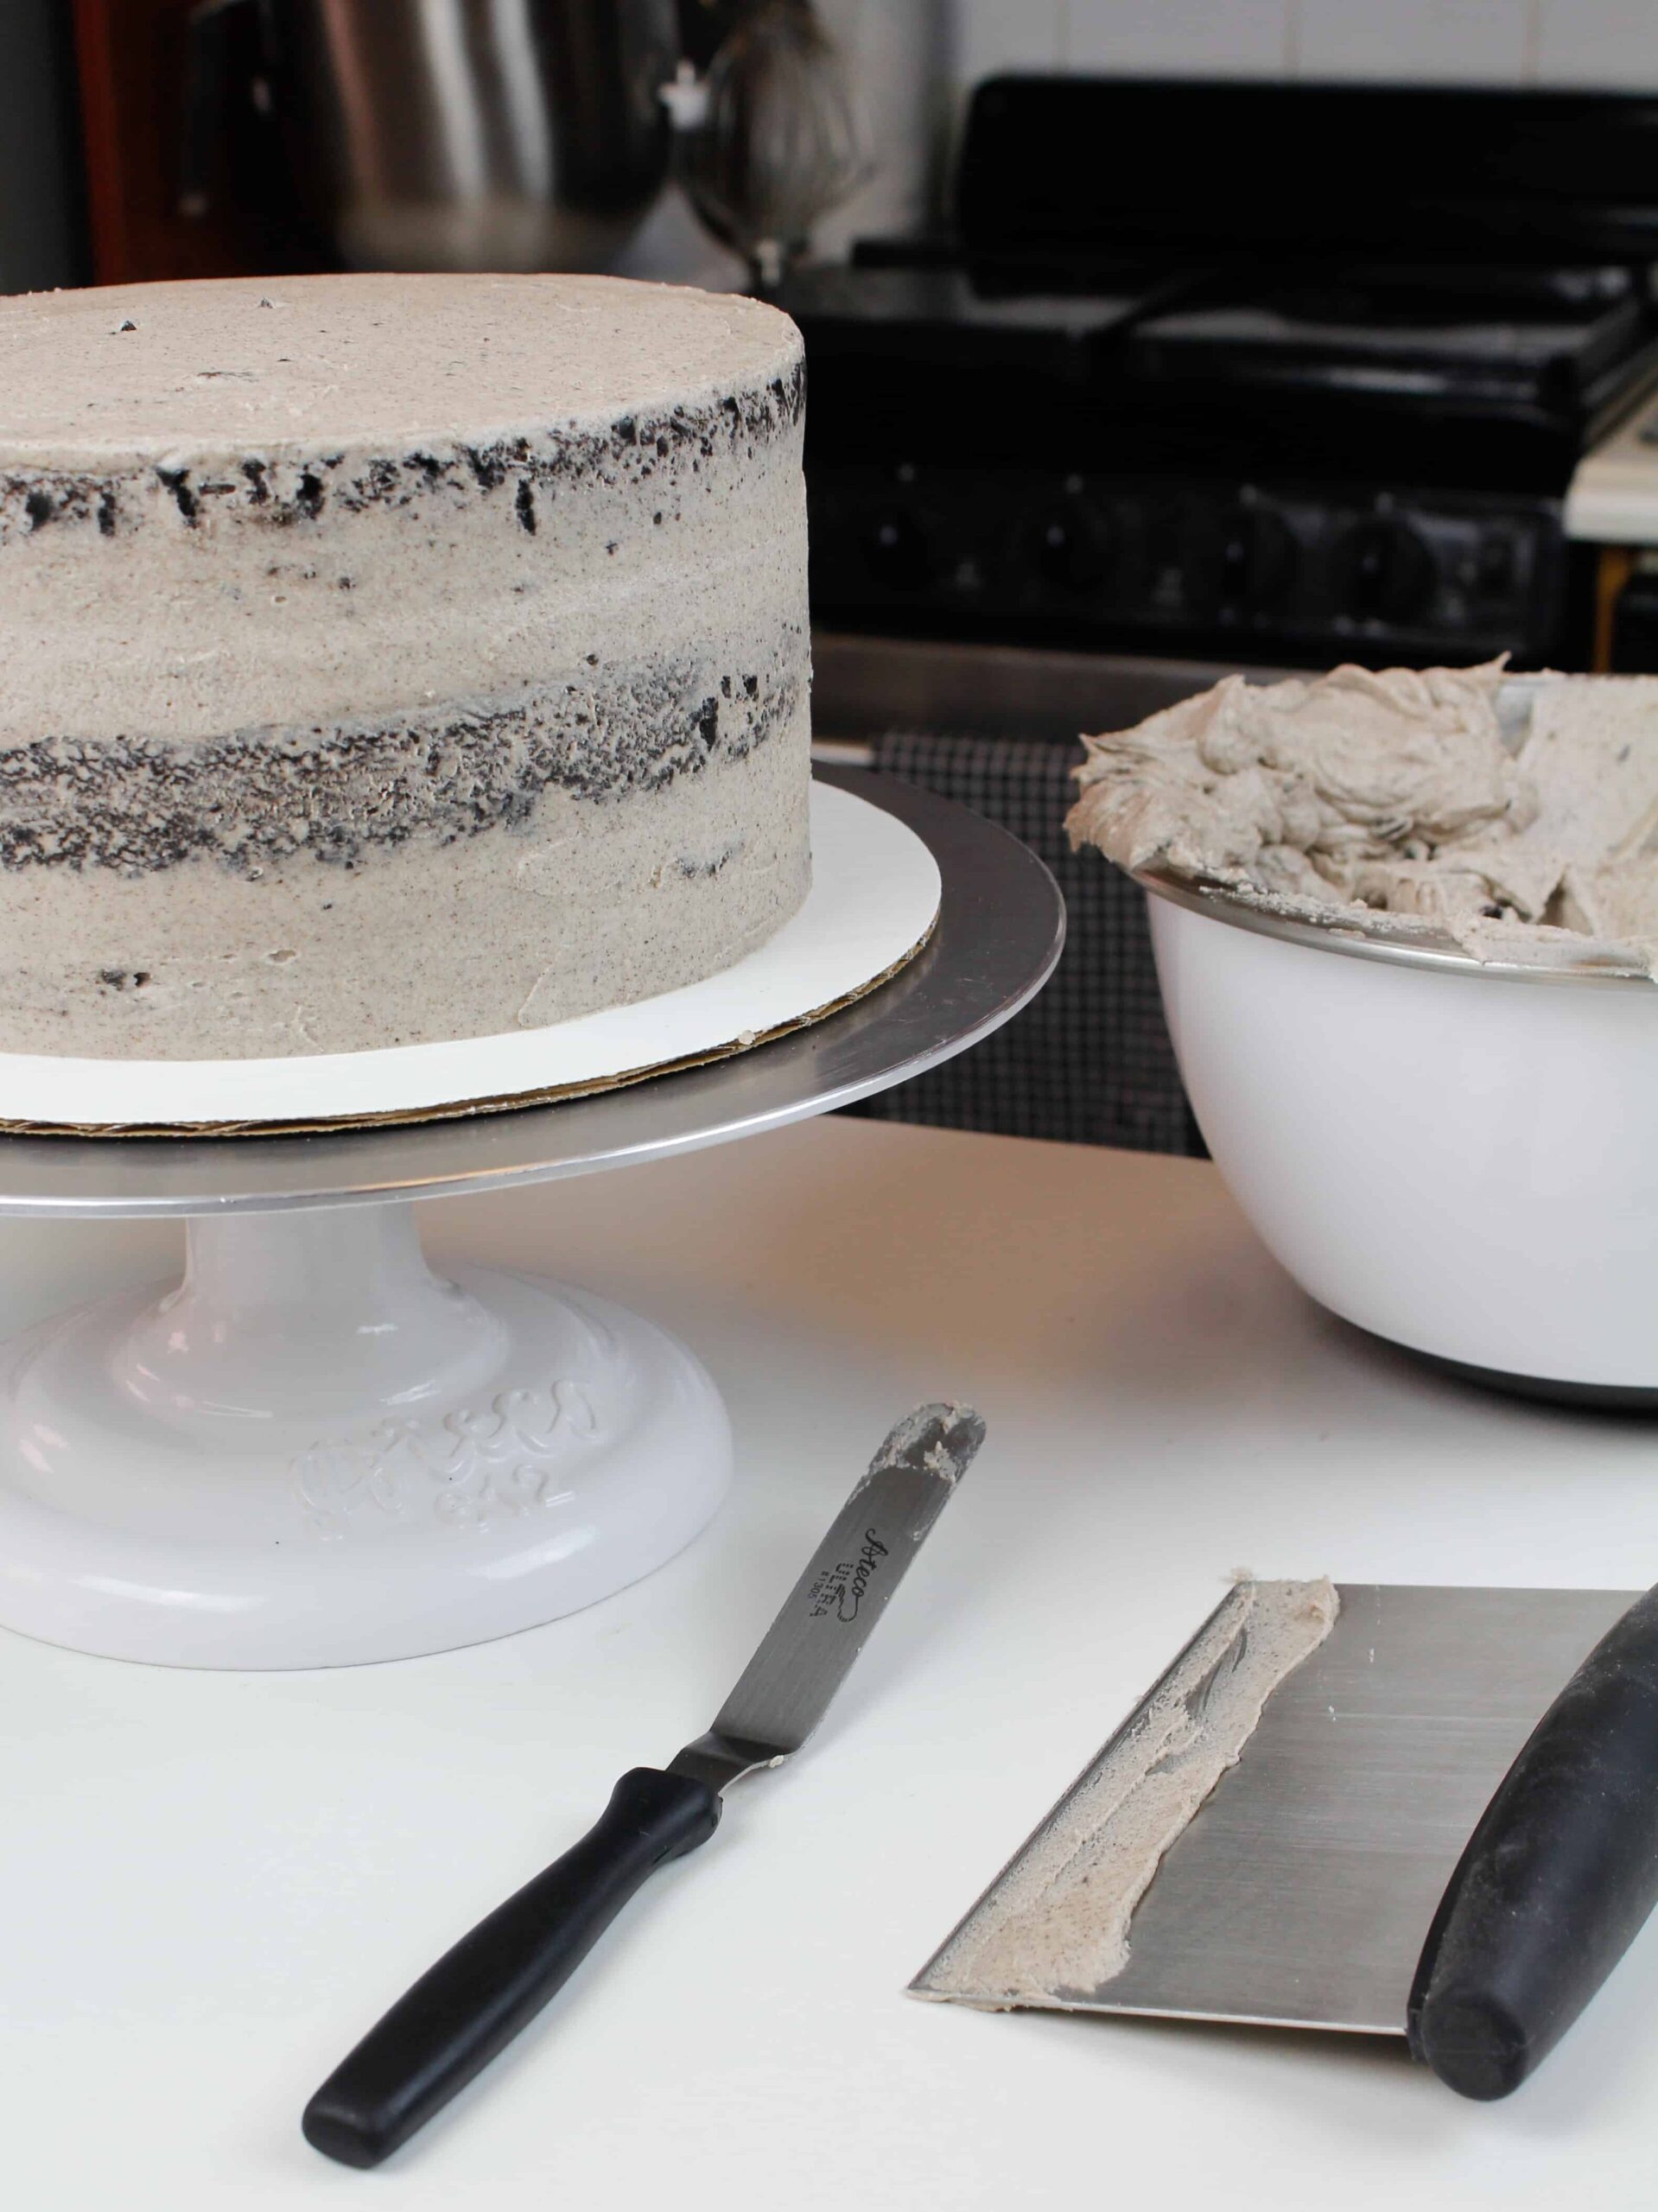
- Spread a thin coat of frosting around the cake to fully cover the cake layers.
- Smooth using a bench scraper, then chill the cake in the fridge (30 minutes) or freezer (10 minutes) until the frosting is firm to the touch.
- Add a second, thicker layer of frosting to the cake and smooth using a bench scraper.
- Spoon crushed Oreos around the base of the cake, then use the offset spatula to carefully press them into the frosting.
- Chill the cake in the fridge (30 minutes) or freezer (10 minutes) again until the frosting is firm to the touch.
- While the cake chills, place the remaining frosting into a large piping bag fit with a Wilton 1M frosting tip (open star).
- Once the cake is chilled, add the chocolate ganache drips to the cake using a spoon or plastic squirt bottle.
- If you use a spoon, scoop up about a tsp of ganache and scrape the bottom of the spoon against the bowl. Add the ganache to the top of the cake (about ½ inch from the edge of the cake). Gently push the ganache over the edge of the cake with the spoon, and allow it to run down the side of the cake.
- Whether you use a spoon or squirt bottle, allow the first drip to be a test drip to check the consistency of the ganache.
- If the test drip seems too thick, try heating up the ganache for 5-10 additional seconds in the microwave. If the mixture seems too thin, allow it cool a bit longer, then try another test drip.
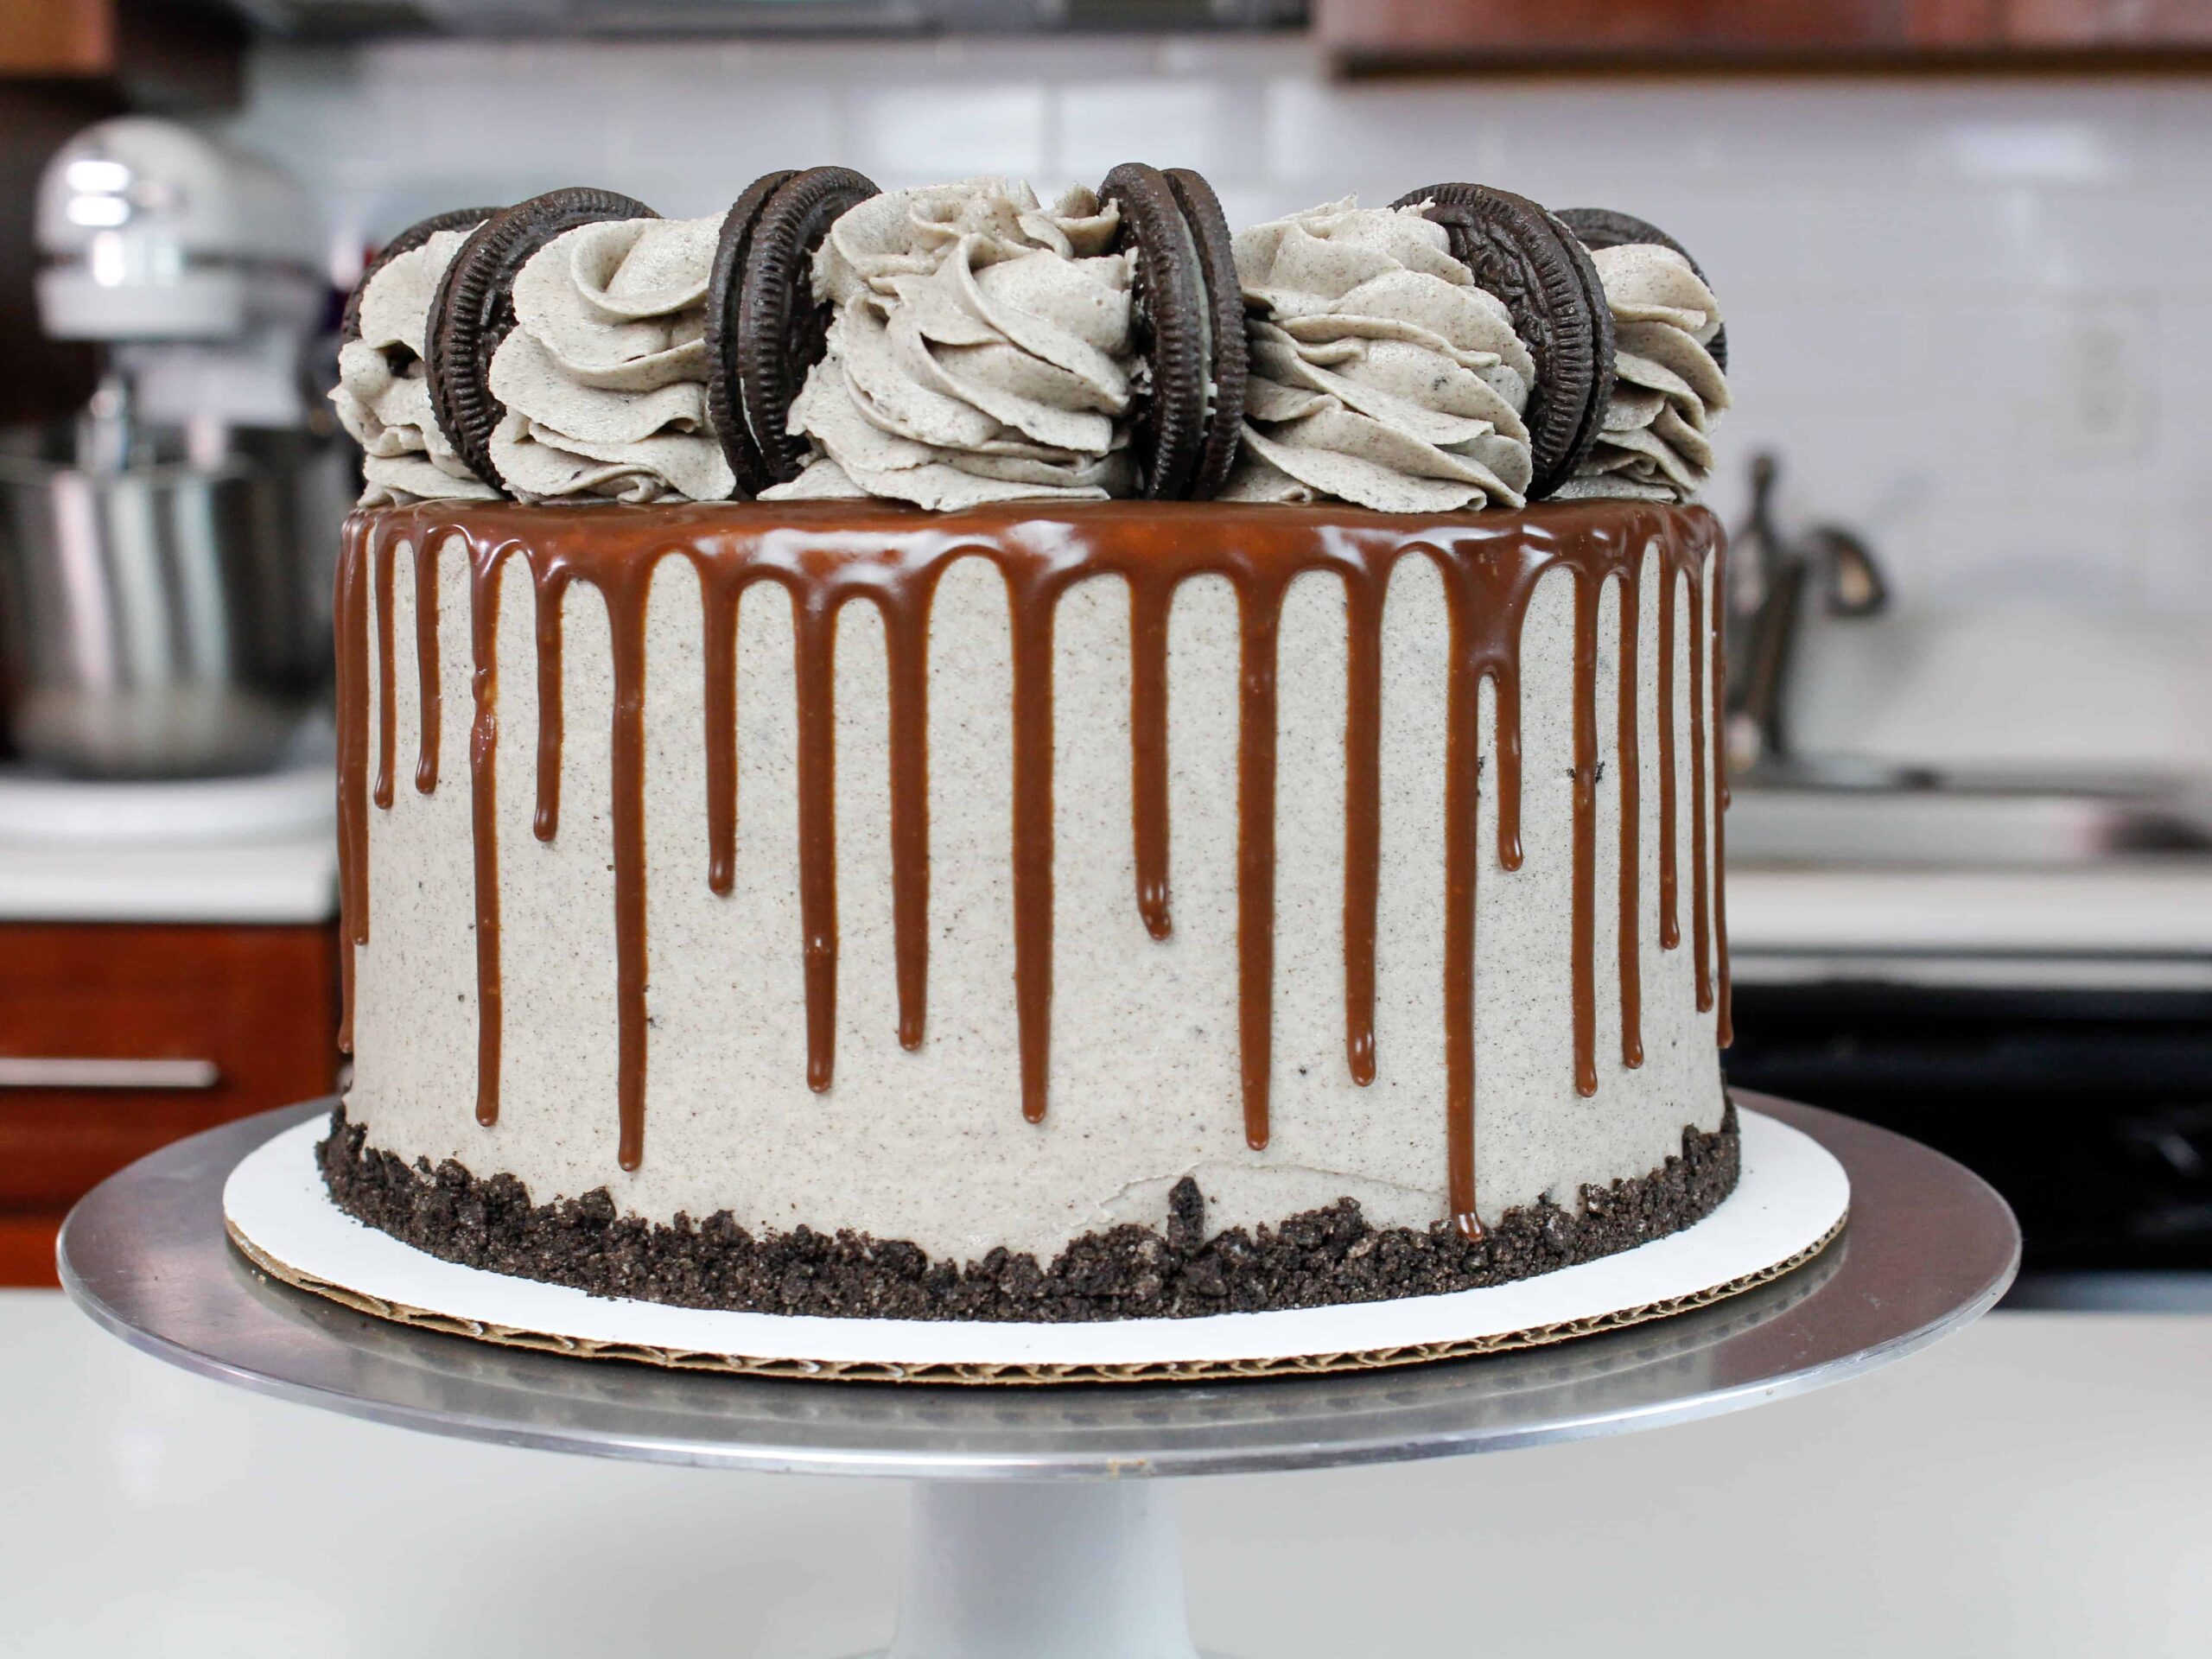
- Once the ganache is the right consistency, add drips around the entire cake. Pipe a ring of large buttercream swirls around the top of the cake using a Wilton 1M frosting tip and place an Oreo cookie vertically between each swirl.
Notes
Tips for Making the Best Oreo Drip Cake
- Ingredients at room temp mix together better! Set out any cold ingredients ahead of time.
- Properly measure your flour (spoon into the cup measure, then level). Or better yet, use a kitchen scale to measure your dry ingredients.
- Mix the cake batter just until the ingredients are incorporated. This will ensure your cake layers are tender and fluffy.
- Use a scale to weigh your cake pans as you fill them. It will make your cake layers bake to the same height and bake more evenly.
- Bang your cake pans on the counter before putting it in the oven. This brings any big air bubbles that are trapped in the batter to the surface.
- Level your room temperature or thawed cake layers with a serrated knife to make them easier to stack.
- Chill your cake layers in the freezer for about 20 minutes before assembling the cake. It makes it so much easier to stack and frost them!
Making These Oreo Cake in Advance and Storage Tips
Make your cake layers in advance and freeze them. It breaks the process up and makes it more approachable.
Make your frosting ahead of time too or save any leftover frosting! It can be stored in an airtight container in the fridge for up to a month, or in the freezer for up to 3 months. Be sure to give it a good stir once it thaws to get the consistency nice and smooth again.
A frosted cake can last in the fridge for up to a week or in the freezer for up to a month. The buttercream locks in all the moisture, keeping the cake fresh and delicious!
If you cut into the cake and have leftovers, use any remaining frosting to cover the cut section to keep it moist and store in the fridge for up to a week.
Leftover ganache can also be stored in the fridge for up to 3 week! Either leave it in the bottle, or place it in an airtight container. Reheat it in 10 second intervals in the microwave when you're ready to use it again.
Nutrition Information
Yield
24Serving Size
1Amount Per Serving Calories 776Total Fat 40gSaturated Fat 23gTrans Fat 0gUnsaturated Fat 14gCholesterol 96mgSodium 379mgCarbohydrates 102gFiber 1gSugar 85gProtein 6g
Lish
Sunday 19th of November 2023
Hi there, Will the oreos go soft on the top if you put cake in the fridge? Or do you leave it out
Chelsweets
Monday 27th of November 2023
Hi Lish,
It can vary if you live in a super warm / humid climate, but in general the Oreos should stay firm and keep their shape if the cake is made in advance and stored in the fridge. Hope that helps, happy baking!
10 Best Oreo Wedding Cake Recipe Ideas For Your Special Day
Tuesday 9th of May 2023
[…] 4. Oreo Drip Cake […]
Funfetti Oreo Cookies - Soft & Chewy Cookies Packed with Sprinkles
Monday 25th of April 2022
[…] Cupcakes Oreo Drip Cake Oreo Cinnamon Rolls Oreo Funfetti Cake Recipe Yield: 30 […]
Chocolate Oreo Cupcakes: Moist Chocolate Cupcakes with Oreo Frosting
Saturday 26th of March 2022
[…] a big fan of baking with Oreos. I love them in ice cream, cakes, even croissants! Hence my Oreo drip cake and my Oreo frosting […]
Oreo Frosting Recipe: The Best Oreo Buttercream
Monday 21st of February 2022
[…] I love a good cupcake, I use this recipe the most on cakes! I’ve made quite a few Oreo drip cakes over the years, and this is my go to frosting for […]