
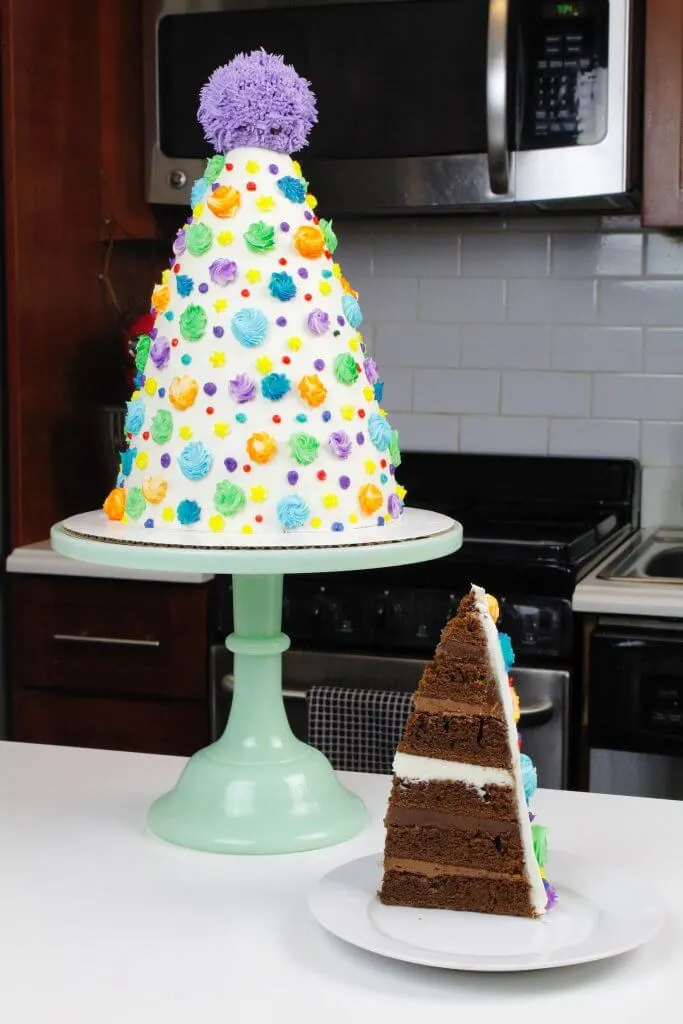
Some celebrations call for a birthday cake hat!! Or a party hat cake, whatever you want to call it.
Alisha Henderson inspired me to make this cake with her adorable floral party hat cake.
I actually made this cake for my “retirement” party, despite it looking like a birthday hat cake.
Sometimes my cakes end up looking different in real life than they do in my head 😛
When I quit my corporate job, I had a get together with my friends to celebrate my career change.
I wanted to make a special cake to celebrate the commencement of all things Chelsweets.

Making A Sculpted Cake
I used my favorite flavors and recipes to make this cake. After all, this cake was for my own party!! I’m a huge fan of chocolate cake, so it’s no surprise I used my go-to chocolate layer cake recipe.
It has an amazing taste, but also has amazing structure! It can stand up to being stacked sky high, and carved with a serrated knife.
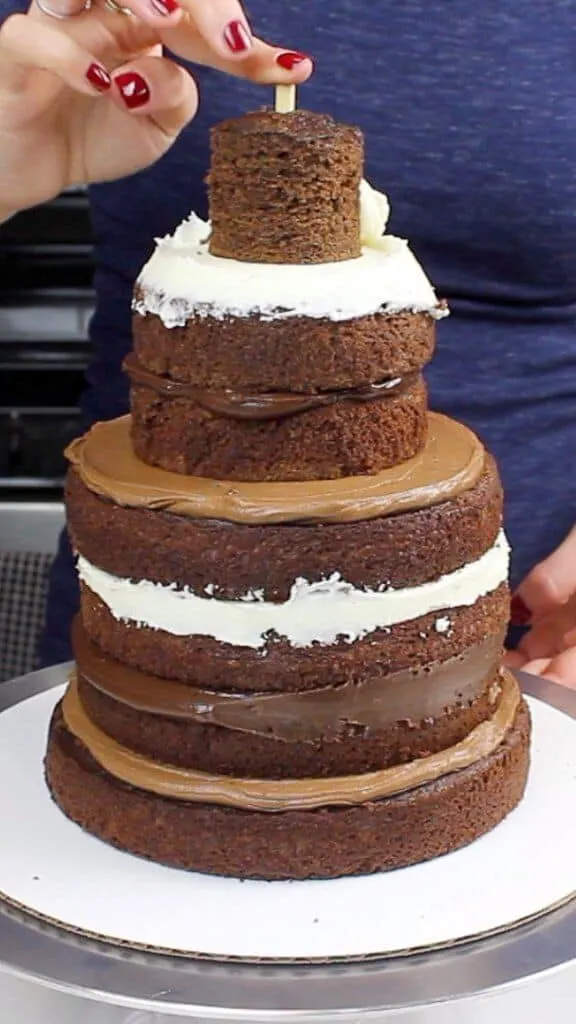
This cake is made with a bunch of different sized cake layers. They range in size from 7 to 2 inches. I used a circle cutter to create the tiny 2 inch cake layer that the cake is topped with.
The cake layers are stacked in a tall, cone-like shape. I started with the largest layer at the base, and worked my way up to my smallest cake layer.
The main benefit of creating this shape is that you don’t necessarily have to carve the cake! You can added extra buttercream around the layers, to create smooth sides.
If desired, you can use a serrated knife to even out the sides bit!! I chose to trim the cake layers a smidge, to make it easier to create a party hat shape.

Stabilizing This Super Tall Cake
This party hat cake is made with seven cake layers, which can be a challenge to stack and frost. I inserted a wooden dowel into the center once the cake layers were stacked.
This gives the cake stability, and makes it way easier to frost!
The dowel also keeps the layers in place as the cake is decorated. If this step is skipped, the cake can end up lopsided, or even topple over!!
Filling this Cake with Vanilla Buttercream
Speaking of keeping this cake upright and level, the buttercream acts as a mortar in this cake! It keeps everything in place. It also tastes delicious with the chocolate cake layers!!
I decided to simplify this recipe by filling the cake with just vanilla buttercream. If you really want to use multiple fillings in this cake, you can make a half batch of my chocolate buttercream recipe.
However, I’m sure you’ll notice this party hat cake has three different fillings! It uses a milk chocolate ganache, chocolate buttercream, and vanilla buttercream.
Whenever I can, I try to save leftover frosting and repurpose it in the future. I was able to use some leftover chocolate buttercream and ganache from prior baking projects to fill this cake.
Making three different fillings for a cake from scratch takes FOREVER! If you don’t already have other cake fillings on hand, I highly recommend just filling the cake with vanilla frosting.

A Big Cake Calls For A Big Party
While on the topic of how tall and large this cake is, I want to discuss the number of people it feeds!
This always varies based on what you consider a proper sized “slice,” which could be rather generous for a teenage boys birthday party.
On the other hand, whenever there’s an office birthday, I feel like people ask for microscopic-sized slices.
In my opinion, this cake feeds 20-25 people with moderately sized slices.
How To Assemble And Decorate This Party Hat Cake
Prepare the cake and buttercream recipes as instructed below.
Mix 1 cup of crumbled cake tops with 1/3 cup of frosting, and place the mixture on a piece of plastic wrap.
Form the mixture into the shape of a ball, and place in the freezer to firm up. This will be the top of the party hat!
Stack and frost cake layers on a greaseproof cake board, using a dab of frosting to help stick the first cake layer to the board.
Insert a wooden dowel through the center of the cake layers, leaving about 1 inch exposed on the top.
If desired, use a serrated knife to trim the cake layers into the shape of a tall cone.

Smooth a thin layer of frosting onto the cake using a bench scraper. Chill in the fridge of freezer for 10 minutes, until the frosting is firm to the touch.
Add a second, thicker layer of frosting to the cake, and smooth using a bench scraper and an acetate sheet. Place the frozen cake ball on top of the wooden dowel.
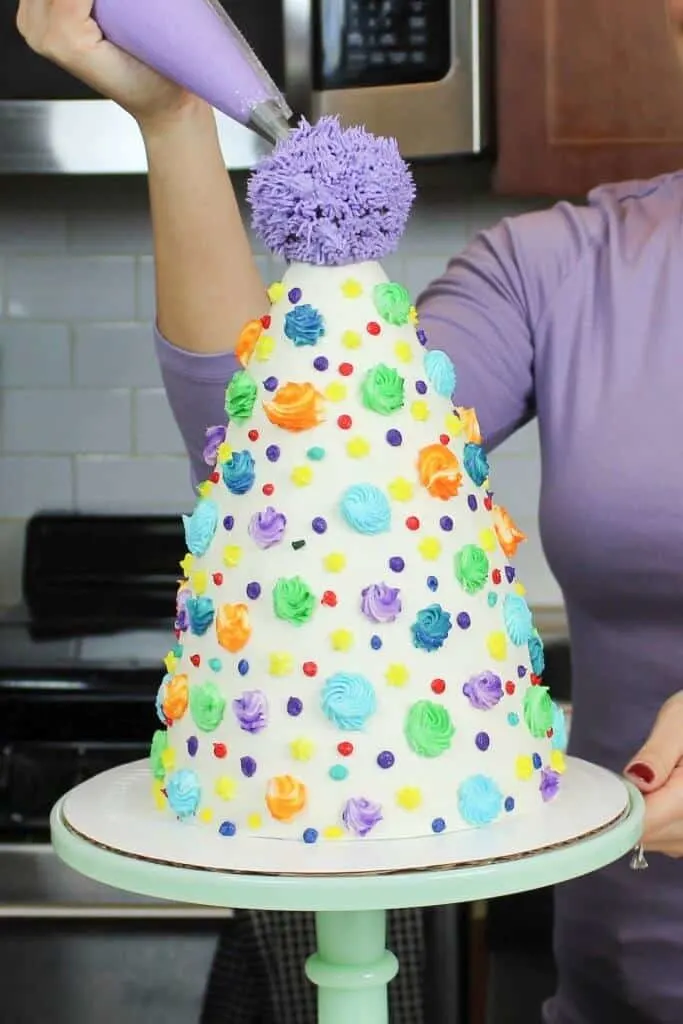
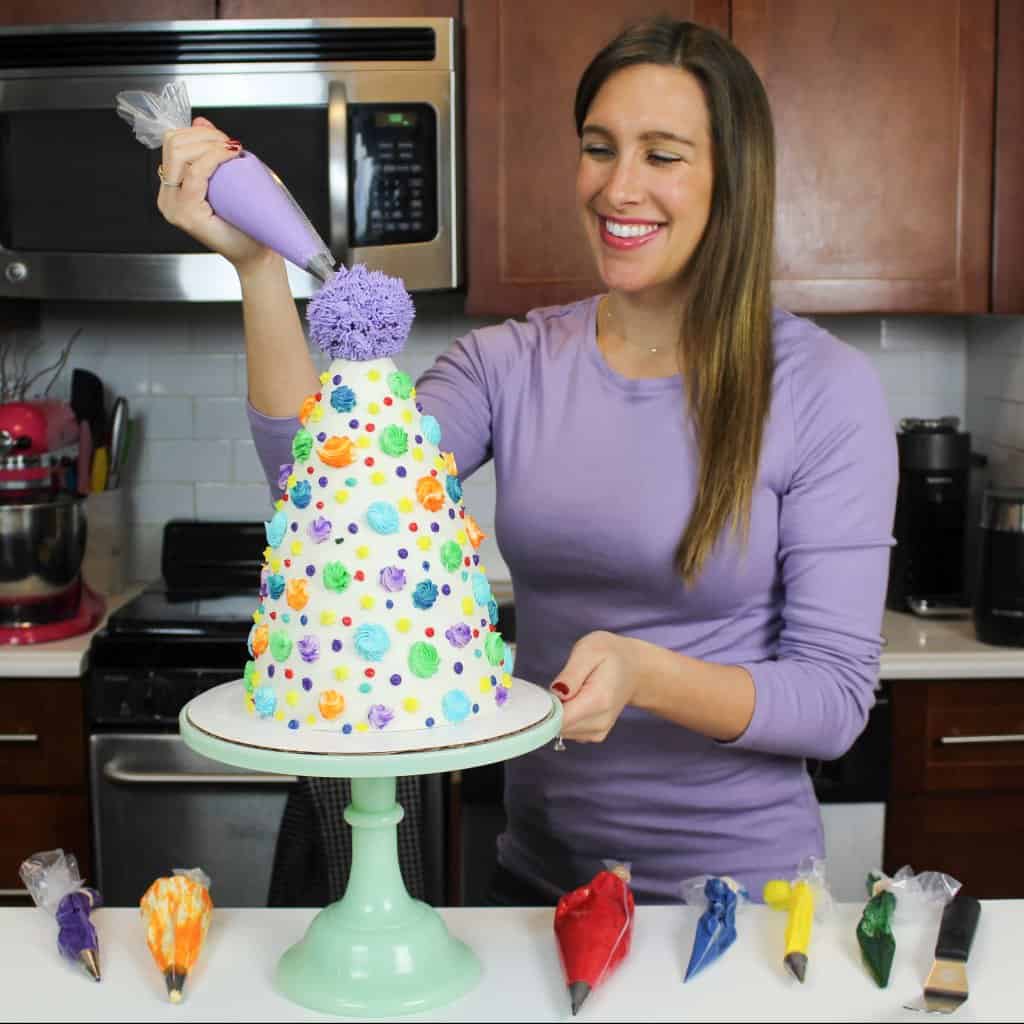
Color the remaining frosting a variety of colors using gel food coloring, and fill piping bags fitted with assorted piping tips.
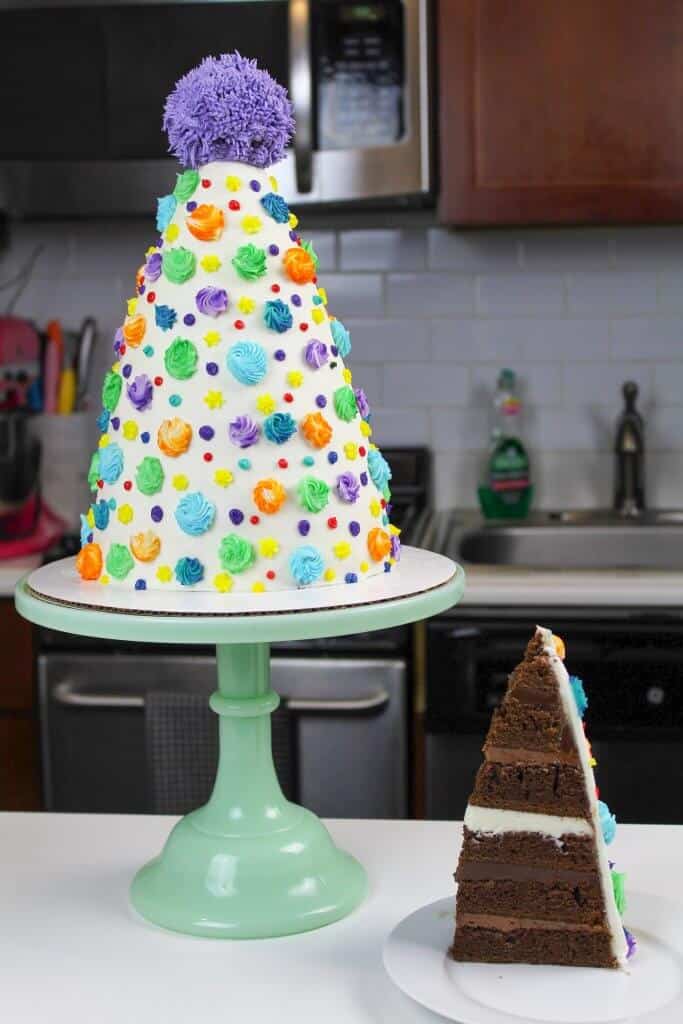
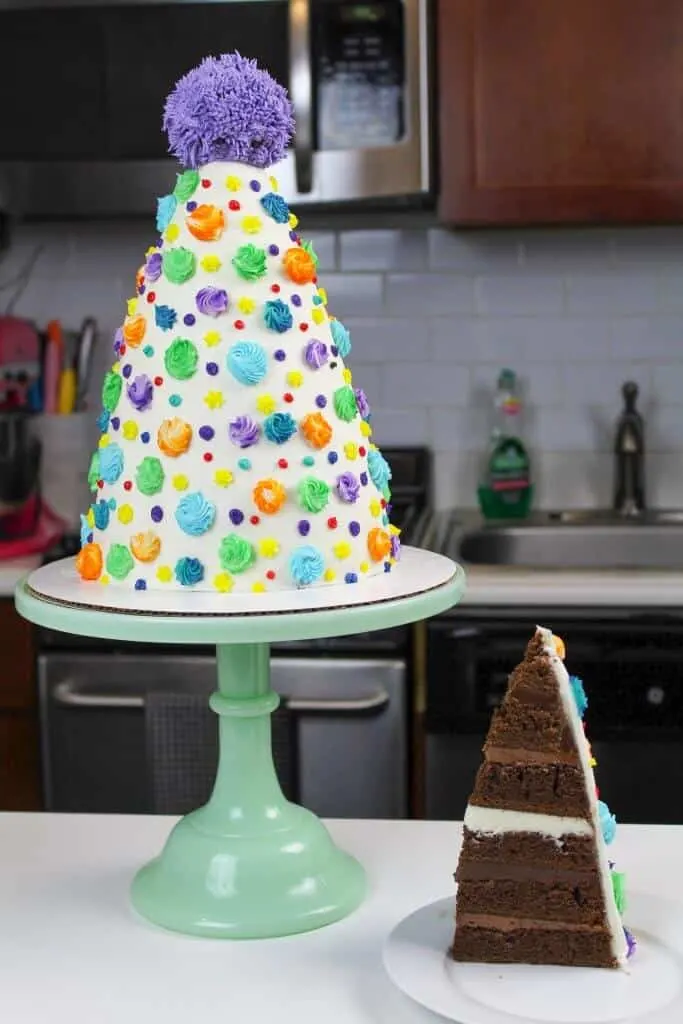
Place some of the colored buttercream in a bag fitted with a grass tip, and pipe buttercream onto the cake ball on top of the cake.
Pipe colorful swirls and dots around the cake, and enjoy!
Tips for Making the Best Party Hat Cake
- Properly measure your flour. Either spoon it into the cup measure, then level with a knife or use a kitchen scale.
- Make sure your ingredients are at room temperature to help them mix together better.
- Don’t level your cake layers until they are completely cooled.
- Make sure your buttercream is the right consistency before frosting your cake! It will help give your cake proper structure and make it easier to decorate.
- If your cake layers turn out less than perfect, I recommend reading my cake troubleshooting guide to see where things might’ve gone awry.
Making This Party Hat Cake in Advance and Storage Tips
Make your cake layers in advance and freeze them. It breaks the process up and make it more approachable.
Make your frosting ahead of time too or save any leftover frosting! It can be stored in an airtight container in the fridge for up to 2 weeks, or in the freezer for up to a month. Be sure to give it a good stir once it thaws to get the consistency nice and smooth again.
A frosted cake can last in the fridge for up to a week or in the freezer for up to a month. The frosting locks in all the moisture, keeping the cake fresh and delicious!
If you cut into the cake and have leftovers, use any remaining frosting to cover the cut section to keep it moist and store in the fridge for up to a week.
Let Me Know What You Think!
If you try this party hat cake recipe, please tag me @chelsweets and use the #chelsweets so I can see your beautiful creations!!
Also leave a comment below and/or a rating to let me know your thoughts.
Other Recipes You Might Like:


Birthday Party Hat Cake


Looking for the perfect cake for a special celebration?? This party hat cake is it! It's made with layers of chocolate cake and decorated with buttercream frosting!!
Ingredients
Chocolate Cake Ingredients
- 3 cups all-purpose flour (390 grams)
- 2 1/2 cups granulated sugar (500 grams)
- 1 tsp salt (6 grams)
- 1 1/2 tsp baking powder (6 grams)
- 1 tsp baking soda (6 grams)
- 4 large eggs, room temp (224 grams)
- 1 cup unsalted butter, room temp (2 sticks, 226 grams)
- 1 cup hot water (237 grams)
- 1 cup buttermilk, room temp (240 grams)
- 1 cup black cocoa (100 grams)
Vanilla Buttercream Frosting
- 3 cups unsalted butter, room temperature (678 grams)
- 11 cups powdered sugar (1375 grams)
- 1 tsp salt (6 grams)
- 1/3 cup heavy cream (or whipping cream) (75 grams)
- 1 1/2 Tbsp vanilla extract (18 grams)
- gel food coloring
Instructions
Chocolate Cake Layers
- Begin by preheating the oven to 350 degrees Fahrenheit. Line following cake pans with parchment rounds, and spray with non-stick spray:
- one seven inch cake pan, three six inch cake pans, and three four inch cake pans
- Add the sugar and butter into the bowl of a stand mixer, and mix on high for 1 minute with a whisk attachment. The mixture should become light in color.
- Add in the eggs, one at a time. Then add baking soda, baking powder, and salt. Mix on high for another minute.
- In a separate bowl, combine the cup of hot water, and cup of buttermilk. Pour in the cup of black cocoa, and whisk until no clumps remain.
- Next, add 1 cup of flour into the butter/egg mixture. Scrape the sides of the bowl with a spatula, to ensure the flour is fully incorporated.
- Pour in half of the buttermilk/cocoa mixture, and gently pulse the mixture to incorporate the liquid (if you don't, you'll end up splattering the cocoa mixture all over you kitchen!)
- Mix in the 2nd cup of flour, at a low speed. Pour in the remaining buttermilk/cocoa mixture, and again gently pulse, then mix on low until fully combined.
- Add in the last cup of flour, and mix on low until the flour is incorporated. Mix on high for 30 additional seconds, to incorporate a bit more air into the batter.
- Divide between the prepared pans, filling them about 1 inch high with batter.
- Bake for 30-35 minutes, or until a toothpick comes out clean. The four inch and six inch pans should be fully baked after about 30 minutes, while the seven inch pan will take a few minutes longer to fully bake.
- Allow layers to cool in the pans for about 10 minutes, then run an offset spatula around the edge of the pans to help separate the layers from the pans.
- Place the pans in the freezer for about 45 minutes, to accelerate the cooling process. Once the layers are fully cooled, carefully flip the pans and remove the layers from the pans.
- Use a serrated knife to level the tops of the layers. Use a 2 inch circle cutter to make a 2 inch cake layer with one of the four inch cake layers. Set the cake layers aside.
- Mix 1 cup of crumbled cake tops with 1/3 cup of frosting, and place the mixture on a piece of plastic wrap. Form the mixture into the shape of a ball, and place in the freezer to firm up. This will be the top of the party hat!
Vanilla Buttercream Frosting
- While the cake layers bake and cool, make the vanilla buttercream frosting.
- Beat the butter on a medium speed for 30 seconds with a paddle attachment, until smooth. Slowly add in the powdered sugar, 1 cup at a time. Alternate with small splashes of cream.
- Once fully mixed, add in the vanilla and salt, and beat on low until the ingredients are fully incorporated, and the desired consistency is reached.
- If the frosting is too thick, add in additional cream (1 teaspoon at a time). If the frosting is too thin, add in more powdered sugar (quarter of a cup at a time).
- If the frosting is too thick, add an extra Tbsp of heavy cream. If it's too thin, add in another 1/2 cup of powdered sugar.
- Stir by hand with a rubber spatula for a couple minutes to get the frosting SUPER smooth.
- Wait to color any of the buttercream until the cake is fully frosted.
To Assemble The Cake:
- Stack and frost cake layers on a greaseproof cake board, using a dab of frosting to help stick the first cake layer to the board.
- Begin with the seven inch cake layer. Cover with an even layer of buttercream. Repeat with the six inch cake layers, the two four inch cake layers, and top with the 2 inch layer.
- Insert a wooden dowel through the center of the cake layers, leaving about 1 inch exposed on the top. If desired, use a serrated knife to trim the cake layers into the shape of a tall cone.
- Cover the cake with thin layer of frosting. Smooth using a bench scraper, and chill in the fridge of freezer for 10 minutes, until the frosting is firm to the touch
- Add a second, thicker layer of frosting to the cake, and smooth using a bench scraper and an acetate sheet.
- Place the frozen cake ball on top of the wooden dowel.
- Color the remaining frosting a variety of colors using gel food coloring, and fill piping bags fitted with assorted piping tips.
- Place some of the colored buttercream in a bag fitted with a grass tip, and pipe buttercream onto the cake ball on top of the cake.
- Pipe colorful swirls and dots around the cake, and enjoy!
Notes
These cake layers can be made in advance!! Learn more about how far in advance they can be made, and how to properly wrap them in my post on how to make cake layers ahead of time.
This buttercream can also be made in advance!! I highly recommend making it ahead of time to make the decoration of a cake less stressful and more fun. It keeps in the fridge for several weeks, if stored in an airtight container.
When you're ready to use the chilled buttercream, remove it from the fridge a few hours in advance (or overnight) and allow it to come to room temperature. Give it a good stir with a rubber spatula or your kitchen aid, to get rid of any air bubbles that may have formed. Once the buttercream is smooth again, it's ready to use!
Nutrition Information
Yield
24Serving Size
1Amount Per Serving Calories 648Total Fat 33gSaturated Fat 20gTrans Fat 0gUnsaturated Fat 11gCholesterol 116mgSodium 315mgCarbohydrates 86gFiber 1gSugar 71gProtein 4g
Pam
Tuesday 19th of March 2019
In order to carve this cake into the party hat shape I'm guessing you have to carve a lot of cake from the largest bottom layer and less as you reach to the top. Could you use a smaller size cake pan for the bottom so there isn't a lot of waste or would that create a balance problem to support the hat cake? It's a very fun cake design!!
Thanks for any help.
Pam
Debbie
Monday 18th of March 2019
Chelsea...... this cake is ADORABLE!! I love it!! I can't wait to make one!! I love all of your creations!! I am going to try a smaller version. I'll send you a picture.
Chelsweets
Saturday 23rd of March 2019
aw thanks Debbie! You're too sweet :) and please do!!! I'd love to see it!