
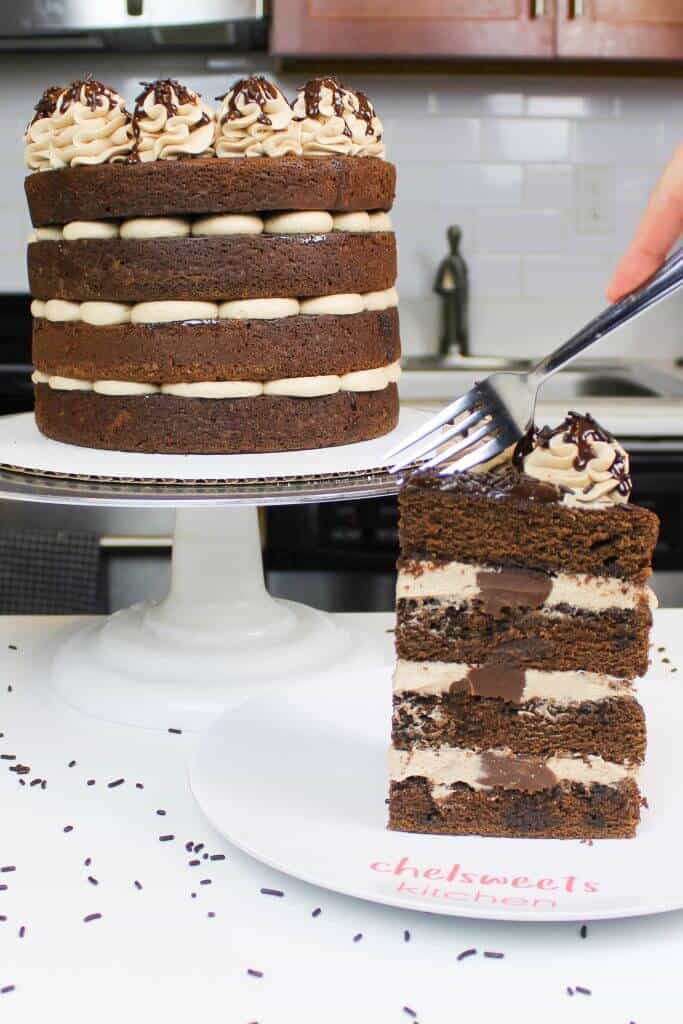
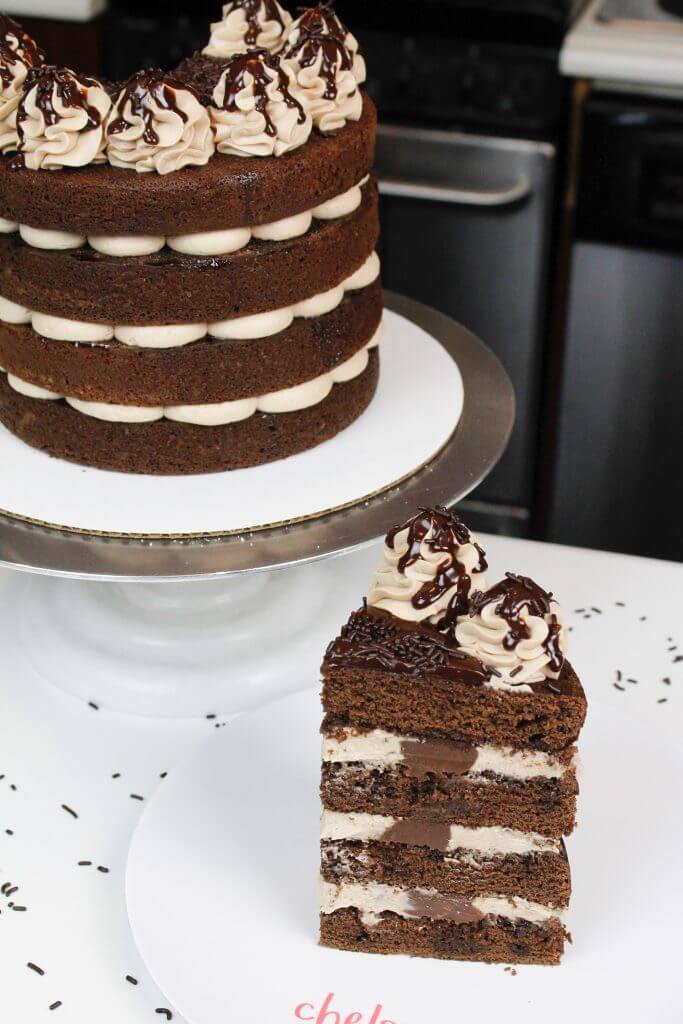
If you’ve ever struggled with frosting a cake, this naked chocolate cake is perfect for you.
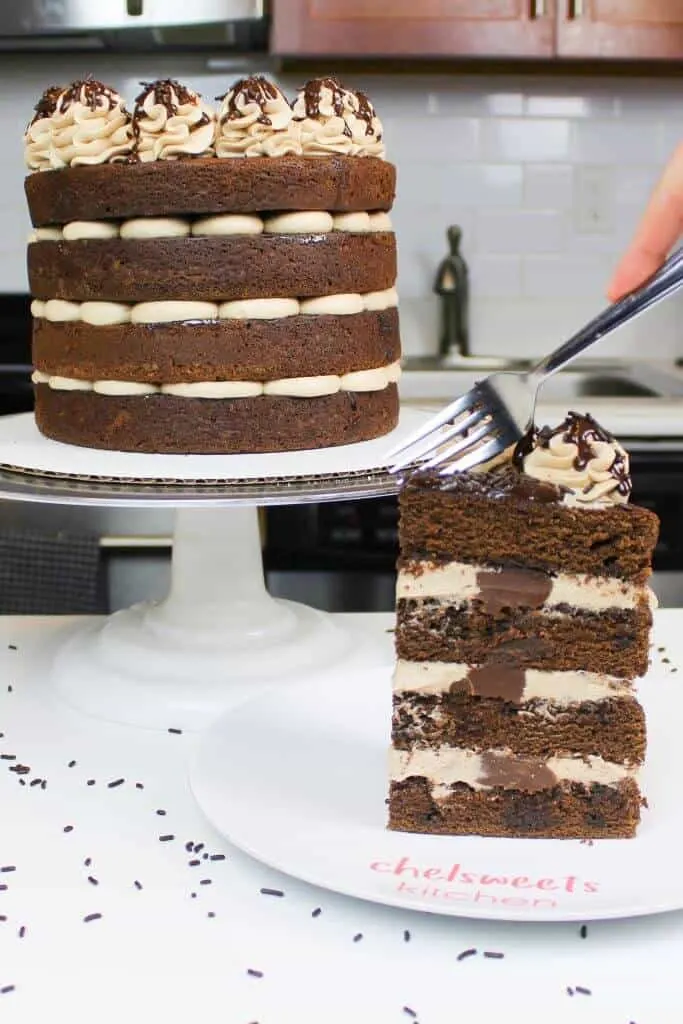
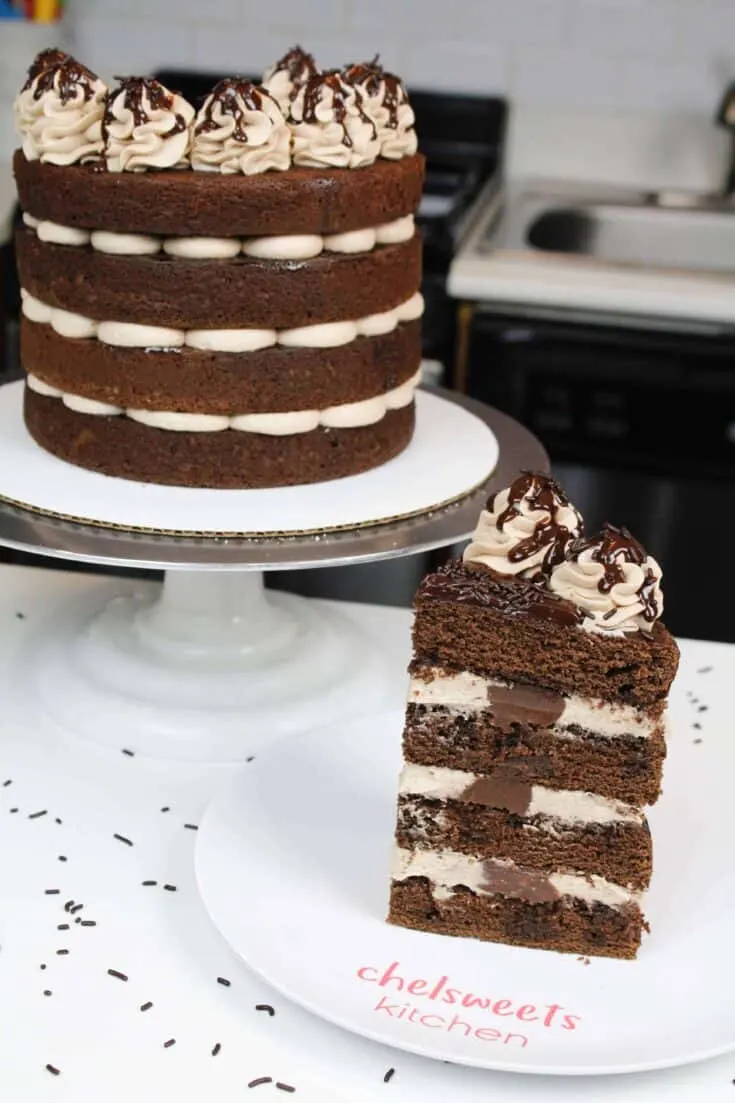
It’s made with moist chocolate cake layers, whipped chocolate buttercream, and chocolate ganache. And best of all? This beautiful look is one of the easiest ways to decorate a cake.
What Is A Naked Cake?
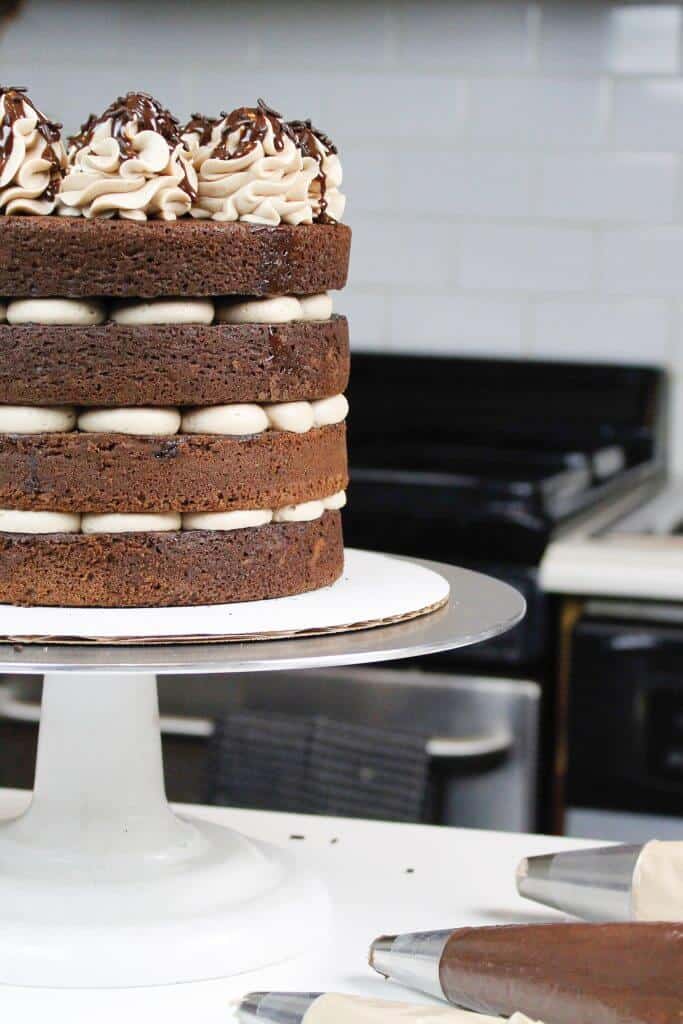
A naked cake is simply a cake that doesn’t have frosting on its sides!
Normally, some sort of filling (whether it’s ganache, whipped buttercream, you name it!) is piped between the cake layers as they’re stacked.
This means you don’t have to worry about pesky crumbs polluting your frosting as you try to smooth it, or cake layers tearing as you gingerly try to spread frosting over them.

How Did Naked Cakes Become A Cake Trend?
In 2014, Christina Tosi (founder of Milk Bar and bestselling cookbook author) began to sell her now famous cakes, which are made without any frosting on the sides!!
She uses acetate sheets to carefully stack and fill her cakes with mind blowing flavor combinations and creative fillings, creating a stunning look that allows the filling of the cake to show in the finished look.
Her innovative style definitely inspired the naked cake trend, and really revolutionized the cake world.
Naked cakes seem to have evolved away from using acetate sheets to a simpler design similar to this cake. They have become a popular wedding cake trend, with their elegant and stunning look.

Why Are Naked Cakes So Great?
Naked cakes are an amazing cake design for SO many reasons!! To list a few…
The first reason is that naked cakes are so incredibly easy to make! If you are a bit of a cake novice, or have never decorated a cake before, this design is a wonderful one to start with.
All you need are some chocolate cake layers, and a piping bag of your favorite filling.
Naked cakes are also a great way to lighten up a cake! Since they don’t have frosting on the sides, they can be a less sweet, and a slightly less indulgent alternative to cakes covered in a thick layer of frosting.
There’s something about a naked cake that is just beautiful! By leaving the sides exposed, you can see the delicious cake layers, and each delicately piped dollop of filling.
It’s a unique look that is beautiful in in it’s simplicity, and is a fun way to mix up the look a cake.
Won’t The Cake Dry Out If They Layers Are Left Unfrosted??
The short answer, yes. But there’s an easy way to fix this! When making this naked chocolate cake, you need to add simple syrup to the cake layers.
Simple syrup is a mixture made with equal parts water and sugar, and is heated to dissolve the sugar into the water. It is almost always added to sponge cakes, but normal isn’t added to butter cakes.
Most of my cake recipes are butter cakes, so I don’t usually add simple syrup to my cakes. I have nothing against it, it just isn’t necessary because my vanilla layer cake recipe is already moist.
On the other hand, sponge cakes are much more porous, and need the additional moisture.
When a regular cake is frosted, the cake layers are protected by a layer of frosting. This helps keep moisture in the cake, and allows the layers to maintain their tender texture.
If you think about the cake layers in this naked chocolate cake, they are exposed to the air as soon as you start to build the cake.
The longer they’re exposed, the drier they get. The air sucks the moisture right out, which can ruin the taste and texture of a cake.
This is why adding simple syrup to a naked cake is an absolute must!!! The extra moisture will keep your cake layers fresh and moist, despite being exposed.

What’s The Difference Between A Semi Naked Cake & A Naked Cake?
People seem to use these terms interchangeably, but a naked cake is a much different design than a semi-naked cake!
A naked cake has absolutely NO frosting on the sides, just like this cake.
Semi-naked cakes have a very thin layer of frosting, and look similar to a cake that is crumb coated!
They both are stunning in their own ways, but they are definitely two different cake designs.

How Far in Advance Can You Make This Naked Chocolate Cake?
While I don’t recommend assembling this cake very far in advance, the components of the cake can be made ahead of time.
I highly recommend making the ganache a day in advance, since it needs 4-6 hours to come to room temperature and firm up (or it can sit on the counter overnight).
The chocolate simply syrup and chocolate cake layers can also be made ahead of time.
I recommend assembling this naked chocolate cake the same day you plan to eat it if possible. The assembly process is pretty simple and only takes about 10 minutes.
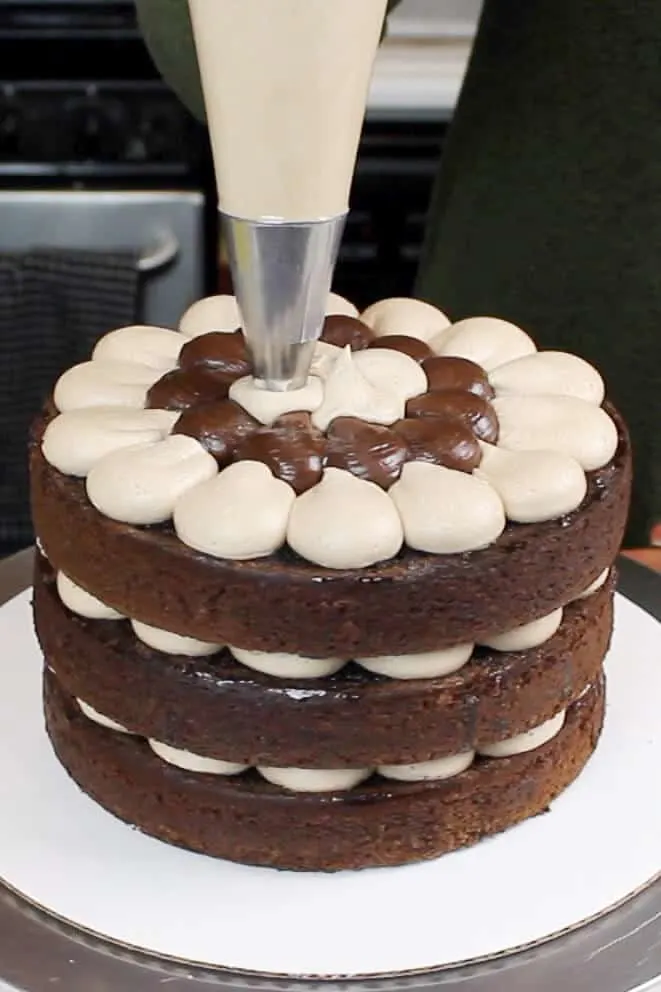
Start by adding a generous amount of simple syrup to each cake layers using a thick, sterile brush.
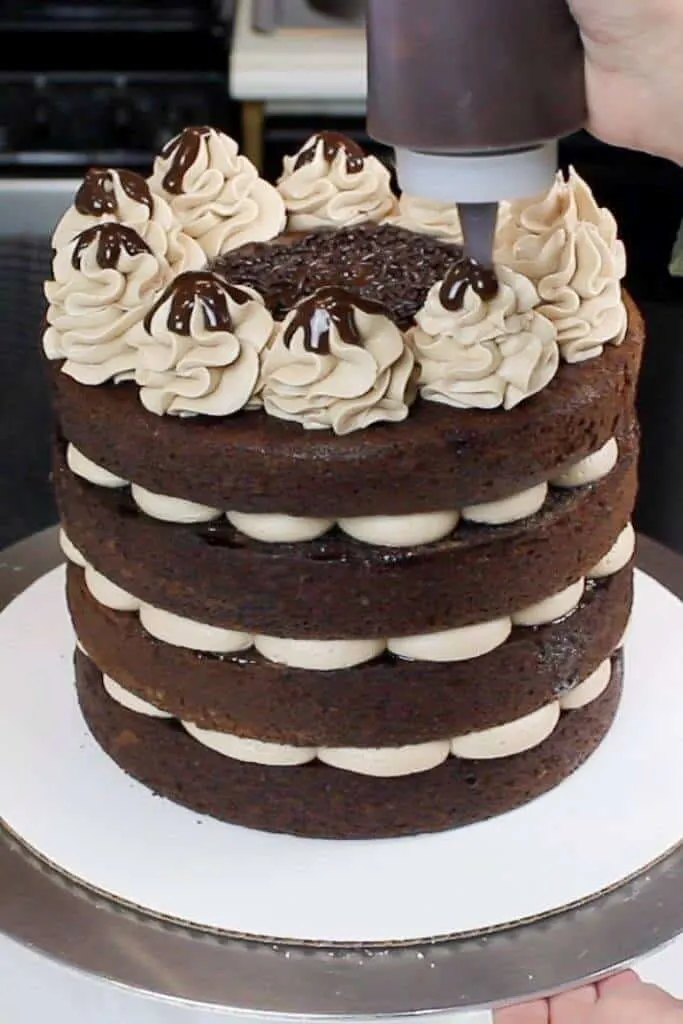
Pipe dollops of whipped chocolate buttercream and chocolate ganache onto the cake layer. Top with a second cake layer, and repeat.
Place the top cake layer upside down. Use the remaining buttercream or ganache to pipe swirls on top of the cake using a wilton 1M tip. Garnish with chocolate sprinkles.
Tips for Making the Best Naked Chocolate Cake
- Properly measure your flour. Either spoon it into the cup measure, then level with a knife or use a kitchen scale.
- Don’t overmix your batter! Mix on the speed the recipe recommends until the ingredients are just combined.
- Make sure your ingredients are at room temperature to help them mix together better.
- Don’t level your cake layers until they are completely cooled.
- Assemble this cake the day you plan to eat it if possible.
- Make sure your buttercream is the right consistency before frosting your cake! It will help give your cake proper structure and make it easier to decorate.
- If your cake layers turn out less than perfect, I recommend reading my cake troubleshooting guide to see where things might’ve gone awry.
Let Me Know What You Think!
If you try this naked chocolate cake recipe, please tag me @chelsweets and use the #chelsweets, so I can see your beautiful creations!!
Naked Chocolate Cake

This naked chocolate cake is insanely easy to make, and equally delicious! It's filled with whipped chocolate buttercream and chocolate ganache
Ingredients
Chocolate Cake Layers
- 3 cups all-purpose flour (390 grams)
- 2 1/2 cups granulated sugar (500 grams)
- 1 tsp salt (5 grams)
- 1 1/2 tsp baking powder (6 grams)
- 1 tsp baking soda (6 grams)
- 4 large eggs, room temp (228 grams)
- 1 cup unsalted butter, room temp (2 sticks; 226 grams)
- 1 cup hot water (237 grams)
- 1 cup buttermilk, room temp (240 grams)
- 1 cup unsweetened baking cocoa (100 grams)
Chocolate Simple Syrup
- 1 cup granulated sugar (200 grams)
- 1 cup water (237 grams)
- 2 Tbsp unsweetened baking cocoa (15 grams)
Whipped Chocolate Buttercream
- 1 cup unsalted butter, room temperature (2 sticks; 226 grams)
- 1/2 cup milk chocolate chips (88 grams)
- 3 1/2 cups powdered sugar (454 grams) - or a 1 lb bag
- 1/2 tsp salt (3 grams)
- 1/4 cup heavy cream or heavy whipping cream (60 grams)
- 1 Tbsp pasteurized egg whites, or 1 medium egg white (30 grams)
Milk Chocolate Ganache Filling
- 1 bag milk chocolate chips (340 grams)
- 1 cup heavy cream (125 grams)
Instructions
Chocolate Cake Layers
- Begin by preheating the oven to 350 degrees Fahrenheit. Line four 7 inch pans with parchment rounds, and spray with non-stick spray.
- Add the sugar and butter into the bowl of a stand mixer, and whisk on high for 1 minute. The mixture should become light in color.
- Add in the eggs, one at a time. Then add baking soda, baking powder, and salt. Mix on high for another minute.
- In a separate bowl, combine the cup of hot water, and cup of buttermilk. Pour in the cup of black cocoa, and whisk until no clumps remain.
- Next, add 1 cup of flour into the butter /egg mixture. Scrape the sides of the bowl with a spatula, to ensure the flour is fully incorporated.
- Pour in half of the buttermilk / cocoa mixture, and gently pulse the mixture to incorporate the liquid (if you don't, you'll end up splattering the cocoa mixture all over you kitchen!
- Mix in the 2nd cup of flour, at a medium speed. Pour in the remaining buttermilk / cocoa mixture, and again gently pulse, then mix on low until fully combined.
- Add in the last cup of flour, and mix on low until the flour is incorporated. Mix on high for 30 additional seconds, to incorporate a bit more air into the batter.
- Evenly divide between the four prepared pans. I like to use a kitchen scale to ensure each pan has exactly the same amount of batter.
- Bake according to the size of pan. Bake for 35-37 minutes, or until a skewer comes out clean.
- Allow layers to cool in the pans for about 10 minutes, then run an offset spatula around the edge of the pans to help separate the layers from the pans.
- Place the pans in the freezer for about 45 minutes, to accelerate the cooling process. Once the layers are fully cooled, carefully flip the pans and remove the layers.
- Use a serrate knife to level the tops of the layers, and then frost as desired.
Chocolate Simple Syrup
- Place the sugar and water in a pot, and bring to a simmer.
- Once the sugar has dissolved, mix in the cocoa, and turn off the heat. Set aside to cool.
Whipped Chocolate Buttercream:
- Begin by melting the cup of chocolate chips. Heat it in the microwave for 1 minute at half power in large heat proof bowl, or over a double boiler.
- Stir until smooth, then set aside briefly to allow it to cool just a bit (not more than 5 minutes).
- In the bowl of a stand mixer, beat the butter on a medium speed for 30 seconds with a whisk attachment, until smooth.
- Slowly add in the powdered sugar, 1 cup at a time. Alternate with small splashes of cream.
- Scrap the sides of the bowl with a spatula, to ensure all the powdered sugar is mixed in.
- Add in any remaining heavy cream, then whip on high for about 1 minute.
- Next, add in the melted chocolate. Beat on high again, until the chocolate is fully incorporated.
- Pour in the egg whites, and beat on high again for about 30 seconds.
- Add in the salt, and mix until fully incorporated. The frosting should be rather thick, like whipped topping!
Milk Chocolate Ganache Filling
- Place chocolate into a medium sized bowl.
- Pour heavy cream in a medium-sized pot, and heat at a medium high heat, until it just begins to boil.
- Pour over the chocolate, and allow the mixture to sit for 1-2 minutes.
- Slowly stir with a rubber spatula, until the mixture is smooth.
- Once the ingredients are fully incorporated, place plastic wrap over the top of the ganache, and set aside. Allow the ganache to cool for 4-6 hours, or overnight.
Notes
Both the chocolate simple syrup and the chocolate ganache filling need time to chill! I highly recommend making them the night before. The ganache can sit out at room temperature overnight, and will be ready to use the following day.
I also suggest making your cake layers in advance. They'll still taste just as good (if not better), and will make your life infinitely easier. If you want to learn how to properly wrap cakes before freezing them, and how long you can freeze cake layers, here is an in-depth post I shared on making cake layers ahead of time.
If your whipped buttercream isn't as thick as you'd like, place the bowl in the freezer for about 5 minutes, then beat on high again for about 1 minute.
Nutrition Information
Yield
20Serving Size
1Amount Per Serving Calories 617Total Fat 30gSaturated Fat 18gTrans Fat 0gUnsaturated Fat 10gCholesterol 108mgSodium 334mgCarbohydrates 83gFiber 2gSugar 65gProtein 6g
DeeDee P Smith
Saturday 24th of September 2022
Is this recipe dense enough for a wedding cake? I am having trouble finding chocolate wedding cake recipes and don't want a "light" cake that I can't stack layers.
DeeDee P Smith
Saturday 15th of October 2022
@Chelsweets, I actually used the Naked Choc. cake recipe (used cake flour and added 2 TBSP for each cup)- it was perfect for stacking and I just made my own buttercream icing and made a semi-naked wedding cake using 2 recipes. Everyone loved it and I thank you for sharing the recipe!!!
Chelsweets
Thursday 6th of October 2022
Hi DeeDee,
This recipe is kind of a hybrid recipe, so no quite sponge, not butter cake. If you're looking for a dense chocolate cake recipe, I'd recommend this one: https://chelsweets.com/the-best-chocolate-layer-cake-recipe/
It's the chocolate version of my vanilla layer cake recipe and it's delicious and sturdy :)
S
Monday 25th of April 2022
If I cut this recipe in half would it still work out for a 6 inch 2 layer cake? I am really wanting to try out this recipe but just looking to make something a lot smaller. Thank you!
Michelle
Sunday 2nd of January 2022
I ended up with massive bubble tunnels in my cakes... I used 3 8 inch pans and unfortunately this recipe didn't work for me at all...
cecile
Wednesday 14th of July 2021
Hi Chelsey This cake looks gorgeous! I am just starting to learn how to bake but I would love to try this recipe for my partner son's birthday because he said he likes this kind of cake :) I just would like to ask, if I would want to make just two layers does it mean the ingredients will all just be half? Thank You!
Denisse
Sunday 2nd of May 2021
Hi!! What can I do If I only have one 8.5 inch x 4 inch cake pan?? Should I put all the batter??? For how long should I cook it??
Or can I divide the batter in two but then I will have to bake a me half first and wait for it to cook to be able to use the pan again to bake the other half?? Can the batter sit on the counter for so long waiting to be bake??
Help!!
Thanks!!!! Denisse