
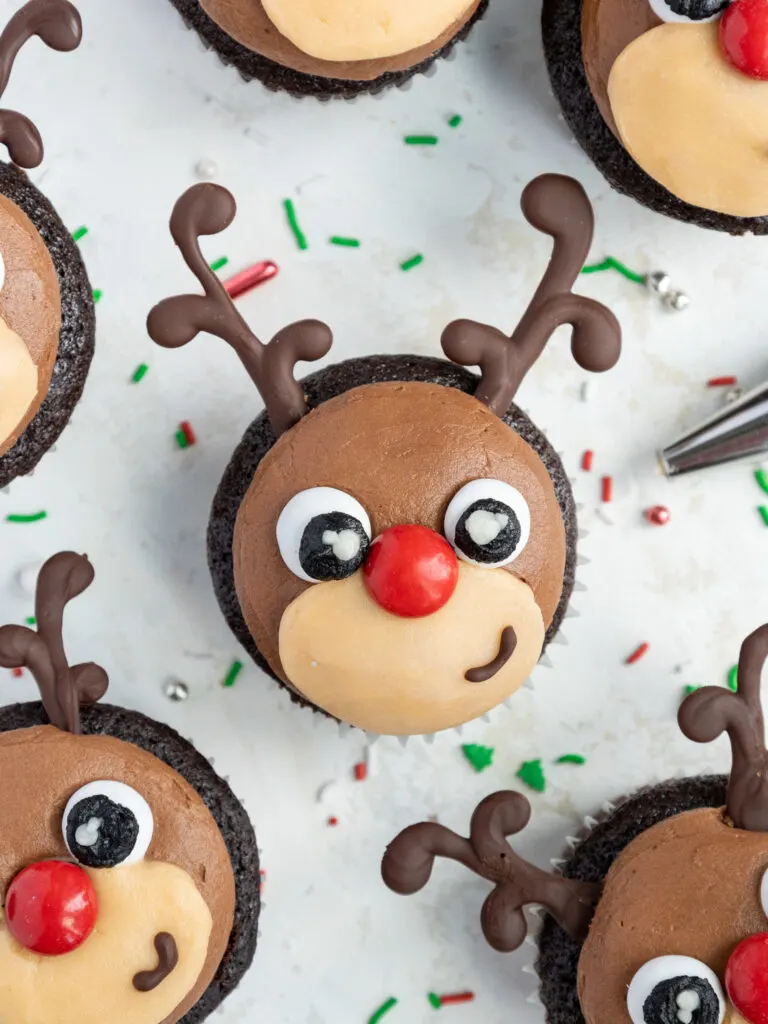
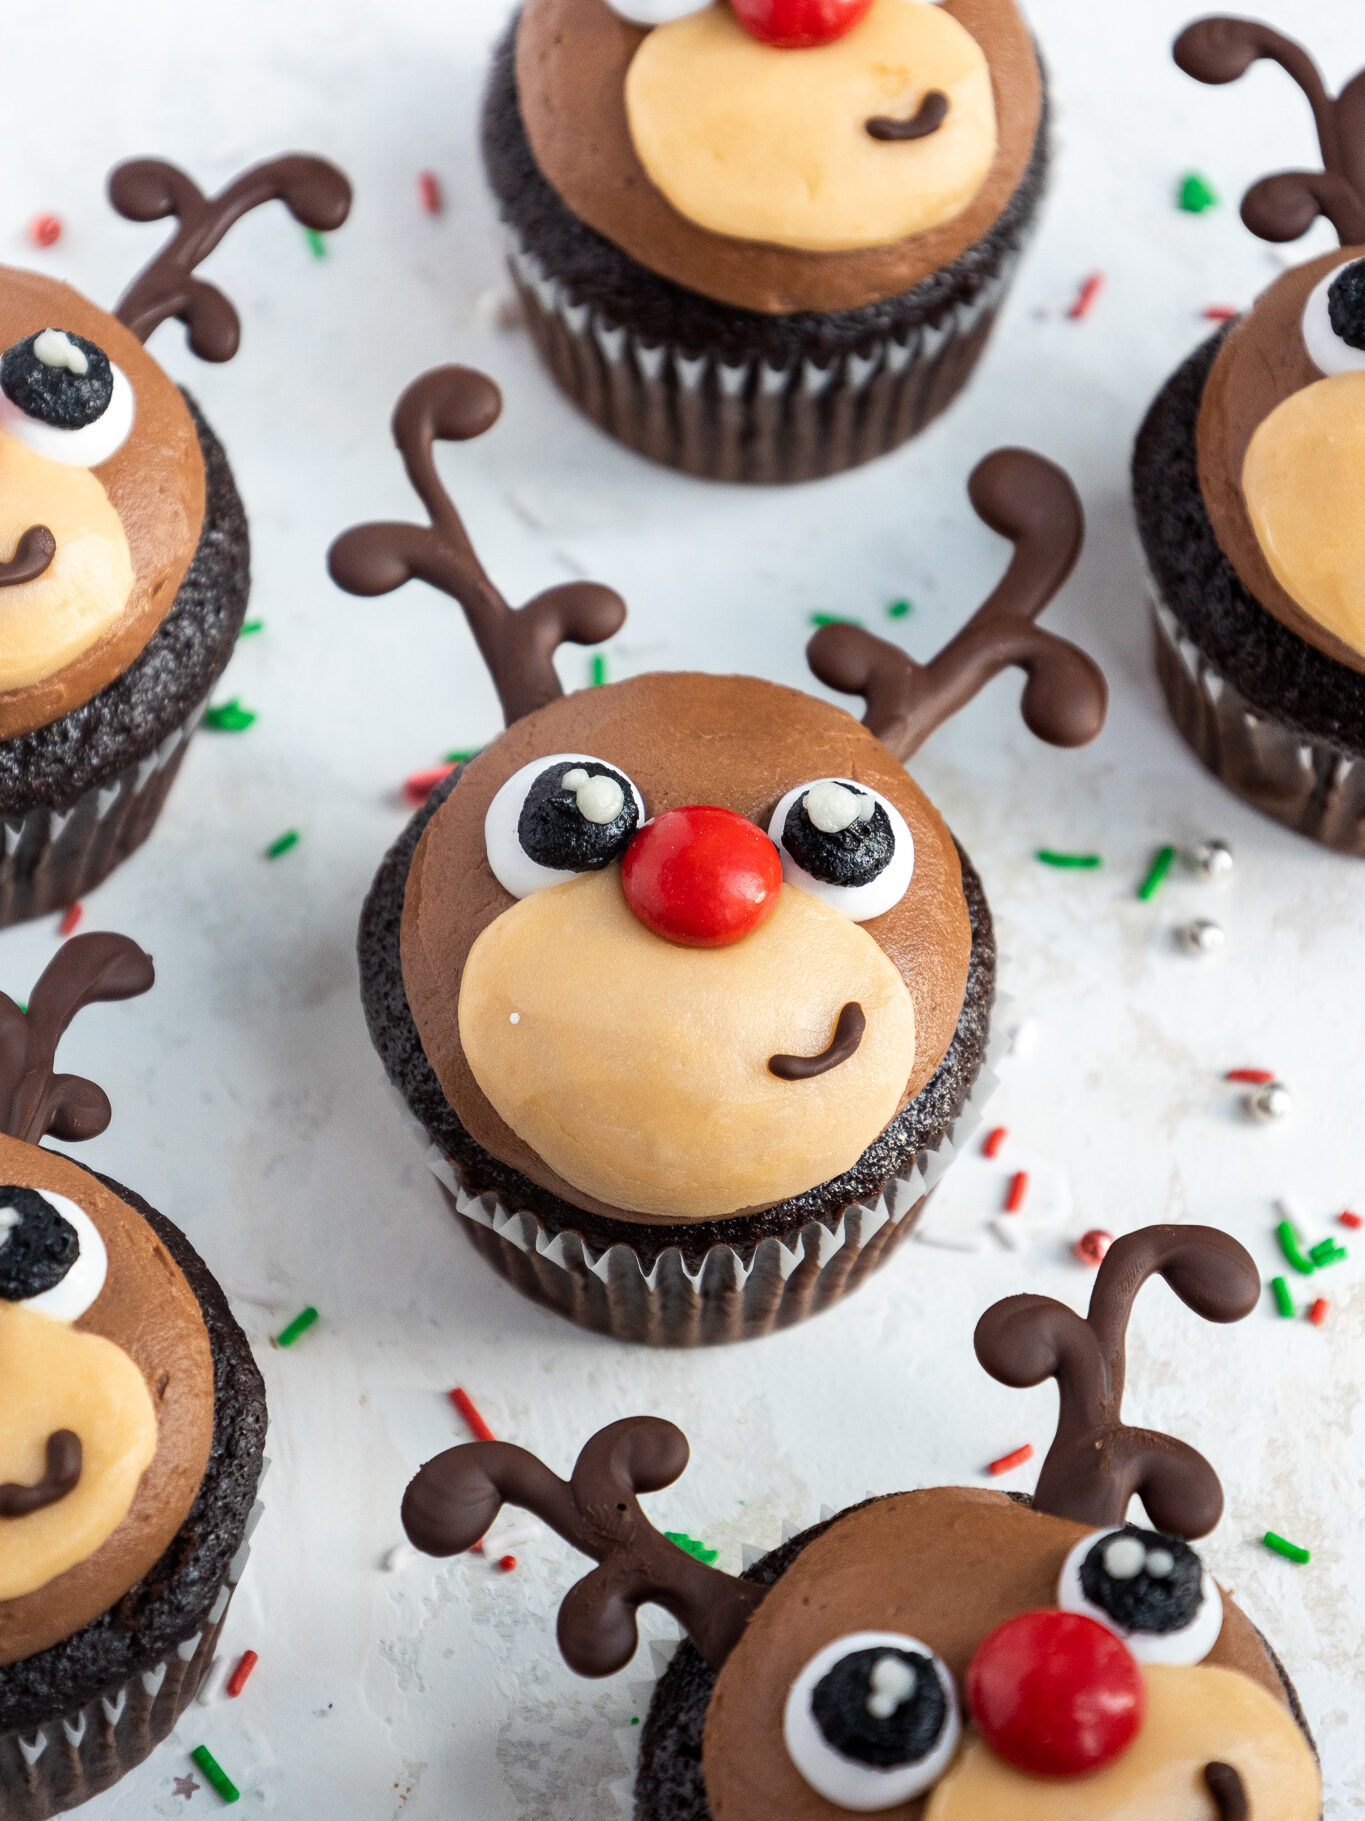
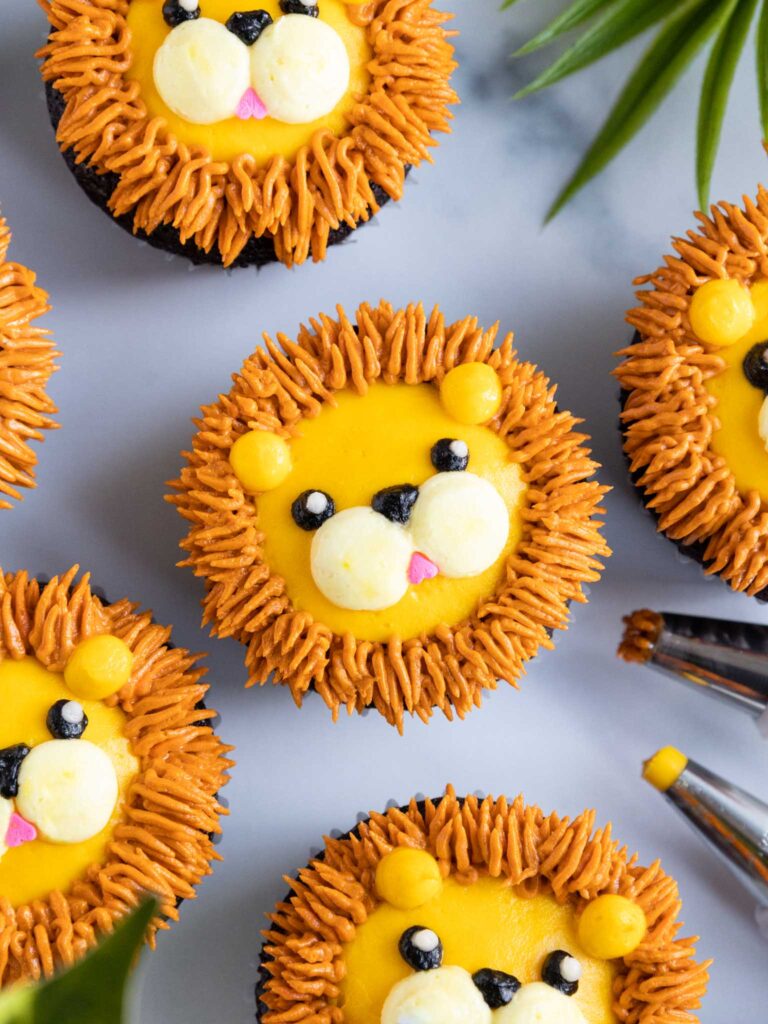
These reindeer cupcakes are decorated with homemade buttercream to look just like Rudolph!
They’re made with my chocolate cupcake recipe, which is one of my favorites! They bake up so soft and tender.

How to Make These Adorable Reindeer Cupcakes
Let’s walk through each step that goes into decorating these reindeer cupcakes! I’ve also included a video of how they’re made below.
I figured it might be helpful to know what tools I use too, so below is a list of everything I used.
Not all of these are mandatory, but they make the process a lot easier. If you don’t have all these things on hand, feel free to improvise and work with what you have.
- Electric hand mixer
- 1 Large Piping Bag
- 3 Small Piping Bags
- 1 Large Round Tip (like an Ateco 805)
- 2 Medium Round Tips (like a Wilton 10)
- Small Offset Spatula or Small Acetate Sheet
- Mint M&Ms or Round, Red and White Candies or Sprinkles
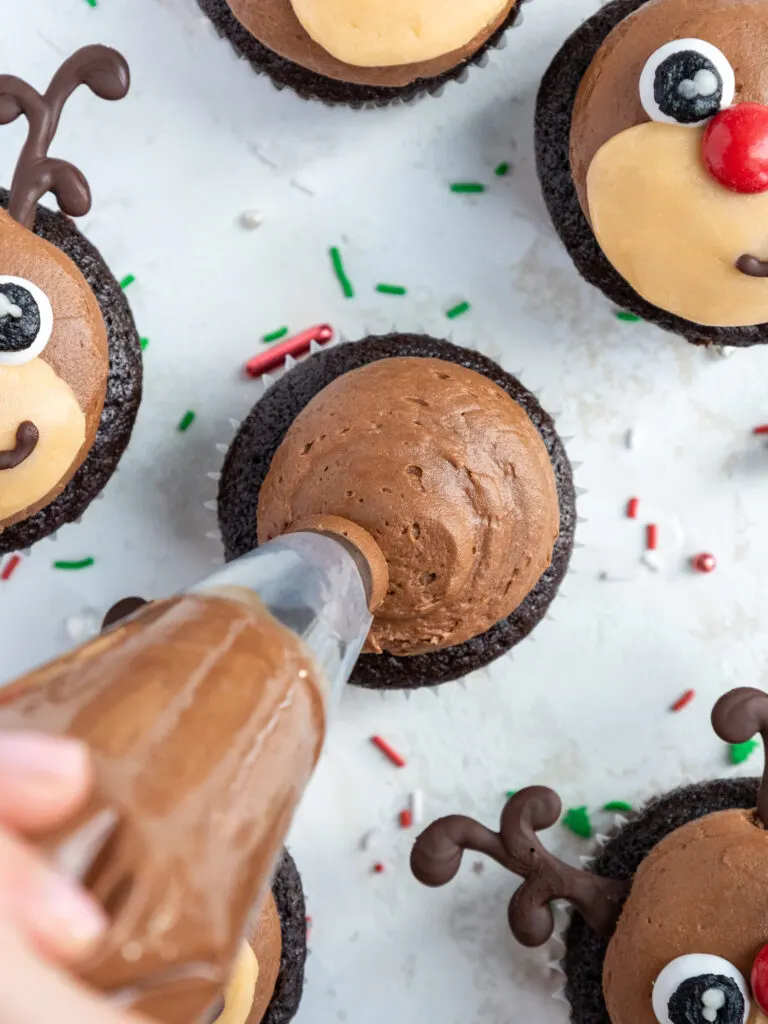
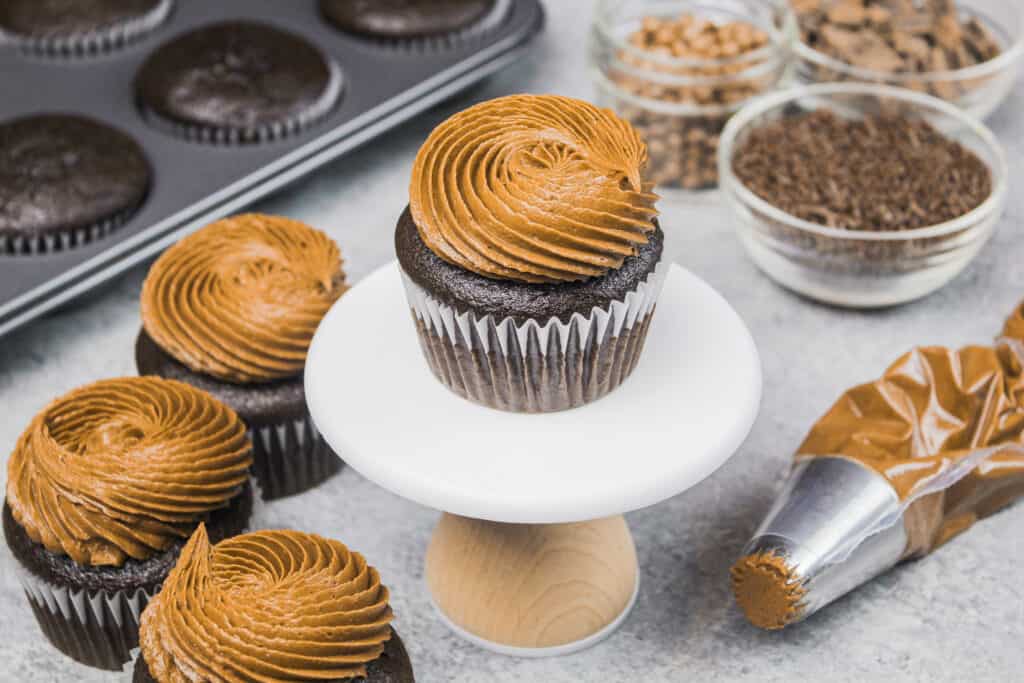
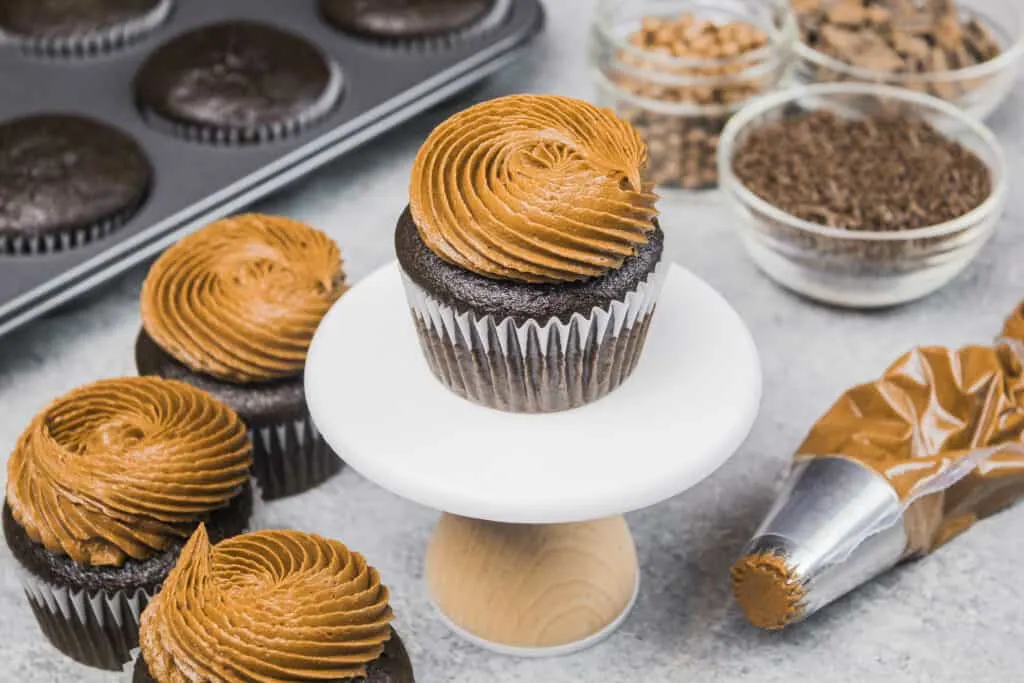
Step 1: Pipe on the Face
Once the cupcakes are baked and cooled, use a round piping tip to pipe a mound of chocolate peanut butter buttercream on top of each cupcake.
Gently tap the cupcake on the counter to help flatten and spread the frosting.
Smooth any lines with a small offset spatula or acetate sheet.

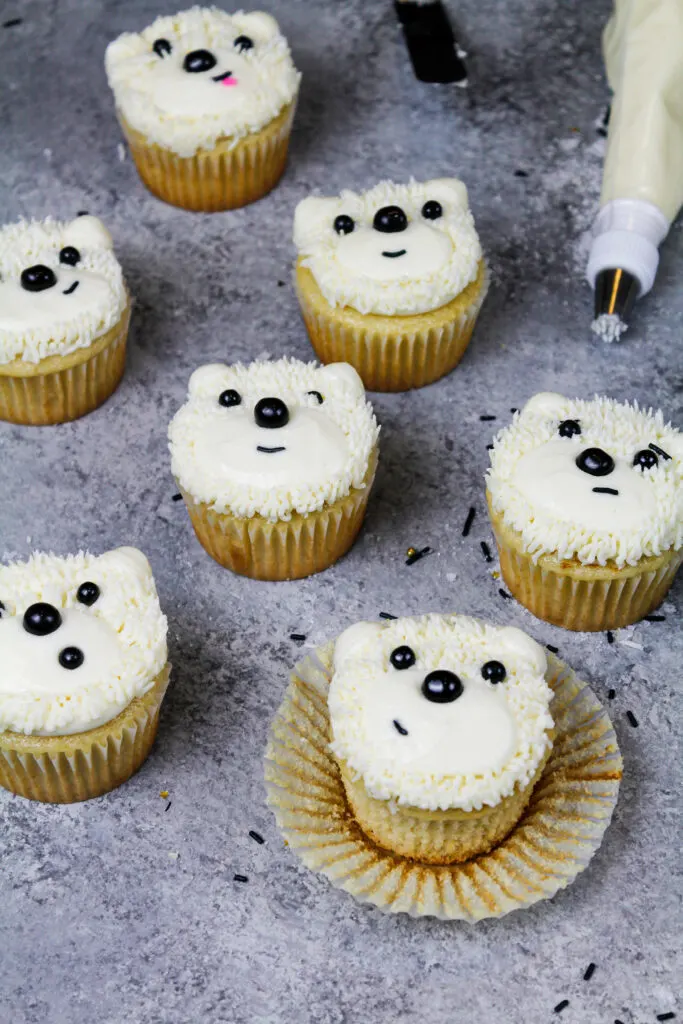
Step 2: Add on the Reindeer’s Facial Features
Then use the peanut butter frosting to pipe on the reindeer’s muzzle like in the picture below.
Next, press one red and two white M&M’s into the frosting to look like the reindeer’s nose and eyes.

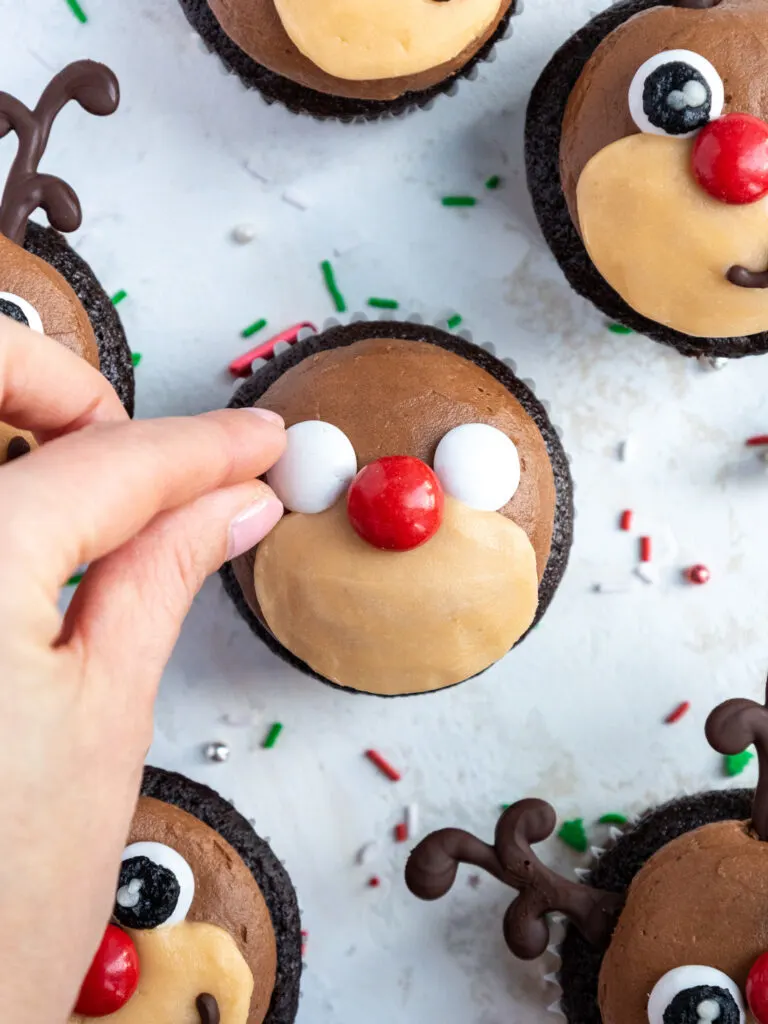
Use the black buttercream to pipe on the reindeer’s pupils.
If you don’t feel comfortable piping on the eyes, you can also use black fondant or just use black sprinkles.
Step 3: Make the Reindeer’s Antlers and Mouth with Melted Chocolate
Add 1/2 cup of dark chocolate chips into a small piping bag and seal the top with a rubber band. Place the bag in the microwave and heat for 30-60 seconds, or until fully melted.
Place a sheet of parchment paper on a flat plate or cutting board.
Snip a small opening at the tip of the bag, then pipe 12 pairs of antlers that are about 1 1/2 inches long and 12 little smiles onto the parchment paper.
Feel free to get creative with each reindeer’s facial expression to give them a little variety.
Place the antlers in the fridge for about 10 minutes to help them firm up.
Once they’re firm to the touch, pipe an additional layer of chocolate on top of them to make them sturdier. Place the antlers in the fridge one more time to let them firm up.
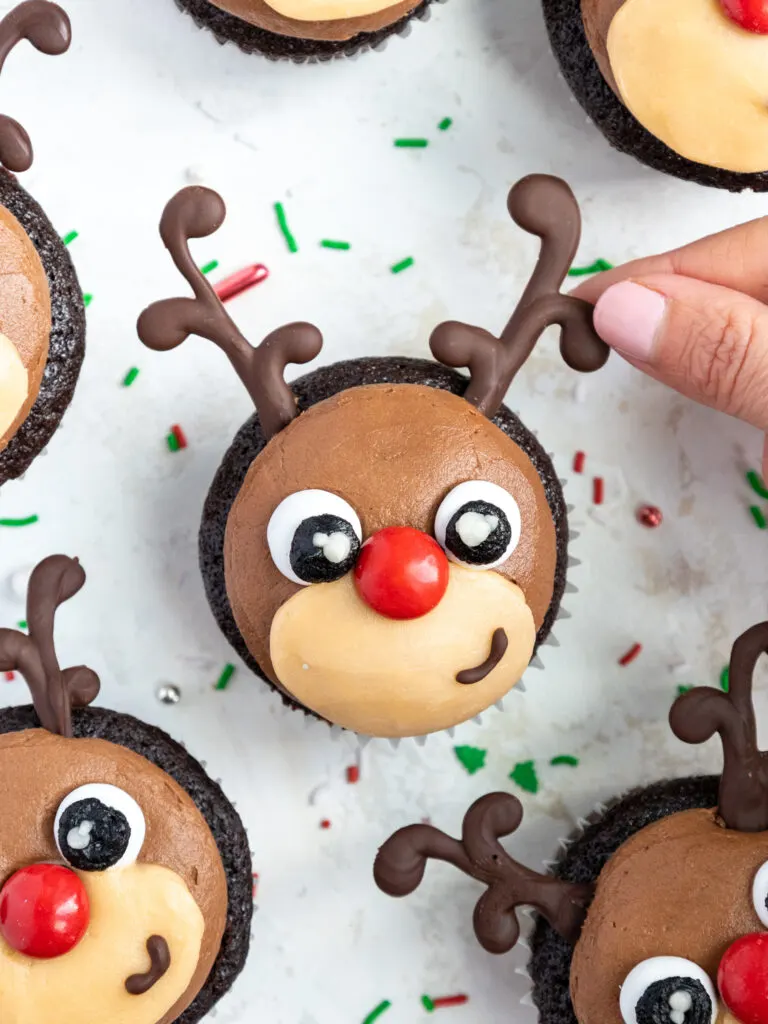
Step 4: Give Each Reindeer a Pair of Antlers
When the antlers have hardened, gently press a pair into each cupcake and add a little chocolate smile.

Substitutions and Swaps in This Reindeer Cupcake Recipe
While I love this recipe just the way it is, I know some of you might not have all these ingredients on hand!
Below are some swaps and substitutions that can be made in this recipe.
- Buttermilk – You can also use full fat yogurt, sour cream, whole milk, or an alternative yogurt or milk (almond, soy, oat) if you’re dairy free
- Instant Espresso or Coffee – You can omit the instant espresso if you dislike the taste of coffee, but it really just enhances the chocolate flavor in this these cupcakes.
- All Purpose Flour – This recipe turns out best with AP flour, but you can use a gluten free flour blend or cake flour if that’s all you have on hand.
- Vegetable Oil – You can use any flavorless oil in this recipe. Canola or sunflower oil would work great!
- Vinegar – This recipe needs a bit of vinegar because it uses baking soda as a leavening agent. The vinegar activates the baking soda and helps the cupcakes rise. You can use white or apple cider vinegar.

Substitutions and Swaps – Buttercream Frosting
- Unsalted Butter – If you only have salted butter on hand, you can use it in place of the unsalted butter. Just be sure to omit the salt that this frosting recipe calls for. You can also use vegan butter in its place!
- Creamy Peanut Butter – Smooth and creamy peanut butters like JIF or Skippy work best in this frosting! Natural frostings have a tendency to separate, and this can cause the frosting to break. If you have a nut allergy, just use additional butter in place of the peanut butter in this recipe.
- Heavy Cream – Whole milk or alternative milk (soy, almond, oat) will work fine in this frosting recipe if that’s what you have on hand.
- Dark Chocolate – You can use pretty much any type of chocolate in this frosting! Dark, semi-sweet, or milk would all taste great. You can also use chocolate chips, baking bars, or chocolate disks.

Making These Reindeer Cupcakes in Advance & Storage Tips
These cupcakes can be made in advance! If stored unfrosted in an airtight container, they can last for 2 days at room temp, up to a week in the fridge, or up to 3 months in the freezer.
You can also make your frosting ahead of time too or save any leftover frosting! Store it in either a piping bag or an airtight container in the fridge for up to a month or the freezer for 3 months.
If you store it in a large container, be sure to give it a good stir once it thaws to get the consistency nice and smooth again.
Frosted cupcakes can sit at room temperature overnight or in the fridge for up to 3 days in an airtight container. However, I find frosting them right before serving is best.
I recommend waiting to add on the chocolate antlers until right before you plan to serve the cupcakes.
Tips for Making the Best Reindeer Cupcakes:
- Ingredients at room temperature mix together better. Set cold ingredients ahead of time.
- Properly measure your flour (spoon into the cup measure, then level) or use a kitchen scale to measure your dry ingredients.
- Mix the cupcake batter just until the ingredients are incorporated. This will ensure your cupcakes are tender and fluffy.
- Use a cookie scoop to easily fill your cupcake liners. It also makes sure your cupcakes end up being the same height.
- Seal off the top of each of your piping bags with a rubber band to prevent any frosting from seeping out the top of the bag and make the piping bags easier to use.
- This recipe makes an American buttercream frosting, so it will crust as it sits out and is exposed to air! Be sure to either cover the frosting with plastic wrap if it’s made in advance, or immediately place it into your piping bags.

Let Me Know What You Think!
If you make these reindeer cupcakes, I’d love to hear what you think! Please leave a rating and comment below.
And don’t forget to tag me @chelsweets and use the #chelsweets so that I can see your amazing creations on social media!
Other Posts You Might Like:


Reindeer Cupcakes


These reindeer cupcakes are decorated with homemade buttercream to look just like Rudolph! They're just as cute as they are tasty.
Ingredients
Chocolate Cupcakes
- 3/4 cup buttermilk, room temperature (180g)
- 1 1/2 tsp instant espresso or coffee (3g)
- 1/3 cup chocolate chips, melted (60g)
- 1/3 cup cocoa powder (32g)
- 2 eggs, room temperature (114g)
- 1/3 cup vegetable oil (73g)
- 1 tsp white vinegar (4g)
- 1 tsp vanilla extract (4g)
- 3/4 cup all-purpose flour (98g)
- 3/4 cup granulated sugar (150g)
- 1/2 tsp baking soda (3g)
- 1/2 tsp salt (2g)
Chocolate Peanut Butter Frosting
- 1 cup (or 2 sticks) unsalted butter, room temperature (226g)
- 1/4 cup creamy peanut butter (60g)
- 1 tsp vanilla extract (4g)
- 1/4 tsp salt (2g)
- 3 cups powdered sugar (375g)
- 1/4 cup heavy cream (60g)
- 3/4 cup melted dark chocolate, melted and cooled (135g)
Reindeer Antlers
- 1/2 cup dark chocolate (80g)
Additional Tools / Equipment
Instructions
Chocolate Cupcake Recipe
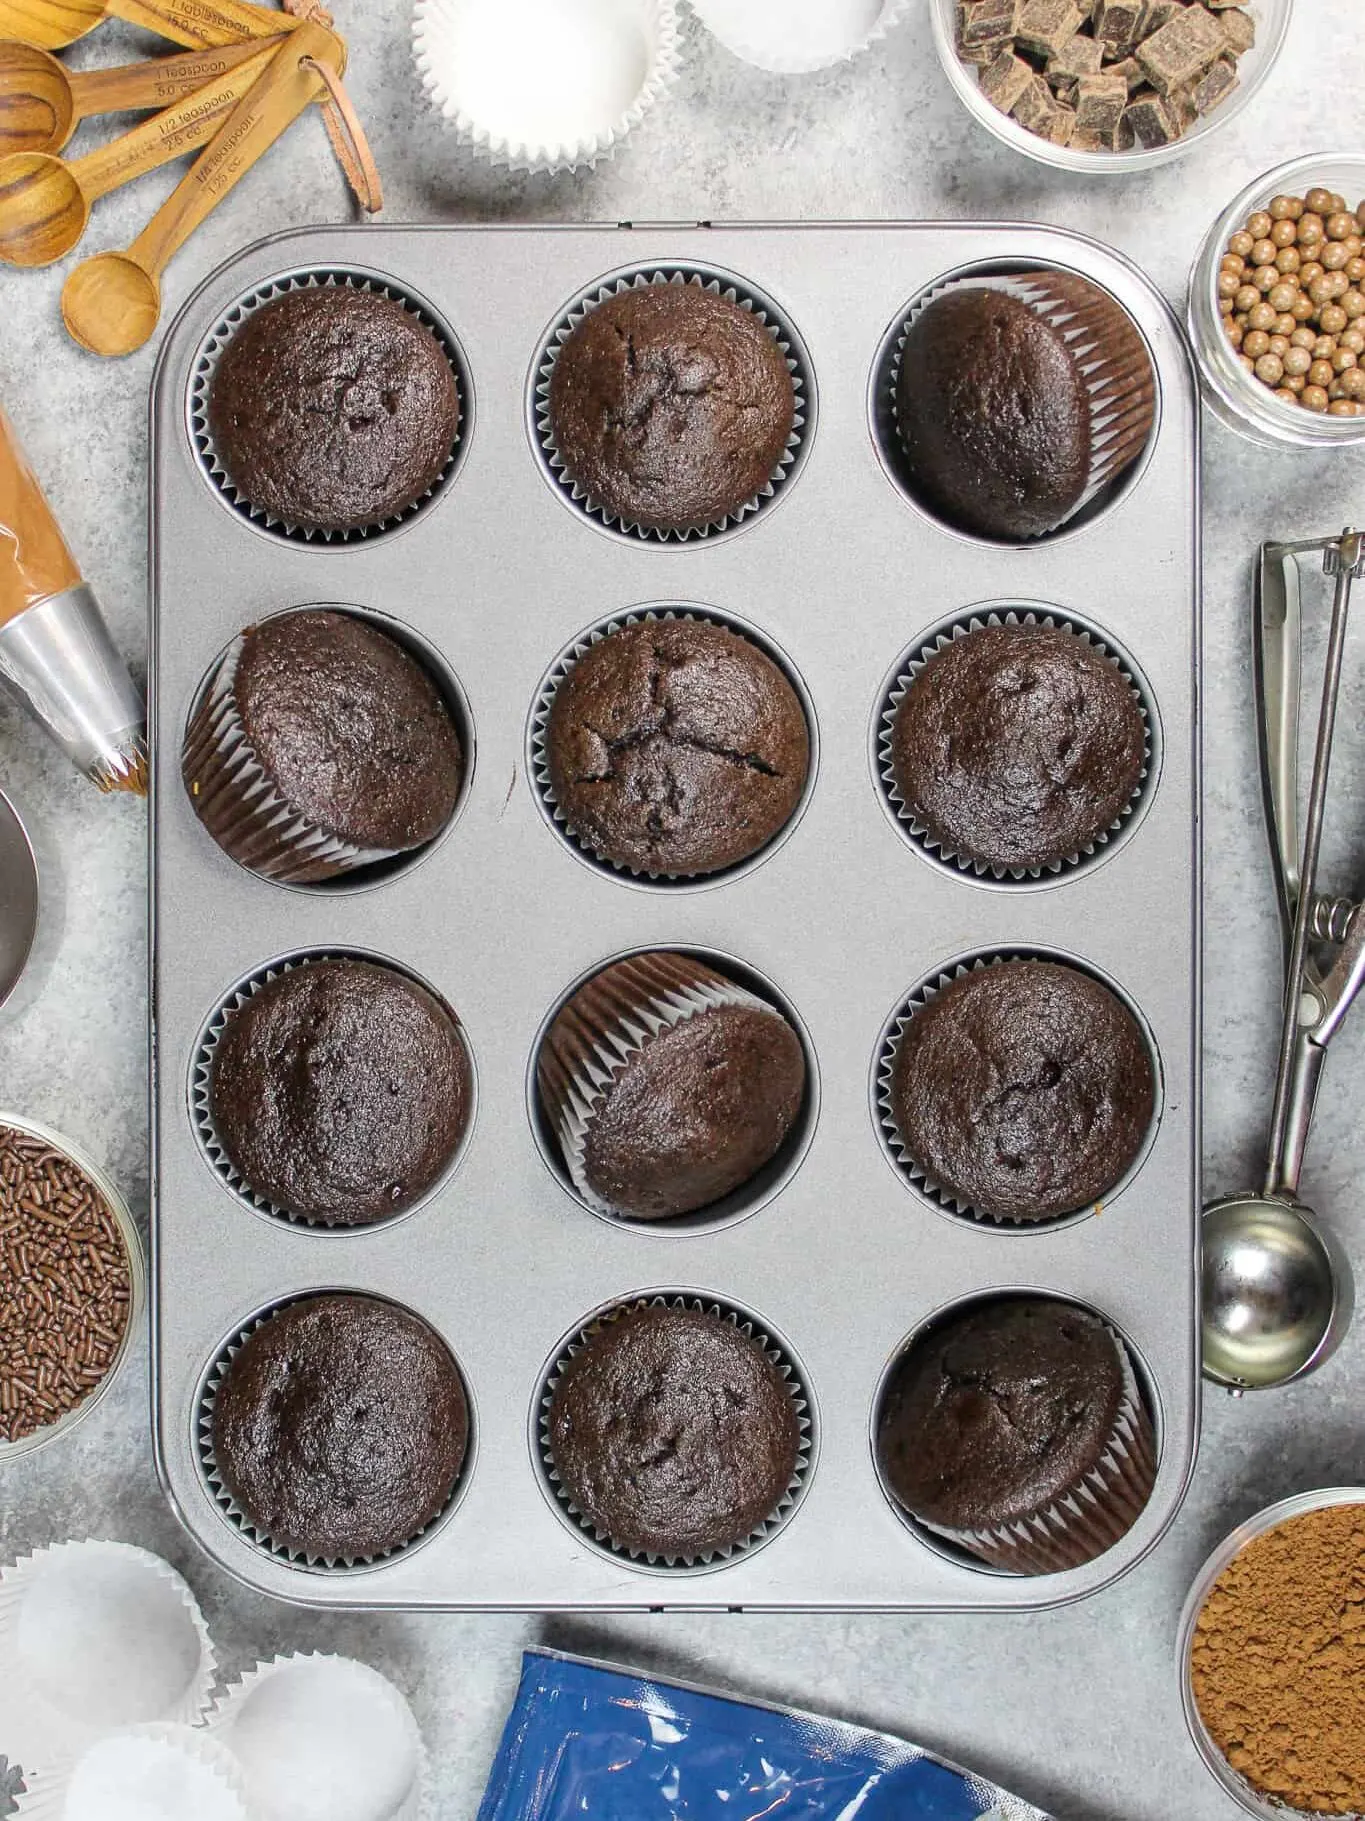
- Begin by preheating the oven to 350°F / 175°F. Place 12 liners in cupcake pan.
- Add 3/4 cup of buttermilk and 1 1/2 tsp of coffee or espresso powder into a large bowl. Stir until dissolved.
- Add 1/3 cup melted chocolate chips and 1/3 cup cocoa powder into the buttermilk mixture and whisk until smooth.
- Whisk 2 large eggs, 1/3 cup vegetable oil, 1 tsp vinegar, and 1 tsp vanilla into the mixture and stir until combined.
- Add 3/4 cup flour, 3/4 cup sugar, 1/2 tsp baking soda, and 1/2 tsp salt into the wet ingredients and whisk until just combined. Scrape the sides and bottom of the bowl as needed with a spatula. The batter will be thin, but don't worry! That's how it's supposed to be.
- Divide the batter evenly between the liners, they should be about 3/4 full. Bake for about 18 minutes or until a toothpick comes out with a few moist crumbs.
- Let the cupcakes cool in pans for 10 minutes, then remove and place on a wire rack to finish cooling. If you're in a rush (or impatient like me), you can place them in the freezer for 15 minutes to accelerate the cooling process.
Chocolate Peanut Butter Frosting
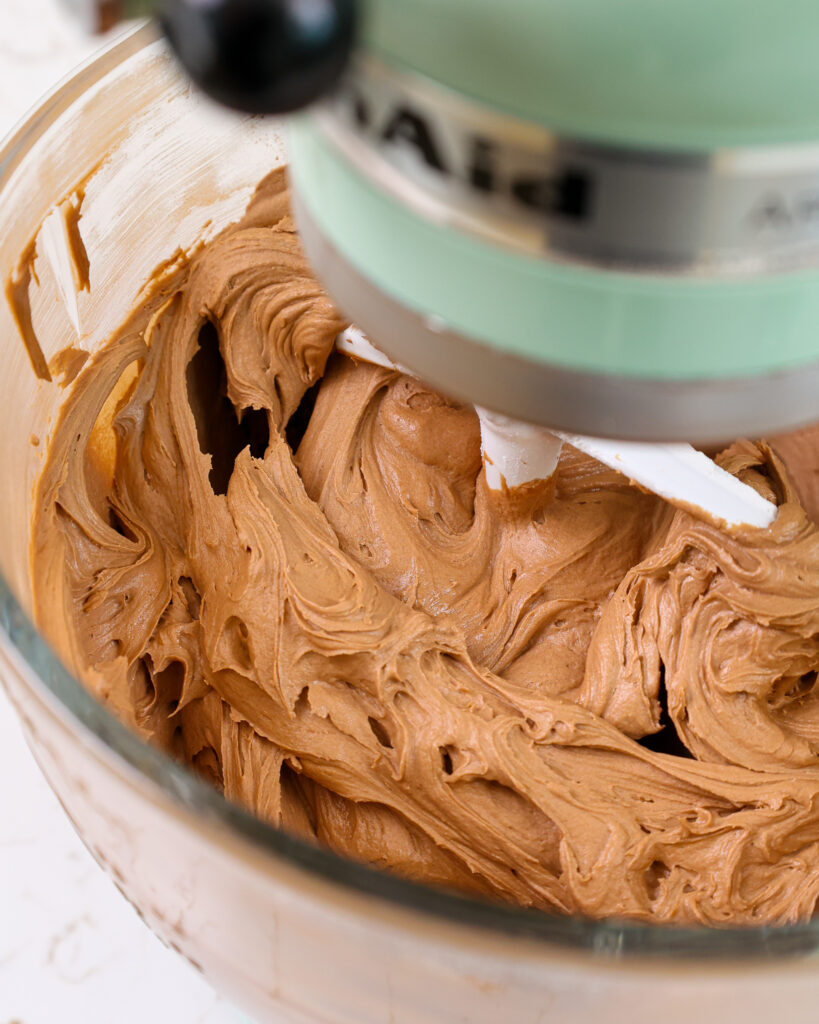
- Start by melting 3/4 cup of chocolate using either a double boiler or a microwave (heat in 15 second intervals and stir between intervals). Heat it until the chocolate is fully melted and smooth. Set aside to cool. It's important to let the chocolate cool, or else it can melt the butter in the frosting and throw off the consistency of the buttercream.
- Beat 1 cup of room temperature butter and 1/4 cup of creamy peanut butter on a medium speed for 30 seconds with a hand mixer or stand mixer and paddle attachment until smooth. If you have a peanut allergy, you can use another type of nut butter in its place or you can use additional butter in place of the peanut butter.
- Add in 1 tsp vanilla extract and 1/4 tsp salt. Mix on a medium-low speed until combined.
- Slowly mix in 3 cups of powdered sugar and 1/4 cup of heavy cream on a low speed.
- Beat on low until the ingredients are fully incorporated and the desired consistency is reached. Scoop 1/2 cup of peanut butter frosting into a small piping bag fit with a round piping tip (like a Wilton 10) and seal the top with a rubber band or clip. Set aside.
- Mix in the melted and cooled chocolate on a low speed. It should still be fully melted and fluid, but less warm than before.
- Then stir the frosting by hand with a rubber spatula to get it super smooth. If the frosting is too thick, add an extra Tbsp of heavy cream. If it's too thin, add in another 1/2 cup of powdered sugar.
- Scoop 1/4 cup of frosting into a separate bowl. Color it black with gel food coloring and place it in a small piping bag fit with a small round opening (like a Wilton 10). Seal the top with rubber band or clip. Set aside.
- Place the remaining chocolate peanut butter buttercream in a large piping bag fit with a large round tip (like an Ateco 805). Seal the top with a rubber band or clip. Set aside.
Decorating these Reindeer Cupcakes
- Use the chocolate peanut butter frosting to pipe a large dollop on top of each cooled cupcake. Gently tap the cupcake on the counter to help flatten and spread the frosting. Smooth the frosting using a small offset spatula or an acetate sheet.
- Then use the peanut butter frosting to pipe on the reindeer's snout like in the picture above.
- Next, press one red and two white M&M's into the frosting to look like the reindeer's nose and eyes. Use the black buttercream to pipe on the reindeer's pupils. If you don't feel comfortable piping on the face, you can also use black fondant or just use black sprinkles.
- Add 1/2 cup of dark chocolate chips into a small piping bag and seal the top with a rubber band. Place the bag in the microwave and heat for 30-60 seconds, or until fully melted.
- Place a sheet of parchment paper on a flat plate or cutting board. Snip a small opening at the tip of the bag, then pipe 12 pairs of antlers that are about 1 1/2 inches long and 12 little smiles onto the parchment paper. Feel free to get creative with each reindeer's facial expression to give them a little variety. Place the antlers in the fridge for about 10 minutes to help them firm up.
- Once they're firm to the touch, pipe an additional layer of chocolate over them to make them sturdier. Place the antlers in the fridge one more time to let them firm up.
- When the antlers have hardened, gently press a pair into each cupcake and add a little chocolate smile.
- Then enjoy! These cupcakes taste best fresh, but frosted cupcakes can sit out at room temperature for a day in an airtight container or be stored in the fridge for up to 3 days.
Notes
How Many Cupcakes Does this Recipe Make?
This recipe makes 12, standard-sized cupcakes. This recipe can be doubled or halved as needed to change the yield.
If you want to make mini reindeer cupcakes, this recipe can be baked in mini muffin tins! It makes about 40 mini cupcakes, and they only need to bake for 9-10 minutes at 350 F / 175 C.
Tips for Making the Best Reindeer Cupcakes
- Ingredients at room temp mix together better. Be sure you set out any cold ingredients ahead of time.
- Properly measure your flour (spoon into the cup measure, then level) or use a kitchen scale to measure your dry ingredients.
- Mix your cupcake batter just until the ingredients are incorporated. This will ensure your cupcakes are tender and fluffy.
- Use a large cookie scoop to easily fill your cupcake liners. It also makes sure your cupcakes end up being the same height.
- Seal off the top of each of your piping bags with a rubber band to prevent any frosting from seeping out the top of the bag and make the piping bags easier to use.
- This recipe makes an American buttercream frosting, so it will crust as it sits out and is exposed to air! Be sure to either cover the frosting with plastic wrap if it's made in advance, or immediately place it into your piping bags.
Reindeer Cupcake Variations:
- To make eggless, dairy free reindeer cupcakes, use an alternative dairy milk to replace the buttermilk and heavy cream (almond, oat, or soy), vegan butter sticks to replace the butter, and an egg replacer like this.
- To make gluten free reindeer cupcakes, swap in your favorite gluten free flour blend for the AP flour this recipe calls for and be sure to over-mix your batter and let it sit for at least 30 minutes before baking for best results.
Making These Reindeer Cupcakes in Advance & Storage Tips:
These cupcakes can be made in advance! If stored unfrosted in an airtight container, they can last for 2 days at room temp, up to a week in the fridge, or up to 3 months in the freezer.
You can also make your frosting ahead of time too or save any leftover frosting! Store it in either a piping bag or an airtight container in the fridge for up to a month or the freezer for 3 months.
If you store it in a large container, be sure to give it a good stir once it thaws to get the consistency nice and smooth again.
Frosted cupcakes can sit at room temperature overnight or in the fridge for up to 3 days in an airtight container. However, I find frosting them right before serving is best.
I recommend waiting to add on the chocolate antlers until right before you plan to serve the cupcakes.
Nutrition Information
Yield
12Serving Size
1Amount Per Serving Calories 497Total Fat 22gSaturated Fat 9gTrans Fat 0gUnsaturated Fat 12gCholesterol 42mgSodium 283mgCarbohydrates 70gFiber 3gSugar 58gProtein 6g
25 Easy And Creative Christmas Desserts You Need To Try - Cosycountrykitchen
Tuesday 19th of December 2023
[…] Credit- chelsweets […]
Jodi Sitkowski
Thursday 17th of October 2019
Can you make this batter into a cake ? My husband is being very picky about his birthday cake. I’m trying to find a good cake to pair with your chocolate whipped buttercream filling :)
Chelsweets
Thursday 24th of October 2019
Hi Jodi! I'd recommend pairing it with my chocolate cake recipe: https://chelsweets.com/2018/05/08/my-go-to-chocolate-layer-cake-recipe/
This cupcake recipe is great, but I think it might be a bit dense if it's baked as cake layers!